First time car Ford Focus II was introduced in September 2004 at the Paris Motor Show. At the Russian plant of the concern in Vsevolozhsk (a suburb of St. Petersburg), cars of this model began
collect in the summer of 2005. In 2007, the car was subjected to a deep restyling, the interior and appearance were changed.
For Russian market Ford Focus II cars are equipped with the following engines: 1.4 l R416V (80 hp); 1.6 L R416V (100 hp); 1.6 L R416V Duratec Ti-VCT with variable valve timing (115 hp); 1.8 L R416V
Duratec-HE (125 hp); 2.0 L R4 16V (145 hp) and Duratorq 1.8 L R4 16V turbodiesel (115 hp). This book describes the gasoline modifications of the engines used.
Mechanical transmissions are installed on cars (five-speed mod. IB5 or MTX75, six-speed mod. MMT6) or four-speed automatic (only for cars with engines with a displacement of 1.6 and 2.0 liters).
Ford Focus II cars are produced with five- or three-door hatchback, sedan and station wagon bodies. In Russia, the car is offered in four basic trim levels:
- Ambiente(driver's airbag, pyrotechnic front seat belt pretensioners with force limiters, power front windows, central locking and immobilizer, steering column adjustable for reach and tilt angle, heater with air recirculation mode);
- Comfort(in addition to the equipment of the Ambiente configuration, an air conditioner, aluminum trim of the interior door handles, side moldings and exterior door handles painted in body color, a chrome trim of the radiator grille are installed);
- trend(in addition to the equipment of the Comfort package, dark rims of headlights, fog lights, on-board computer, improved interior);
- Ghia(compared to the Trend package, the interior is additionally trimmed with aluminum and leather, the central lock is equipped with a remote control, and the glove box is individually cooled, power windows are installed on all doors, full set airbags, including side; an additional ceiling lamp for rear passengers, a system for delaying turning off the headlights when leaving the car, side mirrors rear view with electric drive and electric heating, improved interior, etc.).
By special order, an anti-lock braking system (ABS) with electronic system distribution braking force(EBD)
dynamic stabilization system (ESP), separate climate control, xenon headlights, parking sensors, an audio system with a multifunctional touch screen (there are six options for audio systems to choose from), alloy wheels (three options), it is possible to install voice control of a mobile phone.
Vehicles for the Russian market are equipped with engine and sill protection, mudguards for all wheels and a full-size spare wheel.
In Russia, they also offer a sports version of the Focus ST (only with a hatchback body) with a boosted 2.5 liter R5 20V engine equipped with a turbocharger (225 hp, 320 Nm) and a six-speed mechanical box gears. In addition, this modification is distinguished by 18-inch alloy wheels, metallic interior trim and sports suspension.
Bodies of all modifications ford cars Focus II load-bearing, all-metal, welded construction with hinged front fenders, doors, hood and trunk lid (tailgate). wind and rear window(tailgate glass) glued. The driver's seat is adjustable in the longitudinal direction, in terms of backrest tilt and height, the front passenger seat in the longitudinal direction and in terms of backrest. The front and rear seats are equipped with height-adjustable headrests. The rear seat backrest can be folded forward in parts in a ratio of 40:60.
Transmission made according to front-wheel drive scheme with front wheel drives equipped with constant velocity joints. IN basic configuration automo Beats are equipped with a five-speed manual gearbox. By order for vehicles with engines with a working volume of 1.6 and 2.0 liters, a four-stage automatic transmission gears.
MacPherson type front suspension, independent, spring, with stabilizer roll stability, with hydraulic shock absorbers. The rear suspension is independent, spring, with hydraulic shock absorbers.
Brake mechanisms of forward wheels disk, ventilated, with a floating bracket; rear - drum, with a device for automatically adjusting the gaps between the brake shoes and drums. Brake system equipped with a vacuum booster.
The steering is safe, with a gear-rack type steering mechanism, a hydraulic or electro-hydraulic booster is installed on some cars. Steering column height and tilt adjustable. The frontal airbag is located in the steering wheel hub.
All vehicles are equipped with retractable diagonal seat belts for the driver, front passenger and side passengers on back seat. A lap belt is provided for the middle passenger in the rear seat.
dimensions car with body five-door hatchback shown in fig. 1.1 (the overall dimensions of a car with a three-door hatchback body are similar), with a sedan body.
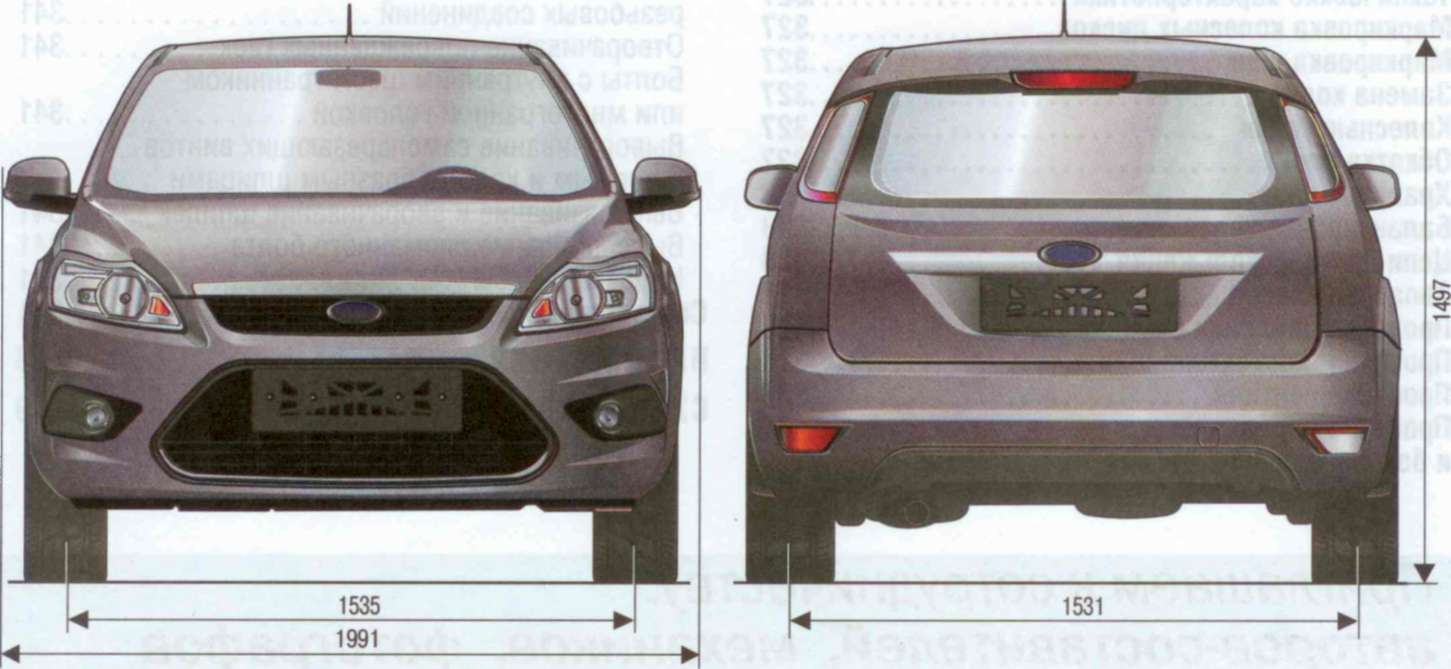
Rice. 1.1. Overall dimensions of a car with a hatchback body

Rice. 1.2. Overall dimensions of a car with a sedan body
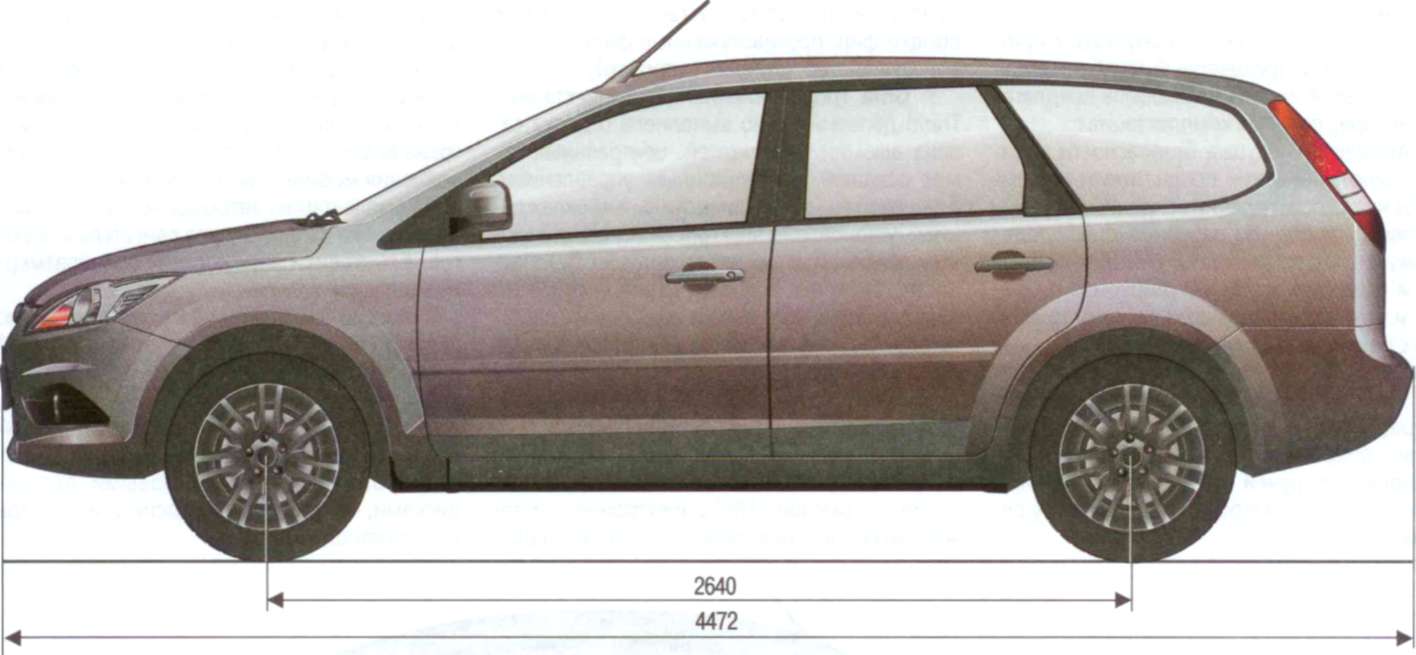
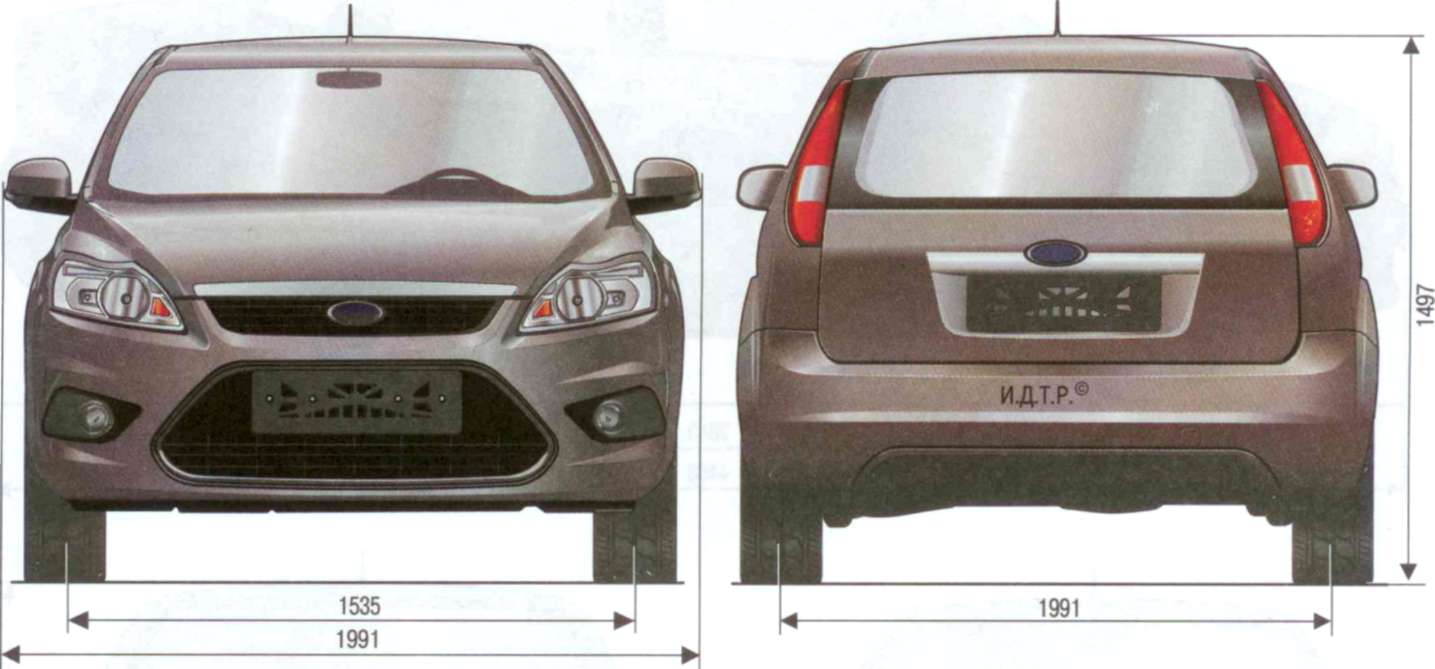
Rice. 1.3. Overall dimensions of a car with a station wagon body
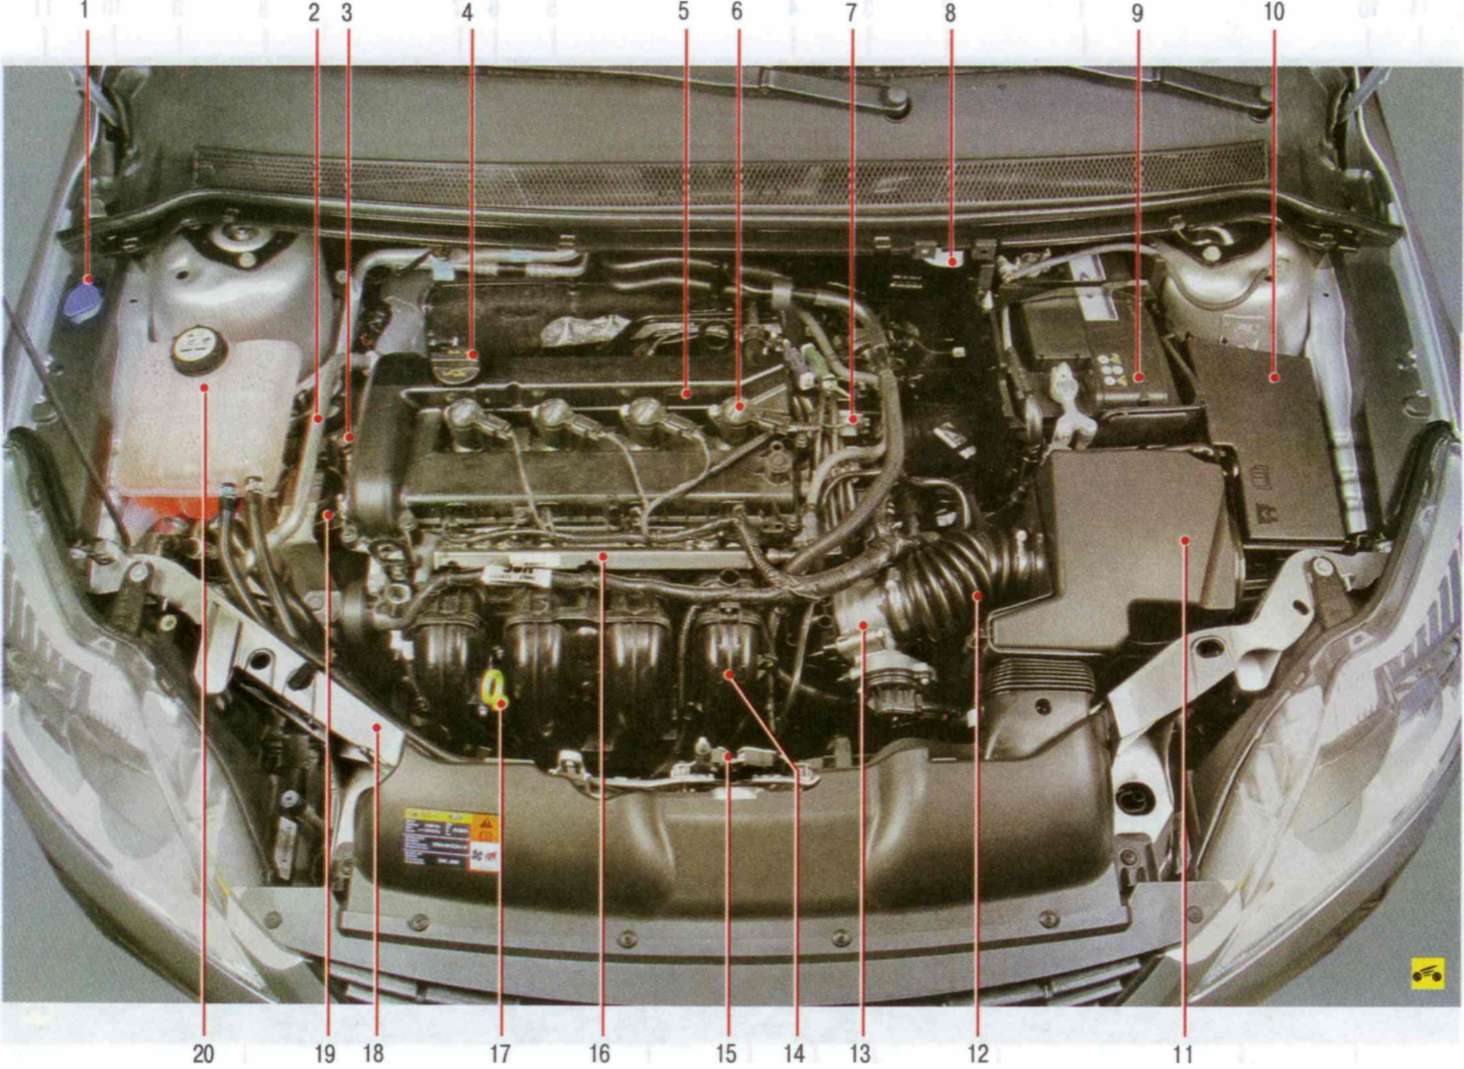
1.6 L Duratec Ti-VCT located in the engine compartment and the main units are shown in fig. 1.4 and 1.6, car with engine volume 1.8 l Duratec-HE - in fig. 1.7 and 1.10. The main units of cars (bottom rear view) are shown in fig. 1.11.
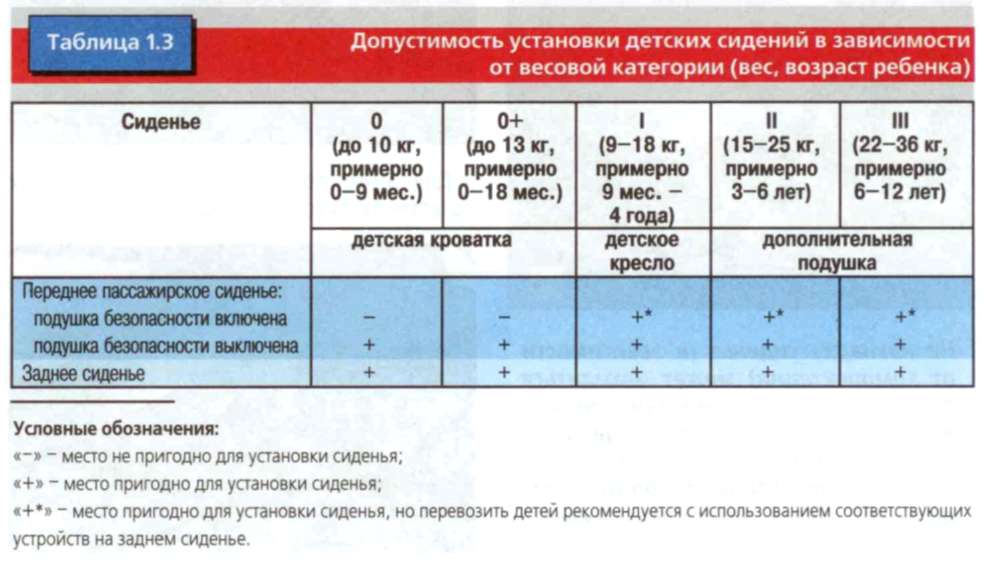
For vehicles with manual transmission.
** In parentheses - for vehicles with a diesel engine.
*** Light alloy wheels are available upon request.
*** By special order, an anti-lock braking system (ABS) with an electronic brake force distribution system (EVO) and a dynamic stabilization system (ESP) are installed on the car.
![]()
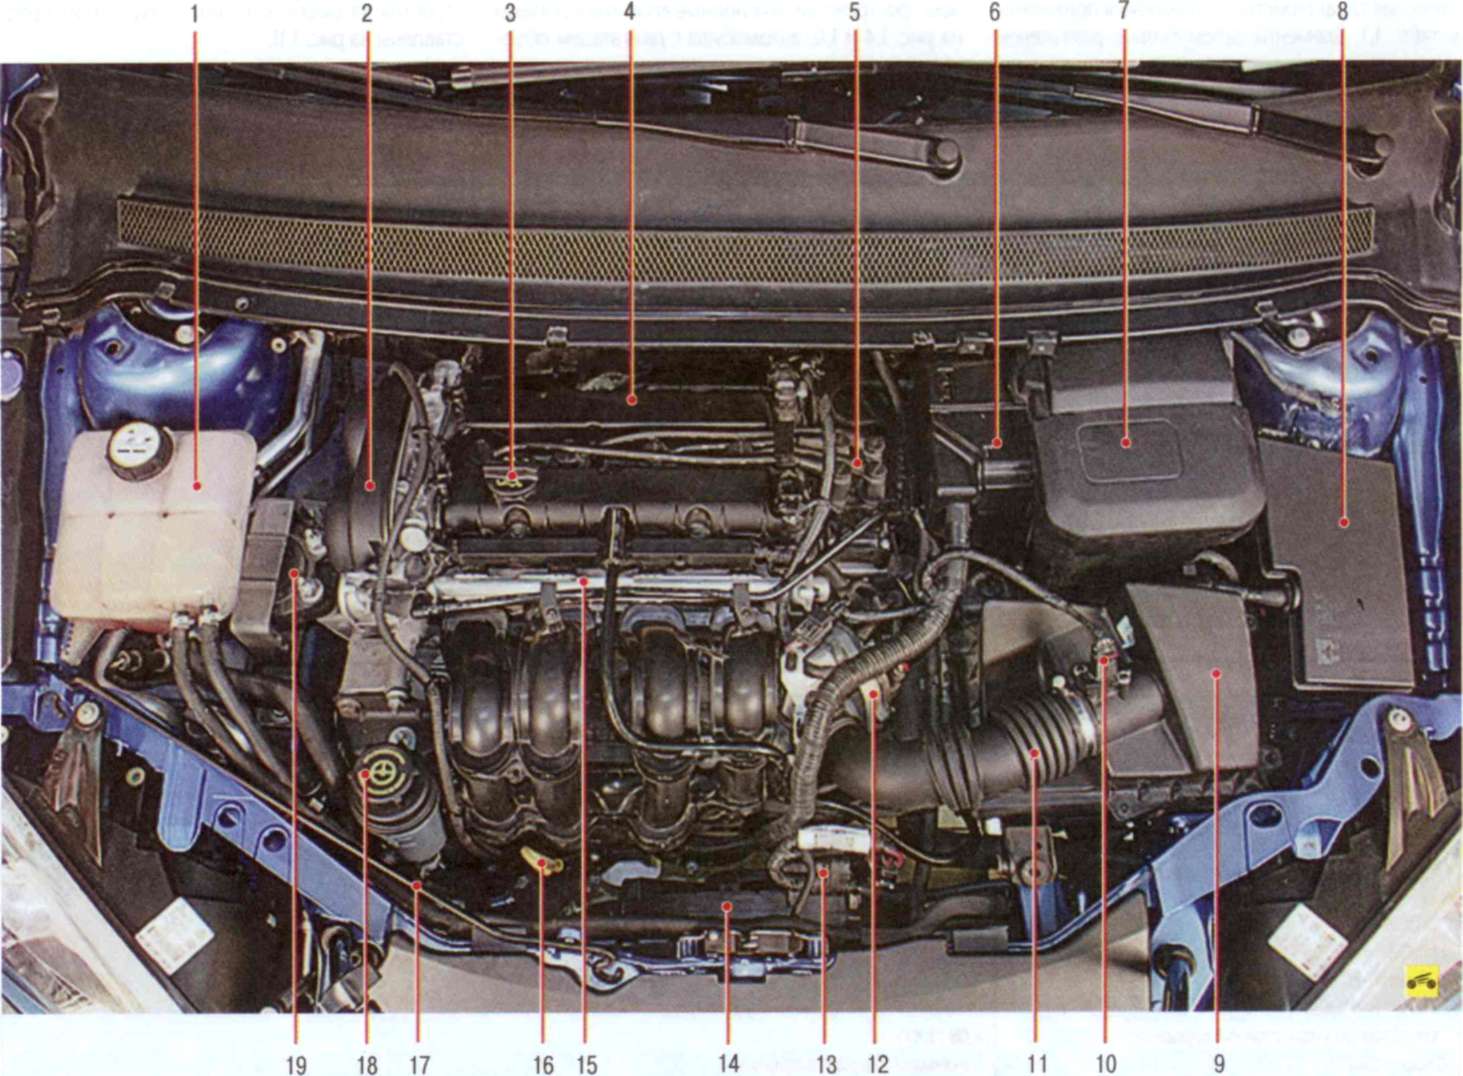
Rice. 1.4. The engine compartment of a car with a 1.6 liter Duratec Ti-VCT engine (top view): 1 - expansion tank engine cooling systems; 2 - top cover of the gas distribution mechanism drive; 3 - oil filler cap; 4-engine; 5 - ignition coil; 6- electronic engine control unit; 7- accumulator battery; 8 - mounting block relays, fuses and fuses; 9 - air filter; 10 - mass air flow sensor; 11 - air supply sleeve; 12 - throttle assembly; 13 - additional resistance of the electric fan of the engine cooling system; 14 - casing of the electric fan of the engine cooling system; 15 - fuel rail; 16 - oil level indicator (oil dipstick); 17 - hood stop; 18 - power steering reservoir; 19 - right support power unit
Note
The arrangement of elements and main units of vehicles equipped with 1.4 l, 1.6 l and 1.6 l Ti-VCT engines is similar. The arrangement of elements and assemblies of cars with a 2.0 liter engine is the same as for cars with a 1.8 liter engine.
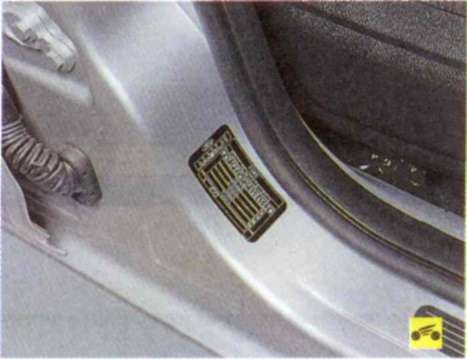
Vehicle Identification Number (VIN), engine model, manufacturer name, year of manufacture and certification information can be found on the identification plate affixed to the vehicle's right-hand center pillar.
On fig. 1.5 shows all the information about the vehicle given in the identification plate.
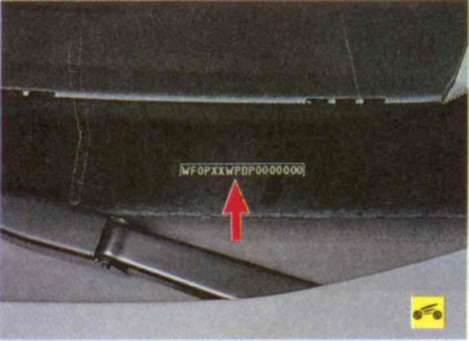
In addition, the vehicle identification number is located in the lower left corner of the windshield opening...

Rice. 1.5. Identification plate:
1 - type approval number vehicle Russia; 2 - manufacturer; 3 - vehicle identification number; 4 - admissible full mass car; 5 - permissible gross vehicle weight with a trailer; 6- permissible load on the front axle of the car; 7 - permissible load on the rear axle of the car
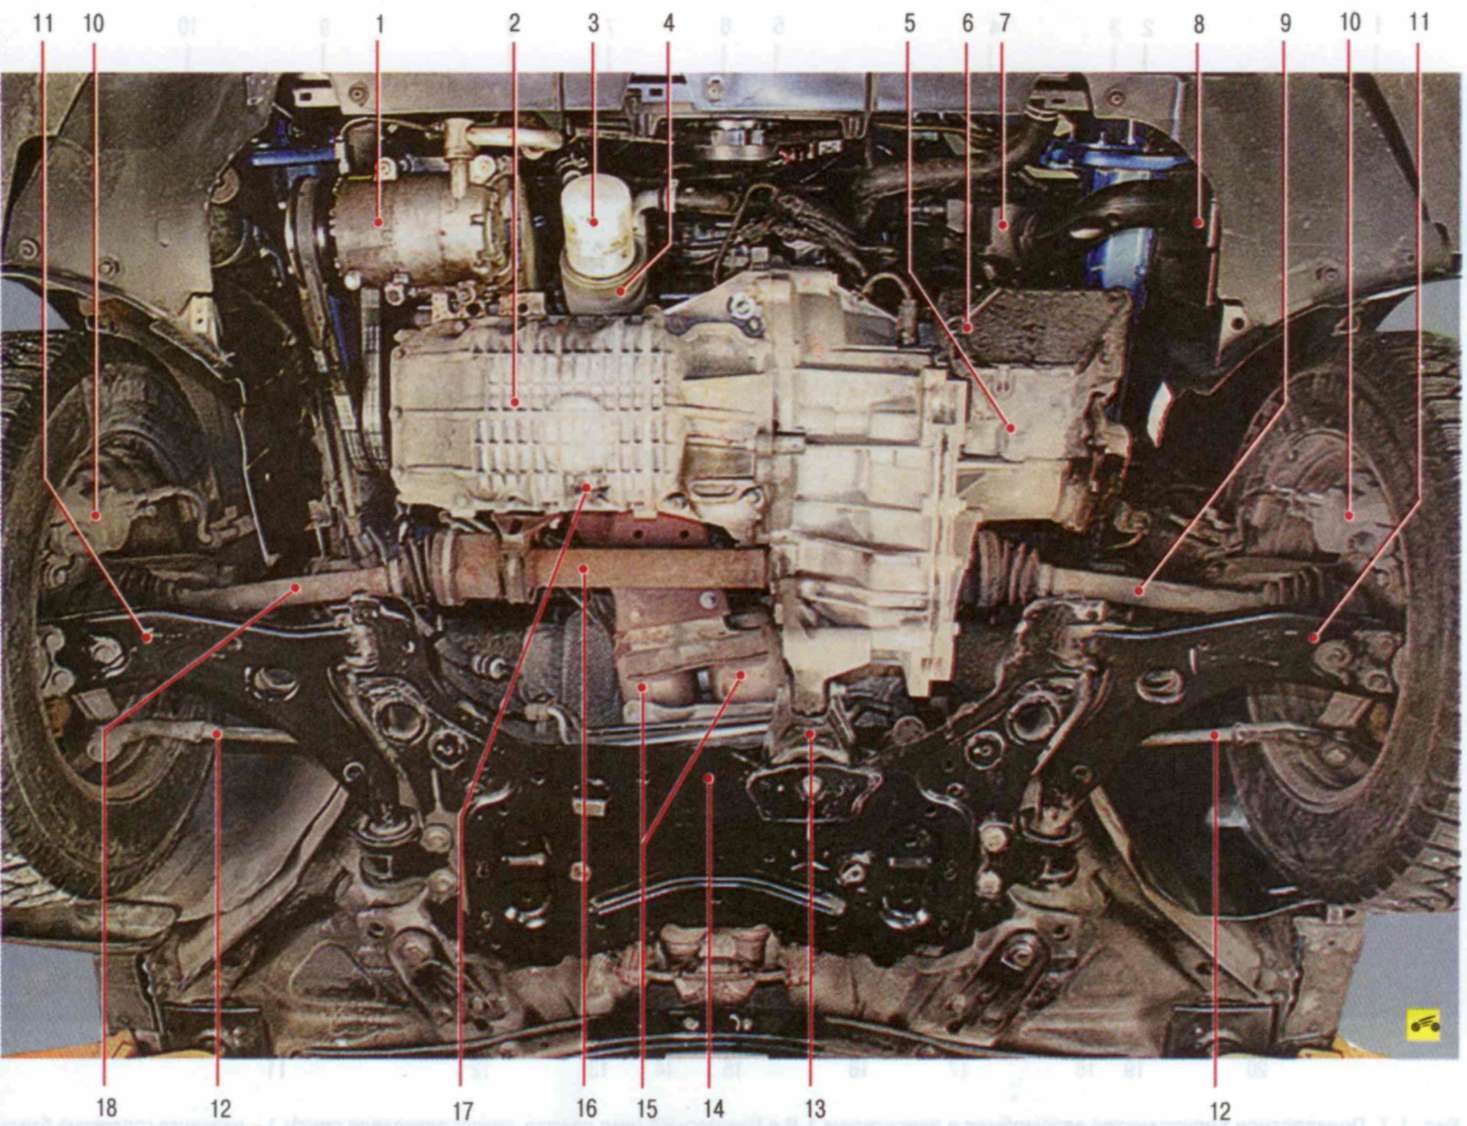
Rice. 1.6. The engine compartment of a car with a 1.6 l Duratec Ti-VCT engine and the main units of the car (view from below, the engine protection is removed):1 - air conditioning compressor (if installed); 2 - engine; 3- oil filter; 4 - oil heat exchanger; 5 - gearbox; 6 - gear shift mechanism; 7 - air filter; 8 - intake silencer; 9 - left drive front wheel; 10 - brake mechanism of the front wheel; 11 - front suspension arm; 12 - Tie Rod; 13 - rear support of the power unit; 14 - cross member of the front suspension; 15 - catalytic converters of exhaust gases; 16 - intermediate shaft; 17 - oil drain plug; 18 - right front wheel drive
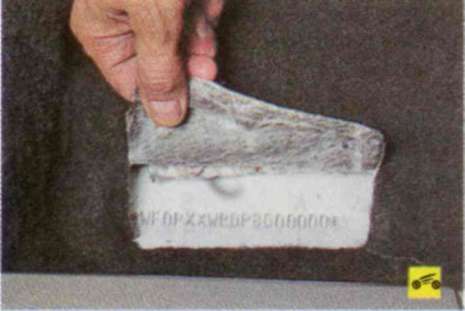
and on the floor of the car on the passenger side under the noise insulation. In order to see the number, bend the cut-out part of the noise insulation.
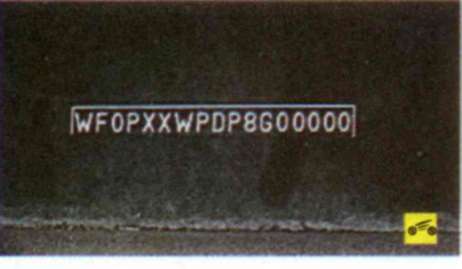
Decryption identification number, for example WFOPXXWPDP8G00000:
WFO - international code of the manufacturer (Ford Motor Company, Germany - European models);
SFA - Ford Motor Company Ltd., UK;
TW2 - Ford Lusitana S. A. R. L, Portugal;
VS6 - Ford Espana S.A., Spain;
X9F - Ford Motor Company, Russia (European models);
XLC - N. V. Nederland Ford, Netherlands;
P - body type (3 - three-door hatchback; 4 - sedan; 5 (P) - five-door hatchback; W - station wagon);
XX - constant;
WP - code of the country and manufacturer (Spain, Valencia);

Rice. 1.7. The engine compartment of a car with a 1.8 l Duratec-HE engine (top view, engine cover removed): 1 - filler neck of the washer reservoir; 2 - air conditioner tube; 3 - cover of the gas distribution mechanism drive; 4 - oil filler cap; 5 - engine; 6 - ignition coil; 7 - block of control valves for the mechanism for changing the length of the intake pipeline; 8 - main tank brake cylinder; 9 - battery; 10 - mounting block of relays, fuses and fuses; 11 - air filter; 12 - air supply sleeve; 13 - throttle assembly; 14 - intake manifold; 15 - hood lock; 16 - fuel rail; 17 - oil level indicator (oil dipstick); 18 - hood stop; 19 - right suspension support of the power unit; 20 - expansion tank
EE - Russia, Leningrad region, Vsevolozhsk;
GA - Germany, Cologne;
GC - Germany, Saarlouis;
LU - Italy, Turin;
D - model code (Focus);
P - body type (3 - three-door hatchback; 4 - sedan; 5 (P) - five-door hatchback; W - station wagon);
8 - year of issue (2008);
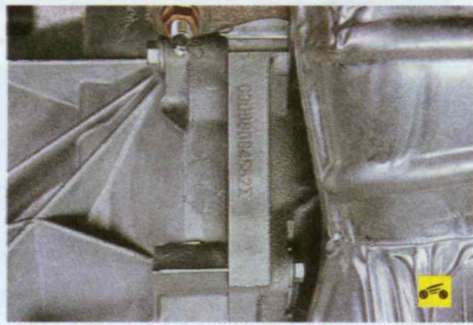
Rice. 1.8. Number location and model designation gasoline engines working volume of 1.4 and 1.6 liters (throttle assembly removed for clarity)
G - code of the month of issue (Table 1.2);
00000 ~ serial number.
The number and designation of models of gasoline engines with a working volume of 1.4 and 1.6 liters are stamped on the tide of the cylinder block behind the throttle assembly (Fig. 1.8).
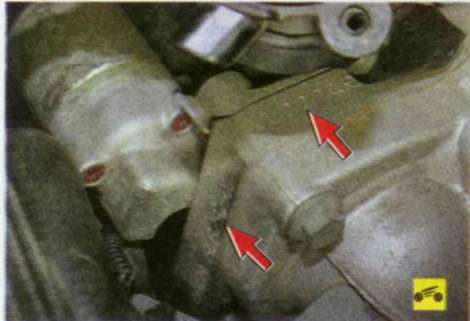
The number and designation of the model of gasoline engines with a working volume of 1.8 and 2.0 liters (Fig. 1.9) are stamped on the rear of the cylinder block on the left side (in the direction of the vehicle).
Rice. 1.9. Location of the number and designation of the model of gasoline engines with a working volume of 1.8 and 2.0 liters
Model number and designation diesel engine a working volume of 1.8 liters are stamped on the intake manifold.
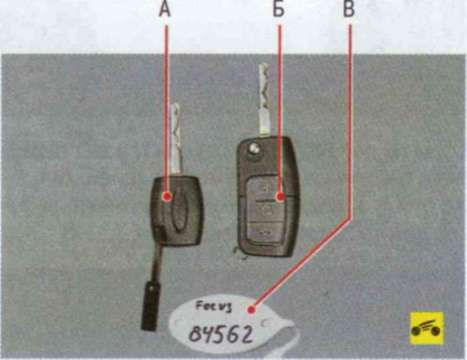
Two keys are applied to the car, each of which can unlock the door locks and turn on the ignition, as well as a tag with the key series number:
A - service key;
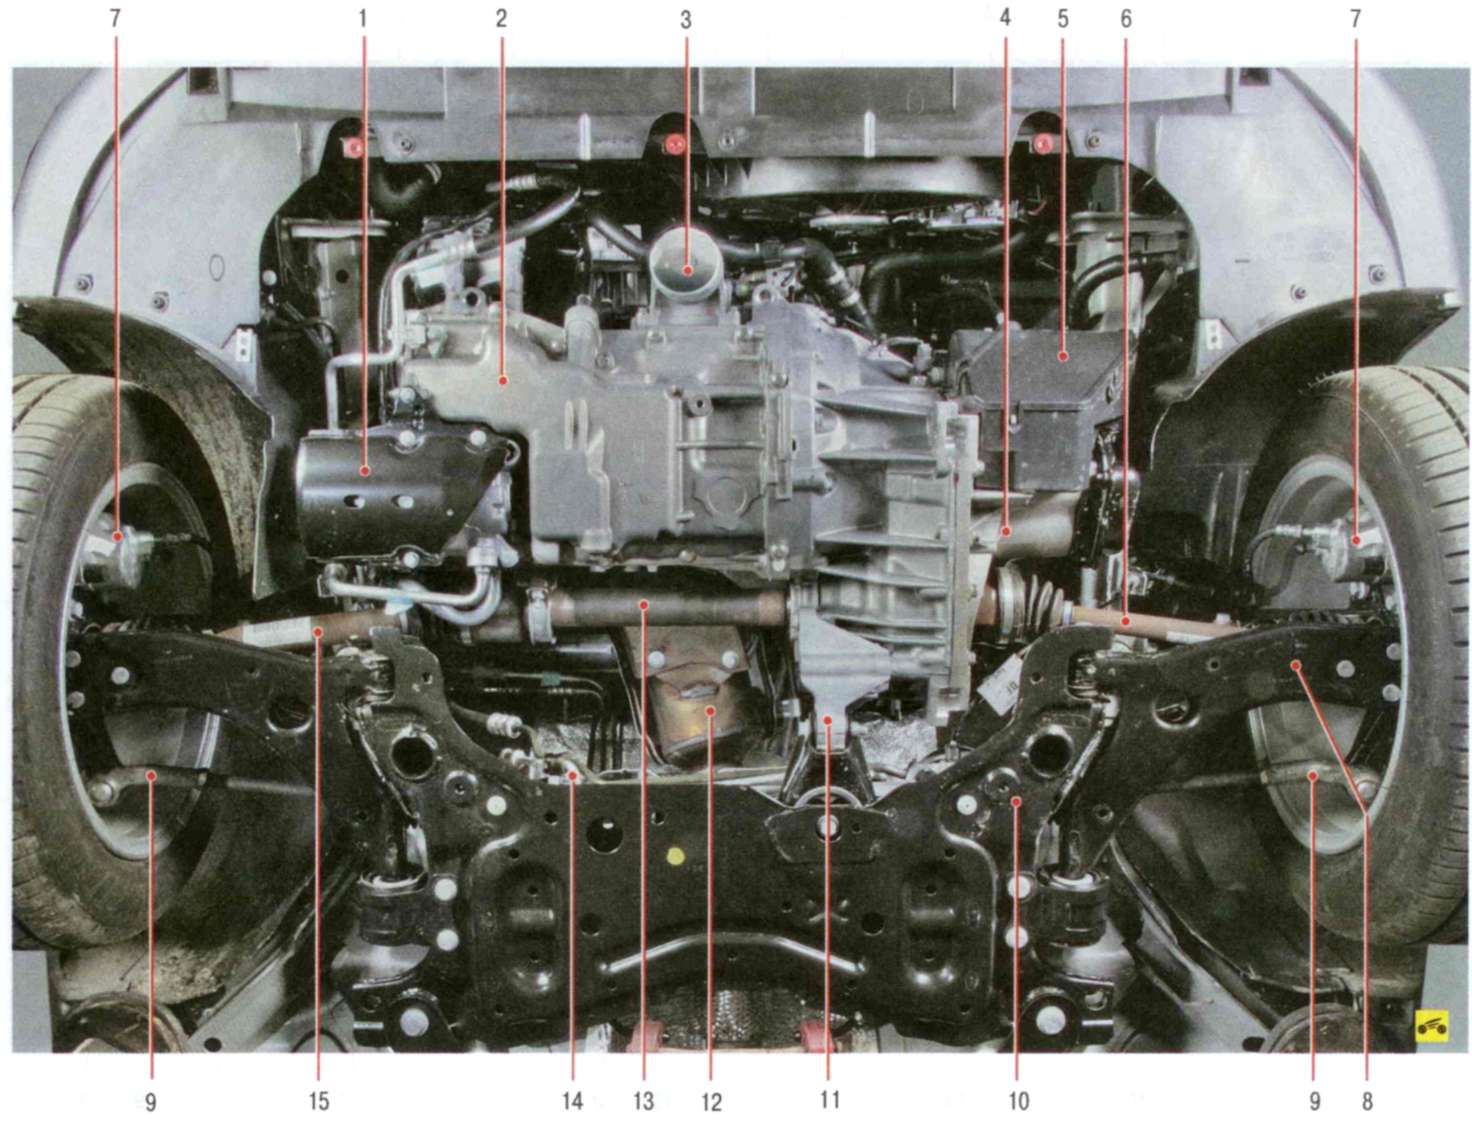
Rice. 1.10. The engine compartment of a car with a 1.8 l Duratec-HE engine and the main units of the car (bottom view, protection removed):
1 - air conditioner compressor; 2 - engine; 3 - oil filter; 4 - gearbox; 5 - gear shift mechanism; 6 - left front wheel drive; 7 - brake mechanism of the front wheel; 8 - front suspension arm; 9 - steering rod; 10 - cross member of the front suspension; 11 - rear support of the power unit; 12 - collector; 13 - intermediate shaft; 14 - steering rack; 15 - right front wheel drive
B - key with remote control remote control;
B - a tag with a series number of keys.
Helpful advice
Save the tag: To avoid having to change the locks if the keys are lost, new keys can be ordered from the factory by their number.
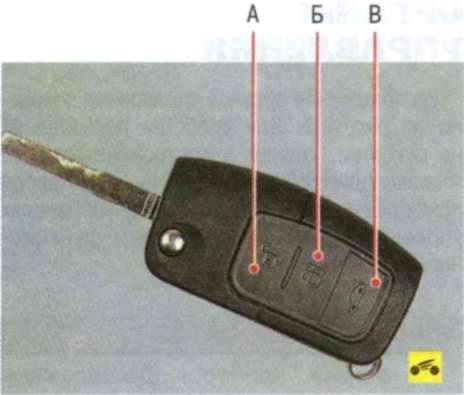
To unlock all vehicle doors and trunk lids (oncars with a sedan), press button A. To block the locks, press button B. If you want to unlock only the tailgate (trunk lid), press button C.
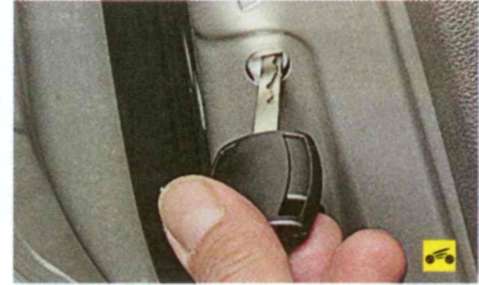
For the convenience of wearing in clothes, the working part of the ignition key is folded inside the remote control.
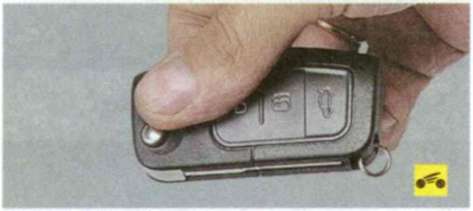
1. To bring the key into working position, press the button on the remote control...
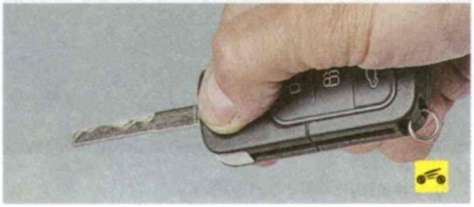
2. The key stem will move to its working position. To replace the battery in the key, follow these steps.
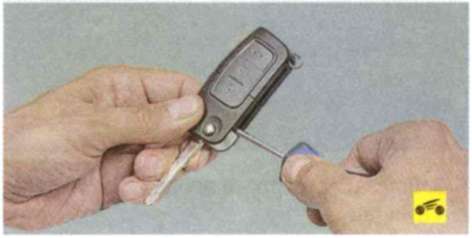
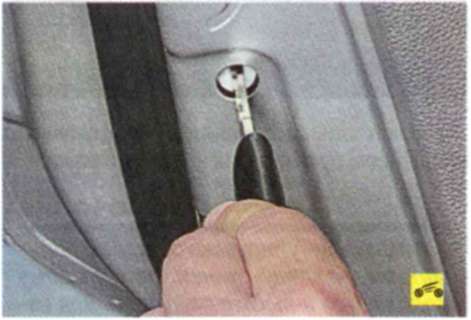
1. Insert the tip of the screwdriver into the slot on the side of the remote control, turn the screwdriver towards the working part of the key...
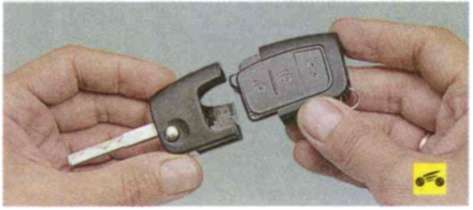
2. Separate the remote control unit and key holder.

Rice. 1.11. The main units of the car (bottom rear view): 1 - spring rear suspension; 2 - stabilizer mount; 3 - rear lower wishbone rear suspension; 4 - rear suspension cross member; 5 - spare wheel niche; 6 - coal adsorber of the fuel vapor recovery system; 7 - filling pipe of the fuel tank; 8 - rear suspension shock absorber; 9 - trailing arm of the rear suspension; 10 - lower transverse arm of the rear suspension; 11 - upper transverse arm of the rear suspension; 12 - stabilizer bar of the rear suspension; 13 - fuel tank; 14 - main muffler
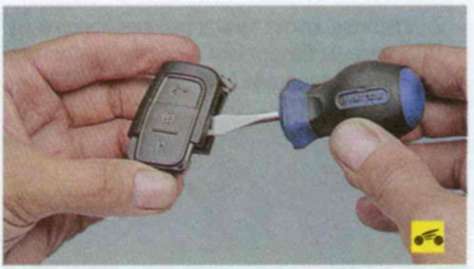
3. Insert a screwdriver into the slot on the side of the remote
4. and separate the body of the remote control.

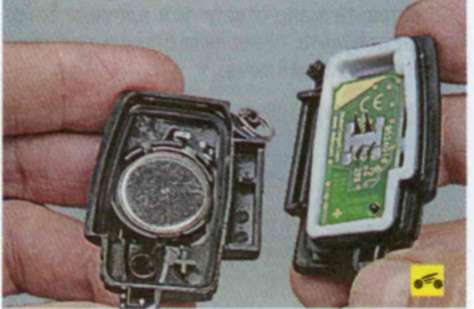
5. Pry off the battery with a screwdriver...

6. and remove the battery.
7. Install a new battery in the reverse order of removal.
Warning
When installing the battery, observe the polarity: the positive pole of the battery must be on top.
4. Ford Focus II controls
The location of the controls is shown in fig. 1.12. For ease of use, the handles, buttons and instrumentation located on the instrument panel and other additional control panels are marked with functional symbols.
Dashboard
The instrument panel contains the following controls and instrumentation (see Fig. 1.12).
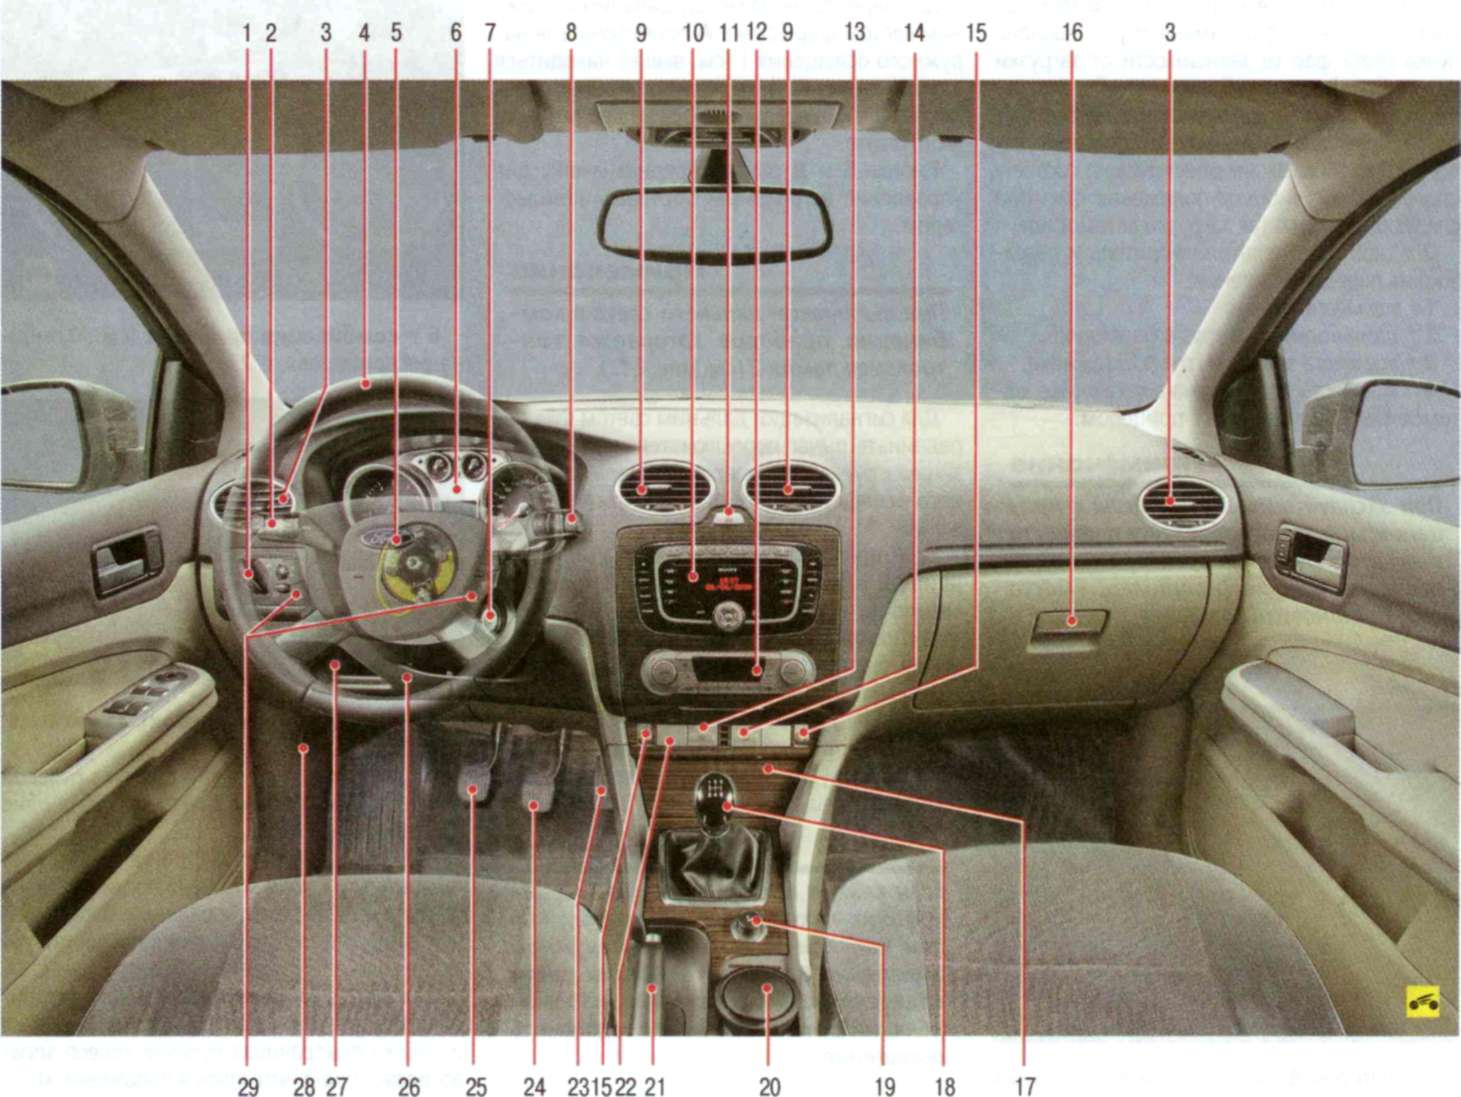
Rice. 1.12. Instrument panel and controls
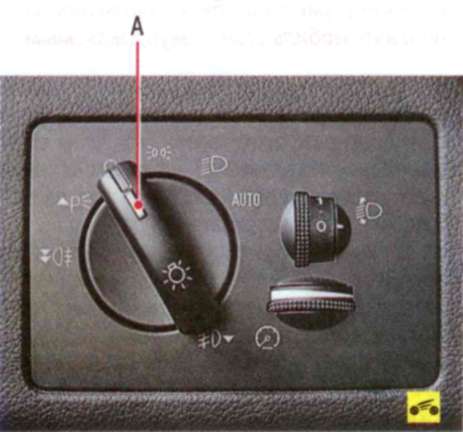
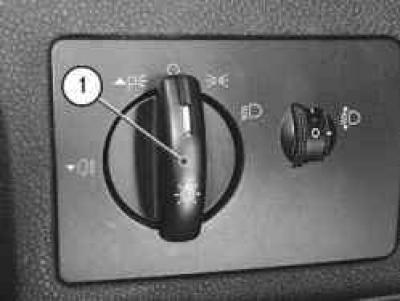
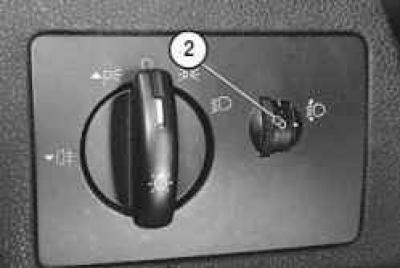
1 - outdoor lighting switch. Turn knob A to select one of the following positions:
O - outdoor lighting is off; ahv - overall lighting is on;
Note
When turned on parking lights in the instrument cluster, the control lamp 26 lights up (see Fig. 1.13).
10 - dipped/ high beam headlights;
Note
When you turn on the high beam headlights in the instrument cluster, the control lamp 2 lights up (see Fig. 1.13).
AUTO - automatic mode of turning on the dipped headlights depending on the illumination;
Notes
For work automatic mode turn on the dipped beam, the ignition must be on (the key in the ignition switch is in position "II").
In "AUTO" mode, the high beam headlights can only be switched on if the system has switched on the low beam. In the "AUTO" mode, the fog lights and the lamp do not turn on. To turn them on, turn the switch handle to the position<с.
Arb - the parking light is on. To enable this mode, press the switch handle and turn it counterclockwise.
To turn on the rear fog light, turn the switch knob
to position yu and pull it out one position.
Note
When the rear fog lamp is turned on, the control lamp 24 lights up in the instrument cluster (see Fig. 1.13).
To turn on the fog lights, turn the switch knob to the id position and pull it out two positions.
Note
When the front fog lights are turned on, the control lamp 25 lights up in the instrument cluster (see Fig. 1.13).
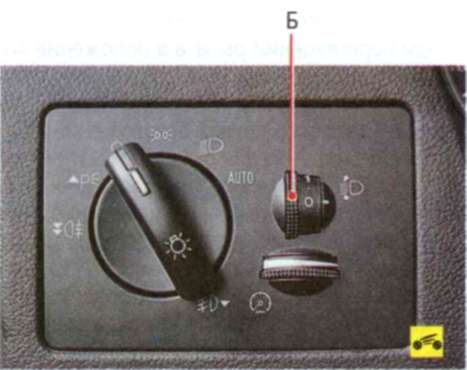
By turning the handle of the regulator B of the headlight electrocorrector, the angle of inclination of the headlight beam is changed (depending on the vehicle load) in such a way as to exclude dazzling of oncoming drivers. Alignment of the mark on the regulator knob and the number on the scale ensures the appropriate adjustment of the position of the headlights for the following vehicle loading options:
0 - one driver or driver and passenger in the front seat;
1 - all places are occupied;
2 ~ one driver and cargo in the trunk;
3 - all seats are occupied and cargo is in the trunk;
4 - all seats are occupied, the cargo is in the trunk, the car is operated with a trailer.
Note
When operating a vehicle with a trailer, it may be necessary to move the electrocorrector control one more position (for example, instead of position 2, set position 3).
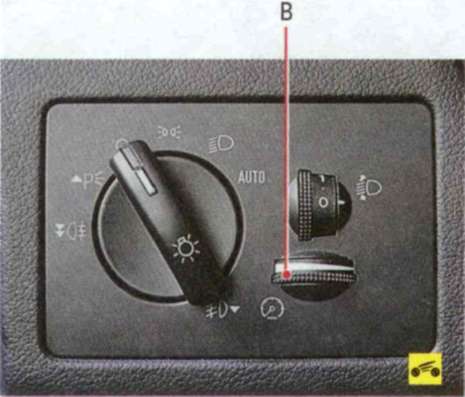
Regulator B selects the brightness of the instrument cluster.
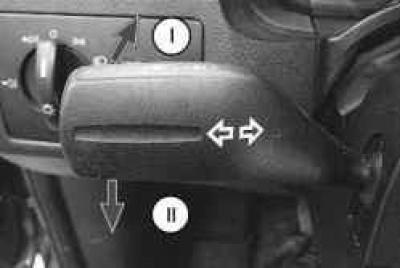
2 - switch lever for outdoor lighting and direction indicators. The switch lever can take the following positions:
I - right turn indicators are on (fixed position);
II - left turn indicators are on (fixed position).
When the lever is moved to the "I" or "II" position, the control lamp 7 or 12 flashes in the instrument cluster (see Fig. 1.13). When the steering wheel is returned to the straight-ahead position, the lever automatically returns to its original position. When changing lanes, to turn on the direction indicator, it is enough to press the lever in the direction of position "I" or "II" only until a moment of tangible resistance, without fixing the lever, and release it. The direction indicators in this case will flash three times.
To switch between high and low beam headlights (handle A of the exterior light switch 1 (see above) be in position “D”), move the switch lever to the steering wheel two positions and release.
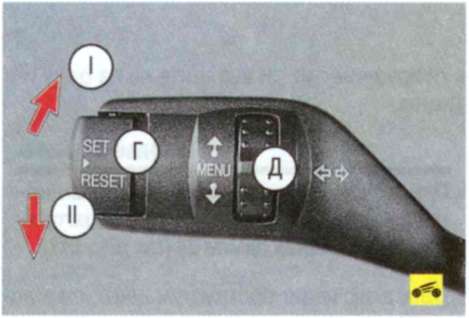
Buttons G and D of the lever are designed to control the built-in on-board computer.
Note
When you turn on the high beam in the instrument cluster, the control lamp 2 lights up (see Fig. 1.13).
To signal the high beam headlights, move the switch lever one position towards the steering wheel (the exterior light switch knob A must be in position o) and release.
If, with the ignition off, move the switch lever one position towards the steering wheel and release it, the headlight off delay function is activated: the dipped beam will turn on, which will go out 30 seconds after the last door is closed. To turn off the headlights, move the switch lever one position towards the steering wheel and release it again.
Note
If the key in the ignition switch (lock) is in the "O" or "I" position, with the outdoor lighting on, when the driver's door is opened, a buzzer will turn on, reminding you to turn off the lighting.
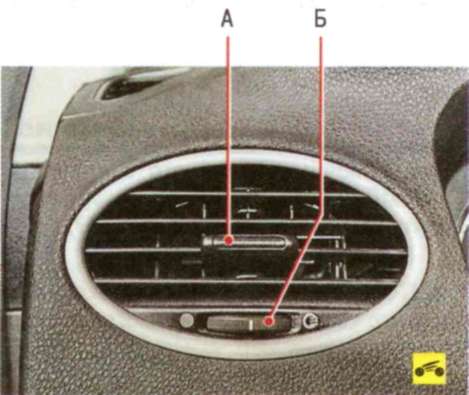
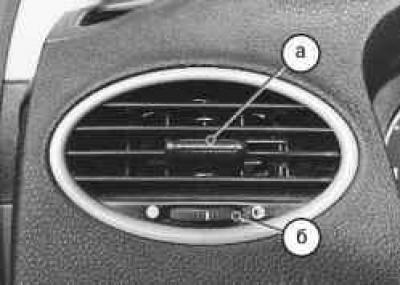
3 - side nozzles of the ventilation and interior heating system. Designed to direct the flow of air from the heater, air conditioner or ventilation system. The direction of the air flow is changed by moving the handle A, installed in the center of the nozzle, to the right or left or by turning it up and down. A handle B is installed under the grate to adjust the amount of air supplied through the nozzle. When the handle is turned all the way to the left, the damper closes completely, blocking the air flow. When the handle is turned all the way to the right, the damper opens completely (maximum air flow).
4 - steering wheel.
5 - key for turning on the sound signal. To give a sound signal, press the button to turn it on.
6 - instrument cluster (see Instrument Cluster, p. 23).
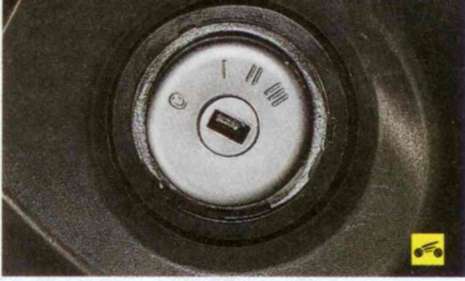
7 - ignition switch (lock),
combined with an anti-theft device, located on the right side of the steering column. The key in the lock can occupy one of four positions:
0 (lock) - the ignition is turned off, when the key is removed, the anti-theft device is turned on. To ensure that the steering shaft is locked, turn the steering wheel to the right or left until it clicks.
To turn off the anti-theft device, insert the key into the ignition switch and, turning the steering wheel slightly to the right and left, turn the key to position "I";
Warning
Do not turn off the ignition or remove the key from the lock while driving: the steering will be locked and the car will become uncontrollable.
I (optional equipment) - the ignition is off, the key cannot be removed, the steering is unlocked. The power supply circuits for the sound signal, outdoor lighting, high-beam headlights, radio equipment, cigarette lighter, etc. are turned on;
II (on) - the ignition is on, the key cannot be removed, the steering is unlocked. Ignition, instruments and all electrical circuits are on;
Ill (starter) - the ignition and starter are on, the key cannot be removed, the steering is unlocked. This position of the key is not fixed; when released, the key returns to position "II" under the action of the force of the spring.

8 - the switch lever for the cleaner and washer of the windshield and tailgate glass (on cars with station wagon and hatchback bodies) turns on the electrical circuits when the ignition is on.
The lever can be moved to the following positions:
I - wiper off;
II - wiper blades make one cycle;
III - intermittent wiper operation is enabled. The delay time between cycles is regulated by the rotary switch A: the lowest position - the minimum interval between cycles, the highest position - the maximum;
Notes
Depending on the equipment, the intermittent wiper can be replaced with an automatic wiper. In this case, when the selector lever is moved to position II, the automatic mode is activated. In this case, handle A regulates the sensitivity of the rain sensor: the lowest position is high sensitivity (the brushes turn on when there is a small amount of water on the windshield), the highest position is low sensitivity (the brushes turn on when a large amount of water is detected on the windshield).
Vehicles may be equipped with a windshield wiper that has a pause between cycles in intermittent operation depending on the speed of the vehicle. When the vehicle slows down or comes to a stop, the delay between wiper cycles increases by one step. When the vehicle speed increases, the delay time returns to the settings set by the driver. Moving the lever while the wiper is operating will turn it off. If the vehicle speed is greatly reduced or the vehicle comes to a stop, the system is reactivated.
IV - the first (low) wiper speed is on;
V - the second (high) wiper speed is on;
VI - button for turning on the washer. When you press the button along with the washer, the wiper will automatically turn on, the brushes of which will perform several work cycles after the button is released.
Note
If the vehicle is equipped with a headlight washer, pressing the button while the headlights are on will also turn on the headlight washer.
Moving the lever towards the steering wheel one position activates the tailgate glass cleaner.
Note
The tailgate wiper is activated automatically (depending on equipment) when reverse gear is engaged, if the wiper lever is in position II, III, IV or V.
When moving the lever to the steering wheel two positions, the tailgate glass washer is switched on.
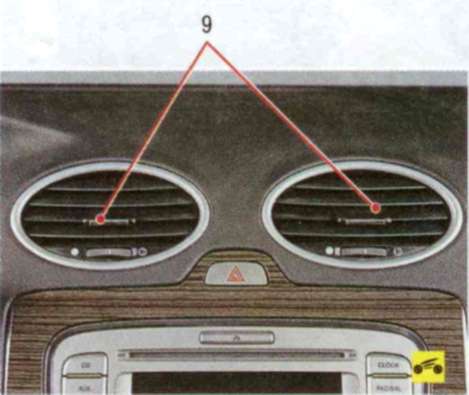
9 - central heater nozzles.

10 - audio system
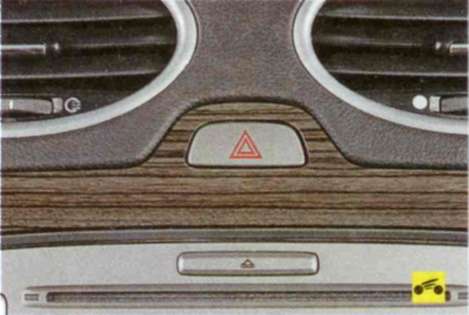
11 - alarm switch.
Note
The alarm system works at any position of a key in the switch (lock) of ignition.
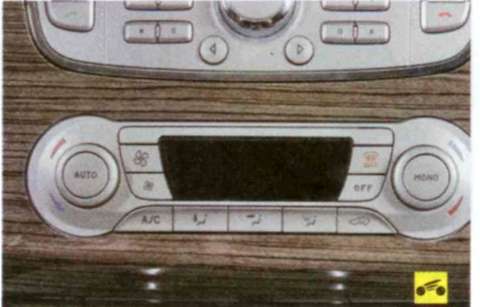
12 - control unit for the heating / climate control and ventilation system, see " Heating (air conditioning) and interior ventilation», With. 27.
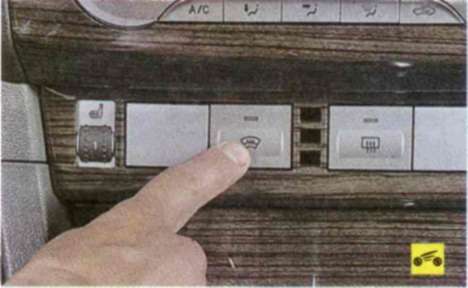
13 - windshield heating switch. When the button is pressed (the engine must be running), the heating of the windshield and washer jets is turned on, at the same time the control lamp in the button lights up. Pressing the button again turns off the heating. In addition, the electric heating switches off automatically after a short period of time.
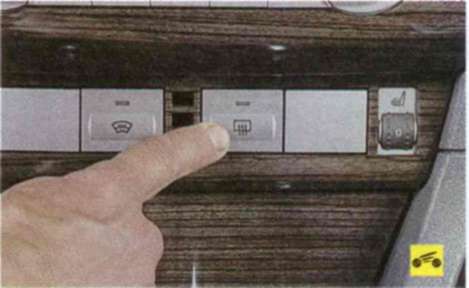
When the button is pressed (the key in the ignition switch must be in position "II"), the rear window heating, the heating of the exterior rear-view mirrors are turned on, at the same time the control lamp in the button lights up. Pressing the button again turns off the heating.
Warnings
The heating element consumes a very large current. Therefore, to avoid over discharging the battery, turn on the heater when the engine is running and only for the time necessary to defog the rear window. To avoid damage to the heater filaments, do not use scrapers or other sharp objects, or detergents with abrasive substances to clean the inside of the rear window.

15 - electric heating controls for the front seats (left - driver's, right -
passenger). The seat heating can only be switched on when the ignition is on (position "II"). When the regulator is set to the "O" position, the electric heating is turned off. In position "3", the maximum heating is turned on to quickly warm up the seats in the cold season. Intermediate positions define different intensity of heating.
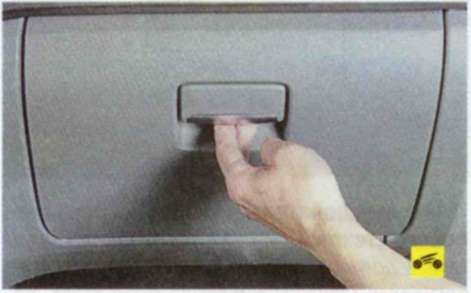
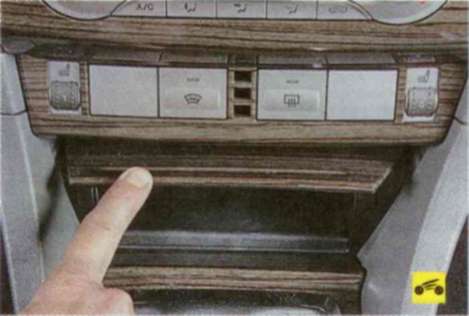
16 - glove box. Serves for storing small things and opens when you press the lock handle up.
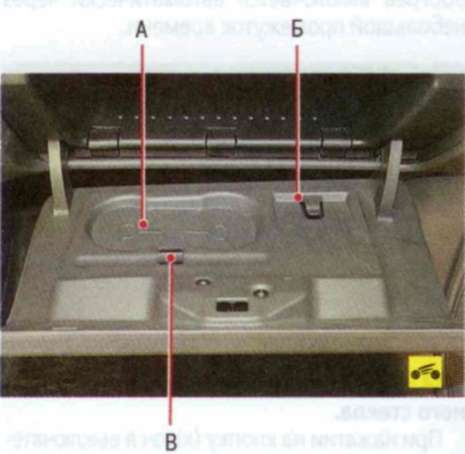
On the inside of the lid are cup holders A, paper clip B and pen clip C.

The interior of the glove box is cooled when the air conditioner is on. The cooled air is supplied through a separate duct, the cooled air supply is closed and opened with handle A.
Connector A is used to connect an external audio source ("AUX IN").
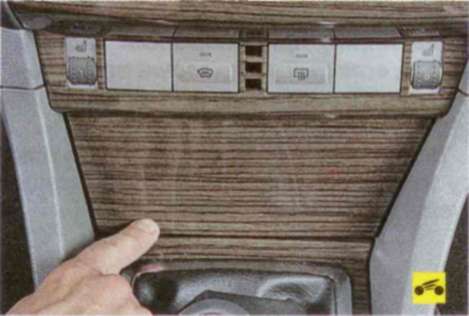
17 - box for small things. Press on the bottom of the box lid...
And the lid will lift up.

19 - cigarette lighter.
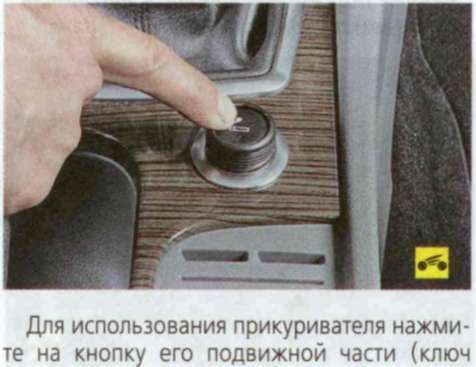
in the ignition switch in position "I" or "II"). After heating the spiral for 10-20 seconds, the moving part will automatically return to its original position with a click.

After that, remove the cigarette lighter for use.
Warnings
The cigarette lighter can be turned on again no earlier than after 20 s. Do not hold the cigarette lighter forcibly in the pressed position. Do not use the cigarette lighter cartridge to connect powerful electrical appliances (electric coffee maker, etc.) - this may damage the electrical equipment of the car. If the cigarette lighter button does not return to its original position 30 seconds after switching on, remove the cigarette lighter from the cartridge to prevent the coil from burning out.
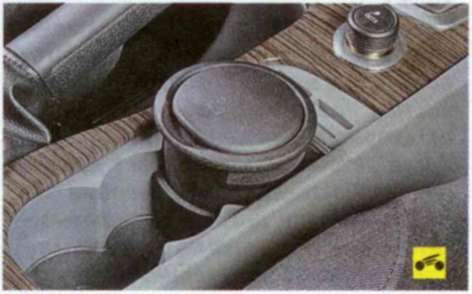
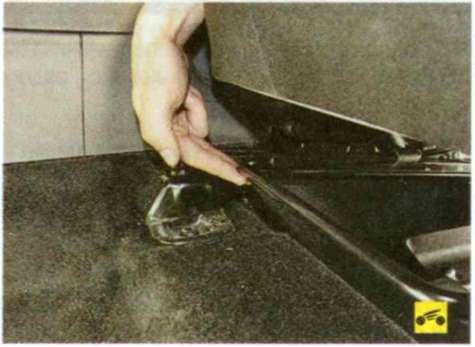
20 - ashtray.
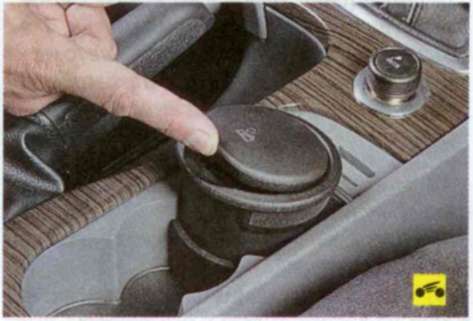
To open, pry off the ashtray cover.
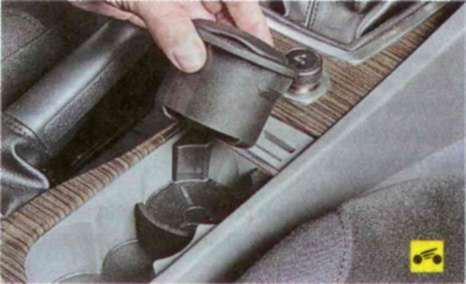
Remove it from its slot to clean it.
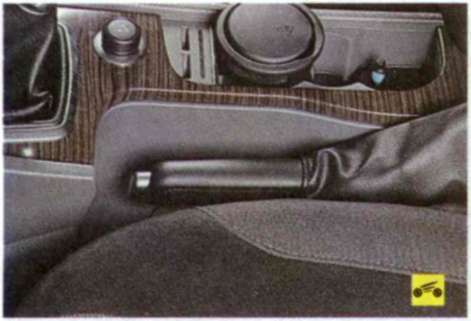
21 - parking brake lever.
In order to slow down the car with a parking brake, lift the lever all the way up - the control lamp in the instrument cluster will light up in red.

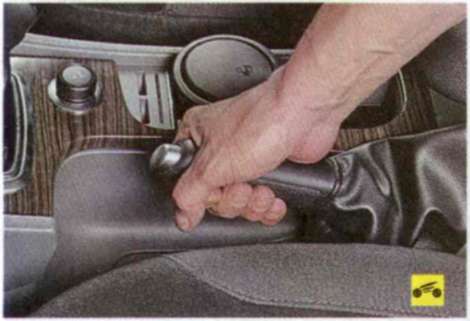
In order to brake the car, pull the lever up a little, press the button at the end of the lever handle and lower the lever all the way down - the control lamp should go out.
22 - ESP dynamic stabilization system switch (if available on the car).
23 - accelerator pedal.
24 - brake pedal.
25 - clutch pedal.
see Adjusting the Steering Wheel, p. 34).
27 - shelf for small items.

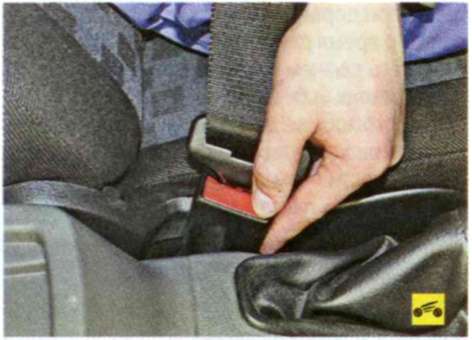
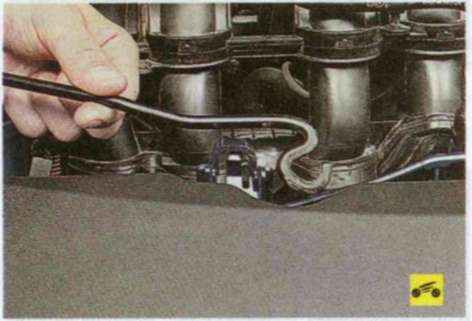
28 - button for emergency shutdown of the fuel supply (on vehicles with gasoline engines).
Note
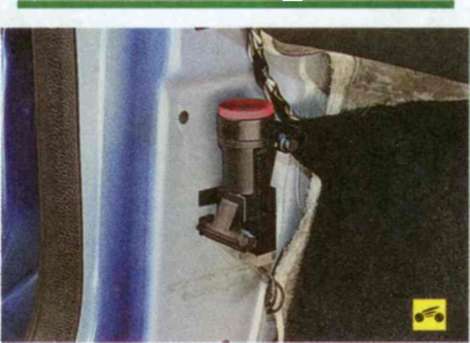
This is how the button for emergency shutdown of the fuel supply looks like (sidewall trim removed).
29 - cruise control system control keys.
5. Instrument cluster Ford Focus II
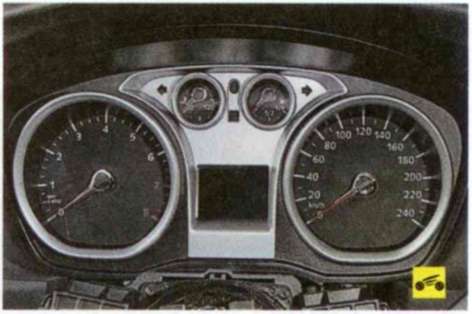
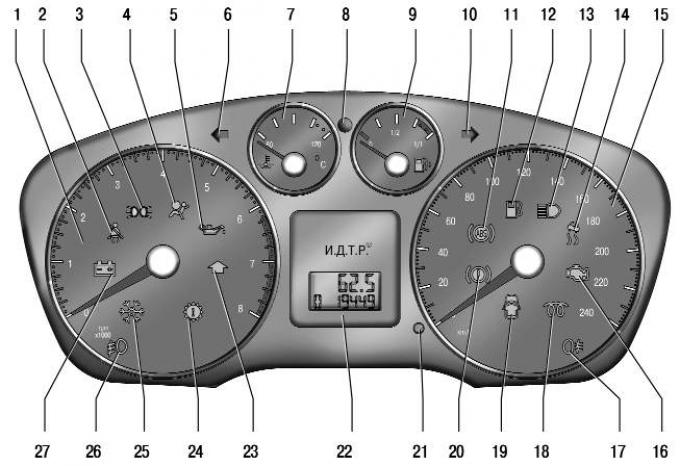
The arrangement of devices and signaling devices in a combination of devices is shown in fig. 1.13.
The following instruments and warning devices are installed in the instrument cluster.

1 - an electronic type tachometer shows the engine speed. The scale has divisions from 0 to 8, the division price is 0.25. to find out the speed of the crankshaft in min "", you need to multiply the tachometer reading by 1000.
Note
On vehicles with a diesel engine, the scale is graduated from 0 to 6.
2 - the control lamp for switching on the main beam of the headlights (with a blue light filter) lights up when the high beam of the headlights is turned on.
3 - signal lamp for turning on the glow plugs (cars with a diesel engine). If the lamp lights up when the ignition is switched on, wait until the lamp goes out before starting the engine.
4 - signal lamp for turning on the cruise control system (see "Cruise control system", p. 28).
5 - signal lamp of the maximum engine speed (with a red light filter). When the lamp lights up, it is necessary to reduce the engine speed.
Note
On the Ford Focus ST, the driver's seat belt warning light is installed instead of the engine speed warning light.
6 - airbag malfunction warning light (with red light filter). Illuminates when the ignition is switched on, if there is a malfunction in the airbag system.
Warning
If the signal lamp lights up, contact the car service immediately. In addition to the possible failure in an emergency, the airbag may unexpectedly deploy while driving, leading to serious consequences.
7 - the control lamp for turning on the left direction indicator (in the form of an arrow with a green light filter) lights up with a flashing light when the left direction indicator is turned on (synchronously with it). The blinking of the control lamp with a doubled frequency indicates a lamp burnout in any left turn indicator.
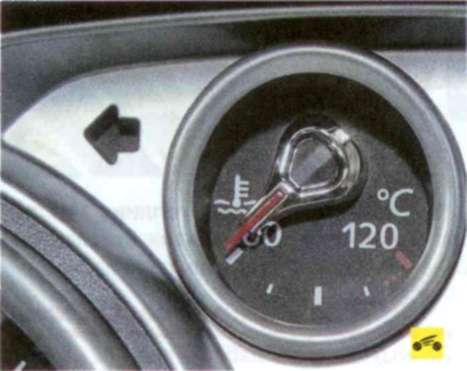
8 - coolant temperature gauge in the engine cooling system. The red zone warns of engine overheating. If the arrow goes into the red zone, you should stop, let the engine cool down and eliminate the cause of overheating.
9 - immobilizer control lamp.
10 - signaling device for on-board computer messages.

Rice. 1.13. instrument cluster
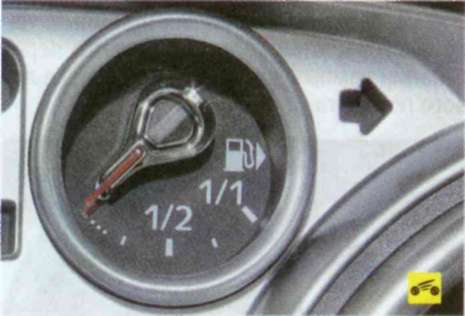
11 - fuel level indicator of the electromagnetic principle of operation. The red zone means the reserve fuel balance.
Warning
12 - the control lamp for turning on the right direction indicator (in the form of an arrow with a green light filter) lights up with a flashing light when the right direction indicator is turned on (synchronously with it). Double flashing of the control lamp a high frequency indicates a lamp burnout in any right turn indicator.
13 - the signal lamp for an emergency drop in oil pressure (with a red light filter) lights up when the ignition is turned on and warns that the pressure in the engine lubrication system is below normal. Immediately after starting the engine, the lamp should go out.
Warning
The movement of the car with a burning lamp is prohibited, as it will lead to engine damage.
14 - signal lamp of the engine management system (with a yellow filter). Lights up when the ignition is turned on and lights up when the engine is started. Immediately after starting the engine, the lamp should go out. If the lamp comes on when the engine is running, it indicates a malfunction in the engine management system. In this case, the control unit switches to the backup program, which allows you to continue driving. When the lamp lights up, it is necessary to check the electronic control unit using the self-diagnosis function and eliminate the malfunction.
Warning
Prolonged operation of the car with a burning lamp is not recommended, as it can lead to an increase in fuel consumption, a deterioration in the traction characteristics of the car and engine breakdowns.
15 - the signal lamp of the minimum fuel reserve in the tank (with a yellow light filter) lights up when there is fuel left in the tank for about 80 km.
Warning
If possible, avoid driving on reserve fuel. The operation of the electric fuel pump in the absence of a continuous supply of fuel with air entering the system will lead to the failure of the pump!
16 - signal lamp for a malfunction of the anti-lock braking system
(with yellow filter). Functions if the car is equipped with an anti-lock braking system. Lights up when the ignition is on for 3 s (at the same time, lamp 19 lights up with it). When the starter is turned on, both lamps are on constantly. After starting the engine, lamp 16 should go out immediately, and lamp 19 after 3~4 s. In the event of a system failure, the lamp is permanently on.
Warning
When the lamp lights up, contact a car service, as braking in all cases will occur without the participation of the anti-lock braking system.
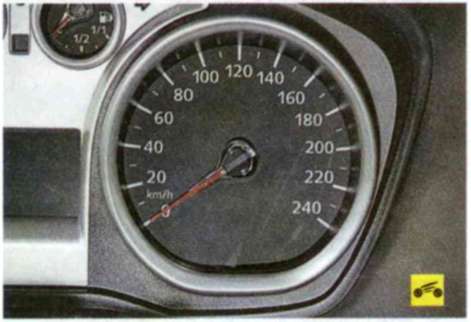
17 - speedometer. Shows how fast the vehicle is currently moving. The scale is calibrated from 0 to 240 km/h, the division value is 10 km/h.
18 - signal lamp of the dynamic stabilization system (ESP). When the ignition is switched on, it lights up for a short time. When the system is turned on, the lamp starts flashing, and when the system malfunctions, it is constantly on.
19 - signal lamp for the state of the brake system and the activation of the parking brake (with a red light filter) lights up when the ignition is on in the event of an excessive decrease in the level of brake fluid in the reservoir of the brake master cylinder or when the parking brake lever is raised.
Warning
The movement of a car with a burning lamp is prohibited.
20 - the signal lamp of the battery discharge (with a red light filter) lights up when the ignition is turned on. Immediately after starting the engine, the lamp should go out. The lamp burning or glowing half-heartedly with the engine running indicates a lack of charging current caused by a malfunction of the generator or voltage regulator, as well as weak tension (or breakage) of the generator drive belt.
Warning
Driving a car with a burning lamp is prohibited, since, in addition to the complete discharge of the battery, this may indicate a short circuit in the charging circuit, which is fraught with fire.

21 - on-board computer display
displays trip information. The counter A of the total vehicle mileage (odometer) shows the distance traveled in kilometers. After a run of 1,000,000 km, a new countdown cycle begins. Counter B shows the daily mileage.
22 - signal lamp for an unfastened driver's seat belt (with a red light filter). Lights up when the ignition is turned on and goes out after the driver's seat belt is fastened. In addition, when the ignition is turned on, at the same time as the lamp, the warning buzzer will turn on for 4~8 seconds.
23 - signal lamp for possible icing of windows and the road. At an outside air temperature of +1 to +4 °C, the lamp lights up orange, and at temperatures below +1 "C - red.
24 - the control lamp for turning on the rear fog lamp (with a yellow filter) lights up when the rear fog lamp is turned on.
25 - the control lamp for turning on the front fog lights (with a green light filter) lights up when the front fog lights are turned on.
26 - control lamp for turning on side lights. Lights up when the side lighting is turned on.
6. Ford Focus II cruise control system
The cruise control system allows you to control the speed of the car using the buttons on the steering wheel. The cruise control function is available at speeds above 40 km/h.
Warning
It is not recommended to use the cruise control in heavy traffic (such as in the city), on slippery or winding roads, or in other traffic situations that may cause you to lose control of your vehicle.
The cruise control system is controlled by five buttons located on the steering wheel.

Rice. 1.14. Cruise control keys: 1 - key "ON"; 2 - key "OFF"; 3 - "RES" key; 4 - key to increase the speed "SET +"; 5 - speed reduction key "-"
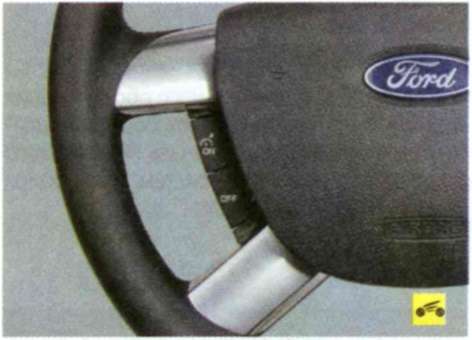
To turn on cruise control, press key 1 (Fig. 1.14) (“ON”), and to turn it off, press key 2 (“OFF”). Once switched on, the system is ready to memorize the desired constant speed, deactivate and then activate the cruise control. When the system is turned on, the previously set speed is deleted from memory.

To set a constant speed, accelerate the vehicle to the desired speed (at least 40 km/h) and press the 4 (“SET+”) or 5 (“-”) key. The control lamp 4 will light up in the instrument cluster (see Fig. 1.13). You can now take your foot off the accelerator pedal.
Note
Cruise control maintains engine torque at a level that maintains a set speed. However, since the cruise control system is not connected to the braking system in any way, when driving on slopes, the vehicle speed may exceed the set speed. In this case, if you downshift and press key 3 ("RES"), the vehicle will return to the set speed.
With each subsequent short-term pressing of keys 4 (“SET+”) or 5 (“-”), the value of the supported speed will increase or decrease accordingly. If you hold these keys, the car will accelerate (without pressing the accelerator pedal) or decelerate accordingly. After releasing the keys, the current speed will be set as the set one. To temporarily increase speed, press the accelerator pedal; when the pedal is released, the previously selected constant speed will be automatically set. To cancel maintaining the set speed, press the key 3 ("RES") control lamp 4 (see Fig. 1.13) in the instrument cluster will go out. The set speed is also canceled automatically when the clutch or brake pedal is depressed. To return to the previously set constant speed after its cancellation, press the key 3 ("RES") again (see Fig. 1.14).
As additional equipment, an on-board computer is installed in the car. It allows you to receive information about the status of various vehicle systems and customize them for yourself.
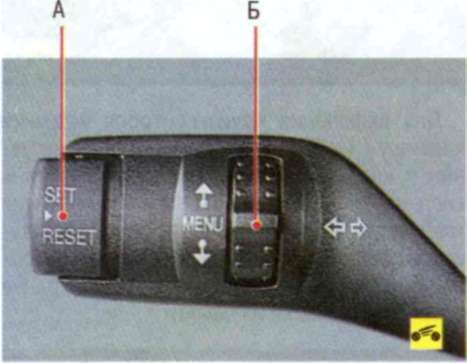
The on-board computer is controlled by two switches located on the left-hand stalk. Press button A to enter the menu, and use button B to scroll through the menu.
While driving, the following indications can be displayed on the trip computer display:

Fuel reserve. Shows approximate mileage on the remaining fuel in the tank;
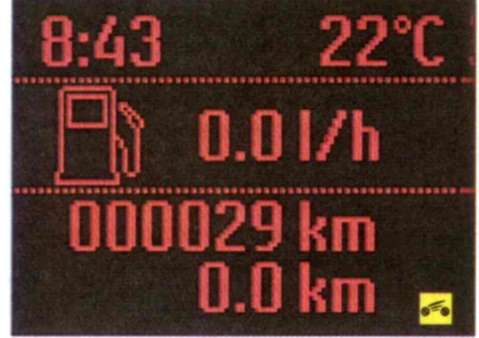
instantaneous fuel consumption;
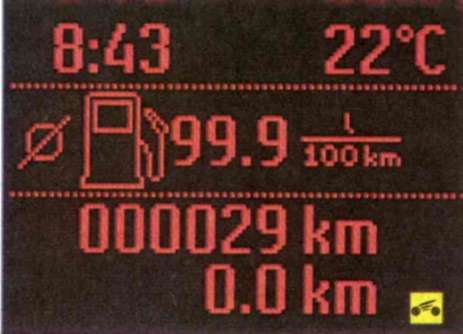
average fuel consumption;
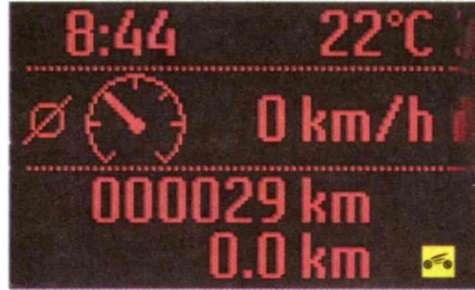
average vehicle speed;
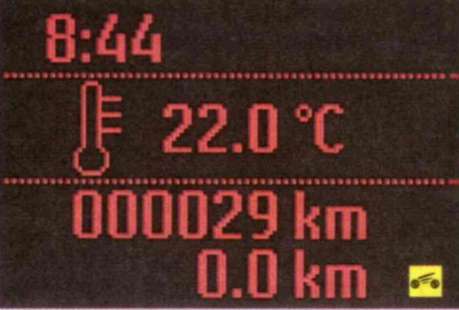
outdoor air temperature;
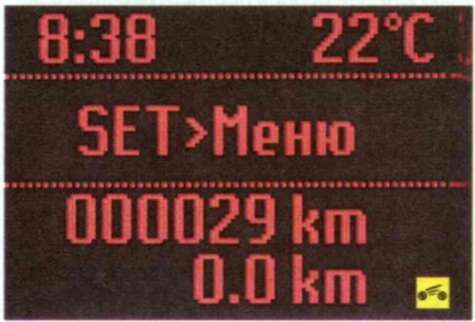
Settings menu.
Press the SET/RESET button to enter the main menu. By turning the MENU knob you can move from one menu item to another. Confirm the selection of the menu item by pressing the “SET/RESET” button:
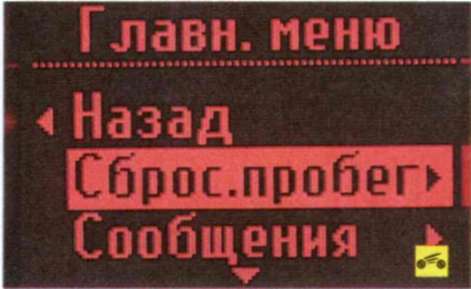
- "mileage reset" - zeroing the value of the average fuel consumption, average speed and daily mileage;
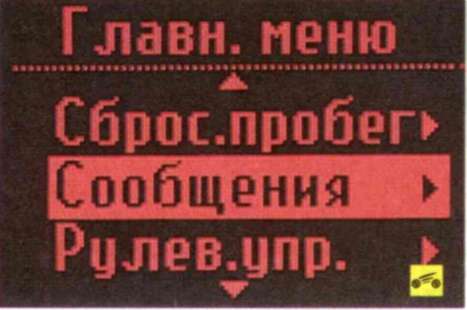
- "messages" - information messages about the state of the car;
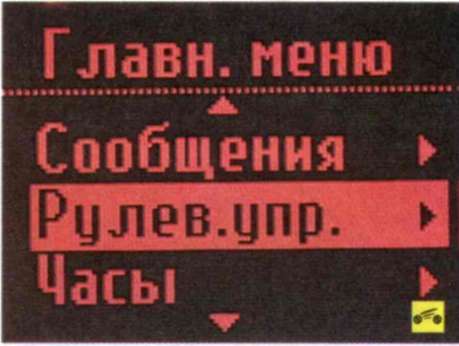
- "steering" - setting steering modes;

¦ "clock" - time display setting;
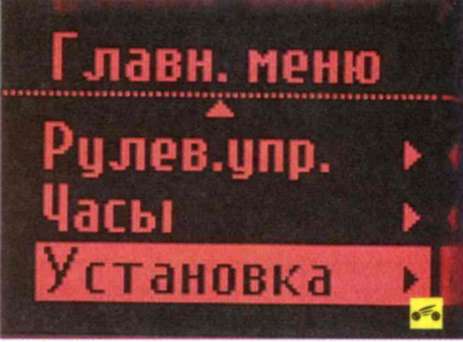
- "installation" - setting the sound signals of the on-board computer and the language menu of messages.

To exit the menu, select the "back" indication and press the "SET/RESET" button.
For safety reasons, the individual adjustment of the vehicle systems can only be carried out when the vehicle is stationary.
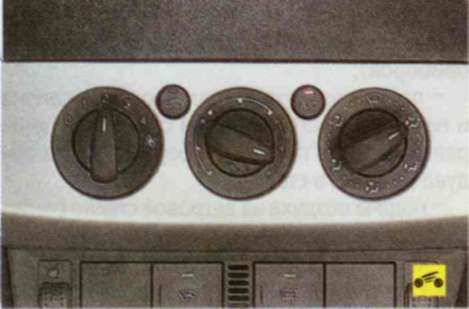
Depending on the configuration, the car can be used for manual climate control (air conditioning installed) or automatic (climate control system installed).
Manual climate control
The ventilation, heating and air conditioning system installed on the car effectively operates with the windows closed and is a single complex that provides the most comfortable conditions in the car, regardless of weather conditions and ambient temperature. The temperature in the cabin is controlled by mixing cold and hot air. The cooling unit of the air conditioning system reduces the temperature and humidity of the air, cleans it from dust. The heater raises the air temperature in all operating modes of the system.
The complex provides low-inertia regulation of air temperature, practically independent of the vehicle speed. The amount of air entering the passenger compartment is mainly determined by the mode of operation of the fan, so it must be turned on even while driving at high speed.
Outside air can enter the passenger compartment through the door windows with the windows down and the air blower located in front of the windshield. The air from the blower can enter the passenger compartment through the windshield blower nozzles, side and center nozzles, and also through the lower nozzles of the heater housing.
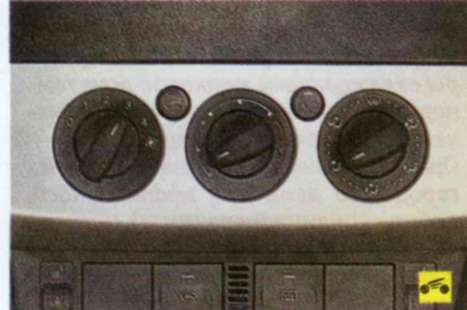
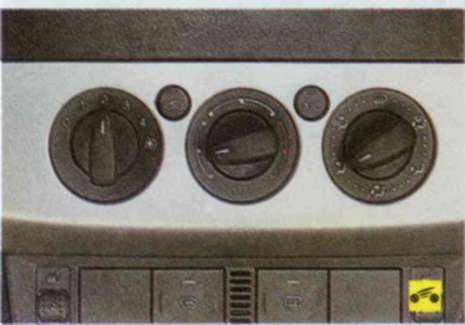
The volume, temperature, direction and intensity of air flows are regulated by switches installed in the control unit for the heating (air conditioning) and ventilation system.
To change the temperature of the air entering the passenger compartment, turn the temperature control knob. The blue part of the scale corresponds to the supply of the most cooled air, the red part - the most heated. With the handle in the middle position, air is supplied to the passenger compartment at ambient temperature (white part of the scale).

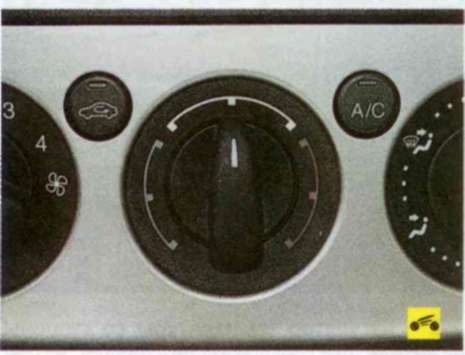
To increase the intensity of the air supply to the passenger compartment while driving and ensure the supply of air to a stationary vehicle, use the switch handle to turn on one of the four modes of operation of the air blower fan.

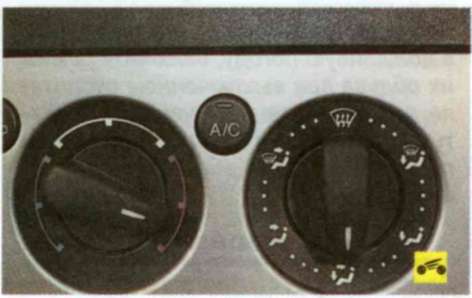
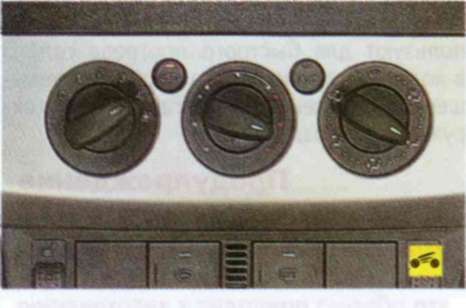
To change the direction of the air supply, use the air distribution knob to select one of the following options (clockwise):
Air supply to the upper and lower parts of the passenger compartment (through the side and central nozzles of the instrument panel, as well as through the lower nozzles of the heater housing);
Air supply to the upper part of the cabin (through the side and central nozzles of the instrument panel);
Air supply to the upper part of the passenger compartment and to the windshield (through the side and central nozzles of the instrument panel and windshield blower nozzles);
Air supply to the windshield (through the windshield blower nozzles);
Air supply to the lower part of the passenger compartment and to the windshield (through the lower nozzles of the heater housing and windshield blower nozzles);
Air supply to the lower part of the passenger compartment (through the lower nozzles of the heater housing).
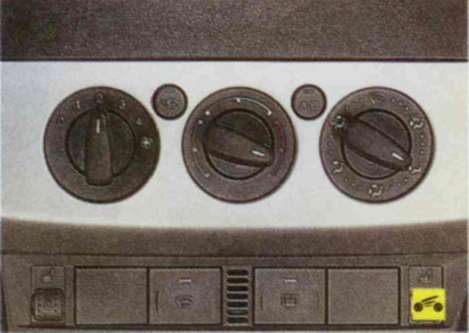
The regulator knob can be set to intermediate positions for more precise adjustment.
To cool the air entering the car interior, press the button for turning on the air conditioner (if it is installed on the car).
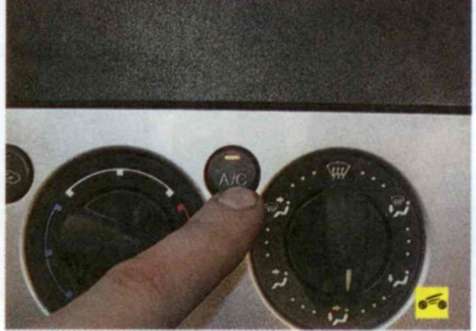
When the air conditioner is turned on, the control lamp in the button will light up. To turn off the air conditioner, press the button again (the control lamp goes out).
Warnings
Turning on the air conditioner while the engine is running under severe conditions (long hills, heavy city traffic, etc.) can cause the engine to overheat. Watch the readings of the coolant temperature gauge: if the temperature exceeds the permissible value, turn off the air conditioner. During long trips in city traffic, the efficiency of the air conditioner may be reduced due to the intense thermal conditions of the engine. This is not a malfunction, the air conditioner will still operate efficiently when driving under normal road conditions.
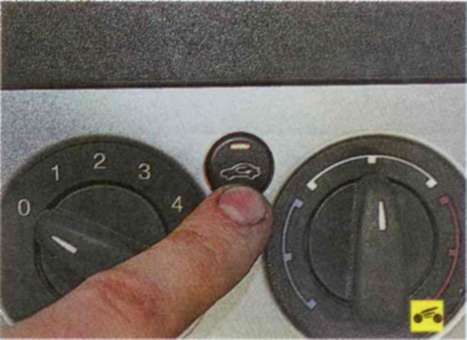
To turn on the recirculation mode, press the corresponding button (the control lamp will light up in it). When the recirculation mode is on, outside air does not enter the passenger compartment, the air circulation inside the passenger compartment is provided by the air blower fan. This mode is used to quickly warm up the cabin in the cold season, as well as with increased dust and gas contamination of the surrounding air.
Depending on the various combinations of switching on the switches of the control unit, the heating and ventilation system operates in the following basic modes:

Maximum cooling mode.
Used in hot weather and after a long stay in the sun to quickly cool the air in the cabin. In this case, before turning on the air conditioner, it is recommended to briefly open the windows to remove the heated air from the passenger compartment. Air conditioning and air recirculation mode must be turned on;
Normal cooling mode.
Used when traveling around the city and outside the city in moderately warm weather. The air conditioner must be on, the recirculation mode must be off;
ventilation mode. Used to ventilate the interior. The speed of the heater fan can be changed at will;
Maximum heating mode. It is used at very low ambient temperatures and to quickly warm up the air in the cabin after a long parking. Air conditioning and recirculation mode must be turned off;
Normal heating mode. It is used in the cold season to maintain the optimum air temperature in the cabin after it has been intensively warmed up in the maximum heating mode. Air conditioning and air recirculation mode must be turned off;

Mode for removing moisture or frost from the windshield. It is used to quickly eliminate fogging of glasses at high humidity. The air conditioner must be on and the recirculation mode must be off;
Mode for reducing the humidity in the cabin. Turning on the air conditioner helps to reduce the humidity in the cabin, which leads to faster cleaning of windows from fogging.
Note
In order to prevent the windows from misting up in rainy weather, turn on the blowing mode when the heater is off, since the difference in the temperature of the glass surface and the air supplied can cause moisture condensation.
Helpful Hints
For a more efficient operation of ventilation and heating at a vehicle speed of less than 50 km / h and when driving through especially dusty sections of roads with closed windows (to create to reduce excess air pressure in the passenger compartment, which prevents dust from being sucked in), we recommend turning on the heater fan with the switch at low or maximum speed. To quickly eliminate fogging of the rear window and free it from ice and snow, turn on the glass heating.
If you do not use the air conditioner for a long time, it is necessary to turn it on briefly once a week with the engine running to restore the lubrication layer on the compressor parts and seals.
Depending on the configuration, the car may be equipped with a climate control system. Functionally, it is similar to a manual heating (air conditioning) and ventilation system. The differences are in the possibility of automatically maintaining the set temperature in the car, and the system is two-zone, i.e. The interior climate can be controlled separately for the driver and front passenger. The location of the climate control controls is shown in fig. 1.15.
The following climate controls are located on the panel.
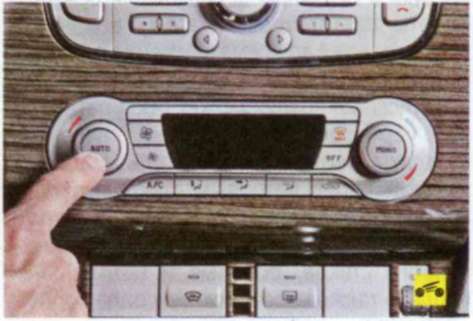
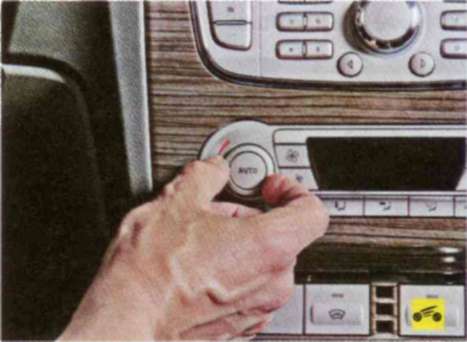
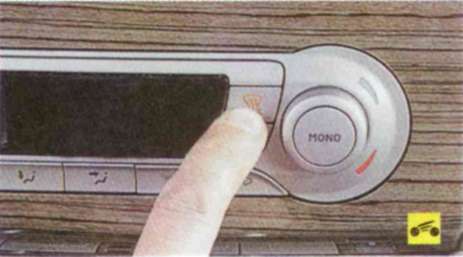
1 - button for switching on the "A11TO" mode.
By pressing the button once, the automatic mode is switched on.
2 - temperature controller on the driver's side. To increase the air temperature, turn the knob clockwise, to decrease - counterclockwise. You can set the temperature from 16 to 28°C (0.5°C increments). In the position corresponding to the minimum (below 16 °C) temperature, the system switches to continuous cooling mode, and in the position corresponding to the maximum (above 28 °C) temperature, to continuous heating mode.

Rice. 1.15. Climate Control Panel
In both cases, a constant temperature will not be maintained.
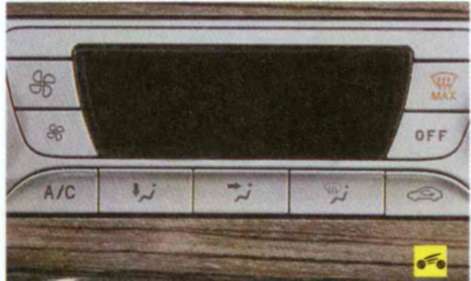
3 - button to increase the fan speed.
4 - climate control display. Displays system operation mode, set temperature, airflow distribution and fan speed.
5 - button to eliminate fogging / frosting of the windshield. Outside air will begin to flow into the cabin. The air conditioner will turn on automatically. The maximum fan speed and air temperature are set, but it is not possible to turn on the recirculation mode.
At the same time, the heated windshield will turn on automatically for a short time and then turn off.

6 - button for turning on the "MONO" mode. In this mode, the air temperatures in the driver's and passenger's zones are the same.

7 - temperature controller on the passenger side. By turning the knob, the single-zone mode will be turned off, the temperature in the driver's zone will remain unchanged. You can set the desired air temperature in the passenger area with a difference of 4 °C.
Note
If you set the air temperature with a larger difference, the temperature in the other zone will be adjusted so that the difference does not exceed 4 °C.
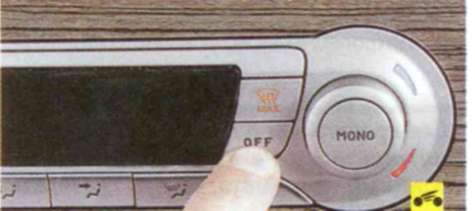
8 - turn off climate control. When the button is pressed, heating, ventilation and air conditioning are switched off and the recirculation mode is switched on.
9 - switching on the recirculation mode.
Note
At high air temperatures outside and inside, in the "AUTO" mode, recirculation is automatically turned on to quickly cool the passenger compartment.
10-12 - buttons for regulating the distribution of air flows. Any setup configuration can be selected at the same time.

13 - button on / off the air conditioner.
14 - fan speed reduction button.
The operation of automatic climate control is regulated by sensors for the intensity of solar radiation and air temperature in the cabin.
The solar radiation intensity sensor is located at the top of the instrument panel under the windshield.
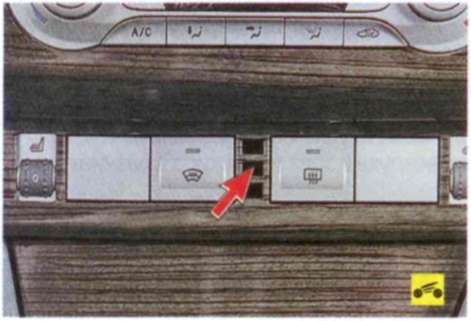
The interior air temperature sensor is located under the climate control panel at the location indicated by the arrow.
Notes
For proper operation of the climate control system, do not cover these sensors with foreign objects and keep the central and side nozzles of the ventilation and heating system open.
At low outside temperatures, if the climate control system is in "AUTO" mode, the air flow will be directed to the windshield and side windows until the engine reaches operating temperature.
Locks
The locks of all doors, and in case of failure of the remote drive and the lock of the trunk lid, are unlocked with one key, which also turns on the ignition.
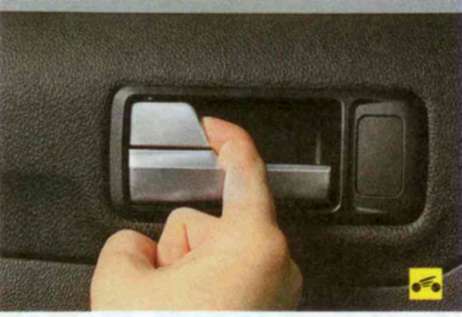
The side doors are opened by pulling the outer...

Or an inner handle.
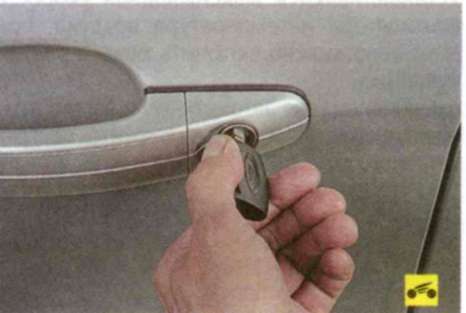
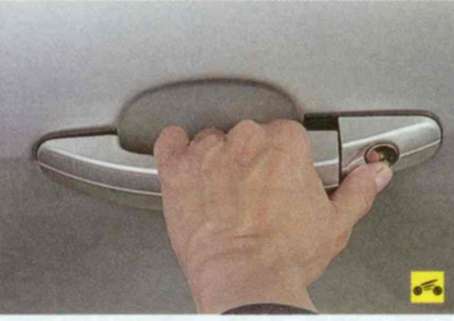
The front doors can be locked from the outside with a key...

Or the lock key by pressing it until it clicks.
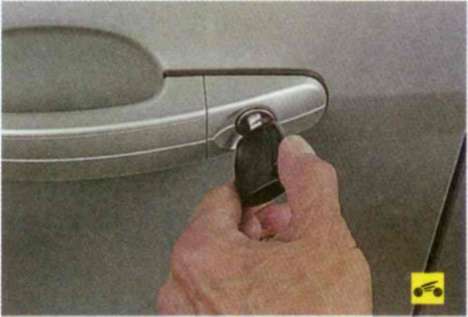
The doors can be unlocked either by using the key (front)...
Or by pulling the lock button.
Notes
If your vehicle is equipped with a central locking system, turning the key in the driver's door or pressing (turning) the lock button on the driver's door locks (unlocks) all four doors. The rear doors can only be locked or unlocked with the lock buttons.
The driver's door can only be locked in the closed position, to lock other doors, the lock button can be pressed in any position of the door.
The rear door locks are equipped with a mechanism that excludes the possibility of opening the doors from the inside (child lock).
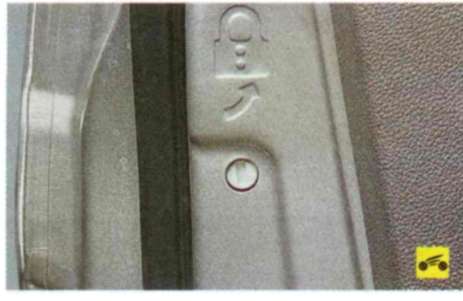
If there are children in the back seat, with the door open, turn the lock switch clockwise with the key and close the door (the slot in the switch will be in a horizontal position). In this case, if the lock button is not pressed, the door can only be opened from the outside; the lock cannot be unlocked with the inside handle.
To disable the "child" lock, turn the switch counterclockwise (the slot in the switch will take a vertical position).
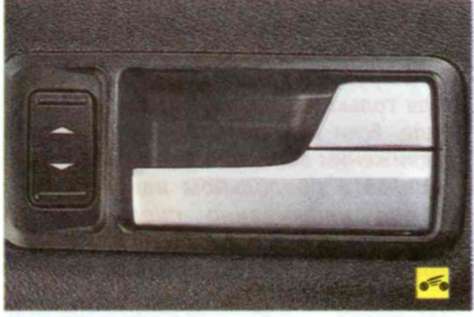
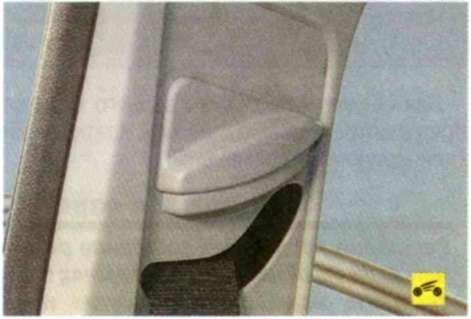
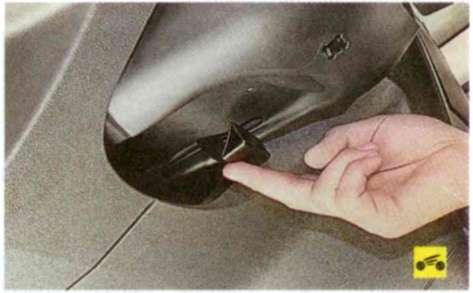
To open the tailgate (trunk lid), press the button located in the door trim (lid)...
And lift the door (lid) up.
Glass front and rear doors lowering. Electric windows are installed on the front doors of the car. Power windows can also be installed on the rear doors, depending on the configuration.
Warning
Due to the design features of the doors, the rear door windows do not lower completely. Attempting to lower them below the limit position will break the window handle.

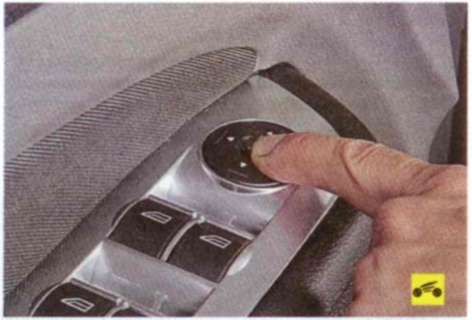
The central power window control unit is located in the armrest of the driver's door. The unit combines the power window switches for all doors.
To lower the window, press the power window control button, and to raise the window, pull the button up.
On vehicles whose rear doors are equipped with power windows, the central control unit additionally contains button A for locking the rear power window control button. The ability to control the rear power windows from the central control unit remains.
The passenger door power window controls are located next to the door handles.
Note
If you press the power window control button of the driver's door lightly, the window will stop lowering when the button is released, and if you press it all the way down, the window will go down to the end.
To lower or raise the power window glass, rotate the handle in the appropriate direction.
Seat belts- an effective means of protecting the driver and passengers from heavy
injuries in road traffic accidents. Be sure to fasten your seat belt while driving and do not transport passengers who are not wearing seat belts.
The car has retractable seat belts for the driver and front passenger. The same belts are installed for the extreme passengers of the rear seat.
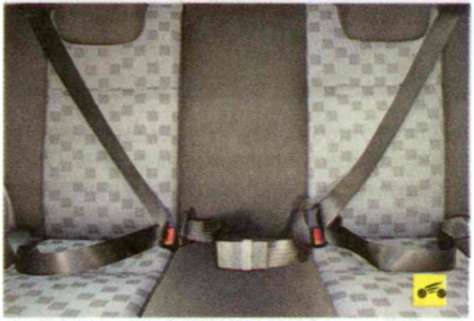
For the middle passenger in the rear seat, only a static (non-inertial) lap belt is provided.
Helpful Hints
Check the condition of the belts regularly. If you find frayed, torn or otherwise damaged straps, be sure to replace the straps. If the belts are dirty, wash them with mild soapy water. The seat belts can be used to secure the cargo carried in the rear seat from moving.
Warnings
Never iron the straps.
Do not use a seat belt on a child sitting on a passenger's lap. Be sure to replace belts that have been critically stressed in an accident.
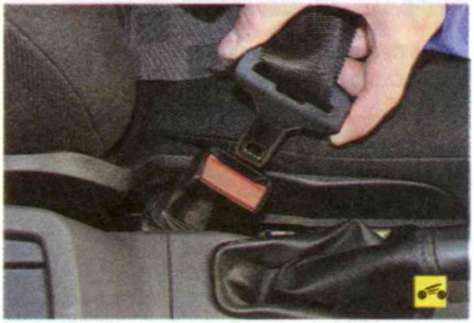
To fasten the seat belt, pull it out of the spool...

And insert the buckle tongue into the lock until it clicks, without allowing the straps to twist.
To unfasten the belt, press the buckle button while holding the belt. Release the belt - it will automatically wind onto the spool.
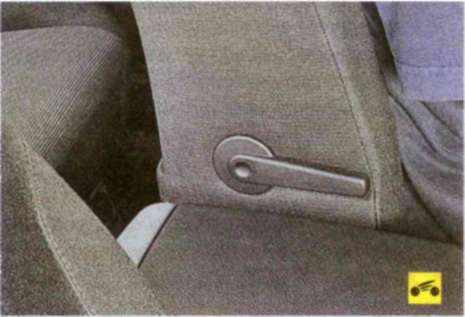
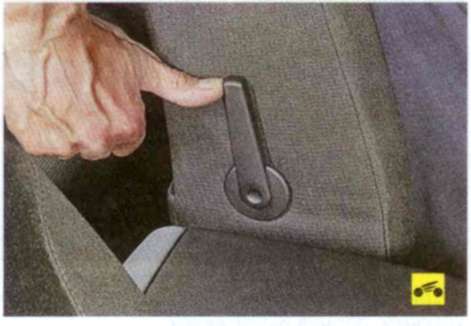
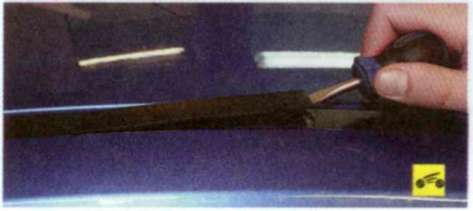
The car also provides for height adjustment of the front seat belts.
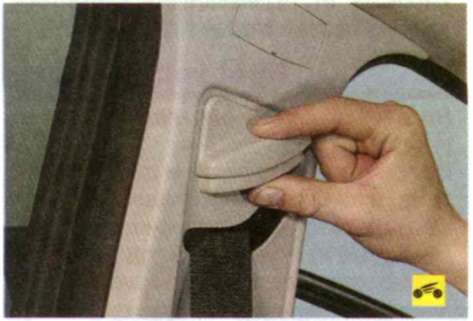
To adjust the position of the belt, squeeze the latch ...

Or, raise the belt anchor so that the belt does not touch your neck and does not put pressure on your shoulder.
Note
According to the Road Traffic Regulations, for the transportation of children under the age of 12, it is necessary to use special child seats, to which the child is fastened with his own belt. In turn, this seat must be securely fixed to the car seat with standard seat belts.
Front seat adjustment
To ensure the most comfortable fit for people of different heights and builds, the position of the driver's and front passenger's seats can be changed in the longitudinal direction, in the angle of the backrest, in the height and angle of the pillow, as well as in the position of the lumbar support roller (the number of seat adjustments depends on the configuration). In addition, the height of the headrest can also be adjusted.
Warning
Adjust the driver's seat only when the vehicle is stationary. If, while attempting to adjust while driving, you do not properly lock the seat in the longitudinal direction and it suddenly moves, you can lose control of the car.
To adjust the position of the front seats in the longitudinal direction, pull up the lock lever handle and move the seat on the slide to a comfortable position. After installing the seat, lower the handle and slightly move the seat back and forth until it is securely locked.
Note
For a three-way adjustable seat (backrest tilt, fore-and-aft position and cushion height), to change the position in the longitudinal direction, move the lower lever located on the left side of the seat cushion forward or backward, depending on where you want to move the seat.
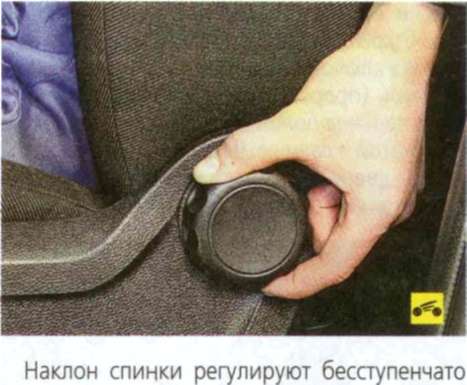
turning the handle at the base of the backrest.
Note
For a three-way adjustable seat (backrest inclination, fore-and-aft position and cushion height), to change the angle of the backrest, turn the upper lever located on the left side of the seat cushion forward or backward, depending on where you want to recline the backrest.
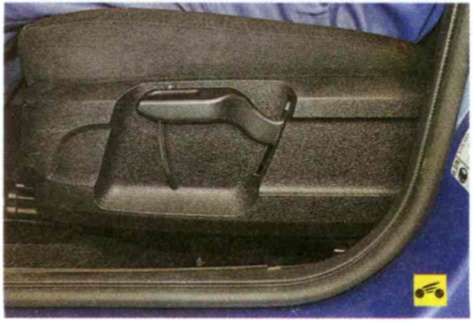
The seat cushion height adjustment lever is located on the left end of the seat.
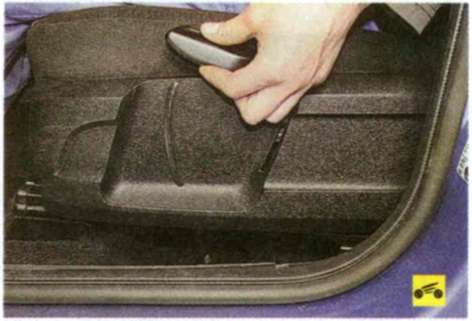
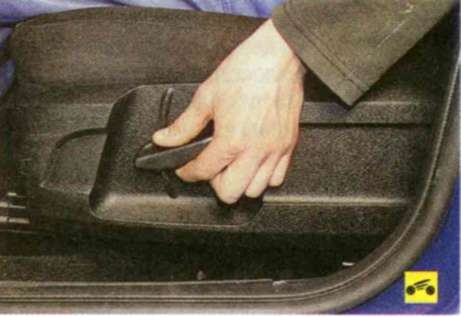
If you need to raise the seat cushion, lift the lever up and release it - the cushion will rise slightly. Repeat the operation until the pillow is in the most comfortable position for you.
If you need to lower the seat cushion, push the lever down and release - the cushion will lower slightly. Repeat operation
Note
Depending on the equipment, an electric seat cushion can be installed. In this case, a switch is installed instead of the adjustment lever: pressing the upper part of the switch raises the seat cushion, pressing the lower part of the switch lowers it.
The lever for adjusting the position of the lumbar support roller is located on the left end of the seatback in the middle.
The position of the roller is changed by turning the lever forward or backward.
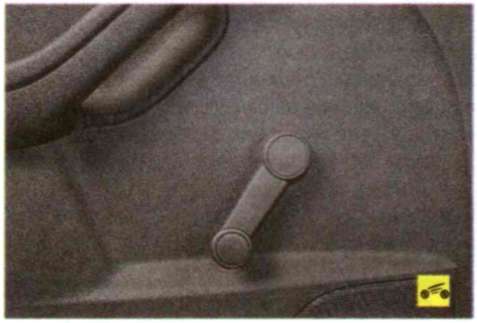
In vehicles with a three-door body, to sit in the rear seat, turn the handle located at the top of the seatback, fold the backrest forward until it locks, and slide the seat forward.
After the passenger has boarded, slide the seat back, turn the handle in the seatback and unfold the seatback.
Note
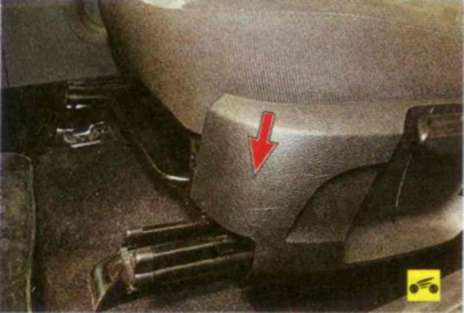
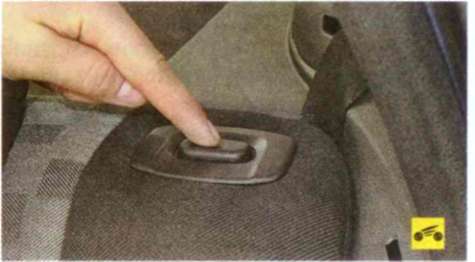
On the seat pad (depending on the configuration) there may be a switch for adjusting the position of the pedal assembly (the place where the switch is located is shown by an arrow). To bring the pedal assembly closer to the driver, press
on the top of the switch, and to move it away from the driver - on the bottom.
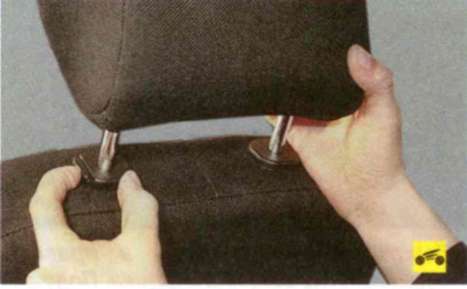
The front seat head restraints can be adjusted in height: press the lock and move the head restraint up or down to the desired height. The optimal position of the head restraint is that its upper edge is flush with the top of the head.
Note
For very tall people, raise the head restraint to its highest position, for very short people, lower the head restraint to its lowest position.
If necessary (for example, to fold the seat into a sleeping position), the head restraint can be removed.
Backseat
The rear seat is equipped with headrests that can be adjusted in height.
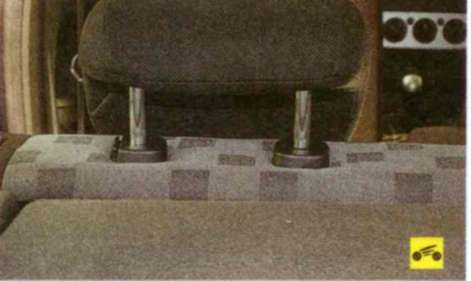
To do this, pull the head restraint up until it locks (you will hear a click).

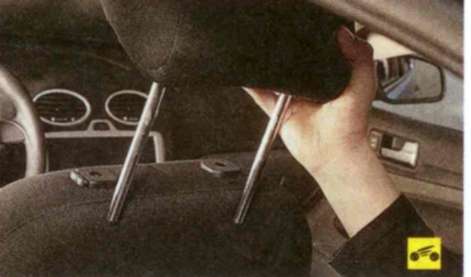
To lower the head restraint, press the latch and lower the head restraint. To remove the headrest...

Press the latch and tilt the seat back slightly forward.
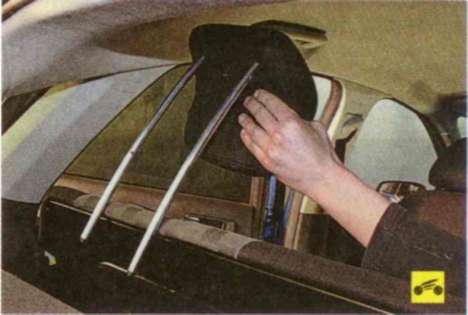
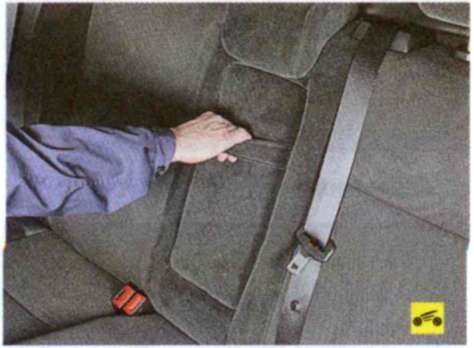
Press the latch and remove the head restraint. The rear seatback can be folded down completely, 2/3 or 1/3. To fold back...

Grab the seat cushion with your hand.
And push it forward.
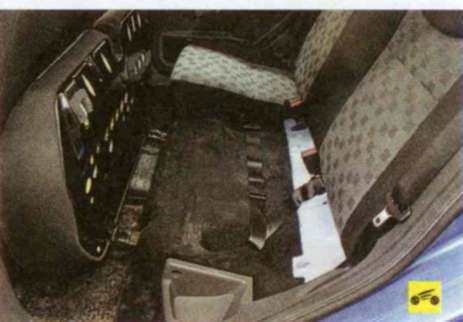
Click on the latch.

And lower the left side of the seatback down.
Note
The head restraint must be in the lowest position.
Fold the right side of the seatback in the same way.
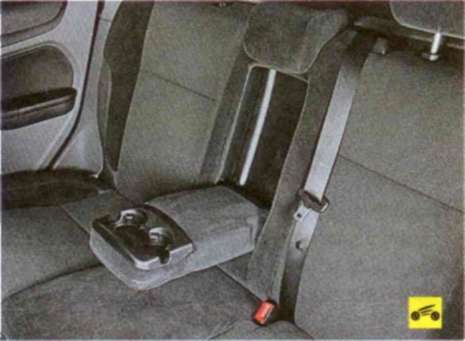
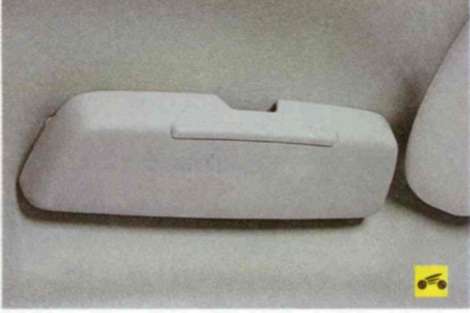
Depending on the configuration, an additional armrest with built-in cup holders can be installed in the back of the rear seat.
To unfold the armrest, pull the strap and fold down the armrest.
Use of child seats
According to the requirements of the Rules of the Road, children under 12 years of age must be transported in special child seats.
For information about the types of child seats and places in the car where they can be installed, see table. 1.3.
Warning
When installing a child seat in the front passenger seat, disable the passenger airbag (if equipped).
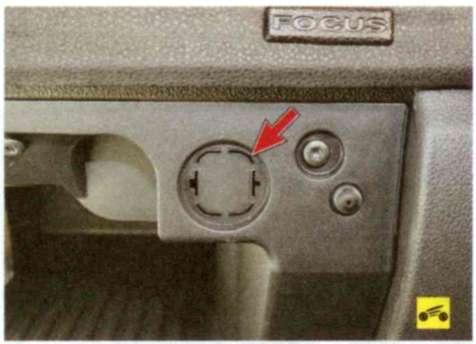
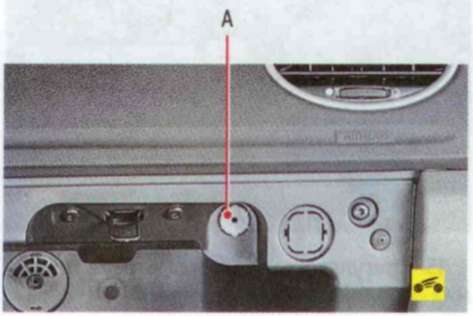
The switch is located in the upper right corner of the glove box. The pillow is deactivated with the car key.

When the passenger airbag is deactivated, the airbag deactivation indicator light on the instrument panel lights up (the location of the lamp is indicated by an arrow).
The neck of a two-year-old child is very fragile. Transport children in rearward facing basket seats. This position ensures maximum safety for the child.
For transporting children from 2 to 4 years old, use an all-round seat that allows you to support the child with a special child seat belt or a special elastic cushion.
For children under 12 years of age, use a cushion-style child seat with belt guides to ensure that the seat belt slides over the child's thighs without twisting.
The car is equipped with a steering column, adjustable for reach and angle of inclination. Before driving, adjust the position of the steering wheel so that it is convenient to drive the car and the instruments in the combination are clearly visible.
Warning
Adjust the steering wheel only when the vehicle is stationary. If you try to make adjustments while driving and the steering column does not lock properly and moves unexpectedly, you may lose control of your vehicle.
To adjust, unlock the steering column by lifting the lever up...
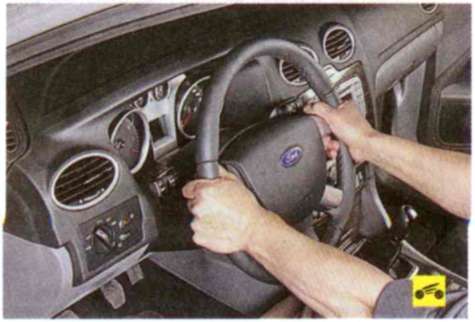
Adjust the tilt and reach of the steering wheel so that all instruments in the instrument cluster are clearly visible, and your hands on the steering wheel are in the most comfortable position ...

Then lock the steering column by lowering the lever all the way down.
To adjust the position of the exterior mirrors, move the lever of the hinge installed in the mirror support in the desired direction.
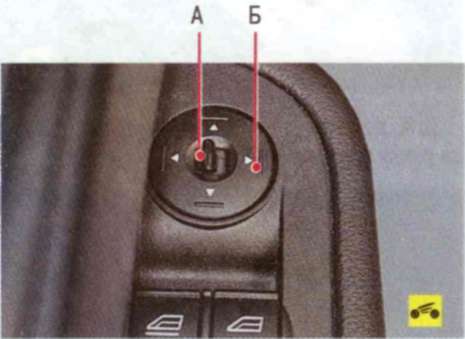
The power mirror control unit is located on the driver's door handle: A - left and right mirror blocking switch; B - key for adjusting the position of the mirror. To adjust the position of the mirrors, it is necessary that the key in the ignition switch be in position "I" or "II".
To switch control between the left and right mirrors, move switch A to the appropriate side. In the central position of the switch, the mirror control unit is locked.
To adjust the position of the mirrors, press the corresponding side of the button B.
After completing the adjustment, return switch A to the middle position.
Notes

To reduce the size of the car when parking in areas with heavy traffic, the outside mirror can be folded by pivoting it by hand.
Depending on the configuration, electric folding mirrors can be installed on cars. In this case, to fold the mirrors, press the switch located next to the inside handle for opening the driver's door. If you press the button while the mirrors are moving, they will change direction. If the button is pressed too frequently, the system may turn off temporarily to prevent the motor from overheating.
Depending on the configuration, vehicles can be equipped with electric heated mirrors, which turn on automatically when the heated windshield is turned on.
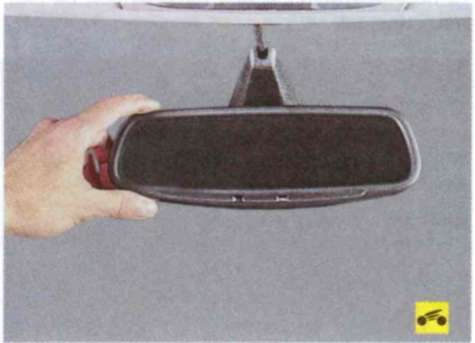
The position of the interior rear-view mirror is adjusted by turning in the desired direction on the bracket hinge.
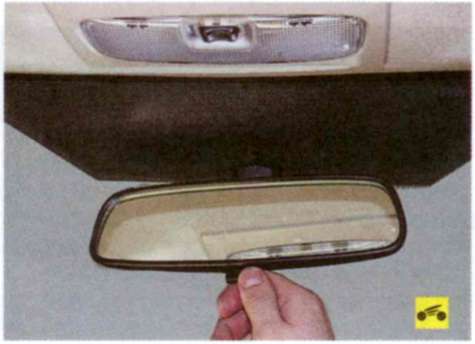
To prevent blinding by the headlights of a vehicle moving behind, you can change the position of the optical element on its support by turning the lever.
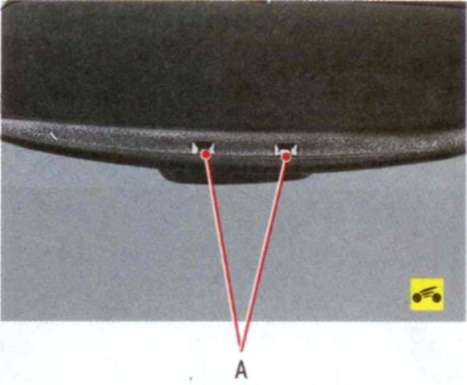
Depending on the equipment, a mirror with automatic dimming can be installed on the car. The signal comes from light sensors A located on the mirror.
Note
The auto dimming function is activated when the mirror is exposed to strong light from the headlights of vehicles moving behind. When reverse gear is engaged, the function is automatically disabled.
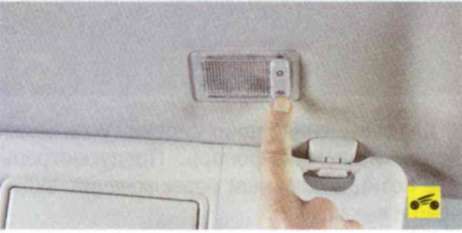
For general illumination of the passenger compartment, a ceiling lamp is installed in the headlining above the front seats.
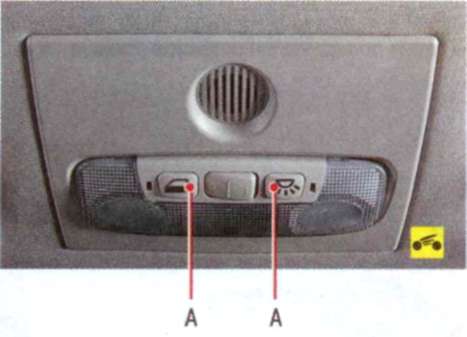
The switch key can take the following positions:
O - interior lighting ceiling is off; Ш - interior lighting lamp turns on when the doors are opened; - Me? - - the ceiling light is on.
A - keys for turning on individual lighting.

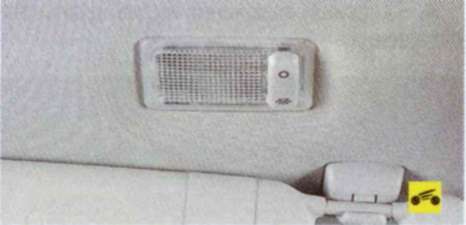
An additional lamp is installed to illuminate the rear seats. There are two positions of the switch key: on and off.
Sun visors are designed to protect the eyes of the driver and front passenger from dazzling sunlight.
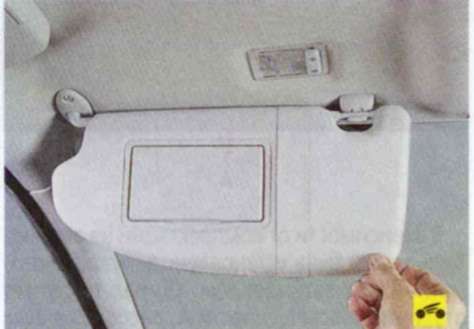
Pull the visor down for protection from the sun.

Depending on the direction of the sun's rays, the visor can be removed from the holder and then pivoted to the side.
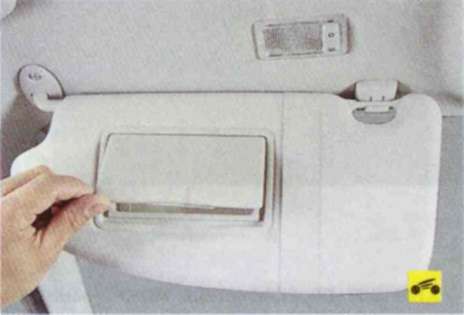
Vanity mirrors are installed on the back side of both visors under hinged covers.
Each cosmetic mirror is equipped with an individual lighting lamp.
To turn on the lighting, press the key with the YP symbol,
A spectacle case is attached to the headliner above the driver's seat.
To use it, open the lid of the case.
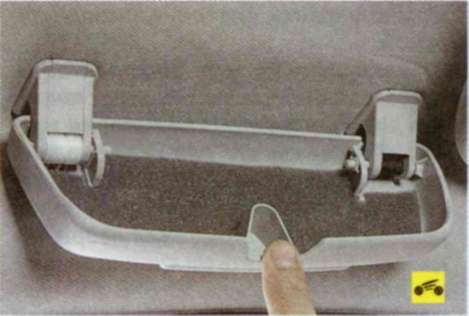
The interior of the car has stowage boxes between the front seats (in the armrest) and for passengers in the back seat.
To access the glove box located in the armrest, press the lock handle and lift the box cover.
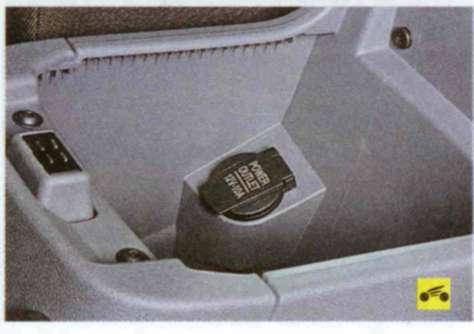
Depending on the configuration, an additional 12 V socket can be installed under the armrest cover to power external consumers.
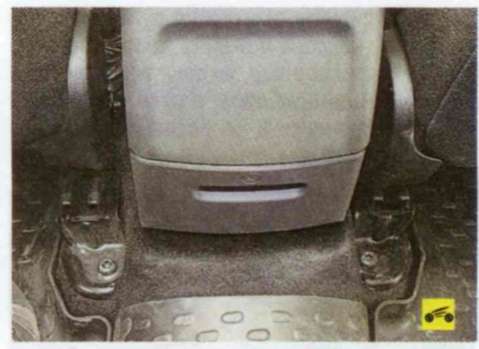
The storage box for passengers in the rear seat is installed at the end of the lining of the floor tunnel between the front seats.
Note
An ashtray can be installed instead of the glove box on request.
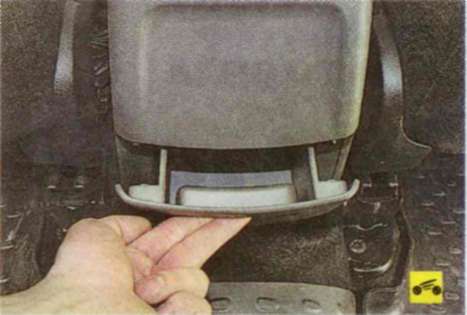
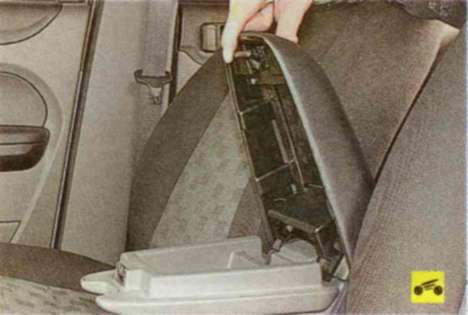
To access the glove box, pull the lid by the handle...

And open the box.
Note
On vehicles equipped with the Key Free system, use the spare key to open the hood.
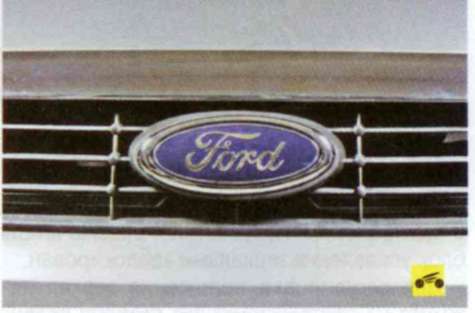
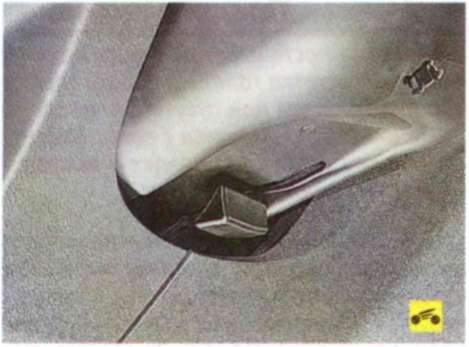
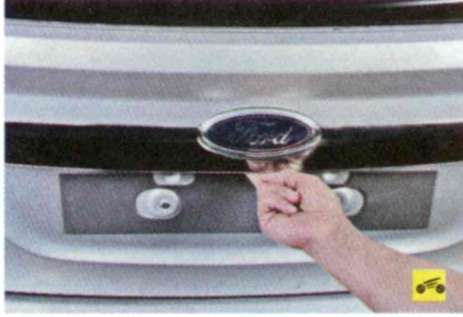
The bonnet lock is located under the vehicle emblem on the radiator grille. To gain access to the engine bay...

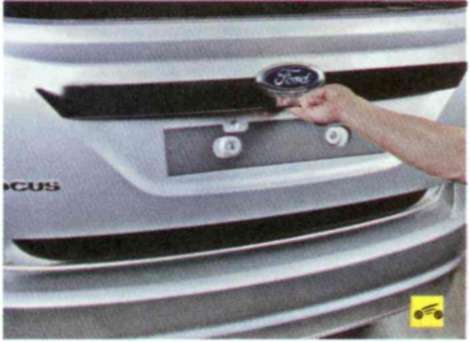
Insert the key into the lock cylinder and turn it counterclockwise - the hood will rise slightly...
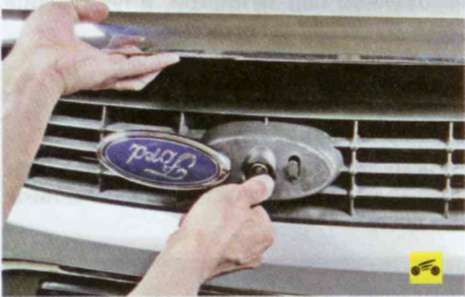
Then turn the key clockwise and raise the hood.
Remove the stop from the holder...

And install it in a special nest of the hood.
Note
Immediately after opening the hood, remove the key from the lock cylinder so as not to lose or damage it, and return the emblem to its original position.
Warnings
When lowering the hood, check the reliability of the lock operation: at the moment of locking, a characteristic click should be heard. To avoid the appearance of dents on the front surface of the hood, close the hood by slamming it, releasing it from a height of 15-20 cm from the upper edge of the front end shield.
The vehicles are fitted with a five-speed manual transmission as standard, and a four-speed automatic transmission is available upon request.

Operate a manual transmission according to the shift pattern printed on the handle of its lever. In the neutral position, the lever is automatically set to the 3rd or 4th gear position, from which it can be moved forward or backward respectively. To engage 1st or 2nd gear, move the lever to the left as far as it will go and then move forward or backward accordingly. To engage V gear, move the lever to the right as far as it will go and forward.
To engage reverse gear, move the lever all the way to the right and then back.
Warnings
Engage reverse gear only when the vehicle is completely stopped.
To avoid damage to the transmission, avoid shifting when the wheels are slipping.
The automatic transmission has four forward gears and one reverse gear. The inclusion of each gear occurs automatically depending on the position of the gear selector lever, vehicle speed and the position of the accelerator pedal.
Note
During the break-in period of a new vehicle or immediately after connecting the battery (after disconnecting or replacing it), gear shifting
may not run as smoothly as usual. This does not indicate a malfunction: after several automatic gear shifts, the shifting process will become smooth.
In addition to the automatic control mode, there is also a manual mode in which the driver can independently quickly shift gears by moving the selector lever forward or backward.
Note
Unlike a manual transmission, an automatic transmission, while in manual control mode, allows the driver to shift gears without releasing the accelerator pedal.
The selector lever is located on the floor tunnel in the same place as the manual transmission control lever. Scales 7 and 1 (Fig. 1.16), respectively, of manual and automatic control modes are applied to the overlay of the floor tunnel. On the handle 4 of the lever there is a button 3 for locking the gear.
Two slots are made in the overlay of the floor tunnel for moving the selector lever: 2 - automatic and 6 manual modes.
The following designations are applied to scale 1 of the automatic control mode:
"R" - parking. In this position, the transmission is locked to prevent the parked vehicle from moving. If the selector lever is in this position, the engine can be started;
"IN." - reverse. Move the lever to this position only after the vehicle has come to a complete stop;
Warning
Never move the selector lever to the "P" (parking) or "R" (reverse) position while the car is moving! This will damage the gearbox.
"N" - neutral. In this position of the lever in the gearbox, no gear is engaged. This position is used during long stops, such as traffic jams;

Rice. 1.16. Automatic transmission selector lever: 1 - automatic control cabinet; 2 - slot of automatic control mode; 3 - gear lock button; 4 - lever handle; 5 - plug; 6 - slot for manual control mode; 7 - scale of manual control mode
Warning
Never move the selector lever to the "N" (neutral) position while driving! In doing so, you can accidentally move the lever to the "P" (parking) or "R" (reverse) position, which will lead to damage to the gearbox. In addition, engine braking will become impossible.
Helpful Hints
To maintain control of the vehicle, always keep your foot on the brake pedal when the lever is in the "N" (Neutral) position and also when moving the lever to this position. If the car is on a slope, then when starting the engine, the selector lever must be set to the "P" (parking) position, and not "N" (neutral).
"D" - forward movement. This
the main position of the selector lever, in which it is located most of the time when driving. In this case, the automatic transmission selects the gear that is optimal for a given speed and acceleration of the car. When driving down a steep descent, a downshift may automatically be engaged to provide more effective engine braking.
To move the selector lever from the "P" (parking) position to the "R" (reverse) position, press the lock button 3 (see Fig. 1.16) while pressing the brake pedal.
Note
A special locking device will not allow the selector lever to be moved from the “P” (parking) position to any other position if the brake pedal is not held down.
To further move the lever to the "N" (neutral) and "D" (forward) positions, it is not necessary to press the lock button. To move the lever back from the “D” position (forward) to the “N” (neutral) position, you do not need to press the lock button, and to further move the lever to the “R” (reverse) and “P” (parking) positions, the button should be pressed.
Warnings
Do not press the lock button each time the selector lever is moved from one position to another. This will become a habit, and you can put the lever in the "P" (park) or "R" (reverse) position while the car is moving, which will damage the transmission. When driving, do not press the accelerator pedal when moving the selector lever from the "P" (parking) or "N" (neutral) position to any other position. This is dangerous as the vehicle may move suddenly forward or backward.
When the ignition is on, the display of the instrument cluster shows the designation of the selector position (automatic shift mode) or the number of the selected gear (manual shift mode).
Regardless of whether the car is moving or stationary, to select the manual gear shifting mode, move the selector lever from position “D” (forward) to slot 6 (see Fig. 1.16) of the manual gear shifting mode. In manual transmission control mode, you can quickly change gears by moving the selector lever forward or backward without releasing the accelerator pedal.
To shift to a higher gear, move the selector lever forward in the direction of the "+" sign and release the lever. To downshift, move the lever back towards the "-" sign and release.
Warnings
In manual transmission control mode, shifting to a higher gear does not occur automatically. It is up to the driver to determine when to shift into a higher gear according to road conditions. In this case, it is necessary to ensure that the engine speed does not exceed the maximum allowable value (the tachometer needle does not enter the red zone of the scale).
Moving the selector lever back quickly twice in the direction of the "-" sign allows you to skip one gear when downshifting. For example, switch from III gear to I or from IV gear to II. Since in this case, sudden engine braking can lead to a loss of traction of the wheels with the road surface, shifting to lower gears should be done carefully, taking into account the speed of the car.
Notes
In manual transmission mode, only one of the four forward gears can be selected. To move in reverse or park, move the selector lever into slot 2 (see Fig. 1.16) of the automatic mode and then to the “R” (reverse) or “P” (parking) position, respectively.
To ensure the necessary traction and dynamic characteristics and vehicle safety, the automatic transmission may not shift to a higher gear when the vehicle speed is insufficient, even if the driver moves the selector lever forward in the direction of the “+” sign. Similarly, the transmission may not downshift at high speed even if the driver moves the selector lever back in the direction
"-" sign to prevent excessive engine speed increase. In manual transmission control mode, when the vehicle speed is reduced, downshifting occurs automatically. When the car stops, 1st gear is automatically engaged. In order to make starting off on slippery surfaces easier, move the selector lever forward in the direction of the “+” sign. At the same time, the second gear will immediately turn on in the box, which will ensure smooth starting on a slippery road. Then, to re-engage 1st gear, move the selector lever back in the direction of the "-" sign. Move the selector lever into the manual mode slots and when changing from manual to automatic mode smoothly, without undue effort. Sharp and strong movements can damage the lever.
In the event of a discharge of the battery or a malfunction of the electrical equipment to unlock the automatic transmission (moving the selector lever from the “P” position), perform the following operations.
1. Pry with a screwdriver and remove the plug 5 holes (see Fig. 1.16) next to the selector lever.
2. Press the lock lever located under the plug and move the selector lever from the “P” position.
3. Replace the plug.
On the roof of the car there are special places for installing the trunk. To access them...

Turn 90" anti-clockwise the plug retainer...
Pry off the plug with a screwdriver...
And take it off.
Install the rack according to the manufacturer's instructions.
![]()
Rice. 1.7 . Instrument panel and controls
The instrument panel contains the following controls and instrumentation (see Fig. 1.7).
1 - outdoor lighting switch. Turn the knob to select one of the following positions:
0 - outdoor lighting off;
- side lighting is on;
Rice. 1.8 . instrument cluster
NOTE: When the side lighting is turned on, the control lamp 3 lights up in the instrument cluster (see Fig. 1.8).
– the dipped/high beam headlights are on;
NOTE: When the high beam headlights are switched on, the control lamp 13 lights up in the instrument cluster (see Fig. 1.8).
AUTO - automatic mode of turning on the dipped beam of headlights depending on the illumination (on vehicles equipped with an automatic dipped beam system);
NOTE: The ignition must be on (the key in the ignition switch must be in the "II" position) for the automatic dipped beam mode to work.
NOTE: In AUTO mode, the high beam headlights can only be turned on if the system has turned on the low beam.
NOTE: In AUTO mode, the fog lights and taillight will not turn on. To turn them on, turn the switch handle to the position
– the parking lights are on. To enable this mode, press the switch handle and turn it counterclockwise.
To turn on the rear fog light, turn the switch knob to position and pull it out one position.
NOTE: When the rear fog lamp is turned on, the control lamp 17 lights up in the instrument cluster (see Fig. 1.8).
To turn on the fog lights, turn the switch knob to position and pull it out two positions.
NOTE: When the fog lights are turned on, the control lamp 26 lights up in the instrument cluster (see Fig. 1.8).
2 - headlight electrocorrector regulator. By turning the knob, depending on the load of the car, the angle of inclination of the headlight beam is changed in such a way as to prevent dazzling of oncoming drivers. Alignment of the mark on the regulator knob and the number on the scale ensures the appropriate adjustment of the position of the headlights for the following vehicle loading options:
0 - one driver or driver and passenger in the front seat;
1 - all seats are occupied;
2 - one driver and cargo in the trunk;
3 - all seats are occupied and cargo is in the trunk;
4 - all seats are occupied, cargo is in the trunk, the car is operated with a trailer.
NOTE: When operating a vehicle with a trailer, it may be necessary to move the electrocorrector control one more position (for example, instead of pos. 2, set pos. 3).
3 – the lever of the switch of external illumination and indexes of turn. The switch lever can take the following positions:
I - right turn indicators are on (fixed position);
II - left turn indicators are on (fixed position).
When the lever is moved to position "I" or "II" in the instrument cluster, the control lamp 10 or 6 lights up with a flashing light (see Fig. 1.8). When the steering wheel is returned to the straight-ahead position, the lever automatically returns to its original position. When changing lanes, to turn on the direction indicator, it is enough to press the lever in the direction of position "I" or "II" only until a moment of tangible resistance, without fixing the lever, and release it. The direction indicators in this case will flash three times.
To switch between high and low beam headlights (outside lighting switch knob 1, shown in Fig. 1.7, must be in position), move the switch lever to the steering wheel two positions and release.
To signal high-beam headlights, move the switch lever one position to the steering wheel (outer lighting switch knob 1, shown in Fig. 1.7, must be in position) and release.
NOTE: When you turn on the high beam, the control lamp 13 lights up in the instrument cluster (see Fig. 1.8).
If, with the ignition off, move the switch lever one position to the steering wheel and release it, the headlights off delay function is activated: the dipped beam will turn on, which will turn off 30 minutes after the last door is closed. To turn off the headlights, move the switch lever one position toward the steering wheel and release it again.
NOTE: Note
NOTE: If the ignition switch (lock) is in the "0" or "I" position, when the exterior lights are on, when the driver's door is opened, a buzzer will turn on, reminding you to turn off the lights.
Depending on the equipment, the lever may also have a SET/RESET button and a MENU switch. Turning the MENU switch selects the desired on-board computer menu screens or settings, and the SET/RESET button is used to enter submenus or adjust settings.
4 - side nozzles of the ventilation and interior heating system. Designed to direct the flow of air from the heater, air conditioner or ventilation system. The direction of the air flow is changed by moving the handle a, installed in the center of the nozzle, to the right or left or by turning it up and down. A handle b is installed under the grate to adjust the amount of air supplied through the nozzle. When the handle is turned all the way to the left, the damper closes completely, blocking the air flow. When the handle is turned all the way to the right, the damper opens completely (maximum air flow).
5 - steering wheel.
6 - key for turning on the sound signal. To give a sound signal, press the button to turn it on.

7 - a combination of devices ().
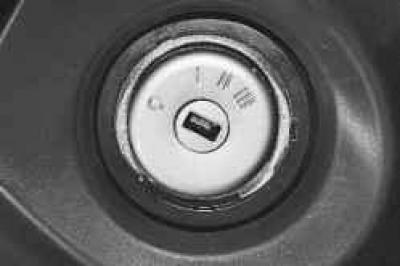
8 - ignition switch (lock), integrated with the anti-theft device, is located on the right side of the steering column. The key in the lock can occupy one of four positions:
– 0 (blocking) – the ignition is off, when the key is removed, the anti-theft device is turned on.
To ensure that the steering shaft is locked, turn the steering wheel to the right or left until it clicks.
To turn off the anti-theft device, insert the key into the ignition switch and, turning the steering wheel slightly to the right and left, turn the key to position "I";
WARNING: Do not turn off the ignition or remove the key from the lock while driving: the steering will be locked and the car will become uncontrollable.
– I (optional equipment) – ignition is off, the key cannot be removed, the steering is unlocked. The power supply circuits for the sound signal, outdoor lighting, high-beam headlights, radio equipment, cigarette lighter, etc. are turned on;
– II (on) – the ignition is on, the key cannot be removed, the steering is unlocked. Ignition, instruments and all electrical circuits are on;
- III (starter) - the ignition and starter are on, the key cannot be removed, the steering is unlocked. This position of the key is not fixed; when released, the key returns to position "II" under the action of the force of the spring.
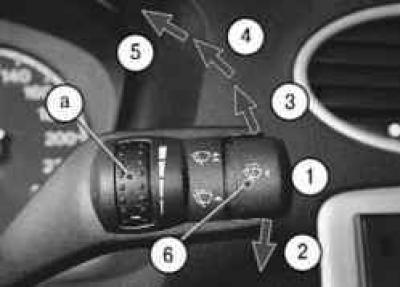
9 - switch lever of the cleaner and washer of the windshield and glass of the tailgate(on station wagon and hatchback vehicles) turns on the electrical circuits when the ignition is on.
The lever can be moved to the following positions:
1 - wiper off;
2 - wiper blades will make one cycle;
3 - intermittent wiper operation is enabled. The delay time between cycles is regulated by the rotary switch a: the lowest position - the minimum interval between cycles, the highest position - the maximum;
NOTE: Notes
NOTE: Depending on equipment, the intermittent wiper may be replaced with an automatic wiper. In this case, moving the selector lever to position 2 activates automatic mode. In this case, handle a regulates the sensitivity of the rain sensor: the lowest position is high sensitivity (the brushes turn on when there is a small amount of water on the windshield), the highest position is low sensitivity (the brushes turn on when a large amount of water is detected on the windshield).
NOTE: Vehicles may be equipped with a windshield wiper that has a pause between cycles in intermittent operation based on vehicle speed. When the vehicle slows down or comes to a stop, the delay between wiper cycles increases by one step. When the vehicle speed increases, the delay time returns to the settings set by the driver. Moving the lever while the wiper is operating will turn it off. If the vehicle speed is greatly reduced or the vehicle comes to a stop, the system is reactivated.
4 - the first (low) wiper speed is on;
5 - the second (high) wiper speed is on;
6 - button for turning on the washer. When you press the button along with the washer, the wiper will automatically turn on, the brushes of which will perform several work cycles after the button is released.
NOTE: If the vehicle is equipped with a headlight washer, pressing the button while the headlights are on will also turn on the headlight washer.
When moving the lever to the steering wheel one position, the tailgate glass cleaner is turned on.
NOTE: The tailgate wiper is activated automatically (depending on equipment) when reverse gear is engaged with the wiper lever in position 2, 3, 4 or 5.
When moving the lever to the steering wheel by two positions, the tailgate glass washer is switched on.
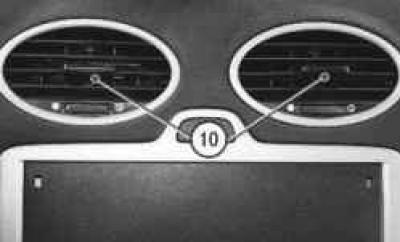
10 - central heater nozzles.
11 - a place to install the radio.
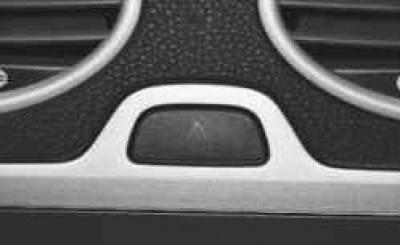
12 - alarm switch.
NOTE: The alarm system works at any position of a key in the switch (lock) of ignition.
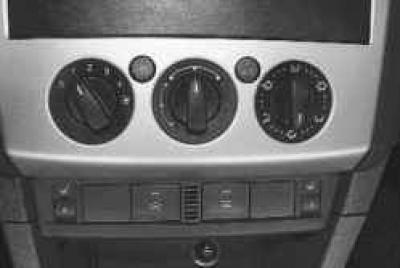
13 - control unit for the heating (air conditioning) and interior ventilation system, see "Heating (air conditioning) and interior ventilation".

14 - glove box. Serves for storing small things and opens when you press the lock handle up.
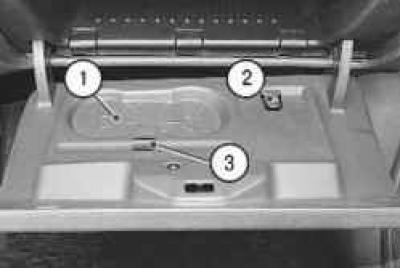
On the inside of the lid are cupholders 1, paper clip 2 and pen clip 3.
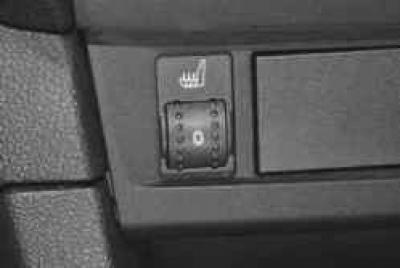
15 - front seat heating controls(left - driver, right - passenger). The seat heating can only be switched on when the ignition is on (position "II"). When the regulator is set to position "0", the electric heating is switched off. In position "3", the maximum heating is turned on to quickly warm up the seats in the cold season. Intermediate positions define different intensity of heating.
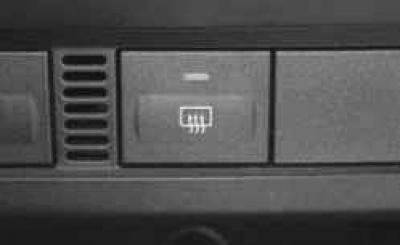
16 - rear window electric heating switch.
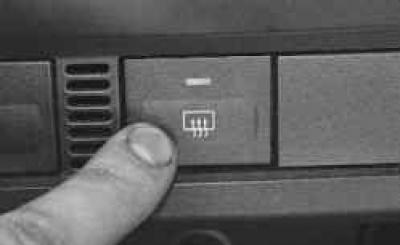
When the button is pressed (the key in the ignition switch must be in position "II"), the rear window heating is turned on, at the same time the control lamp in the button lights up. Pressing the button again turns off the heating.
WARNING: The heating element draws a very high current. Therefore, to avoid over discharging the battery, turn on the heater when the engine is running and only for the time necessary to defog the rear window.
WARNING: To avoid damaging the heater filaments, do not use scrapers or other sharp objects, or detergents with abrasive substances to clean the inside of the rear window.
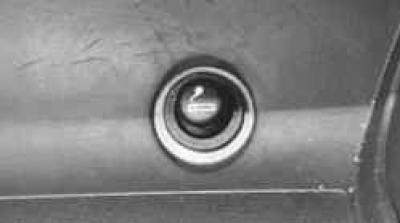
17 - cigarette lighter.

To use the cigarette lighter, press the button on its movable part (the key is in the ignition switch in position "I" or "II"). After heating the spiral for 10–20 s, the movable part will automatically return to its original position with a click.
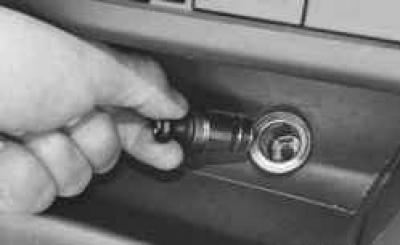
After that, remove the cigarette lighter for use.
WARNING: The cigarette lighter can be turned on again after 20 seconds at the earliest.
WARNING: Do not forcefully press the cigarette lighter.
WARNING: Do not use the cigarette lighter cartridge to connect powerful electrical appliances (electric coffee maker, etc.) - this may damage the vehicle's electrical equipment.
WARNING: If the cigarette lighter button does not return to its original position after 30 seconds after switching on, remove the cigarette lighter from the cartridge to prevent the coil from burning out.
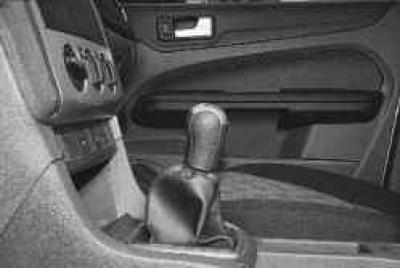
18 - gearbox control lever ().
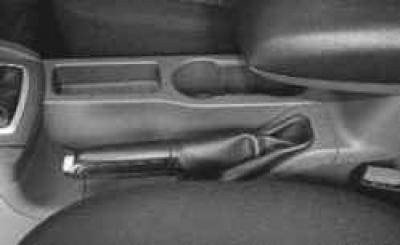
19 - parking brake lever.
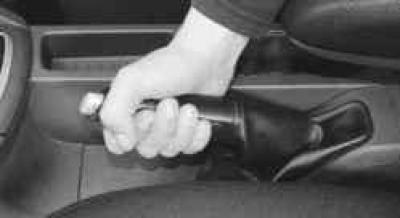
In order to slow down the car with a parking brake, lift the lever all the way up - the control lamp in the instrument cluster will light up in red.
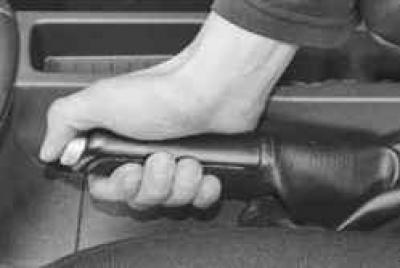
In order to brake the car, pull the lever up a little, press the button at the end of the lever handle and lower the lever all the way down - the control lamp should go out.

20 – the switch of an electric heating of a windshield. When the button is pressed (the engine must be running), the heating of the windshield and washer jets is turned on, at the same time the control lamp in the button lights up. Pressing the button again turns off the heating. Also, the electric heating switches off automatically after a short period of time.
21 - ESP dynamic stabilization system switch(if available).
22 - accelerator pedal.
23 - brake pedal.
24 - clutch pedal.
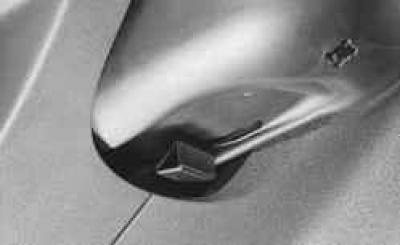
25 - steering column lock lever ().
26 - shelf for small items.

27 - button for emergency shutdown of fuel supply(on vehicles with petrol engines).
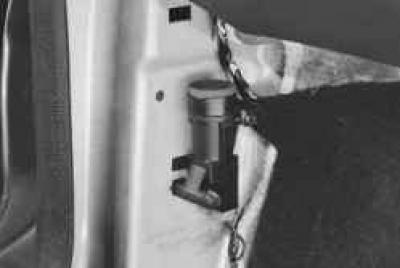
NOTE: This is what the emergency fuel shutoff button looks like (body side trim removed for clarity).
The location of the controls is shown in fig. 1.7. For ease of use, the handles, buttons and instrumentation located on the instrument panel and other additional control panels are marked with functional symbols.Dashboard
The instrument panel contains the following controls and instrumentation (see Fig. 1.7).
Turn the knob to select one of the following positions:
- outdoor lighting is off;  - side lighting is on;
NOTE
When the side lighting is turned on, the control lamp 3 lights up in the instrument cluster (see Fig. 1.8).
 - low / high beam headlights are on;
NOTE
When the high beam headlights are turned on, the control lamp 13 lights up in the instrument cluster (see Fig. 1.8).
AUTO- automatic mode of turning on the dipped beam of headlights depending on the illumination (on vehicles equipped with an automatic dipped beam system);
NOTE
For the automatic dipped beam mode to work, the ignition must be on (the key in the ignition switch must be in position "II"). In AUTO mode, high beams can only be switched on if the system has switched on the low beams.
In AUTO mode, the fog lights and taillight do not turn on. To turn them on, turn the switch handle to the position .
P - parking lights are on. To enable this mode, press the switch handle and turn it counterclockwise.
To turn on the rear fog light, turn the switch knob to the position and pull it out one position.
NOTE
When the rear fog lamp is turned on, the control lamp 17 lights up in the instrument cluster (see Fig. 1.8).
To turn on the fog lights, turn the switch knob to the position and pull it out two positions.
NOTE
When the fog lights are turned on, the control lamp 26 lights up in the instrument cluster (see Fig. 1.8).
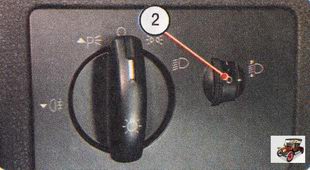
By turning the knob, depending on the load of the car, the angle of inclination of the headlight beam is changed in such a way as to prevent dazzling of oncoming drivers. The combination of the mark on the regulator knob and the number on the dial ensures the appropriate adjustment of the position of the headlights for the following vehicle loading options:
0 - one driver or driver and passenger in the front seat;
1 - all places are occupied;
2 - one driver and cargo in the trunk;
3 - all seats are occupied and cargo is in the trunk;
4 - all places are occupied, the cargo is in the trunk, the car is operated with a trailer.
NOTE
When operating a vehicle with a trailer, it may be necessary to move the electrocorrector control one more position (for example, instead of position 2, set position 3).
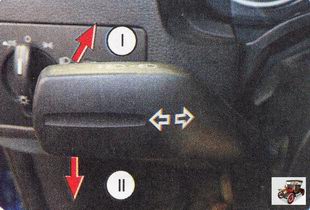
The switch lever can take the following positions:
I - right turn indicators are on (fixed position);
II - left turn indicators are on (fixed position).
When the lever is moved to position "I" or "II" in the instrument cluster, the control lamp 10 or 6 lights up with a flashing light (see Fig. 1.8). When the steering wheel is returned to the straight-ahead position, the lever automatically returns to its original position. When changing lanes, to turn on the direction indicator, it is enough to press the lever in the direction of position "I" or "II" only until a moment of tangible resistance, without fixing the lever, and release it. The direction indicators in this case will flash three times.
To switch between high and low beam headlights (the switch knob 1 for external lighting, shown in Fig. 1.7, must be in the position ) move the switch lever to the steering wheel two positions and release.
NOTE
To signal the high beam headlights, move the switch lever one position to the steering wheel (the handle of the switch 1 for external lighting, shown in Fig. 1.7, must be in the position ) and release.
NOTE
When you turn on the high beam in the instrument cluster, the control lamp 13 lights up (see Fig. 1.8).
If, with the ignition off, move the switch lever one position to the steering wheel and release it, the headlights off delay function is activated: the dipped beam will turn on, which will turn off 30 minutes after the last door is closed. To turn off the headlights, move the switch lever one position toward the steering wheel and release it again.
NOTE
If the ignition switch (lock) is in the "0" or "I" position, with the outdoor lighting on, when the driver's door is opened, a buzzer will turn on, reminding you to turn off the lighting.
Depending on the equipment, the lever may also have a SET/RESET button and a MENU switch. Turning the MENU switch selects the desired on-board computer menu screens or settings, and the SET/RESET button is used to enter submenus or adjust settings.

Designed to direct the flow of air from the heater, air conditioner or ventilation system. The direction of the air flow is changed by moving the handle A installed in the center of the nozzle, right-left or up-down. A handle is installed under the grate b to adjust the amount of air. supplied through the nozzle. When the handle is turned all the way to the left, the damper closes completely, blocking the air flow. When the handle is turned all the way to the right, the damper opens completely (maximum air flow).
5 - steering wheel.
6 - key for turning on the sound signal. To give a sound signal, press the button to turn it on.
Menu 1.Operating manual 2.Engine 3.Clutch 4.Gearbox 5.Front drive 6.Front suspension 7.Rear suspension 8.Steering 9.Brake system 10.Electrical equipment 11.Body 12.Heating, ventilation and air conditioning 13 .Applications Forum Technical help "FORD"
LOCATION OF CONTROLS
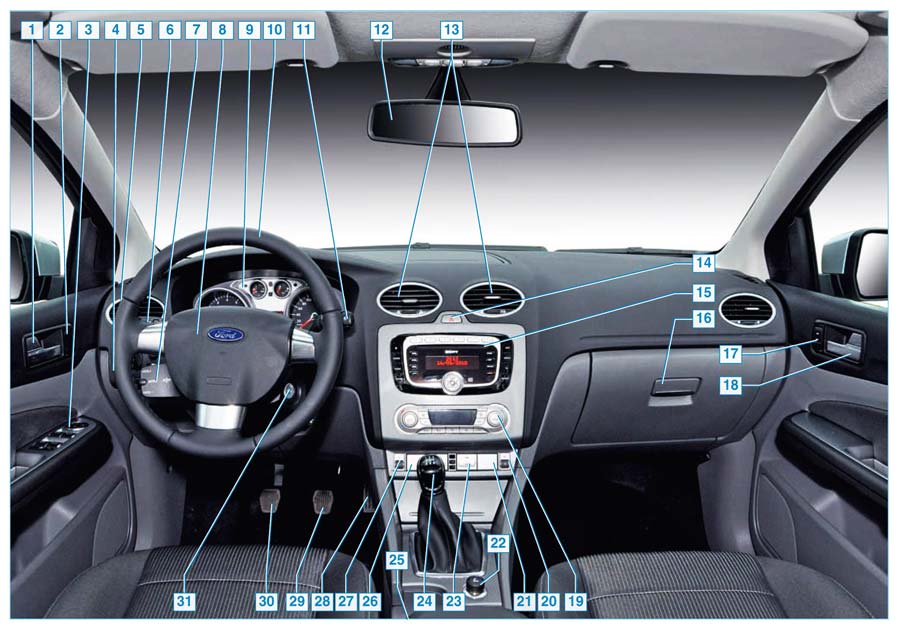
Vehicle controls with manual transmission:
1 — the inner handle of the driver's door with the central lock control lever; 2 - stub; 3 - control unit for power windows of doors and exterior mirrors; 4 - lighting control unit; 5 - side deflector of the heating, ventilation and air conditioning system; 6 - left steering column switch; 7 — the control console of the head unit of sound reproduction; 8 — the switch of a sound signal; 9 — a combination of devices; 10 - steering wheel; 11 - right steering column switch; 12 - rearview mirror; 13 — central deflectors of the heating, ventilation and air conditioning system; 14 - alarm switch; 15 - head unit sound reproduction / navigation system; 16 — glove box handle; 17 - power window switch button for the front passenger door; 18 — the internal handle of a door of the forward passenger with the lever of management of the central lock; 19 — climate control unit; 20 — the switch of heating of a seat of the forward passenger; 21 - stub; 22 — cigarette lighter; 23 - rear window heating switch (tailgate glass); 24 - gear shift lever; 25 - parking brake lever; 26 — the switch of heating of a windshield; 27 - driver's seat heating switch; 28 - gas pedal"; 29 - brake pedal; 30 - clutch pedal; 31 - ignition switch.
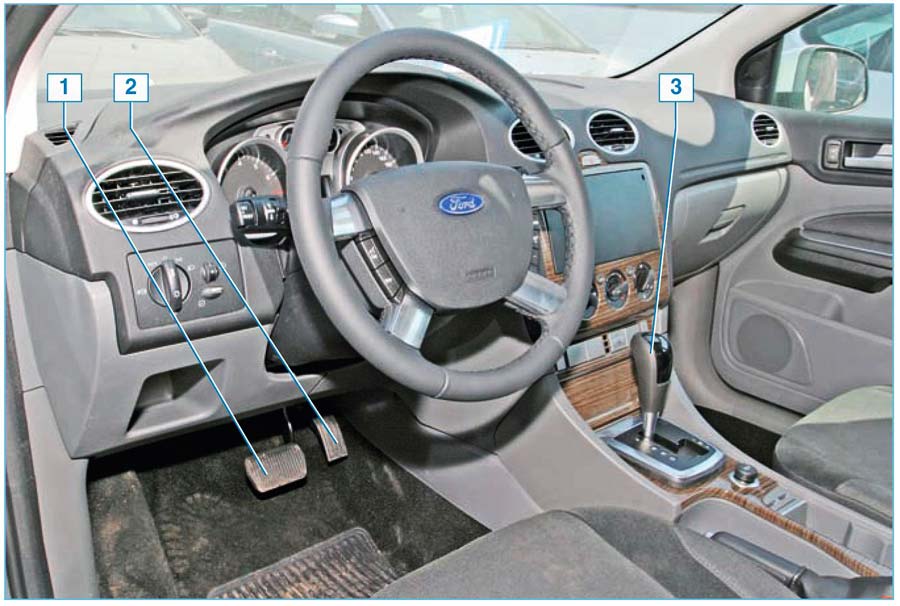
Vehicle controls with automatic transmission:
1 - brake pedal; 2 - gas pedal"; 3 - gear selector
CAR KEYS, IMMOBILIZER AND ELECTRICAL PACKAGE REMOTE CONTROL SYSTEM
The car comes with a set of two keys.
Each of the keys is used to turn on the ignition and start the engine, as well as to open the locks of the front doors, hood, trunk lid (tailgate).
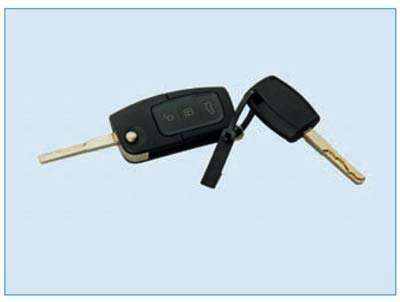
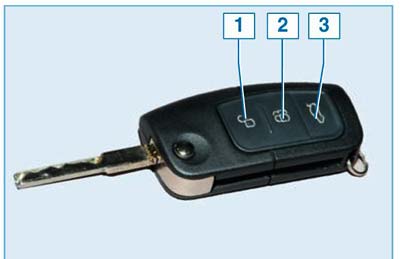
Key with remote control and retractable shaft: 1 - button to turn off the door locks and the alarm system; 2 - button for turning on the door locks and burglar alarm; 3 - button for opening the lock of the trunk lid (tailgate)
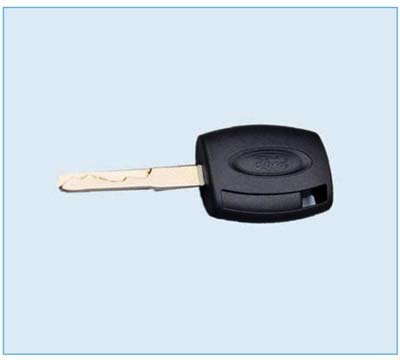 Key without remote control
The key with a remote control combines the functions of an ignition key, a remote control for an electric package, a working immobilizer key and is designed for everyday use.
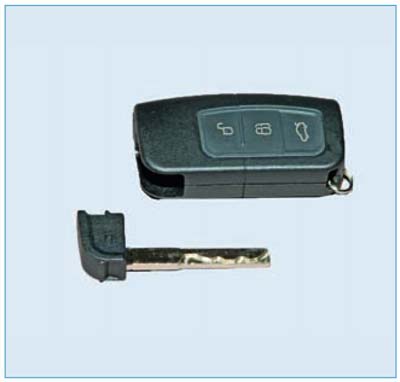 Key with remote control and removable shaft (passive key)
If the car is equipped with the Key Free system - control the locks without using a key or remote control ( see below "Central locking, doors and trunk lid"), a so-called passive key is attached to it.
A chip is built into the plastic case of each key, the code of which is stored in the memory of the immobilizer electronic unit, designed to block unauthorized engine start. The immobilizer is deactivated automatically after the ignition is turned on with a correctly programmed key. At the same time, the indicator in the instrument cluster lights up for three seconds. If the indicator does not go out or flashes, this means that the ignition key is not recognized by the immobilizer. In this case, we take out the key from the lock and, having inserted it again, we repeat the attempt to start the engine.
The electrical package remote control system is used for:
— remote (from the key panel) blocking (unblocking) locks of all doors with simultaneous arming (disarming) of the vehicle security mode;
— remote unlocking of the trunk lid lock;
- activation of the alarm mode in case of violations of the vehicle security zones;
- turn off the alarm mode remotely or when the ignition is turned on.
Activation of the security mode with blocking of door locks is carried out by pressing button 2 (see photo above) once on the remote control.
Disabling the security mode with unlocking the door locks is carried out by pressing button 1 on the remote control once. The trunk lid is opened by pressing button 3 on the remote control.
If the range of the key with the remote control has significantly decreased or the remote control has stopped working, it is necessary to replace the battery. The key contains a CR 2032 element with a voltage of 3 V.
To replace the battery, insert a screwdriver blade into the slot between the remote control and the plastic base of the key...
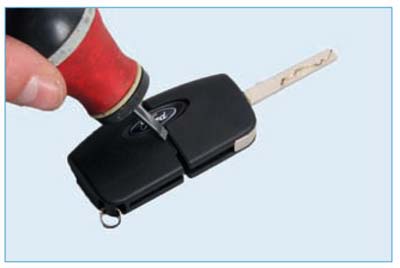
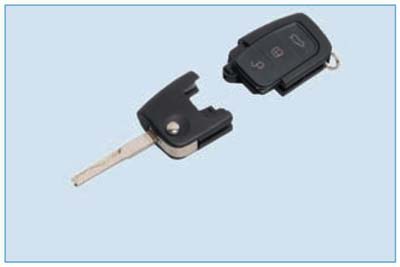
... and move the remote control from the base of the key.
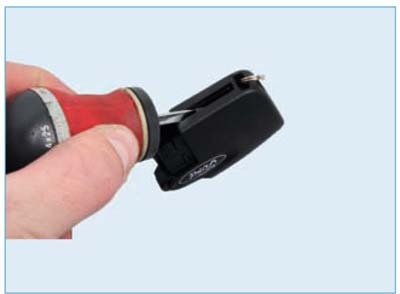
We insert a screwdriver into the slot formed by two parts of the remote control and turn it around its axis, pushing the halves apart.
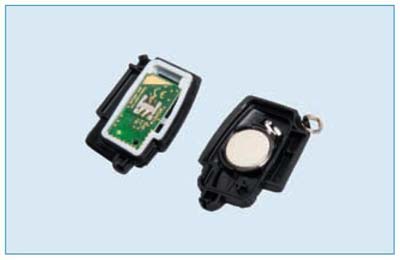
The remote control consists of two parts
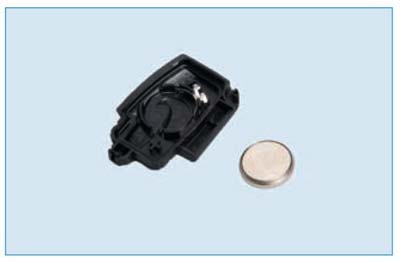
Remove the battery from the case and replace with a new one. CR 2032 observing the polarity.
INSTRUMENT COMBINATION
With the help of control lamps and signaling devices, the driver receives important information about the operational parameters of the car, its systems and assemblies and the resulting violations of their normal operation.
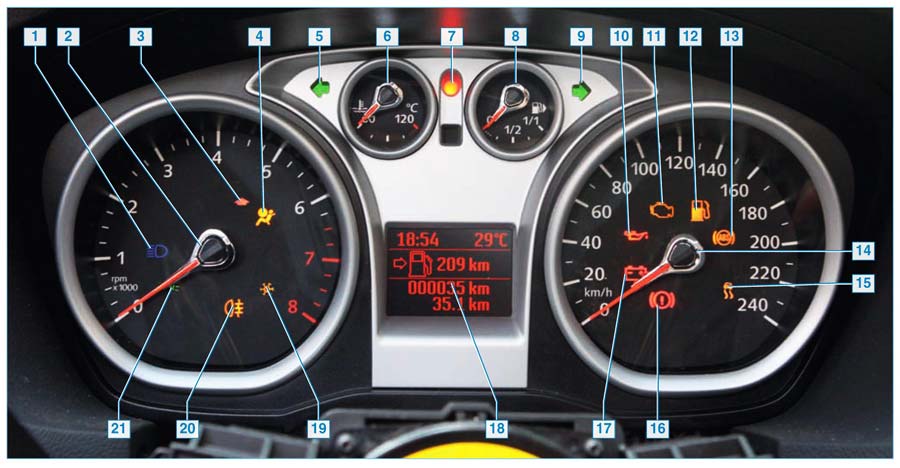
All instruments, warning lamps and signaling devices are built into the instrument cluster.
1 - signaling device for switching on the high beam headlights. The indicator lights up blue when the high beam headlights are turned on; 2 - tachometer (speed indicator of the crankshaft); 3 - the signaling device for reaching the maximum engine speed lights up in red when the maximum speed of the engine crankshaft is reached; 4 — a signaling device of malfunction of pillows of safety. The indicator lights up red when the ignition is switched on and goes out after a few seconds. If the indicator lights up while the car is moving, then there is a malfunction in the system; 5 - the signaling device of the left turn indicators lights up with a flashing green light when the left turn indicators are turned on and when the alarm is turned on; 6 - engine coolant temperature gauge. If the pointer arrow approaches 120 ° C, this means that the engine is overheating. Do not allow the engine to run in overheating mode; 7 - the immobilizer status indicator lights up red. The flashing of the signaling device confirms the operation of the system. The immobilizer is deactivated automatically after the ignition is switched on with a correctly coded key. At the same time, in the instrument cluster, for about three seconds, the signal indicator lights up in red. If the signaling device lights up or flashes for one minute, and then turns on at different time intervals, then the key is not recognized by the system; 8 - fuel level indicator in the fuel tank; 9 - the right turn indicator signaling device lights up with a flashing green light when the right turn indicators are turned on and when the alarm is turned on; 10 - a signaling device for insufficient (emergency) oil pressure in the engine. Lights up red when the ignition is switched on and goes out after the engine is started. Illumination of the signaling device during engine operation indicates insufficient pressure in the engine lubrication system; 11 - a signaling device for a malfunction of the engine management system. Lights up in orange when the ignition is turned on. In the absence of malfunctions, it goes out within 3-5 seconds after starting the engine. If the indicator flashes while the vehicle is moving, this indicates a malfunction in the engine management system. The engine will continue to run, but with less power, higher fuel consumption and increased toxicity of exhaust gases; 12 - the low fuel level indicator in the tank lights up in orange when it is necessary to refuel the car with fuel; 13 - the anti-lock braking system (ABS) malfunction indicator lights up in orange when the ignition is turned on and then goes out. If the indicator lights up while the vehicle is moving, there is a malfunction in the system. In this case, braking will occur as on a car not equipped with ABS; 14 - speedometer (vehicle speed indicator); 15 - signaling device of the dynamic stabilization system (ESP). If the indicator flashes, then the system is working. If the indicator does not flash or stays on while the vehicle is moving, this indicates a malfunction in the system. When the system is deactivated by the driver, the indicator lights up permanently orange; 16 - signaling device for applying the parking brake and insufficient fluid level in the reservoir of hydraulic brakes and clutch. The indicator lights up red when the ignition is switched on and, in the absence of malfunctions, goes out after the engine is started (if the parking brake is off). Illumination of the signaling device with the engine running indicates a decrease in the level of the working fluid in the reservoir of hydraulic drives below the MIN mark; 17 - signaling device for lack of battery charge. Lights up red when the ignition is switched on and goes out after the engine is started. Illumination of the signaling device during engine operation indicates insufficient tension or a break in the auxiliary drive belt, a generator malfunction; 18 - information display. On the display, with the ignition on, you can see information about the current time, outside temperature, range (approximate distance that can be driven on the remaining fuel), total mileage and vehicle mileage for the last trip; 19 - road pavement icing danger signaling device; 20 - a signaling device for turning on the rear fog lights (lantern). The signaling device lights up in yellow when the rear fog lights (lantern) are turned on; 21 — signaling device for switching on external lighting. The indicator lights up green when the outdoor lighting is turned on.
IGNITION SWITCH
The ignition switch is located on the steering column on the right side.
It is equipped with an anti-theft device that locks the steering shaft when the ignition key is removed from the lock.
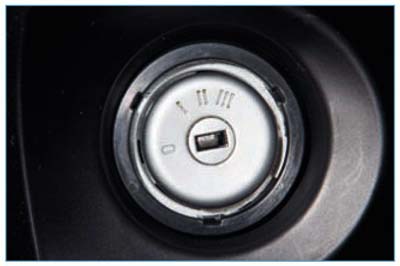
The key in the ignition switch can occupy one of four positions.
The key can only be removed from the lock in the " ABOUT” by turning it counterclockwise until it stops. With the key removed, the steering lock is engaged.
In order to unlock the shaft, insert the key into the lock and, slightly rocking the steering wheel to the right and left, turn the key to the position I.
Key positions in the ignition lock:ABOUT- a position when you can turn on the side lights, alarm, horn, cigarette lighter, interior and trunk lighting, turn on the low beam by briefly moving the left steering column switch towards you. With the key removed, the steering shaft lock is on; it is possible to turn on the head unit and listen to it for 1 hour, then the system will automatically turn it off. To continue listening, you will need to turn on the device again. I- the position when you can turn on the alarm, horn, cigarette lighter, interior and trunk lighting. The key cannot be removed - the anti-theft device is disabled. II- the ignition is on. All electrical circuits are energized. Signaling devices and control lamps in a combination of devices light up. III- Ignition and starter included. The key in this position is not fixed, it must be held against the force of the spring. After starting the engine, release the ignition key and it will automatically return to the II.
Do not leave the ignition key in position I or II for a long time, and, if possible, do not use the car's electrical appliances when the engine is not running. This may lead to battery discharge.
STEERING SWITCHES
Left stalk switch turns on the direction indicators and controls the headlights, it also has a multi-function switch.
 Left stalk combined with multifunction switch
To turn on the high beam headlights, move the lever of the left stalk switch towards you as far as it will go, while the external lighting control knob should be in position 3 (dipped headlights on), and the ignition key in position III.
To switch from high beam to low beam, move the switch towards you again.
To briefly turn on the high beam of the headlights (signaling the high beam), move the lever slightly towards you.
At night, for a safe approach to the house after the end of the trip in the car, it is possible to delay turning off the high beam headlights after leaving the car. To do this, after turning off the ignition, pull the left stalk to the stop. The high beam headlights will automatically turn off after three minutes if one of the doors is open and 30 seconds after the last door is closed.
To turn on the direction indicators, move the lever up or down (with the ignition on). The first position is not fixed, and when the lever is released, it will return to its original position, the second is fixed. In the upper position of the lever, the right turn signal is turned on, in the lower position - the left one.
When the steering wheel is returned to the neutral position, the stalk switch will automatically return to its original position.
controls the operation of the wipers and washers for the windshield and tailgate glass. Windshield wipers and washers only operate when the ignition is on.
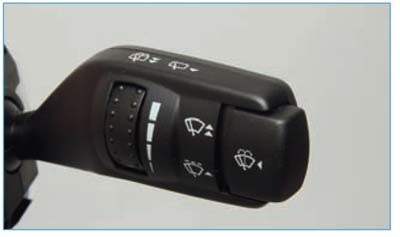
Right stalk switch
The windshield wiper has two brush speeds and an intermittent or automatic mode.
To turn on the cleaner in the single cleaning mode, press the lever down. The lever is not fixed in this position. The cleaner will continue to operate while holding the lever down.
To enable intermittent or automatic operation of the cleaner, move the lever one position up.
When the lever is moved to this position, the brushes will make one movement, regardless of whether the windshield is dry or wet.
Use automatic mode only in wet weather. The rain sensor system is very sensitive to dirt particles, mist droplets, which are in the area of the rain sensor, and this can cause the sensor to trip even in dry weather.
There are six preset rain sensor sensitivity settings. The sensitivity of the rain sensor is changed by turning the ring on the steering column switch. When the ring is turned up, the sensor will work with low sensitivity (the purifier will start working with a large amount of water). When the ring is turned down, the sensor works with high sensitivity (the purifier will start working with a small amount of water).
Some vehicles that are not equipped with a rain sensor have a system that changes the speed of the wiper depending on the speed of the vehicle.
To turn on the low speed mode of the cleaner, move the lever from its original position two positions up. To turn on the high-speed mode of the cleaner, move the lever from its original position three positions up.
To turn on the windshield washer, press the button at the end of the lever. Simultaneously with the washer, the cleaner is turned on, the brushes of which perform three working cycles, then after a pause, another cycle. The washer can be turned on at any position of the cleaner.
On cars with hatchback and station wagon bodies, to turn on the tailgate cleaner, move the lever towards you to a fixed position. To turn on the washer, we additionally move the lever towards ourselves, while the cleaner brush works while the lever is held.
The tailgate wiper turns on automatically when reverse gear is engaged if the windshield wiper is on.
Using the multi-function switch located on the left-hand stalk, you can get information about instantaneous fuel consumption, average fuel consumption (per 100 km), average vehicle speed displayed on the instrument cluster display. You can also receive information about the technical condition of the car and reprogram its various systems.
The MENU switch is used to select the parameter to be adjusted, with which you can scroll through the menu windows that appear on the display. Having found the desired window, press the SET / RESET button. In the submenu, using the MENU switch, we find the desired setting and press the SET / RESET button, the setting will be saved in memory, etc. By entering the “Main Menu”, you can change the car settings. This can only be done while the vehicle is stationary. If this menu or any submenu is open, the system will automatically exit this menu when the vehicle starts moving. In the "Main Menu" you can change the setting of the electro-hydraulic power steering, turn on the ESP system, set the clock, program the preheater, turn off unnecessary warning sounds.
LIGHTING CONTROL UNIT, HEADLIGHT BEAM DIRECTIONAL
On vehicles with gas-discharge (xenon) dipped-beam headlights, there is no headlight beam direction control, since the adjustment is automatic.
The outdoor lighting control unit is located on the instrument panel on the left.
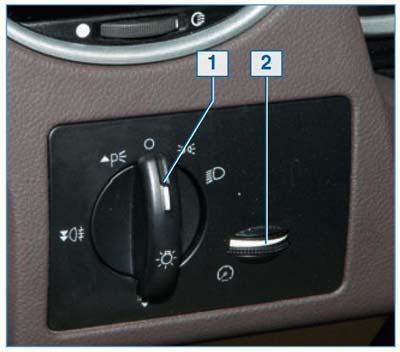
External lighting control unit on a car with xenon headlights:
1 - outdoor lighting control knob; 2 - instrument cluster backlight brightness control

Positions of the outdoor lighting control handle
Position 1- the lighting is off. Position 2- side light, license plate light and instrument panel lights are on (ignition key is in position I or II). Position 3- the dipped headlights are on (the ignition key is in the II). When the handle is pulled out one position, the fog lights and the corresponding indicator in the instrument cluster come on. When the handle is pulled out to the second position, the fog lamps and rear fog lamps (lantern), as well as signaling devices in the instrument cluster, light up. Statement 4- the automatic lighting control mode is on (if the car has an automatic headlight switch-on system). The headlights turn on automatically as soon as it gets dark, whether it's dusk or entering a tunnel. When automatic driving lights are active, if the system has turned on the headlights, the driver can only turn on the high beams and cannot use the front and rear fog lights. Regulation 5- parking lights are on. Ignition off. Turns on when the handle is pulled down. The mode is used to designate a car on the road or in a parking lot at night. When the parking lights are on, power consumption is minimal, since only the parking lights are on and the license plate and instrument panel lights are not on.
On vehicles with halogen lamps for low and high beam headlights, a headlight beam direction control is installed on the unit
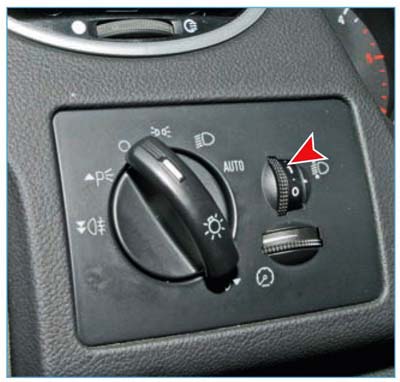
Alignment of the label with the numbers ensures the appropriate adjustment of the headlight beams for the following vehicle loading options:
0 - one driver or driver and passenger in the front seat with an empty trunk; 1 - driver and four passengers with an empty trunk; 2 - driver with four passengers and cargo in the trunk; 3 - one driver and cargo in the trunk.
HEATING, VENTILATION AND AIR CONDITIONING CONTROL UNIT
A car, regardless of body type, can be equipped with a heating, ventilation and air conditioning system with manual activation of the air conditioner and automatic control of the air temperature in the cabin (climate control system). Control of any of the heating, ventilation and air conditioning systems is possible only when the engine is running. It is not recommended to use the system devices with the ignition on and the engine off, as this can lead to battery discharge.
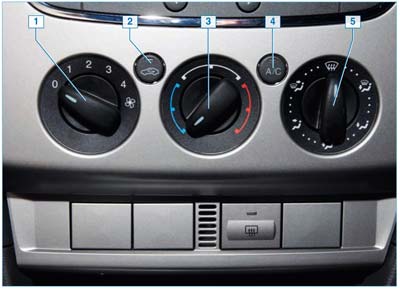 Heating, ventilation and air conditioning control unit (on vehicles with manual air conditioning):
1 — the switch of modes of operation of the fan of a heater; 2 - air recirculation mode switch button; 3 - air temperature controller; 4 — the button of the switch of the conditioner; 5 — regulator of distribution of streams of air.
The intensity of the air supply to the passenger compartment is regulated by turning the handle of the heater fan operating mode switch. This turns on one of the four fan speeds. Turning the switch knob clockwise increases the fan speed of the heater.
The flow distribution regulator sets the following air flow directions in the passenger compartment:
- in the area of the head. The air flow through the deflectors in the instrument panel enters the upper part of the vehicle interior.
- in the area of \u200b\u200bthe location of the head and on blowing the windshield and windows of the front doors. The air flow through the deflectors in the instrument panel enters the upper part of the passenger compartment and to the grilles for blowing the windshield and front door windows.
- in the area of \u200b\u200bthe legs and on blowing the windshield and windows of the front doors. The air flow enters the footwell area, as well as to the windshield and front door windows.
- in the leg area. The air flow enters only the leg area.
- in the area of \u200b\u200bthe location of the legs and head. The air flow enters through the deflectors into the upper part of the car interior and into the footwell area.
By turning the handle of the air temperature regulator, we change the temperature of the air entering the passenger compartment.
To increase the air temperature, turn the knob to the right, to the red sector of the scale, and to decrease the air temperature, to the left, to the blue sector.
To turn on the air recirculation mode, press the switch button 2. To turn it off, press the button again. The air recirculation mode (stopping the supply of outside air to the passenger compartment) is recommended to be used when it is necessary to quickly reduce or increase the air temperature in the passenger compartment, as well as when driving in dusty areas or in heavy traffic, in order to avoid dust, exhaust gases and unpleasant odors from entering the passenger compartment.
It is not recommended to use the recirculation mode for a long time, as this can lead to an increase in air humidity in the cabin and fogging of the windows.
Outside air can enter the car interior through the central and side deflectors of the heating, ventilation and air conditioning system.
The cabin air filter prevents harmful airborne particles such as pollen, industrial emissions and road dust from entering the vehicle interior.
The flow of air entering the cabin can be adjusted.

Deflector of the heating and ventilation system:
1 - a disk for adjusting the degree of opening of the deflector; 2 - lever for changing the direction of air flow
When turning the dial 1
to the extreme left position - the damper of the deflector is closed and no air enters through this deflector, and to the extreme right - it is completely open.
By moving the lever 2
left-right or up-down, change the direction of air flow.
To turn on the air conditioner, press the button 4
switch (see above) with the engine running and the heater fan on. The indicator in the button lights up.
Press the button again to turn off the air conditioner. The air conditioner is switched off when the heater fan is turned off.
The air conditioning system only works if the outside temperature is above 4 °C. On long hills or in heavy urban traffic, the operation of the air conditioner can cause the engine to overheat. Therefore, if the temperature of the coolant has exceeded the permissible value, the air conditioner should be turned off.
If the car is parked in direct sunlight, open the windows and ventilate the interior before turning on the air conditioner.
To avoid misting up the windows in rainy weather, turn on the air conditioner and set the air distribution control to the position, while it is recommended to set the air temperature control at the border of the blue and white zones.
After the car has been parked for a long time in hot weather in the sun, when turning on the air conditioner, do not direct the flow of cold air to the windshield to avoid cracking.
If there is no need to turn on the air conditioner, then it must be turned on monthly for several minutes, and even in the winter period of operation. This helps retain lubricant on compressor parts and seals, which extends the life of the A/C system.
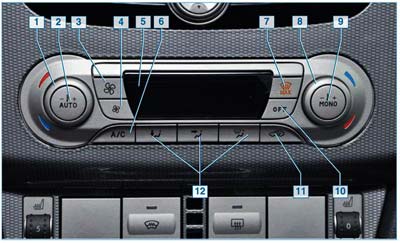
Climate control system control unit:
1 - air temperature controller set in the driver's area; 2 — the button of inclusion of an automatic mode; 3 — button to increase the fan speed; 4 — button to reduce the fan speed; 5 — information display; 6 — button to turn off the air conditioner; 7 - button for turning on the mode of removing frost / moisture from the windshield; 8 - air temperature controller set in the passenger area of the front seat; 9 - button for turning on the "MONO" mode; 10 — climate control off button; 11 - button for turning on the air recirculation mode; 12 — buttons for the distribution of air flows in the cabin
In the car, depending on the configuration, a dual-zone climate control system can be installed, which automatically controls the temperature, quantity and distribution of air flows and regulates them depending on the conditions set by the driver, as well as weather conditions. Pressing the AUTO button once turns on the automatic mode. To turn off the automatic climate control system, press the OFF button, which turns on the air recirculation mode.
Switching from single-zone to dual-zone climate control is done by pressing the MONO button.
When the system is in mono mode, all temperature zones are linked to the driver zone. After turning off the mono mode, the dual-zone system allows you to set different interior temperatures in the driver and passenger zones of the front seat.
The rotary controls allow you to set the temperature between 16°C and 28°C in 0.5°C increments. In the LO position (below 16 °C) the system switches to continuous cooling mode, and in the HI position (above 28 °C) it switches to continuous heating mode; in both cases, a constant temperature will not be maintained.
When the "mono" mode is activated, the temperature in the zones of the driver and passenger of the front seat will be maintained the same and it can be set with the rotary control on the driver's side. In the "mono" mode, the corresponding inscription will appear on the display. When the "mono" mode is off, the inscription on the display will disappear. In this case, it is possible to regulate the temperature in the driver and passenger areas independently of each other. The display will show the temperatures set for each zone individually.
You can set temperatures for each zone with a difference of no more than 4 °C. To return to the "mono" mode, press the MONO button, and the air temperature in the passenger area will be set to the same as in the driver's area.
The solar radiation intensity sensor is located at the top of the instrument panel. Do not cover the sensor with any objects.
There are two buttons on the unit to adjust the fan speed. Pressing the top button increases the speed, pressing the bottom button decreases it.
Fan settings are shown on the display as dashes. To return to auto mode, press the AUTO button.
The distribution of air flows in the cabin is carried out by three buttons.
- in the leg area. Airflow only enters the leg area
- in the area of the head. The air flow through the deflectors in the instrument panel enters the upper part of the car
- for blowing the windshield and front door windows. The airflow is directed only to the windshield and front door windshields.
A button is used to remove frost / moisture from the windshield 7
. When this button is pressed, the air conditioner will automatically turn on. In this case, the fan speed and interior temperature are automatically controlled and these parameters cannot be changed manually. The maximum fan speed and maximum air temperature are set, and the window heating is switched on for a short time. In this mode, the air distribution buttons will turn off and the air recirculation mode cannot be turned on.
To return to auto mode, press the AUTO button. Turning the air conditioner on and off is done by pressing the A/C button.
When the air conditioner is on, A/C ON will appear on the display, when it is off, A/C OFF.
Button 11
is used to select the mode of supplying outside air to the vehicle interior and recirculating air when the supply of outside air to the passenger compartment is stopped. The air recirculation mode is recommended when driving in dusty areas or in heavy traffic to avoid dust or exhaust gases entering the passenger compartment.
ELECTRIC WINDOWS, EXTERIOR MIRROR CONTROL
The car is equipped with power windows of the front doors, and in the variant, power windows of the rear doors can be installed. The power windows of all doors can be controlled using switches located in the switch box on the armrest of the driver's door.
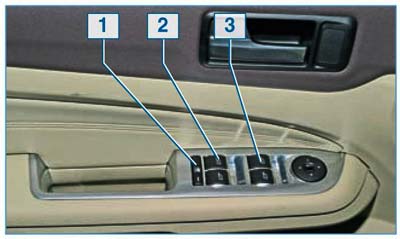
The location of the power window switches in the driver's door armrest panel:
1
— the switch of blocking of electrowindow regulators of back doors; 2
— Switches of electrowindow lifters of back doors; 3
- front door power window switches
The location of the power window switches in the driver's door armrest panel on vehicles that do not have rear power windows
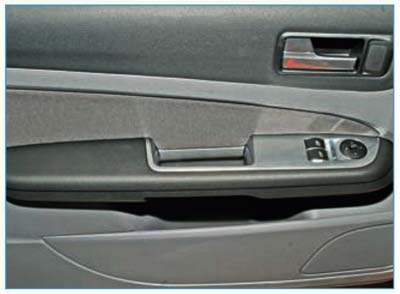
Each passenger door's power window can also be controlled by its own switch.
The passenger door power window switch is located in the trim on the inside door handle.
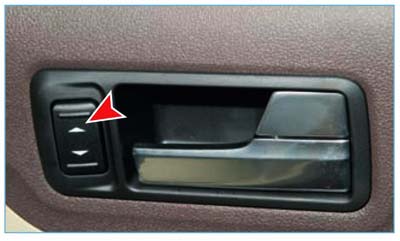
Controlling the power windows of the doors using the switch keys is possible only when the ignition is on (the key in the ignition lock is in the "II").
To lower the glass, press the edge of the corresponding switch key and hold it until the glass reaches the desired position.
In order to raise the glass completely or to a certain height, pry off the switch key and hold it until the glass reaches the desired position.
When using power windows, do not allow items of clothing or body parts to fall into the gap between the glass and the door frame. Do not allow young children to use the power window switches.
To disable the control of the rear power windows from the switch buttons located in the rear doors (for example, when there are children in the back seat), press the rear power window lock button located in the driver's door switch box.
When the lock button is pressed again, the ability to control the power windows of the rear doors from the switches located in these doors is resumed.
The regulator of management of the electric drive of external rear-view mirrors

To adjust the position of the outside rear-view mirrors in the driver's door armrest switch block, a joystick-shaped controller is used. Adjustment of mirrors is carried out by pressing the edges of the joystick. The choice of setting the left or right mirror is carried out by moving the lever in the center of the joystick to the left or right. The mirrors can be adjusted when the ignition key is in the II.
CENTRAL LOCKING, DOOR AND LID LID
The car is equipped with a system of centralized locking (unlocking) of the door and trunk locks - "central locking", which can be controlled using a remote control built into the ignition key.
To lock or unlock the locks of all car doors, press the corresponding button on the remote control once.
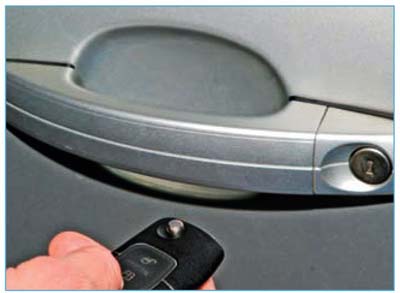
From the driver's seat, you can lock the locks of all doors from inside the car, to do this, press lever 1. To unlock the door locks, pull the inner door handle 2 towards you.
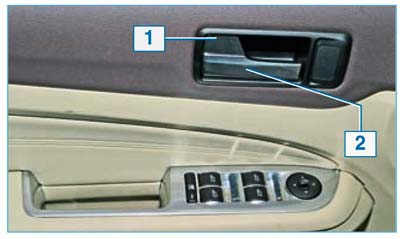
To lock the passenger door lock from inside the car, press lever 1. To unlock the door lock, pull the inner door handle 2 towards you.
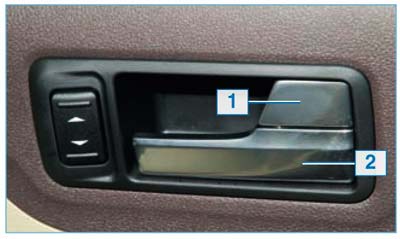
The mechanical key can be used if the battery in the remote control is low.
To lock or unlock the locks of all doors using a mechanical key, insert it into the driver's door lock cylinder and turn it in one direction or another.
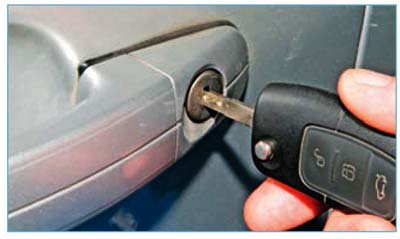
Cars can be equipped with a double locking system, which is an additional measure of protection against theft. To enable dual locking, press the corresponding button on the remote control twice within three seconds, or turn the mechanical key in the door lock twice.
To open the trunk lid or tailgate, press the corresponding button on the remote control twice within three seconds ...

... and open the trunk lid or tailgate by pressing the rubberized button.
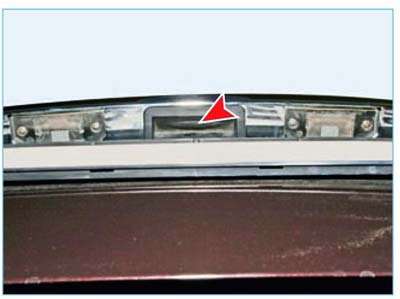

Trunk lid outer handle
For convenient closing of the tailgate (hatchback) in its lower part there are two niches for the fingers.
The rear doors have an additional locking system that can be used when driving with children or in other cases where conventional locking cannot provide sufficient protection against unwanted opening of the doors.
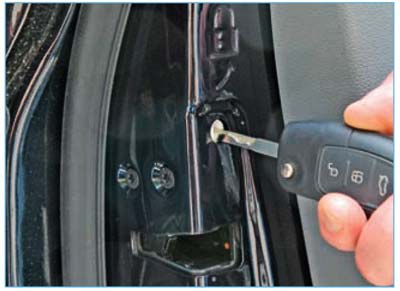
To lock the inner handle of the rear door, insert the key into the slot of the plastic larva and turn it counterclockwise.
When the lock is on, the door can only be opened from outside the vehicle. To disable the lock, turn the key in the opposite direction.
On a Ford Focus car, the Key Free system with a passive key can be used - lock control without using a key or remote control.
With this system, you can lock / unlock the door locks without inserting the key into the lock and without pressing the buttons on the remote control. To unlock the door locks and turn off the security alarm, just pull the handle of the door being opened. In this case, the passive key must be within one of the three zones near the car. These zones cover approximately 1.5-2m around the front door handles and the tailgate/trunk lid lining. If the passive key is near the trunk lid (tailgate), only the trunk lid (tailgate) will be unlocked. The locks of the side doors will remain locked. To lock the side doors and the tailgate, press the outside door handle button and the tailgate button.
If the locks have not been unlocked for more than 5 days, the Key Free system switches to energy saving mode. This is provided to prevent battery discharge. When the system is in this mode, the locks will take longer to unlock than usual. After the first operation to unlock the locks, the system will exit the energy-saving mode.
Do not store the passive key near metal objects or electronic devices such as a mobile phone.
HOOD
To open the hood...
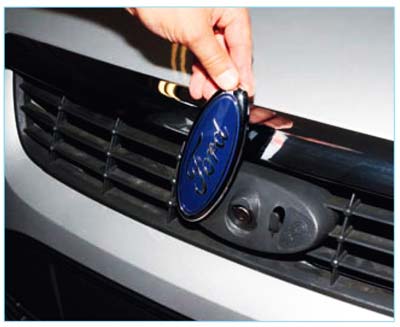
... turn the emblem counterclockwise to access the hood lock cylinder.
We insert the key into the lock cylinder and turn it counterclockwise until the lock is activated.
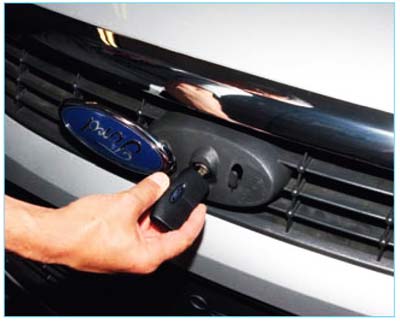
Then turn the key clockwise until it stops and, holding the key in this position, raise the hood.
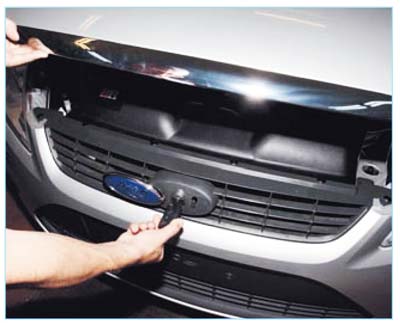
Raising the hood, remove the emphasis from the holder ...

... and insert its hook into the nest of the hood panel.

We take out the key from the lock cylinder and return the emblem to its place.
Before closing the hood, raise it a little and, having removed the stop hook, insert the stop into the holder. Having lowered the hood to a height of 200-300 mm from the radiator lining, release the hood so that it closes under its own weight. Make sure the hood is securely closed.
Before driving, pay attention to the message in the information display of the instrument cluster. If a message is displayed that the hood is not closed, then do not start driving. An unclosed hood may swing open while driving, resulting in an accident.
FUEL FILLER
The car is equipped with the Easyfuel system.
It does not have the classic filler cap, but instead uses a special mechanical device located in the neck, which provides the same tightness and safety as the classic cork. This paddle-type device does not allow the insertion of leaded gasoline or diesel nozzles with other outside diameters, nor can the diesel be filled with gasoline.
The absence of the classic fuel cap will also allow the driver to keep their hands clean when refueling the car.
To refuel the car with fuel, open the fuel tank filler cap until it locks.

A special funnel is attached to the car, for the possibility of filling the tank from a canister.
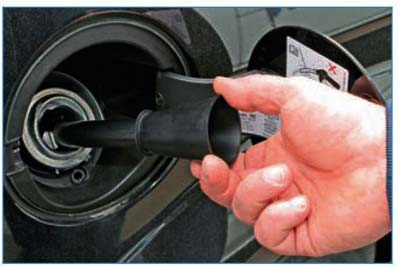
ADJUSTING THE FRONT SEATS, STEERING COLUMN, SEAT BELT
The driver's and front passenger's seats are equipped with mechanisms for adjusting the position in the longitudinal direction, in height, in the tilt of the backrest, as well as adjusting the lumbar support.
To move the driver's seat forward or backward, raise the lever located under the front of the cushion from below, and move the seat in the desired direction.
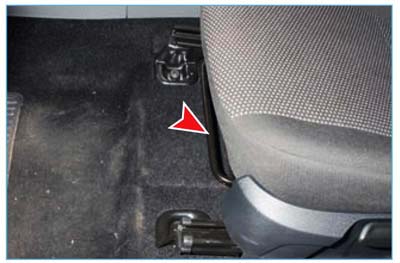
Lever arm 1 front seat height adjustment and handle 2 backrest adjustment.
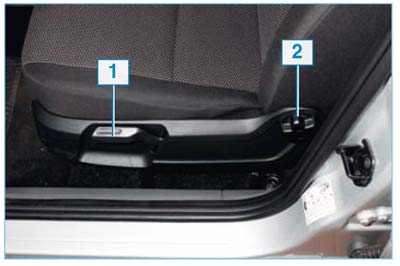
The driver's seat can be equipped with electric height adjustment.
The seat height adjustment switch is located on the left side of the seat cushion. Adjustment can be made both with the ignition on and with the ignition off.
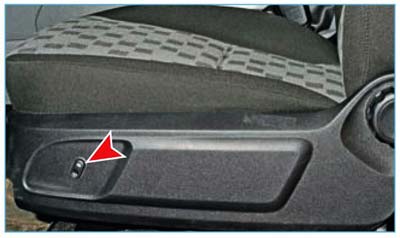
To remove the head restraint or adjust its height…
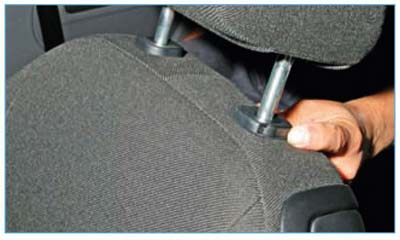
... press the release button and raise or lower the head restraint.
The lumbar support adjustment knob is located on the side of the front seatback.

Do not adjust the driver's seat while driving, which may result in loss of vehicle control.
On a 3-door hatchback, in order to get passengers into the rear seat, the front seatback must be folded down and moved forward. We pull the handle, fold the backrest and move the front seat forward.
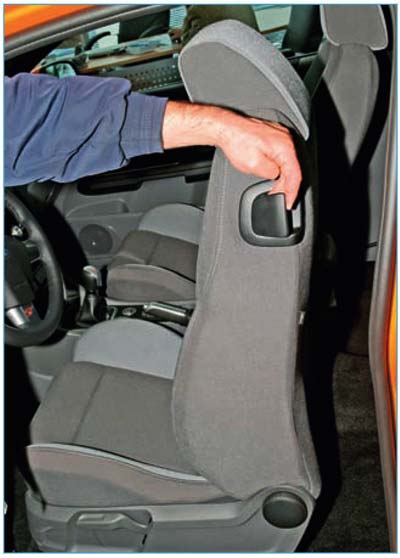
Additional convenience for the driver is the ability to adjust the steering column for reach and tilt. The locking lever of the adjustment mechanism is located in the recess in the lower casing of the steering column.
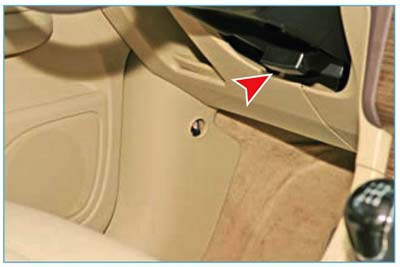
In this (upper) position of the locking lever, the adjustment mechanism is fixed.
To select the optimal position of the steering wheel and steering column, move the locking lever down. In this case, the steering column is able to move up / down and forward / backward.
We set the steering wheel to the desired position and fix the steering column by moving the lever to the upper fixed position.
It is forbidden to start moving with the steering column lock lever released, and also to adjust the position of the steering column while driving. This may result in loss of vehicle control.
Before driving, the driver and passengers must fasten their seat belts.
All seat belts are inertial type.
Fastened seat belts must not sag or twist. The upper branch of the belt should pass through the middle of the shoulder, and the lower branch should fit snugly around the hips.
The driver and front passenger can adjust the upper anchor point of the seat belt. To do this, press the release button and move the upper support of the belt up or down so that the shoulder branch of the belt passes through the middle of the shoulder.
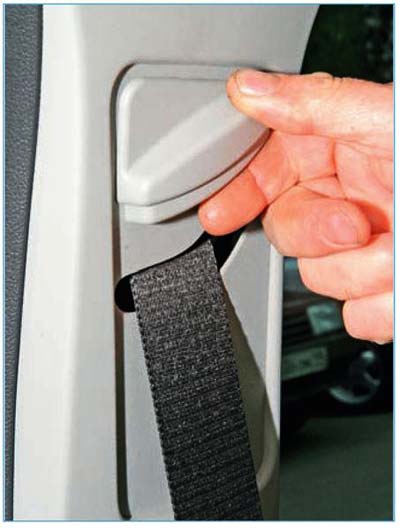
After adjustment, pull the belt to make sure that the upper belt support is securely locked.
If the seat belt is not fastened after the ignition is switched on, the corresponding warning lamp will illuminate in the instrument cluster and a warning buzzer will sound.
The vehicle may be equipped with front seat belt pretensioners, which additionally tighten the seat belts in the event of a severe frontal impact. Pretensioners and seat belts that have deployed in an accident must be replaced. This work must be carried out by specially trained personnel at a service station.
INTERIOR LIGHTS
To illuminate the interior of the car in the upholstery of the ceiling, the front and, on the part of the cars, the rear lampshades are installed. Depending on the configuration of the car, the front ceiling lamps are of two types - with or without directional light lamps.
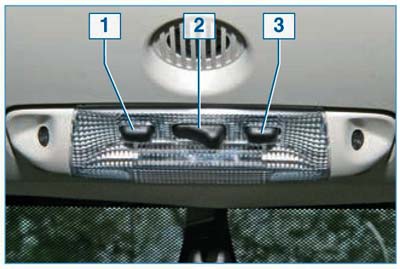
Front dome light with spotlights
When buttons 1 and 3 are pressed, the directional lights for the driver and passenger light up.
The central switch 2 of the ceiling has three positions. If the switch key is moved to the extreme left position, the ceiling lamp will not light up. In the middle position, the ceiling lamp lights up when the doors are opened and goes out a few seconds after they are closed. If the door is left open when the ignition is on, then the lamp will go out after a while to avoid discharging the battery. To turn it on, you need to turn on the ignition for a short time. If you set the switch to the extreme right position, then when the ignition is off, the lamp will light up. It will turn off after a while to prevent battery drain.
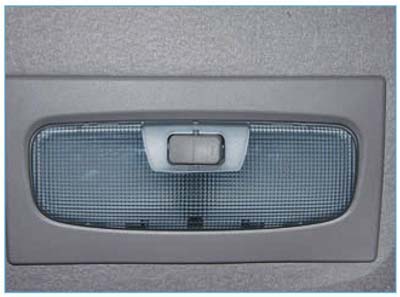 Front dome light without spotlights
 Rear dome light