In a vaz 2109 car, replacing the rear brake cylinder Is a rather difficult task. Before that, you need to know what it consists of.
The braking system in any car consists of many elements. We will find out what the rear brake cylinder of the VAZ 2109 consists of and how it is replaced.
Rear cylinder design
Repeat until only liquid without bubbles seeps into the pipe, you do not want air in the system. Thanks for reading, I hope these notes are helpful. When we mention brake repair, we usually think of replacing brake pads, but much more can be involved in brake work... The brake pad pressed against the brake drum causes the car to stop, but the pressure comes from the cylinder of the hydraulic wheel, which is expanded by the brake fluid, which is pumped through a series of metal lines and finally a rubber line.
In turn, the cylinder consists of:
- ... A special sensor regulates the liquid level;
Note: The brake fluid reservoir does not have to be installed on the actual cylinder.
It can be installed in another place, if it is more convenient. It is important that it is connected to the cylinder cavity by means of tubes.The fluid starts its flow on the master cylinder, which is just a hydraulic pump attached to the brake pedal. Of course, there must be brake fluid in the reservoir, the brake drum must be dry, and the brake pads must be properly adjusted. Therefore, if master cylinder pumpable, metal lines do not rust, and rubber hoses do not swell with age, we can focus on replacing shoes and wheel cylinders. To remove the brake pads, the brake drum must first be removed.
At the back, it is held in place with a 36mm nut that tightens to about 250 ft-in when installed and usually takes a lot more to lose. If you don't have an impact wrench, you can lock the wheel with a piece of angle drill to match a pair of bolts. Then use the steel pipe above the breaker for the lever.
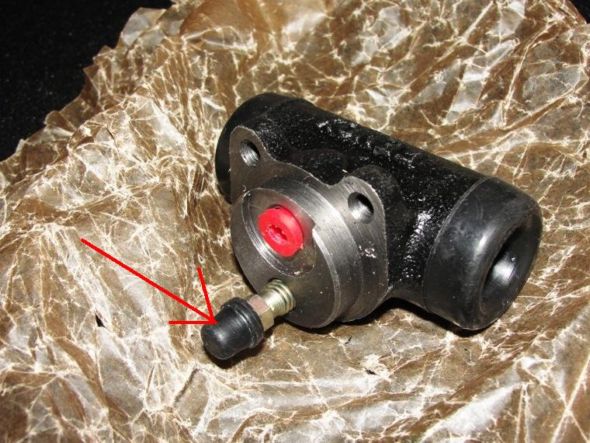
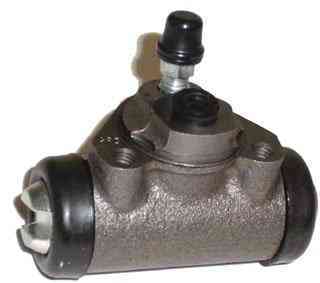
- The body in which the pistons and return springs are concentrated;
- Return springs that allow the pistons to return to their original position after pressing the brake;

- Sealing cuffs that create correct pressure in the tank;
- Pistons with pushers;
- Differential pressure sensor.
Note: with its help, the driver learns about the loss of tightness in one of the circuits.
How does it work
![]()
Typically, in normal condition and under optimal environmental conditions, the cylinder operates as follows:
- To slow down, the driver must apply the brake. After that, the force is transmitted along the rod to the piston.
This rod moves forward to close the expansion hole. Thus, an increase in pressure begins.
Note: The same thing happens in the front cylinder, which helps the machine to brake quickly.
- After the car has been stopped, the driver stops pressing the pedal. As a result, the pistons return to their original positions.
In addition, the pistons begin to act in concert with the reservoir. This contributes to the fact that the pressure in the second is equalized and becomes similar to atmospheric.
In addition, the wheels also return to their original position.
Note: if the front or rear cylinder fails, the second will operate with less force.
Repair

If there is a drip, then it must be changed. But for this, you should not always buy a new one.
You can just renovate the old one. To do this, you need to buy cuffs in advance. As a rule, they are sold together with a dust cover and a pump.
To do this, you must:
- Raise the car using a jack.
Note: To prevent the machine from rolling away, place bricks on both sides under the wheels.
- Remove the wheel, but before that it is advisable to unscrew all the nuts that hold it. The key for 19 will help in this.
Note: the removed wheel must be put in its place, but not vertically, but horizontally. Some objects can be placed to match the height of the wheel with the height of the other wheels. Now you can lower the car and move the jack to the side.
- Then the disc is removed.
Note: in no case should you hit the edge immediately with a hammer, as you can beat off the shells. It is advisable to do this through some kind of instruction (this is a small object that is attached to the edge, and already on it - hit with a hammer).
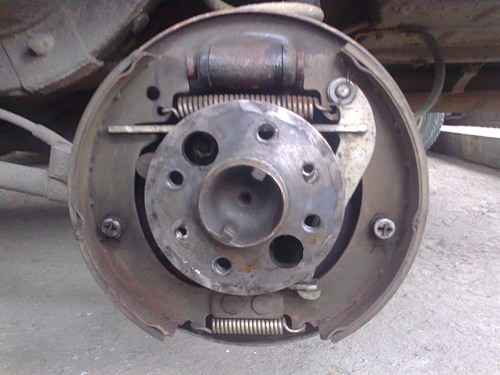
- Unscrew all nuts that hold the drum. After that you can easily remove it.
Note: access to the brake cylinder will now appear.
- Remove the brake cylinder.
- Before starting its repair, it is necessary to lubricate the cuffs and boot with brake fluid so that they become slippery.
- Replace old cuffs with new ones. Insert the boot into place.
Note: After that, screw it on with a pump that is specially created for this (it is included in the kit).
- Replace the cylinder.
Note: it needs to be pressed lightly. To make it easier to fall into place, you need to shake it a little.
- You can screw it up. To do this, you need to use a key of 10.
Note: the downside of the rear cylinder is that there is no way to screw it with a head, which would be much easier.
- After that, you need to take a flat screwdriver and put the cylinder straight.
- Then you need to start screwing.
Note: The ends of the shoes must be connected to the holes in the cylinder.
- Screw on the pads so that they are stationary. The pads must be connected with springs.
- Replace the drum, disc and wheel itself.
Replacement
To replace the cylinder, you must have not only all the standard tools, but also a special wrench for unscrewing the pads.
The replacement is carried out as follows:
- Jack up the machine and remove the wheel.
Note: it is advisable to install additional emphasis as the jack may not be able to withstand it. In any case, it will be safer.
- It is necessary to remove the brake drum. To do this, unscrew all the nuts that hold it.
- Use a large flat screwdriver to unscrew the brake pads. To make it easier to remove them, you need to press on them from above, then with a quick movement lower them down.
- It is necessary to unscrew the brake pipe from the cylinder. To do this, you will need the aforementioned wrench to unwind the pads.
It is needed in order to disrupt the tightened fitting. After that, you can use the normal key.
Note: it is important that the fitting does not twist, otherwise the pipe can be ripped off along with it.
- After the tube is unscrewed, it is necessary to plug it with a protective cap to prevent leakage of brake fluid.
- Now you can remove the brake cylinder itself. It can be removed easily: you just need to open it with a 10 key.
- After that, you need to install the new cylinder back and screw on the brake pipes.
- Do the same, but in reverse order.
Replacing the rear brake cylinder is difficult, but possible. Therefore, it is not necessary to go to a car service, where the price for any repairs will be very high.
Before starting repairs, you need to review many photos and videos on this topic. Then you can start replacing the cylinder with your own hands.
Any instruction will help you quickly and efficiently do the job.
On VAZ cars of the "tenth" family is installed brake system with a diagonal separation of the contours. This means that 2 wheels are driven by one hydraulic drive and 2 by the other. This arrangement improves security. Indeed, if one circuit fails, the second one is included in the work. However, it is strictly forbidden to drive with such a malfunction (if only because you will only have the left rear and right front wheels blocked). Therefore, today we will look at how to independently replace the rear brake cylinder.
VAZ-2110 and its braking system
It is hydraulically driven by a vacuum booster. The system has a dual-circuit pressure regulator. In common people he is called a "sorcerer". The system itself consists of the following elements:
- Brake pad.
- Cylinder.
- Working pistons.
- Guide springs (there are two of them behind on each side).
- Rear brake shield.
How does it work?
The principle of the system is to use hydraulic drive... When the driver presses the pedal, pressure is generated in the system. The rod presses on the piston. That, in turn, transfers efforts to the liquid. The latter moves from the beginning of the master cylinder to the end. Moreover, from expansion tank part of the liquid is taken. It acts on the working cylinders located in the front disc and rear drum mechanisms. Under the force of pressure, the pistons press on the pads. They merge with the drum (or disc in front). When the driver releases the pedal, the system pressure drops. The piston releases the pads. They open and the vehicle stops braking. Additionally, the system uses vacuum amplifier... It eases the pressure on the pedal. Applies to all modern cars family VAZ. Distribution braking efforts produced by a special regulator.
Traffic safety depends on the correct operation of this system. Therefore, you need to be able to diagnose a malfunction in time. How to do it? Let's consider further.
Malfunction symptoms
How do you know if your car needs to replace the rear brake cylinders? The 2110th VAZ will slow down ineffectively. You will feel the pedal soften. On visual inspection, traces of brake fluid drips will be visible. If similar symptoms are observed, it is required to replace the rear brake cylinder.
Instruments
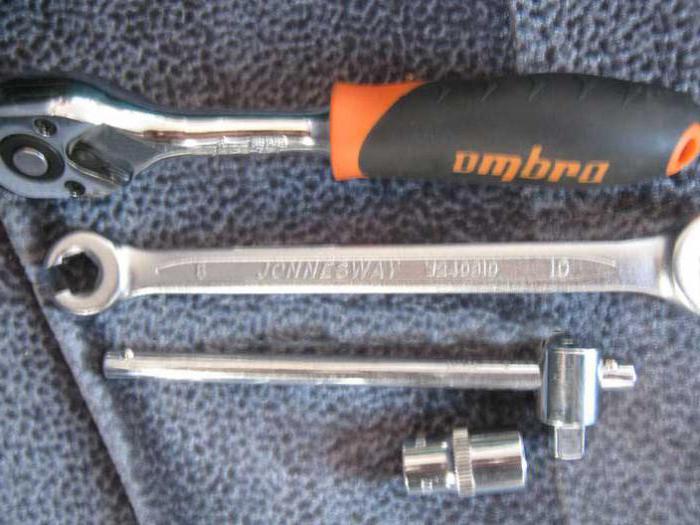
What do we need to prepare for work? Replacing the rear brake cylinder is not possible without the following tools:
- Heads "10".
- Collar or ratchets.
- Special key for unscrewing brake tube.
 Since there is liquid in the system, it will leak out during work. To restore the serviceability of the brake mechanism, after repair, you need to bleed the system by removing air from it. For this we need a transparent bottle and a short hose. The volume of the container must be at least 500 milliliters.
Instructions
So how do you replace the rear brake cylinder yourself? The VAZ must be placed on a flat area and the rear part must be jacked up, having previously ripped off wheel bolts... Next, remove the wheel itself. Getting to the brake cylinder is quite difficult. To do this, we need to remove the drum and also remove the pads. In addition, the brake fluid hose is unscrewed.
How to remove a drum? Before dismantling it, you need to thoroughly clean it with a metal brush, removing all rust and dirt. After that, unscrew the 2 guide pins with a wrench. Next, we remove the drum from the seat. This is done using a special puller. If one is not available, you can use 2 M8 bolts 6-7 centimeters long. We screw them evenly with a wrench into the holes. This is how the drum is pressed from the hub.  Next, we proceed to the pads. They need to be brought together. This is done with a small scrap or special paddles. Using pliers, bend the spring and remove it from the pads. An important point- do not press the brake pedal in order to remove the pads in this way. This will push the pistons out of the cylinder. It will be very difficult to install them in place. Further, in the same way, we remove the lower spring and carefully remove the pads from the seat.
Now we need to remove the rear brake cylinder itself. So, remove the plastic protective cap and unscrew the bleed fitting itself. For this we need a key "for 8". To pick up the tube, you must use the head "10". We break off the tightening on the fitting and unscrew the element. Be careful - brake fluid will pour out of the tube. Wear protective rubber gloves. Next, the bolts that secure the rear brake cylinder itself are unscrewed.
Installation
The installation of a new element is carried out in the reverse order. Before installation, it is required to thoroughly clean the brake mechanism from dirt using sandpaper. Degrease the seat with white spirit. 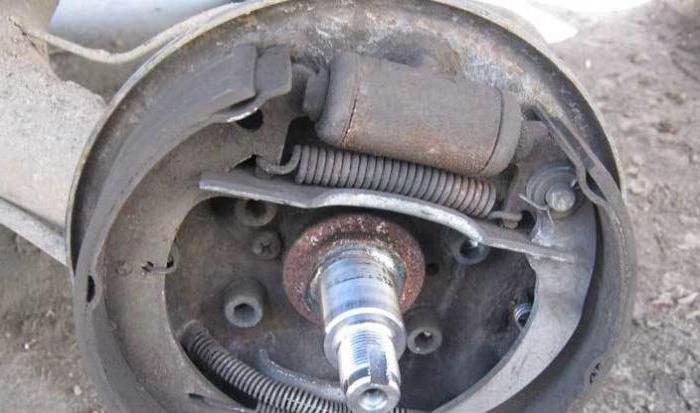 After installation, you need to pump the system. The presence of air in it is unacceptable. Even the highest quality rear brake cylinder will not work well as long as there are bubbles and dirt in the system.
So, first you need to open the hood and top up brake fluid to the maximum level. It is not recommended to mix different classes of agents. The cars of the "tenth" family are filled with liquid of the "RosDot-4" class. Please note that during pumping, its level in the tank will drop. As soon as it fell 1.5 centimeters, you need to refill it. Next, we need an assistant. He will press the brake pedal at your command. So, unscrew the cap from the bleed nipple and put a hose on it. We bring its second end into a plastic bottle. We give a command to the assistant. He must press the pedal 5 times and at the last stage clamp it “in the floor”. At this time, you will watch how airy liquid flows out of the fitting. 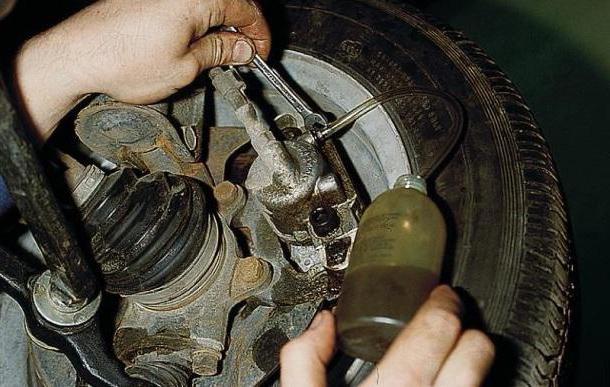 The operation should be carried out until a clear liquid, without bubbles, comes out into the bottle. On final stage we twist the union 2-3 turns. We finally top up the liquid (however, not to the maximum, but to the average level).
Note
When changing the rear brake cylinder, it is recommended to wet the brake pipe nut with the VD-40 universal agent. 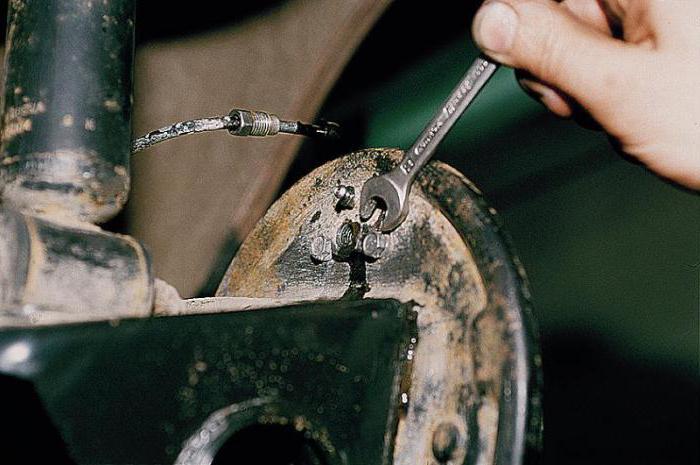 Keep the hose from twisting while unscrewing the nut. If the tube rotates with it even after lubrication, then it is defective. As a rule, such hoses have cracks and other signs of deformation.
Conclusion
So, we found out how to independently replace the rear brake cylinder using the example of a VAZ-2110 car. As you can see, the operation does not require any special skills. Even novice motorists can handle it. However, in the final step, you will need an assistant. Without it, it will be quite difficult to pump the system.