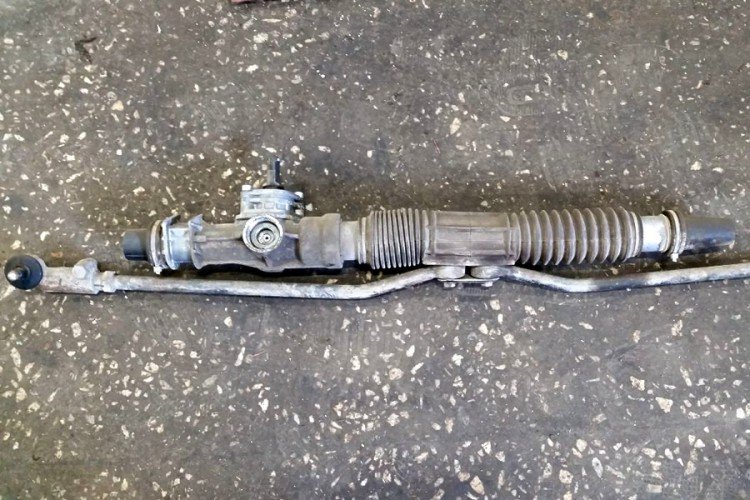
Hello dear blog readers site... A couple of months ago at my five year old Viburnum suddenly there was a tangible steering play... Until that moment steering suited me, and therefore it never entered my head steering rack prevention, but there was a play in the steering, and then I decided to investigate its causes and find a way to eliminate this deficiency.
After researching the question, I found out that loud drumming sounds from the front suspension when driving through small irregularities, they can also be caused by a faulty steering rack, and not at all by the details of the front suspension. And indeed, after the repair of the rail, all the noise disappeared. It turns out that the drumming was not ball, and not silent blocks, and not even racks, just the rail dangled in the case like a pencil in a three-liter jar.
Diagnostics of the steering rack Kalina (steering rack 2110)
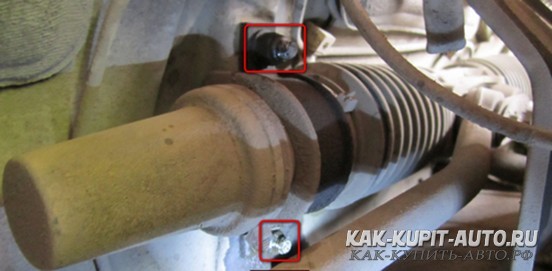
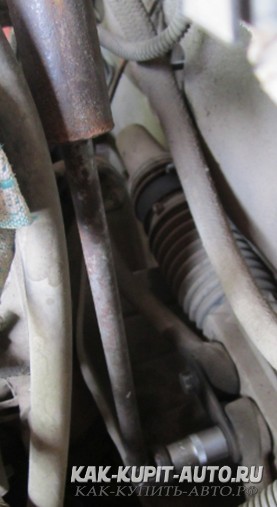
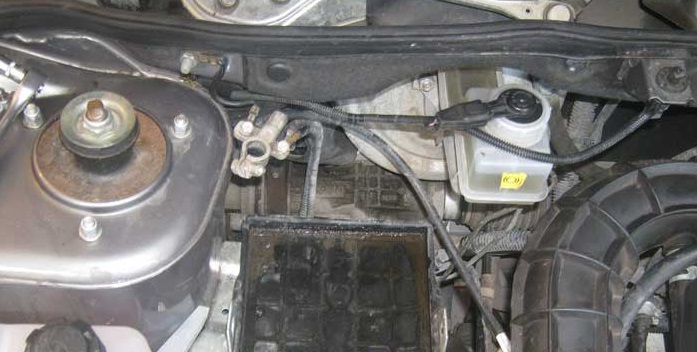
Steering rack repair you should start with diagnostics. Finding out if the rail needs to be repaired is as easy as shelling pears, to do this, open the hood and grasp the steering rod in the area of its attachment to the rail.
Pull the steering rod up and down, up and down. With a working rail, the thrust will not move even a millimeter, in my case the rail simply dangled in the body. Not surprisingly, a deafening rumble was heard in the cabin when driving on gravel.
Here is a video that shows the difference in the work of the old rail (after 164 t.km) and the new one (after 3 t.km)
Steering play diagnosing is also very simple. On a parked car (and a muffled engine if the car is powered), try to slightly turn the steering wheel with one finger, right-left, right-left. If there is no backlash, then wheel will resiliently resist your impact and return to its original position. If there is a backlash, then the steering wheel will "dangle" very freely within it.
For cars with power steering, so that it does not interfere with diagnostics, it must be turned off, that is, the engine must be turned off.
Unfortunately, I did not photograph what it looks like, but in my case the backlash on the steering wheel was about 10 °. Each time, stopping at a traffic light, I rocked the steering wheel from side to side with my index finger, and this made me less and less happy.
On the move, the backlash appears as empty steering wheel rotation in the zero zone (when the wheels are looking straight ahead). For a small course correction, you have to turn the rudder significantly, and the effect is initially absent, but manifests itself suddenly when the rudder reaches the opposite edge of the backlash. Wiggling the steering wheel within the play has no effect at all. On the track, it all looks very unpleasant and unsafe, especially at high speeds. In addition, with a backlash of more than 10 °, it is unlikely that it will be possible to pass the inspection, because such a car does not meet basic safety requirements.
Steering rack device Kalina (steering rack 2110)
I managed to figure out that to Kalina is established steering rack from "ten", a new model, helical, which was also used on the VAZ-2110, 2111, 2112 family. The steering rack of the 2108 family is significantly different, and therefore parts must be bought specifically for the "ten" rail(steering rack from VAZ-2110).
Before you independently repair the steering rack, I recommend that you familiarize yourself with the VAZ-2110 steering device and understand how it works, but I’ll say right away, removing the rack alone is as easy as shelling pears, but putting it back alone is unlikely to work. This must be done together: one will hold the rail from the side of the engine compartment, and the second will connect it to the steering shaft flange in the passenger compartment.
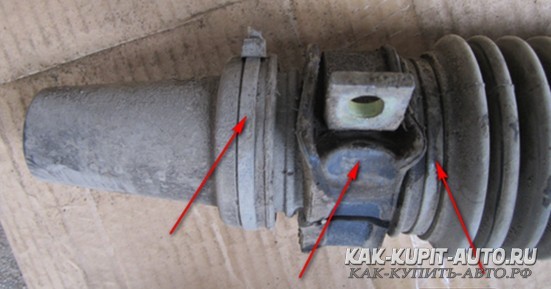
By her own steering rack VAZ-2110 is quite simple in design, but contains, in my opinion, three very weak points: rail bushing, rail stop and rubber protective covers.
Rubber covers can rub or break, then road dust, which serves as an abrasive, gets into the rail body, and in such conditions the rail will not work for a long time.
Rail bushing serves as a guide for the right end of the rail. The rail should be tightly seated in the bushing and work under conditions of abundant lubrication, only then the bushing will not wear out and the rail will not start to dangle. A worn bushing is the main cause of knocking on the 2110 steering gear. high-quality lubrication, as well as when dust gets into the body, the bushing material begins to wear out intensively, the rail dangles more and more inside the bushing, and then, when passing through small irregularities, we hear drum rolls.
Rail stop presses the left edge of the rack (teeth) against the steering shaft gear. Without enough lubrication, rail stop wears out rather quickly, while the teeth of the rack stop pressing tightly against steering shaft gear and there is a backlash of the steering wheel. Emphasis pressed against the rail stop nut, which, theoretically, can be tightened, thus pressing the rack more strongly against the steering shaft gear. This temporarily reduces the noise level, but if the stop has already worn down to metal, then this option can lead to increased wear of the steering mechanism itself - the gear teeth and rack, therefore, tightening the stop nut, if permissible, is only as a temporary measure.
Repair yourself or in a car service?
Repairing the Kalina steering rack is not an easy operation, which is why in a car service they take about 2-3 thousand rubles for it. The removal process, and especially the installation process of the rail, is very laborious, there are several difficult points that you need to know about in advance. In particular, the connection of the rack with the steering column, when installing the rack on a car, is best done together, otherwise you can lose a lot of time and nerves.
In general, if you are not ready to spend the day in the most sophisticated poses, then it is better to fork out right away and entrust the repair of the rail to the specialists of the car service. It makes sense to just buy a new rail and replace it in a car service - this is the most expensive, but also the easiest option.
Fulfill do-it-yourself rail repair I advise you only if you are not afraid of complex repairs and enjoy the fact that everything in your car is done for a solid five, because no one will take care of your car as well as you do it yourself.
Required spare parts and materials
To execute repair of the steering rack Kalina(steering rack 2110, 2111, 2112, etc.) I bought this steering rack repair kit 2110... The main thing is to replace the bushing and the rail stop, which will allow you to overcome the backlash in the rail and the rumble when driving through small irregularities.
On the price tag in "BB" it was indicated that the repair kit was "factory", but in fact it turned out that the manufacturer was some kind of individual entrepreneur. I hope the quality of the bushing and stop will not be inferior to the factory one. From the kit were used: rail bushing, rail stop, rail stop sealing ring (small) and stop nut... The rings are medium and large, I kept the old ones as they were in perfect condition.
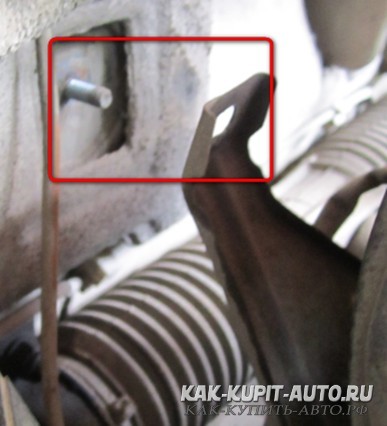
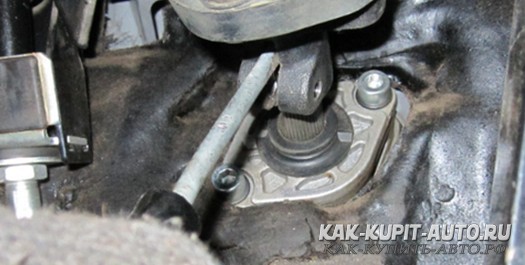
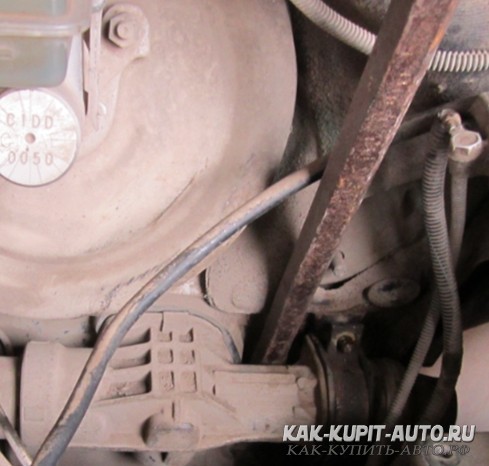
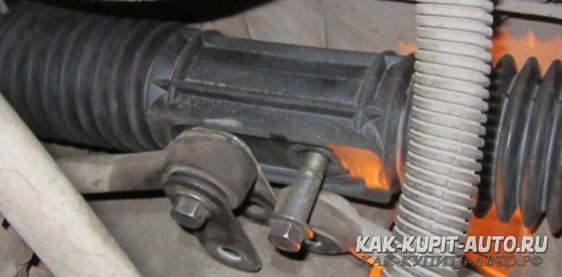
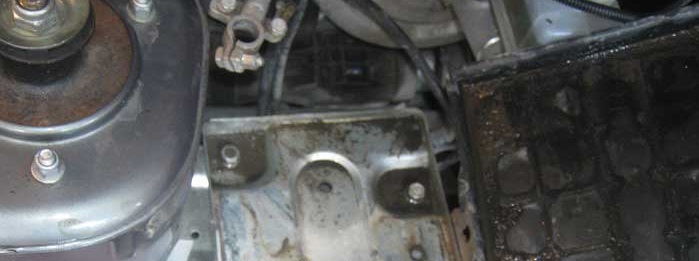
In addition, while preparing for the repair, I saw a gust on the left (short) duster reiki... The impulse arose thanks to the "fenders" installed by the craftsmen of the car dealership even when buying a car. The left front wheel arch liner has touched the steering rack protector all these years and wiped it off as a result. I don’t even know how long I traveled like that, but in the end there was a backlash and I was ripe for repairing the rail. In the right photo, taken from the left wheel arch, the part of the fender liner protruding from above has already been cut off and it no longer rests against the boot:
Before repairing the rail, I bought this one left (short) boot of the steering rack 2110(for 80 rubles), but I did not manage to find it right away. There are anthers from 2108 on sale, but the "eight" ones do not suit us, they are one centimeter smaller in diameter. Later, having already removed the rail from the car, I found that the central corrugation was also damaged. For 5 years and 140 thousand km. it rubbed against the body of the rail (the photo will be just below), no wonder that the dust got inside.
I still bought the corrugation, thank God, it was available in one of the nearest stores, but for the future the conclusion is: the central corrugation must be changed, and therefore it should be bought in advance. The side caps are not subject to friction, to change them or not, determine for yourself, having previously examined them visually.
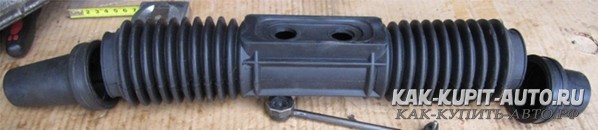
It looks like this set of anthers steering rack Kalina(steering rack 2110). The left one in the photo is native.
When assembling, rubber covers best secured with disposable plastic straps ( nylon ties), but 30 cm long (28 cm - minimum). I bought a hundred ties for 75 rubles, and they are sold individually for 5 rubles. each one. If everything is fine, then you will need 4 such ties for repair.
In order not to unscrew the studs with which the rail is attached to the body, their threads, before unscrewing, must be soaked with a "wedge" (WD-40) or kerosene, and it is advisable to do this a couple of days before unscrewing the nuts. The bitter experience of many motorists suggests that rolling the studs is as easy as shelling pears, and this leads to the need to drill the shield of the engine compartment and insert the bolts from the inside suitable size... Attention! Remember this danger and unscrew the rail fastening nuts very carefully! Do not make much effort! It is very convenient to use a small Vedashka bottle with a tube in the engine compartment, but if you are going to use kerosene, do not forget to prepare a small syringe, because the nuts securing the rail to the body are in very hard-to-reach places.
If the rail inside turns out to be dirty and rusty, then it will need to be washed (with the same kerosene, diesel fuel or gasoline), and then, for reliability, it would not be bad to blow out all the dirt carburetor cleaner.

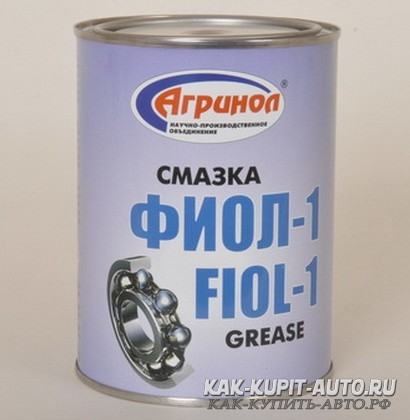
When assembling the rail, it will need to be abundantly lubricated. In theory, for this it is necessary to use low-temperature grease FIOL, but it is quite difficult to find it, and it is sold only in large cans, costing 600 rubles.
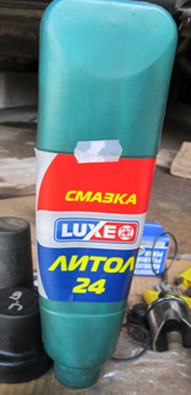
Litol-24 reduces its plasticity in severe frost, but at higher temperatures it successfully replaces FIOL. In addition, Litol-24 is sold on every corner and is inexpensive.
So, spare parts and materials used in the repair:
- Steering rack repair kit 2110 (210 rubles)
- Protective covers for steering rack 2110 (245 rubles + 80 rubles)
- Plastic clamps 30 cm (at least 4 pcs)
- Penetrating bolt lubricant (WD-40 or kerosene)
- Rack flushing agent (carburetor cleaner, diesel fuel or gasoline)
- FIOL grease (as a last resort Litol-24)
Required tool
Now consider which tool you will need for self repair reiki. This list is no less important than the list of spare parts, because if you don’t have the correct key, then the repair may stop at the most interesting place.
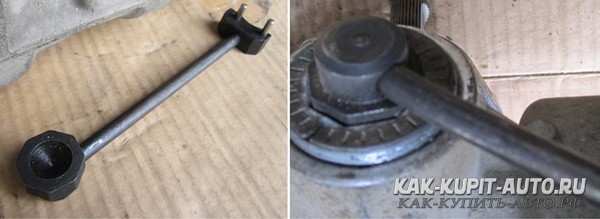
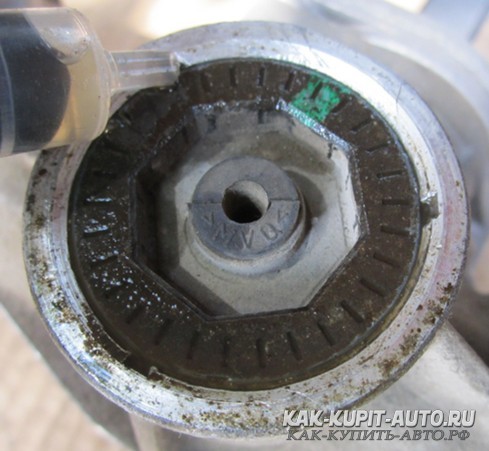
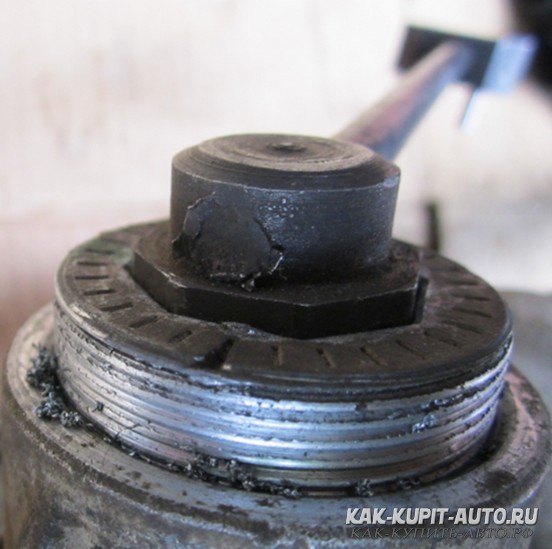
Let's start with the most exotic and most important key, on which the repair of the rail depends entirely. You will need it at the moment when the rail is already removed from the car and turning it over you will see rail stop nut... Preparing for the repair, I tucked my camera under the rail and took a couple of shots. And this is what I saw. It looks like this rail stop nut(bottom view):

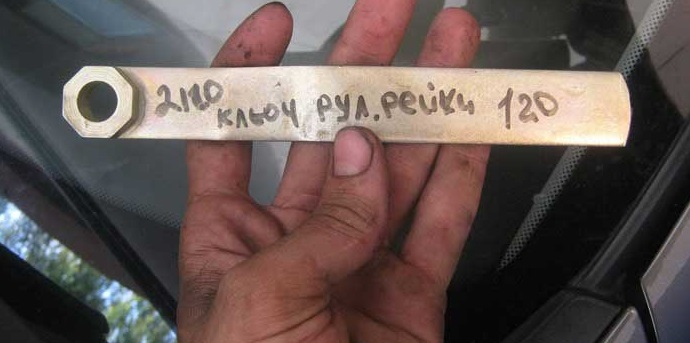
The steering rack key is of two types: for rack 2108 and for rack 2110. For rack 2108, this is a simple octahedron by 17, it does not suit us. Our option is octahedron 24, with a depression in the center, this is how the key for the nut of the rail stop 2110 looks like. I will say right away that you DO NOT buy this option in any case:
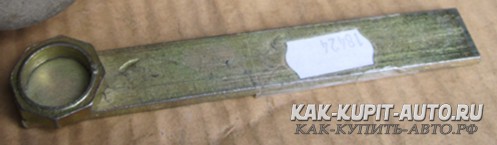
The stop nut sits quite tightly in the body, in addition, its thread is jammed during assembly so that it does not unscrew. Such a key is not able to unscrew this nut, at the first attempt it falls apart:
In order not to rush about when the rail is removed, in search of a solution, immediately buy a more reliable key, in which there are no flimsy welded joints. I was lucky, and in the nearest store I bought such a solid key, the handle of which is screwed into the head:
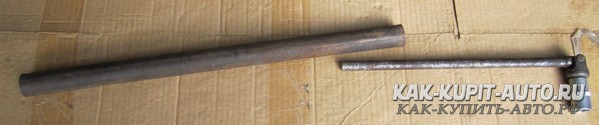
Now let's consider the second key, no less important for the repair of the rail. We will not disassemble the suspension parts, and thereby violate its geometry. We simply unscrew the steering rods from the steering rack, and during assembly we will install them in place, so we will not need to adjust the camber after repair. However, the tie rods are attached to the rail with rather powerful bolts, which you will hardly be able to unscrew with an ordinary wrench. This requires a powerful 15 mm head and a wrench with a long handle about a meter.
At my disposal was a hinged knob with a 40 cm handle and a half-meter piece of steel pipe that served as an extension.
The third key, which, in my deep conviction, is required for the repair of the rail, is ratchet wrench, for which it is incomparably more convenient to unscrew and tighten the nuts securing the rail to the body. The fact is that the nut needs to be driven almost along the entire length of the stud, and you have to work "by touch" - there is very little space. With a ratchet, all 4 nuts securing the rail to the body, you unscrew and tighten in 5 minutes, and without it you can take an hour.
For the ratchet, it is necessary to prepare the heads for 10 and 13, and the head for 15 must fit the above-mentioned wrench. Also useful are spanners for 10 and 13 (for removing the battery and the platform under it), a jack, a sharp knife (cut off the clamps), a pair of gloves, a flashlight, medium-sized flat and Phillips screwdrivers for unscrewing the steel clamps. For work in the area of the pedals, you will need a flashlight, and for removing and installing the rail, a large mount was very useful to me.
A pry bar, or something similar, is simply a must if you will be installing the rail without a partner. I wanted to call my neighbor in the garage, but I mastered this operation myself. However, wiping the sweat from my forehead, I will say right away that this is not an easy task and it is better to call a neighbor in advance.
Here is a list of the tools used in the repair:
- Special key for steering rack nut 2110
- Large articulated crank (for 15 head)
- Ratchet wrench, medium (for sockets 10 and 13)
- Heads for 10, 13 and 15
- Span keys for 10, 13 (optional).
- Flat and Phillips screwdriver
- Jack
- Flashlight
- Large pry bar
Removing the steering rack Kalina
Before you shoot steering rack from Kalina, I drove the car into the garage with the hood to the doors, and slightly shifted the front part to the right, leaving free space on the left in order to easily remove the rail through the opening in the left arch front wheel... Ideally, there should be at least a meter of free space to the left of the front left wheel.
Put the steering wheel straight. The front left wheel can be lifted immediately, although this can be done later. It is only necessary to raise the left front wheel, and this is necessary in order to reach the rack through the opening between the wheel arch and the engine compartment. Now we open the hood, use a screwdriver to loosen the clamps of the air duct between air filter and the engine, we remove the air duct, and now the free holes, for the duration of the repair, are plugged with a clean rag. Next, remove the battery (10 and 13 mm spanners) and the area under the battery (13 mm spanner).
Attention! In order not to break the ratchet wrench, it is not recommended to use it to pry off strongly tightened bolts!
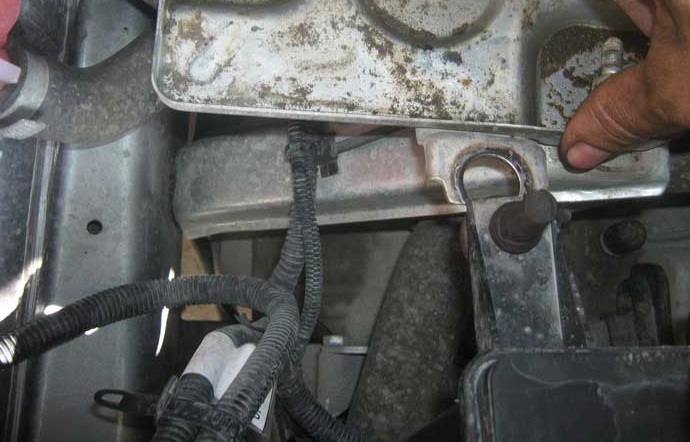
When the pad is unscrewed, it turns out that two wires are attached to it from below. They need to be freed, and a 10 mm key will help us with this. Here's what the mount looks like already without wires:
In order not to damage the wires and connectors of the IAC and TPS, it is recommended to disconnect them immediately.
Now very important point! Right now, treat the 4 studs for attaching the rail to the body with a "wedge" or kerosene - let the threads soak. It may turn out that the nuts have stuck (rusted) and then you can easily roll the hairpin, pulling it out of the body. In this case, you are guaranteed real problem, in comparison with which the usual repair of the rail is just flowers. By the way, if possible, pour over these nuts with "vedeshka" or kerosene a couple of days before the repair.
For the convenience of work, unscrew the upper nut for fastening the thermal protection to the body, and slightly bend the thermal protection itself towards the engine.
Now you can shoot locking plate from the bolts of the inner ends of the steering rods. This stopper prevents the bolts from loosening. Insert a flat screwdriver between the stopper and the plate connecting the bolts and slide the plate off the bolt heads.
When the stopper is removed from the bolts, you can unscrew them, this is where a powerful wrench with a long handle and a 17 mm head comes in handy. Personally, I managed to move the bolts from their place only by strengthening the handle with a half-meter steel pipe. After unscrewing, the bolts must be removed, and the steering rods simply put down on the thermal protection.
We continue to dismantle the rail from the car. First of all, curse into the salon, under the pedals. While the steering wheel is straight, notice where the flange bolt is and how the groove is located on the steering rack shaft. This is exactly how the bolt and the groove are located when the steering wheel is in a straight position, this is how they will need to be placed when installing the rail on the car. I recommend making marks on the shaft and flange, for example with a marker, and even taking pictures of them. Later, all this will help you to install the rack so that when driving in a straight line, the steering wheel is in the middle position.

Now turn the steering wheel a quarter of a turn to the right and use a 13 mm spanner wrench to completely unscrew and remove the steering rack flange bolt from the hole. Note again the position of the flange slot and the groove on the steering rack shaft. When assembling, you will need to return them to their original position.
Attention! Now is the most crucial moment. You must unscrew the nuts from the four studs that secure the steering rack to the bulkhead between the passenger compartment and the engine compartment, but this must be done very carefully. Do not forget: the studs hold very weakly to the body and can break off even with a little effort.
Once again, process the threads with kerosene or WD-40 and start unscrewing the nuts with a ratchet wrench, while holding the wrench with literally two fingers. Hopefully you can move and then unscrew all the nuts without damaging any of the studs. If you overdo it, then you will have to find a bolt similar to the hairpin, but longer, drill a hole into the passenger compartment and insert it from the inside. We return to the salon and use a powerful screwdriver to push the steering rack shaft out of the flange.
The rack should detach from the steering column and fall out into the engine compartment, if this does not happen, then you can slightly help it: in the engine compartment, using a pry bar, squeeze the rack away from the engine shield.
We will get the steering rack through the opening above the left wheel, so the left front part of the car must be raised with a jack. There is no need to unscrew the wheel, and there is no need to raise it high either, the main thing is that the opening is higher than the wheel. We take out the steering rack like this:
Rail repair
Fine! The steering rack is in your hands. Now you need to carefully cut off the plastic clamps from the anthers, without damaging the rubber bands themselves, if you plan to reuse them. The left clamp for attaching the rail to the body can not be touched, but the right clamp must be removed along with the rubber band: this is necessary to replace the central corrugation.
You can also remove the gasket located where the rail contacts the hole in the engine board.

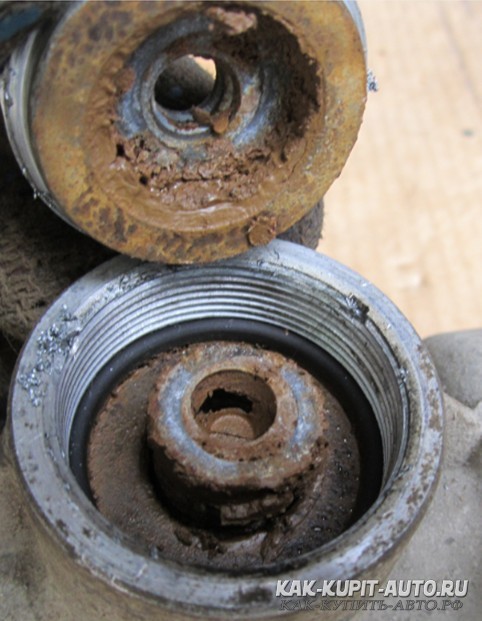
We remove the left and right anthers, and then the corrugation. Take a look at the picture I found when I removed the left steering rack boot. There was grease here, but mixed with dirt.
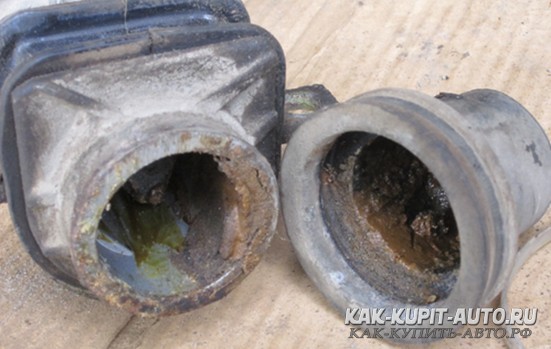
On the right side - on the contrary, there was no trace of grease, but a whole mountain of rust poured out from there.
The central boot is reluctant, but still removed from the steering rack housing.
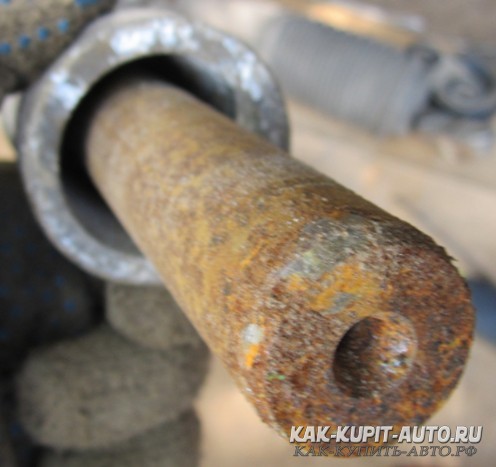
The right end of the rail was coated with a thick layer of rust without the slightest hint of grease. Unsurprisingly, it dangled with a crash in the broken bushing.
Soak the stop nut with kerosene or WD-40, and in the meantime, you can try to remove the worm shaft.
Having unscrewed two hex bolts, I found a bearing and a Belleville spring, but I still could not remove the worm shaft, no matter how much I knocked the rack body against a piece of wood.

As a result, I realized that I did not need this, because I can rinse and lubricate the insides of the rail without even disassembling it to the end. Having thoroughly lubricated the bearing, I returned the cover to its place and proceeded to unscrew the stop nut. To do this, you will need a very good key, I came across this one.
Having unscrewed the nut, I saw the same picture as in the rail itself. Everything was in the grease mixed with dirt, or maybe it had deteriorated from time to time.
We take out the spring and the elastic band, turn it over with the hole down and beat it against the wooden block until the stop pops down.
Taking out the stop, I found that it was covered in mud, like everything else inside the rail body.
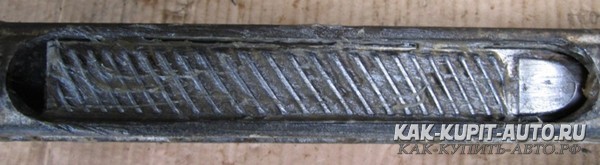
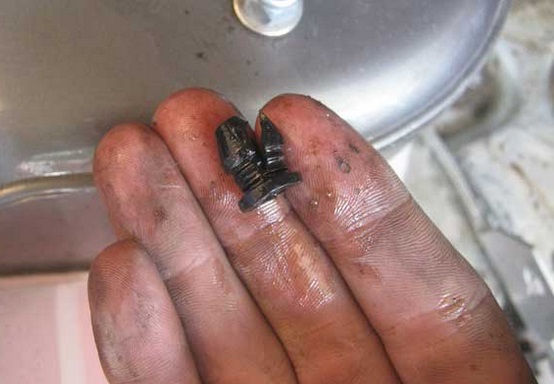
Compare the new stop with the old one: the plastic lining has worn off, the rack has become worse to press against the worm shaft, now it is clear how the backlash in the steering has arisen.
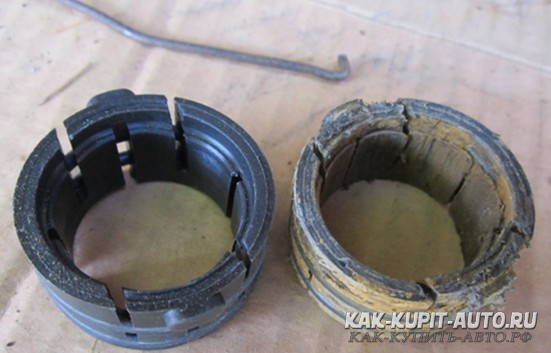
But the rumble when driving over small irregularities comes from the steering rack bushing. To get the old broken bushing, you need to bend inward each of the two projections with a thin long screwdriver, which hold the grooves inside the rail housing, and pull the bushing out of the housing using a steel wire hook.

This is what the old and new steering rack bushings look like:
So, we have disassembled the steering rack, and now is the time to properly rinse it. To do this, you can use gasoline, diesel fuel or kerosene, as well as dry rags and something long and thin to clean the insides of the steering rack housing. By moving the rail inside the case and cleaning out the remnants of old grease and dust from it, I achieved almost perfect cleanliness of both the rail itself and the case, and also removed the rust to the maximum.
But the worm shaft, which I could not reach, still looked not perfect:
If you want to bring the rail to a perfectly clean state, then right now it must be blown out with a carburetor cleaner. Do not forget to turn the worm shaft to blow out any dirt from the back of it. After such a wash, the rail looked almost like new, all internal surfaces shone with a dazzling shine and novelty. This is the feeling for which we are doing it ourselves - the feeling of satisfaction from a renovation done in a way that no one else would have done.
Now we wipe everything, grease abundantly and collect. We turn the worm shaft and lubricate it.
We do not spare lubrication on the toothed part of the rack - it is here, between the worm and the rack, that the main friction occurs.
We also cover the right end of the rail with grease, which will not only play the role of a preservative here, but should also extend the life of the new bushing.
Having greased the right end of the rail, check if the bushing is put on it. It should be put on with some effort, only in this case the repair will bring silence when driving through minor irregularities.
Then the sleeve must be removed from the rail and carefully inserted into the pre-lubricated housing. The locking lugs on the bushing should fit into their seats on the inner surface of the rail housing.
Now screw in one of the bolts that attach the steering rods to the rack, and, placing the rack housing with the bushing down, taking care not to damage the bushing, insert the rack into it. The rail should sit in tightness, but with a certain force applied to the bolt, it should still move from its place.
The next steps will determine whether you will be able to collect everything so that the steering wheel looks straight. First of all, you need to find the middle of the window in the rail body, mark it, for example, with a file or a marker, and set the rail to the middle position. In this case, the center hole should be opposite your mark.
Since the stop has not yet been inserted and does not press the rack against the worm shaft, turning the rack housing with the stop hole upwards, we can put the worm shaft in any position we need.
Install the shaft as it was when you removed the rail from the vehicle. My groove on the shaft was on the right and was almost vertical. Unlike you, dear readers, at that time I was not armed with this experience, and therefore I collected the rake at random. As a result, in order to set the steering wheel upright, I had to disassemble the rack a second time.
Having installed the shaft in the desired position, once again make sure that the rack is in the middle position and then, through the hole in the rack stop, press the rack against the worm shaft. In this case, neither the worm nor the rail should change their position.
Now grease everything abundantly and install a new stop, a spring and a rubber sealing ring in their places, and tighten it all with the stop nut from above.
When you install the rail on the car, the steering wheel may seem a little heavy to you, but after a couple of hundred kilometers, the stop and the rail will wear in, and you will get perfect steering.
Now we collect everything in the reverse order, and do not forget to put all the removed parts in their places. Secure the boots with nylon ties.
Through the opening of the left wheel, we return the steering rack to the engine compartment, install the seal in its place and begin the most difficult operation - installing the rack on the car.
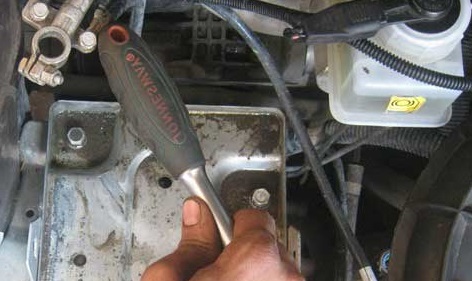
Ideally, one person should press the rack against the engine compartment while another will connect it to the steering shaft flange. I did it without an assistant, so I slightly tightened the nuts securing the rail to the body and pressed the rail to the body with this lever:
Not without difficulty, I set the steering rack shaft and flange to their original position (picture on the left), but this is the second time, and the first time I incorrectly aligned the rack and worm shaft (picture on the right).
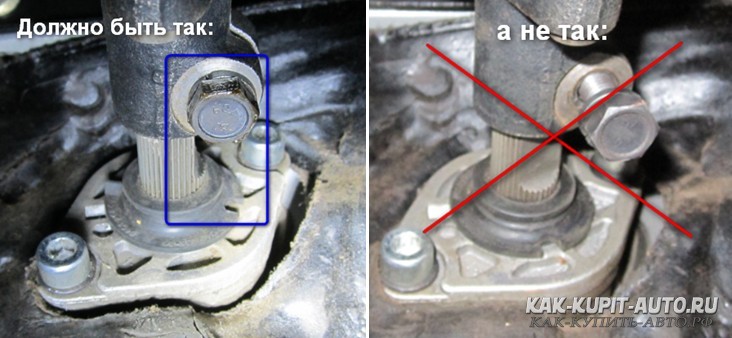
After the first assembly of the rack, the flange bolt, when the steering wheel was in a straight position, did not enter the groove on the shaft, therefore, trying to tighten it, I also damaged the threads on it. I had to replace the bolt and re-sort the rail.
As soon as the axle and the splines of the steering rack shaft are aligned with the steering column flange, you can screw the rack to the body. Here again, the ratchet wrench will help us, but remember that excessive force is unacceptable. Hold the key with literally two fingers.
When the shaft falls into place, with the steering wheel turned 45 ° to the right, it will look something like this:
To completely slide the flange onto the steering rack shaft, you can grab the steering wheel and push it away from you. It will turn out like this:
After that, you need to twist flange pinch bolt, but this must be done by hand, without using keys, so as not to damage the thread of the bolt, if for some reason it did not fall into the groove on the shaft.
The thread of the tie bolt is very easy to damage, so it must be tightened without using a wrench - by hand
I confess, I myself did not foresee this, and therefore I messed up this bolt and went to buy a new one. In theory, you cannot ride without this bolt, but I replaced it with a thinner bot with a nut and so I drove to the store, and in general, it's better not to joke with the steering. If anything, buy a ball joint bolt from the classics - it will definitely fit.

So, if you push the steering wheel away from you, then there will be no gap between the steering wheel and the steering column pad. You can't leave it like that, because when you turn the steering wheel, all this stuff will creak.
Now the bolt should be easily screwed into the flange by hand, approximately to this state.
I remind you: do not tighten the key yet... We do everything with our gloved hands. Now that the bolt is tightened, but not yet tightened, pull the steering wheel towards you, it will move out about a centimeter and there will be a gap:
Fine! Now you can tighten the bolt with a 13 spanner wrench - you will not damage the thread now.
So, at this point, you have already bolted the rail to the body. I recommend that you lightly lubricate the protruding threads of the four studs for attaching to the rail to the body with lithol. This will avoid problems in the future possible dismantling of the steering gear.
If the steering wheel is turned, then return it to the "straight" position and fasten the steering rods to the rack. Large bolts 17 which rods are attached to the rail, we tighten the same Meter key and strong enough.
We put on the stopper plate on top. This must be done, otherwise the bolts may come loose.
Now is the time to check the rake again for knocks. To do this, you need to take hold of the steering rod and pull it up and down. If all is well, then during such a check there should be no knocking, the tie rods should be absolutely motionless.
Next, we fasten the thermal protection, connect the IAC and DPDZ connectors, install the platform for the battery and fix two wires to it from below, and install the battery itself on the platform. Not forgetting to take out the rags (if any), install the air duct between the air filter and the engine, tighten all the clamps with a screwdriver.
Ready!
That's all! Now you can make a test drive and check how the rail behaves on small irregularities and at the exit from the turn. My effect was as follows: the rumble when driving on gravel - disappeared, the backlash decreased from 10 ° to zero, but the steering wheel seemed to be filled with lead - it became more difficult to turn, and at the exit from the turn, the steering wheel itself did not return to its original position. However, after 500 kilometers everything got used to it and now I again enjoy perfect steering.
That's all for now! Dear readers, I wish you that your steering rack lasted longer than mine, and even better, that you much earlier changed car to a newer one.
P.S.
I repaired the rail on the run in 144 tkm, and now on the odometer already 150 thousand... There is no backlash in the steering yet, but the knock in the rail began to appear again, while it is quite weak, but gradually intensifies. The test of the steering rods shows a decent backlash in the rack, which means that something is already worn out: either the bushing or the stop. Perhaps the reason is low-quality materials, or maybe the rust on the rail, which works like an abrasive, is to blame for everything. Perhaps I will change the entire rail, but then I will take Sport from Kalina (3.1 turns), and before installing I will disassemble it and properly fill it with grease so that it does not rust.
Continuation from 06/07/2014
I greet you again, my dear readers! Today on the odometer of my Kalina already 167 tkm and a couple of days ago I replaced the entire Kalina steering rack. Before installing, I thoroughly lubricated the new rail, so there is a hope that it lasts longer than the one that was installed on the machine from the factory. If the question of replacing the steering rack is entirely interesting to you, then I suggest you familiarize yourself with the photo report on the topic.
The correctness of the steering system of any car is an important safety requirement on the road. Repair of the steering rack on Kalina must be done if any suspicious sounds appear. As practice shows, many motorists are calm about the fact that when the steering wheel is turned, a knock or creak occurs, and this may indicate that the steering rack is knocking. Repair of the steering rack on Kalina is best done at a service station, but you can do it yourself.
Steering gear: 1 - boot; 2, 20 - bolts; 3 - washer; 4 - stuffing box; 5 - crankcase cover; 6, 17 - sealing rings; 7 - separator; 8 - drive gear with bearing; 9 - steering rack; 10 - left protective cap; 11 - thrust support; 12 - bracket; 13 - plug; 14 - stop nut; 15 - stop spring; 16 - retaining ring; 18 - rail stop; 19 - stop insert; 21 - lock plate; 22 - cover plate; 23 - clamp; 24 - protective cover; 25 - right protective cap; 26 - steering gear housing
Design features
The steering system of the Lada Kalina includes an electric amplifier and steering column adjustable in height and angle. The steering gear is a steering rack with a variable gear ratio. The rack engages with the engine crankcase through a gear that has oblique teeth, the pitch of which differs along the length of the rack. The figure shows the design of the Kalina steering rack.
The steering rack on Kalina is pressed against the gear by a spring. Friction is reduced with a plastic liner. The compression of the spring is changed by an adjusting nut (the factory-set gap between the rack and the shaft is 0.1 mm). The second end of the rail rests against the plastic sleeve. The gap adjustment helps to get rid of knocks.
The steering shaft is mounted in bearings (one in the column bracket, the other in the power steering housing). The column bracket attaches to the pedal bracket (front) and to the body bracket. The column bracket with the pipe is connected in the form of a hinge of two plates, which allows you to change the position of the rudder, and the range of movement is limited by the slots in the plates.
To fix the position of the pipe, there is a lever connected to an adjusting sleeve. It is screwed into a tie bolt located in the plate slots. When you turn the lever, the bushing rotates, loosening the plate fixation, which allows you to change the position of the steering wheel. The springs between the plates and the bracket pull the pipe upward as the fastener is loosened.
The steering system of the Lada Kalina has two tie rods and swivel levers. The rod consists of an external and an internal tip and an adjusting threaded sleeve, which, when rotated, changes the length of the rod. Desired adjustment rods are fixed with bolts. The rod is connected to the pivot arm by an external ball-type end piece.
Kalina's electric amplifier reduces the effort applied to the steering wheel. It is assembled on the basis of an electric motor with a gearbox located under the casing of the steering system. The amplifier is controlled by an electronic unit that receives signals from sensors for vehicle speed, shaft rotation and steering torque.
The principle of operation of the amplifier is based on the fact that in a stationary state of the car, the moment on the steering shaft is set to the greatest, and when driving, it decreases with increasing speed. On dashboard the power steering indicator is installed.
Causes of extraneous sounds, removal of the rail
Situations often arise when, when you turn the steering wheel of the Lada Kalina, you can hear something knocking and rattling. Such extraneous sounds can be heard constantly or appear after a long stay. If something rattles in the steering gear, then you should find out the causes of these noises. They are often caused by wear on the ball joint. Such a defect can lead to the impossibility of traffic, and the part will need to be replaced in a timely manner.
The cause of the knocking or squeak of the steering wheel is sometimes damage to the grenade. In the event of a malfunction of the steering racks, in addition to knocking, there is a kickback of the steering wheel or signs of a biting steering wheel appear. In this case, the steering rack will need to be adjusted or repaired, and possibly replaced. Noises appear when the shock absorber bush is worn. The knock may be due to the loosening of the bolts securing the crankcase.
The design of the Kalina steering system is such that tightening the steering rack, adjusting the spring can only be done after removing the rack. It is removed in the following order. Raises the front of the vehicle using a lift or tragus. From the side of the passenger compartment, the bolt of the spline fastening of the steering column is turned out.
The attachment point is located below the pedal box. The front wheels of the car are removed. Then the nuts of the rotary cams are unscrewed and removed. The battery is removed from under the hood together with the platform. The heat reflector is removed. Finally, the nuts securing the steering rack to the body are unscrewed. After that, the rail can be pulled out.
When disassembling, adjusting and repairing the Kalina steering rack, you will need the following tool:
- a special key for regulating the VAZ rail;
- dial gauge indicator;
- screwdriver, pliers, socket and wrench set;
- hammer;
- mallet;
- steering tip puller;
- calipers;
- chisel;
- brush.
Any extraneous sounds when turning the steering wheel should alert the driver. It is necessary to immediately find out the reasons for their appearance. Repairing and adjusting the Kalina steering rack can improve road safety.
Adjusting the spring and power steering
Very often the cause of knocking when turning the steering wheel is a weakening of the pressure spring. It provides the required force of pressing the steering rack gear to the main shaft gear, which is set at the factory by adjusting and fixing the spring. During use vehicle the spring loses its elasticity, relaxes.
In order to increase the pressing force of the spring, it is necessary to tighten it, which is done after disconnecting the steering mechanism, but without removing the steering rack. Repair of the steering rack in this case consists in setting the required clearance between the rack and the shaft gear. The steering rack is set in the middle position and is fixed against movement.
The plug is removed from the rubber, and the indicator probe is placed in the hole of the stop adjusting nut so that it touches the rail stop. It is better to use a dial indicator. Then, turning the pinion shaft, which pushes the stop, the indicator measures the size of the stop movement. The travel length should not exceed 0.05 mm.
If an excess of this value is observed, then it is eliminated by turning the adjusting nut. The steering rack is fixed in a position corresponding to the required clearance, and the ease of rotation of the pinion shaft is checked within the entire possible movement of the rack.
The adjusting nut is rotated using a special key to adjust the VAZ steering racks. It is not recommended to tighten the nut too tight, which can negatively affect the maximum turns of the steering wheel. If there is any play when turning the steering wheel, the spring can be tightened by practical selection of the correct force.
In this case, initially the adjusting nut is turned by 20-25 °, and the presence of knocking is checked when turning the rack. If the noise is not eliminated, then the nut is tightened again by 10-15 °, and so on until the knock is eliminated. In the case when tightening the spring does not help, repair of the steering rack is required.
It is best to adjust the Kalina electric amplifier after removing the steering rack, but it can be done without dismantling with some inconvenience. The car is placed on the repair pit so that the front of the amplifier is accessible from below.
The clamping nut is tightened by turning it clockwise from the bottom, and when tightening the nut from above, respectively, counterclockwise. For the purpose of prophylaxis, the condition of the oil seal should be checked, since when the steering wheel is turned out strongly, the oil seals wear out quickly. At the same time, all elements are lubricated, especially the anthers of the steering rods.
The Kalina steering rack should serve, according to the manufacturer, for 10 years without breakdowns. However, very specific Russian road conditions make serious adjustments during this period, forcing car owners to periodically carry out such a procedure as adjusting the steering rack. In addition, a variety of road pits and potholes cause frequent breakdowns steering system Lada Kalina, which makes the owners this car incur additional costs.
Vehicle control system device
On the technical side, the Lada Kalina steering rack is a mechanism that has in its design a gear mounted on a shaft, which is coupled with a rack and special rods. It is thanks to them that the process of turning the car takes place, by converting the steering movement into a horizontal deflection of the front wheels in the direction desired by the driver.
Currently car manufacturers 3 variants of rack and pinion mechanisms are used in the production of cars:
- mechanical;
- hydraulic;
- electric.
Mechanical rail is the simplest in terms of design and therefore is installed on most modern cars... Here, the rotation of the special rods is carried out exclusively due to the physical strength of the driver. Naturally, it is rather difficult to drive a car equipped with such a control device.
The second option for equipping vehicles is a hydraulic mechanism. It is with them that the Lada Kalina and Kalina 2 models are equipped. As a result, their owner receives not only sharpness, but also the ease of the steering wheel. Majority modern machines it is equipped with a hydraulic steering wheel.
Another option for the car control system that allows you to reduce the load on the driver is the electric drive of the steering mechanism. In it, the increase in turning force occurs due to the operation of an electric motor built into the column. This device is used only on luxury and premium cars, for example, it can be found as an additional option for the top configuration Lada Kalina.
In addition, there is a mixed version of the power steering - electrohydromechanical. It combines everything positive traits hydraulic and electric power steering. You can see him, for example, in a car.
Each type of control system has its own advantages and disadvantages, but they break down at about the same frequency. At the same time, if the breakdown of the mechanical control system of the direction of movement of the car leads to relatively low costs for its repair, malfunctions of hydraulics and electrics can lead to very serious costs on the part of the car owner.
Basic work on adjusting the mechanism
The main view renovation works the steering mechanism is considered to be adjusted, while, if the steering rack on Kalina lends itself to adjustment independently, then adjust it to sports modification car is problematic enough.
Repair of the Kalina steering mechanism may be necessary for the following reasons:
- loosening of the steering rack fasteners;
- wear of steering racks or gears;
- poor pair engagement adjustment;
- high degree of wear of the bushing in the place where it connects to the rack and steering rods.
The rail is tightened in order to use this procedure to reduce or completely remove the backlash in the vehicle direction control mechanism.
This allows you to significantly improve vehicle handling in different road and weather conditions. In addition, it may be necessary to tighten the steering rack even if it was initially set incorrectly. To do this, usually loosen the tightening of the adjusting screw, while the movement of the steering wheel is facilitated and it becomes easier to control the machine.
In addition to adjusting, in case of difficulties in its operation, it makes sense to lubricate the steering mechanism. You can find out how to do this and how to adjust the steering rack from. In addition, it indicates the type of lubricant recommended by the manufacturer and describes the design of the steering rack.
 In this case, there are 2 ways to carry out the operation of adjusting the steering mechanism:
- with the dismantling of the rail;
- directly by car.
The steering mechanism is usually dismantled in the event of a serious breakdown, that is, when it directly occurred. Usually, some parts of the mechanism need to be replaced, and not all car owners can carry out such a procedure on their own.
In the same case, when it is necessary to carry out relatively simple procedures, for example, to eliminate backlash and knocks, as well as to tighten or loosen the rail, this can be done independently without removing the steering gear from the car. For advice, you can bring in a more experienced car owner.
Quite a frequent occurrence on Kalina is the knock of the reiki. About a year ago, I started to experience tapping on rubble or broken primer. And over time, the knock on the steering rack of Lada Kalina only became stronger. I have long wanted to do this repair, but my hands did not reach. Although it is difficult to call it a repair, since you will not have to disassemble anything, but only tighten the steering nut on Kalina.
So, you need the following tools:
1. Conventional 10 or head with a crank
2. Key for 13 (the head will be the most convenient)
3. A special key for tightening the Kalina rail
How to get to the rack adjustment mechanism
To be able to do everything without a lift and a pit, you must perform the following steps in order to get the adjusting nut.
Disconnect the battery and carefully remove both terminals.
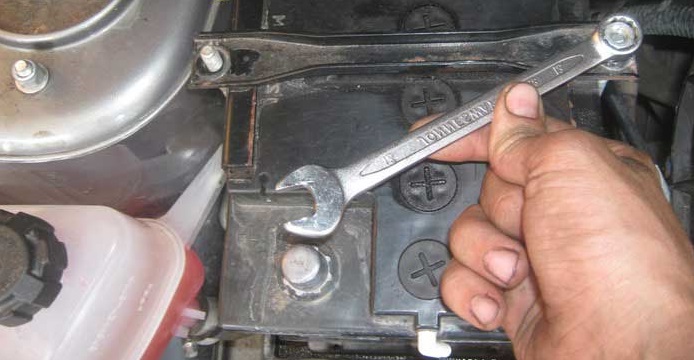
Then we raise the plastic stand, unscrew 4 more bolts under it.
We move this metal pad forward slightly so that it detaches from the air filter housing.
You can push it back a little to gain even more access to the helm. It will look like this:
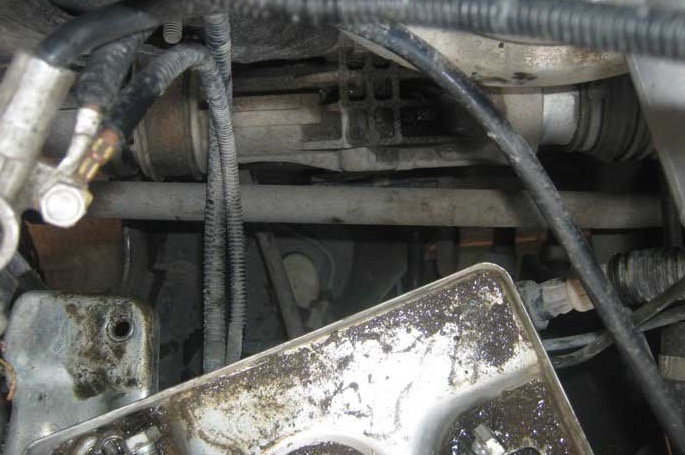
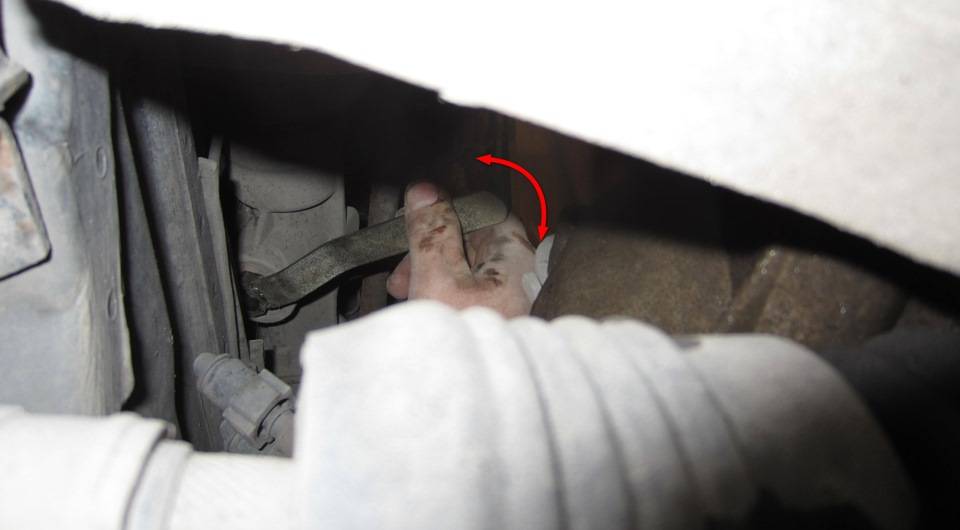
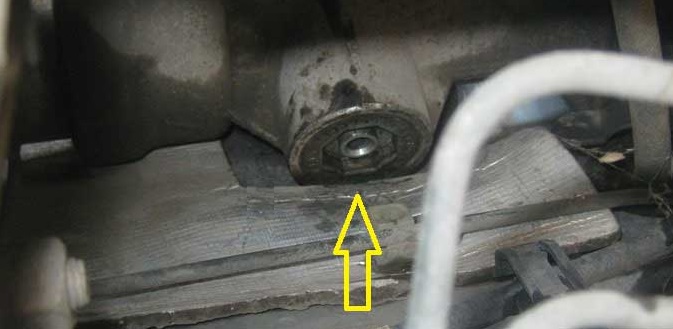
Now you need to crawl under the unit with your hand where it is marked with a yellow circle (see photo), only from the inside, under the bottom,

and feel for the rubber cap there. It must be removed for the key to fit better.
As you can see, it was not possible to remove it successfully; when removed, it burst in half, since it sat quite tightly. Try not to repeat this. Next, we take the key that I mentioned above.
Now we are trying to crawl under the steering wheel with our hand in order to insert it into the required hole - it is shown in the photo below, so that it is more clear how to tighten the steering rack on Kalina.
Do not tighten it too much, because you can overdo it, and then the steering wheel can bite when cornering, which is unsafe. Personally, in my example, I moved the nut 30 degrees. And that was enough for me to make everything work fine. Be sure to check after performing this procedure for problems when turning the steering wheel all the way.
If there are no knocks, then the VAZ 2110 steering rack adjustment is completed. Today I came across good road for diagnostics, like silence. But how long will all this be enough? Well, I'll keep you informed!
It is not good to offend the little ones. And even more so with such a patriotic popular name. Lada Kalina at the beginning of her journey into people, like all new models, aroused some public apprehension, but after, when everyone figured out what they were dealing with, sales went up. The consumer is familiar with the front-wheel drive VAZ baroque, and Kalina, in principle, was not structurally different from other models in any way. A little better, a little more modern, a little more expensive. The first five years the car came to its senses, and only after 2010 Kalina was formed as a separate organism with its own characteristics.
Kalina steering rack design and problems
In the photo - Lada Kalina, structurally no different from other VAZ models
One of the features of Kalina was the microscopic resource of the steering rack. She rarely reached 35 thousand, and began to knock after 25-28 thousand. For other cars, this is just a run-in, but since we agreed not to offend the little ones, we will forgive her for such weakness. Instead, we will figure out for what reasons there is a knock on the rail at Kalina and why mechanics at the service station are trying to change the rail assembly, and not repair it. And because Kalina, for all its novelty and freshness, in the first place budget car... And on state employees they save on everything. Structurally, the same prior and ten racks run much longer without knocking and wedges, and here is such a misfortune. And the point is consumables and components of poor quality. Almost the same rake on the Ford Focus begins to leak only at the 200th thousand, however, under the condition of an accident-free past. The Kalina rail has a factory resource of 80 thousand, but some manage to change the second rail for this run.
Kalina was also unlucky with the electric power steering. The first lots of the car were equipped with an electric booster from the Makhachkala aircraft plant. Moreover, the EUR was developed together with VAZ engineers. But only 50% of the installed rails with an electric booster worked normally, on 35% of cars the unit did not work at all. The rest either wedged, or broke the rail itself, or spontaneously rotated. After a series of incidents with steering racks and electric boosters of an incomprehensible but cheap design, the plant decided to equip the car with Kaluga electric boosters. At least they didn't break the slats. And a few years ago, the production of Kalin with the South Korean ESD Mando was launched. Here are the least complaints about them, but the total percentage of Kalin with Korean amplifiers is extremely small.
Video tutorial on the repair of the steering rack Lada Kalina
Repair of a steering rack Lada Kalina
Buying a rail from Kalina is an expensive pleasure. For 2016, the price of a new rail in Moscow is 4500 rubles. This is on average. The factory rail from AvtoVAZ from the spare parts fund refuses to go at all. Its resource, judging by the reviews, is no more than 20 thousand. And mostly for three to four months, after which it starts knocking again, flowing and demanding adjustment, which, however, gives little. There is, however, a good option complete replacement slats for Kalinovskaya SS-20. Its price is twice the factory price, you can buy it in Moscow, but 10 thousand for a spare part for a budget car looks a little illogical. The resource of such a reiki is almost endless and it will outlive Kalina herself. What is so special about it, and what can be so special about the simplest design, where the whole problem lies only in the polyurethane bushings, the rack itself and the gear? Just high-quality manufacturing according to the nominal factory dimensions. SS-20 just did what the plant had to do, namely, to keep the ratings within the normal range and use those materials and grades of steel and castings that are provided for by the specifications.
If there is no ten thousand for a good rail, then you will have to eliminate factory defects with your own hands. Fortunately, it is not difficult to remove the rail, it is not difficult to put it back in place. But here, too, the plant left room for a flight of imagination. In order for the dismantling of the rack to save several hours, it is enough just to unscrew the four bolts from the passenger compartment that attach the steering column to the engine shield. If this is not done, the dismantling / mounting of the rail will last for an hour or two. It is very inconvenient to shoot it. The bulkhead of the rail is nothing complicated, but again, you need to choose the right repair kit, otherwise all the work is down the drain. There is nothing to break in the structure. The clearance in the gear-rack engagement is affected by the wear of the bushing, which can be adjusted directly on the car without removing the rack.
To do this, you need to remove the battery to open access to the adjusting nut and turn it 25-30 degrees with a special key. The main thing is not to overdo it, as there is a possibility that the couple will have a snack and not return the steering wheel to the central position, but this is clear right away. The steering wheel should not be tight after adjustment. As a rule, the adjustment is enough for 5-7 thousand, then a knock appears again. If you install a complete repair kit, which includes everything completely: bushings, anthers, rail, nut, bearing, oil seals and seals, it is good to grease it all with the correct lithium, correctly assemble and install, not forgetting to set the steering wheel to the central position, then the rail goes through thousand 15-20, until it knocks or flows again. There is nothing to be done, the budget is the budget.
- news
- Workshop
Castrol Edge Unveils Another Episode of Its World Famous Titanium Trials #clonrival
The two world-class racers will face their strongest track rivals - themselves. Participants trained in the Titanium virtual laboratory on a state-of-the-art virtual clone to capture their perfectly fast lap. Similar extreme driving is a challenge to driving skill and technique, allowing you to go beyond your own ...
The new BMW 5-series is completely declassified on the network (photo)
Photos published by the Germancarforum show the new sedan-style five with the M Sport exterior package. The pictures show that new bmw The 5th series is in many ways reminiscent of the flagship "seven", reduced in size. The same can be said about the sedan's interior, almost all the details of which are reminiscent of those presented at BMW ...
Uber began testing its own self-driving car
During the tests of the prototype, called Uber ATC, the company's specialists will collect various data on the behavior of the car, as well as study the capabilities of the drone. Uber ATC is equipped with a range of radars, laser scanners and high-definition cameras, thanks to which the system recognizes the terrain and surrounding objects. The car is accelerating, ...
New crossover Skoda: named modifications for Russia
Kodiaq is the first seven-seat crossover Skoda brands... The model is based on the all-Volkswagen modular platform MQB. That is, the filling "Kodiak" is close, for example, to Volkswagen tiguan second generation. The premiere of the model took place at the recent Paris Motor Show. A week ago, the assembly of the new item began at a plant in Czech Kvasiny, which means that soon ...
Moscow authorities advised not to go to the country on Friday
The optimal time to travel out of town is before 12 noon or after the end of the evening rush hour on Friday (22 hours), or on the first day off before 8:30 am or after 12 noon. This is stated in the official message of the TsODD. As explained in the TSODD, with the onset of the warm season ...
The Silk Road by motorcycle. Interview with Anastasia Nifontova
The long-awaited international rally-marathon "Silk Road", which this year became the longest and longest in its history, came to an end last Sunday, July 24, in Beijing. For the first time, an athlete on a motorcycle - Anastasia Nifontova, the host of the Two Wheels program on the Auto Plus TV channel, entered the race as a full-fledged participant in the Raid classification. ...
Liberalization of OSAGO: decision postponed
As the Deputy Chairman of the Central Bank Vladimir Chistyukhin explained, it is impossible to move in this direction, since the decision of others is required first. important issues insurance industry, TASS reports. Let us briefly recall: the preparation of the roadmap for the liberalization of compulsory motor third party liability insurance tariffs began in November 2015. It was assumed that the first stage on this path should be ...
A database of used cars will appear in Russia
With its help, buyers of used cars will be able to check the legal cleanliness of the car and its history. About this with reference to the chairman of the board of directors of the group of companies "Karoperator" Oskar Akhmedov reports the agency "Moscow". It is assumed that the database will contain information about the mileage of the car, its repairs and owners. Searching for information on a car will be ...
In Moscow, raised pedestrian crossings
In particular, new crossings can be seen at the exits from the lanes to Tverskaya, as well as on Malaya Dmitrovka and Kudrinskaya Square, according to the Official Portal of the Mayor and Government of Moscow. As explained in the Organization Center road traffic(TsODD) of Moscow, the peculiarity of the crossings is that they are arranged on the same level with the sidewalks. When crossing the road to people ...
Moscow is preparing a new extension of paid parking
In April of this year, the Center for Traffic Organization (TsODD), subordinate to the Moscow Department of Transport, GKU, completed several large auctions for the right to conclude government contracts for the installation of road signs, including information signs for paid parking. This is evidenced by the data of the portal of state purchases, which are referred to by “Gazeta. RU". One...
The most expensive car in the world
The most expensive car in the world
There are a huge number of cars in the world: beautiful and not so, expensive and cheap, powerful and weak, ours and foes. However, the most expensive car in the world is the only one - this is a Ferrari 250 GTO, it was in 1963, and only this car is considered ...
Pickup review - three "bison": Ford Ranger, Volkswagen Amarok and Nissan NavaraPickup review - three "bison": Ford Ranger, Volkswagen Amarok and Nissan Navara
What people can't think of to feel an unforgettable moment of excitement from driving their car. Today we will introduce you to a test drive of pickups not in a simple way, but by connecting it with aeronautics. Our goal was to survey the performance of models such as the Ford Ranger, ...
Ranking 2017: DVRs with a radar detectorRequirements for additional equipment in the passenger compartment are growing at a rapid pace. Up to the point that the cabin simply does not have enough space to accommodate all the necessary equipment. If earlier only video recorders and air flavors interfered with the review, today the list of devices ...
WHAT you need to know to take a car loan ?, how long to take a car loan.WHAT you need to know to take a car loan ?, how long to take a car loan.
What do you need to know to take a car loan? Buying a car, and especially at the expense of credit funds, is far from the cheapest pleasure. In addition to the principal amount of the loan, which reaches several hundred thousand rubles, the bank also has to pay interest, and considerable interest at that. The list ...