Figure 1: Drawing diagram of a homemade snowmobile
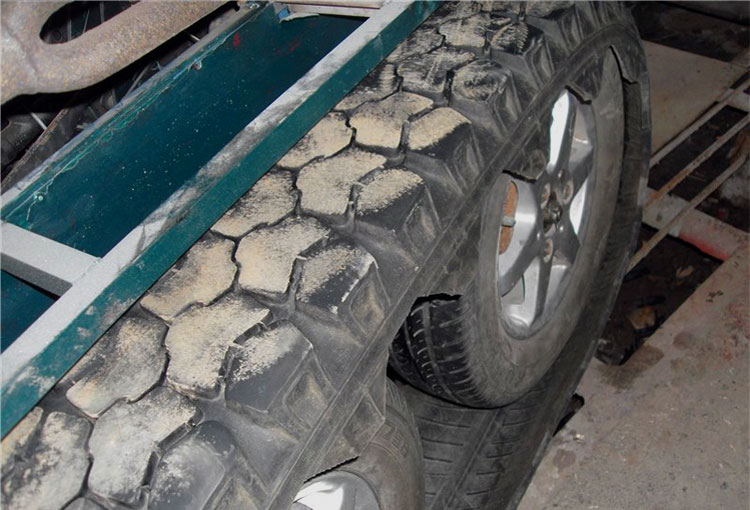
The lugs were attached to the conveyor belt with two 6 mm furniture bolts with a large semicircular head. When making a caterpillar, it is very important to maintain the same distance between the lugs, otherwise they will "run over" the teeth of the drive sprockets and the caterpillar will begin to slip and slide off the rollers.
Figure 2. Device for cutting plastic pipes:
1.wood block;
2. plastic pipe;
3. metal corner.
To drill holes in the conveyor belt for 6 mm fastening bolts, a conductor made a jig. He drilled the holes in the tape with a wood drill with a special sharpening.
Using such a jig, 6 holes can be drilled in the conveyor belt at once for attaching three track lugs.
In the store I bought four inflatable rubber wheels from a garden cart, two drive sprockets from a Buran snowmobile and two closed bearings No. 205 for the drive shaft of the caterpillar.
I asked a turner to make the drive shaft of the track and bearings for the bearings. The frame of the snowmobile was made by myself from square tubes of 25 × 25 mm.
Since the ski and rudder pivot pivots are on the same line and in the same plane, you can use a continuous steering rod without ball ends.
Ski sleeves are easy to make. I welded 3/4 ”female water pipe fittings to the front cross member. He screwed in the pipes with an external thread, to which he welded the tie rod bipods and ski racks.
I recommend using skis from the Argomak children's snow-scooter. They are lighter and more elastic, but they need to be fitted with corners for attaching to the pivot stand of the snowmobile and a metal undercut at the bottom - for better control of the snowmobile when driving on crust or packed snow.
The chain tension is adjusted by shifting the motor.
The snowmobile is very easy to operate. When the engine speed increases with the throttle handle located on the steering wheel, the automatic centrifugal clutch and the snowmobile starts moving. Since the estimated speed of the snowmobile is not high (only about 10-15 km / h) and depends on the density of the snow, the snowmobile is not equipped with brakes. It is enough to reduce the engine speed and the snowmobile stops.
I will share a few tips that can be useful when repeating this construction.
1. I cut the pipe for the tracks along the wood with a circular saw, first on one side, then on the other. So it turns out smoother than cutting both walls at once. It is more convenient to handle small workpieces. If you immediately cut a long pipe along, then in this case the plastic will melt and the saw blade will clamp.
2. Tracks can be made of any width. And each designer has the right to choose what is more convenient for him: to make a wide but short track or a narrow and long one. Just remember that with a large track, the snowmobile will not handle well and the engine is loaded more, but with a small track in loose deep snow, it can fall through.
3. Some of my photos show that plastic "barrels" are installed inside the caterpillar. These are the guide stops for the skid, which should prevent the track from sliding off the rollers. But during the operation of the snowmobile, the caterpillar did not slide off the rollers even without a slip, so the "barrels" can not be installed, which will reduce the weight of the snowmobile.
4. At the end of winter, I completely disassembled the snowmobile to determine its weight. The weight of its individual nodes turned out to be as follows:
- caterpillar - 9 kg;
- drive shaft assembly - 7 kg;
- two pairs of wheels with axles - 9 kg;
- engine and steering wheel - 25 kg; a pair of skis -5 kg;
- frame - 15 kg;
- double seat with uprights - 6 kg.
In total, everything together weighs 76 kg.
The weight of some parts can be reduced even further. Still, the weight for a sled with a track of this size is quite satisfactory.
The geometric dimensions of my snowmobile are as follows: the length of the snowmobile frame is 2 m; the distance between the axles of the support wheels (rollers) - 107 cm; track width - 47 cm. Track lug spacing depends on the thickness of the conveyor belt and it must be selected empirically (I got 93 mm).
I do not give the exact dimensions and drawings of the snowmobile parts, since everyone who is going to repeat the design will focus on those parts and components that they can purchase or make on their own.
In the photo, the stages of manufacturing a snowmobile according to the above drawing diagrams:
- Billets of lugs of the future caterpillar.
- Special drive sprocket from the Buran snowmobile.
- Homemade track drive shaft with chain and track sprockets installed.
- Conveyor belt drilling jig.
- Track rollers with axles and brackets for attaching to the snowmobile frame.
- The drive from the engine of the drive shaft of the track is carried out by a chain from the motorcycle.
- Snowmobile frame with drive shaft and track rollers.
- Ski turn control mechanism.
- On this snowmobile, I put plastic skis from children's Chinese sleds. But the plastic from which they are made turned out to be very fragile and by the end of winter one of the skis broke.
- Skis from the snow-scooter "Argomak" with an installed undercut (ridge) and mounting angles for installation on a snowmobile.
- Ski sleeves. It's very simple: no bearings. It is only necessary to apply lubricant to the threads, and a long service life is ensured. In addition, the ride height of the snowmobile can be changed by screwing in or out the hoses.
- The axle of the front wheels (track rollers) is fixed to the frame, and the axle of the rear wheel-rollers, by rotating the bolt, can be moved to adjust the track tension.
How to make a snowmobile on tracks: photo to article
DIY homemade snowmobile: photo
 1 PC. handmade felt homemade fabric flowers craft feltro…
For the movement of most motoblocks, ordinary wheels are used. The throughput of the apparatus in such cases is extremely small. Fortunately, there are several good ways, allowing you to turn the walk-behind tractor into an all-terrain vehicle or a snowmobile. To do this, it is enough to make homemade caterpillars.
Manufacturing methods and materials
When choosing a material for a future caterpillar with your own hands, you should take into account the type of work for which they are intended. The product should not only be extremely durable, but also lightweight for easy handling of the unit.
The first step is to install additional wheels on the walk-behind tractor so that there are a pair on each side. The future units will be mounted on them, the length of which will be the circumference of each wheel plus the distance between their axles, multiplied by two. All wheels must be of the same diameter.
The most popular raw materials for making do-it-yourself caterpillars include:
- Conveyor belts and roller chain.
- Waste car tires.
- Chains and belts.
Each method implies its own course of action.
Conveyor belt and chain
The method of manufacturing the unit from these materials, according to the majority, is the simplest. It does not require a large number of tools and materials. It is recommended to consider the following tips:

Tire construction
In addition to the product from the transport tape, you can make a caterpillar from the tire with your own hands. There is no need to sew and hook anything with each other, since the tire already has a closed structure with a special grip protector.
Ordinary passenger car tires will not work. I need to find products for trucks or tractors that have a pronounced tread pattern.
The manufacturing procedure for such a unit can be divided into three main stages:

It is worth carefully examining the tread pattern. It should be clearly defined to maximize the throughput of the walk-behind tractor by increasing the traction of the track to the surface.
Belts and chains
This method uses standard V-shaped belts. They are attached to each other using rivets that are placed on them. This track is made from two pieces of the same chain and belts. The algorithm of actions is as follows:

Thus, you can get a durable and high-quality do-it-yourself track from belts and chains. This method is the most time consuming of all presented.
Track tracks
Tracks are the main part of any track. Fortunately, you don't have to buy them from specialty stores. It is quite easy to make them yourself from various materials. The main thing to consider is the level of load that is planned to be applied to the walk-behind tractor. You can make tracks from:
- plastic pipes;
- wooden bars;
- metal tracks.
 To make tracks from plastic pipes, you will need a water pipe no. 40. It is cut into segments, the length of which is equal to the width of the caterpillar. After that, each such segment is cut lengthwise into two halves. A circular saw with a saw blade will help to cope with this.
When all the tracks are ready, they can be hooked onto the main structure. For this, furniture bolts No. 6 and large hemispherical caps are used. With these bolts, each segment is attached to the structure itself.
Thus, an excellent embossed track for a walk-behind tractor is obtained, which allows you to pass in difficult places even in winter.
A track made of wooden blocks is suitable for light loads, since the structural strength is not so great. To make a caterpillar from this material, you will need birch blocks of the same size and length, equal to the width of the tracks.
The main advantage of a track with wooden bars as tracks is the availability of materials, the lightness of the entire structure, and the ability to quickly make repairs.
It is not surprising that the most common and reliable are metal track links, because the level of their strength is quite high. Most often, metal pipes or a profile are used, which is cut into pieces of suitable length and attached to the track in the same way as in the previous methods.
The main disadvantage of this design is the large mass and complexity of repair. If one of the tracks bends during operation, it will take a lot of effort to replace it.
It is not so difficult to make a caterpillar for a walk-behind tractor with your own hands, although it takes a fair amount of time. It is important to treat the process with the utmost care and carry out all calculations correctly. Also, it is necessary to assess the degree of load with which the walk-behind tractor works, and choose the most suitable materials for the product.
Dear visitors of the site "" today we will figure out how to independently make caterpillars for tracked all-terrain vehicle and what is needed for this? Drove ... is the most passable among its fellows, and all because the specific pressure on the ground is evenly distributed over the entire lower plane of the caterpillar, that is, it is a homogeneous fulcrum. But on wheeled all-terrain vehicles, the pressure is distributed over 4 points, so they often get stuck and skid. A simple example to you, why tracked tanks? Yes, all for the same reason, in order to evenly distribute the huge weight of the machine on the plane of the caterpillar in contact with the ground, otherwise they will simply get stuck in the ground and not budge.
The first step is to get a conveyor belt, it looks like this. 
 You will also need a rectangular pipe.
  Well, of course, fasteners in the form of: bolts, nuts, washers, engravers.
  First, we make the blanks of the tracks according to the width of the produced caterpillar, saw it with a grinder and put it in a pile)
  After that, these blanks need to be given the desired shape and crimped on a special home-made machine. For clarity, let's see how a professional does it, 40 seconds for crimping one track is not a joke to you guys)
 It is advisable to lubricate the ends a little with used oil.
  After the track is given the correct shape, it still needs to be welded on the fangs-restraints.
 In the upper part, reinforcement is additionally welded in the form of the letter " V»
 In general, such a track should work.
  First, you need to check and fit directly at the installation site of the track itself.
  Then you can already start assembling the caterpillar, but first you need to make holes in the conveyor belt, this is mainly used homemade tool... The tube is sharpened from the end, and on the side there is a hole for removing chopped rubber.
  The tracks are also drilled with a drill, 2 holes on each edge.
  Next, we are already assembling the caterpillar into a single whole.


 This is how they make homemade tracks for all-terrain vehicles, as you can see, it is quite possible to do it yourself, which will significantly reduce the cost of the all-terrain vehicle you are assembling.
Thank you all for your attention!
Real SUVs have high cross-country ability (I mean, not city SUVs). However, their cross-country ability is often limited, and it is understandable that this is not a tank "embody". For example, on snowy slopes or swampy meadows, such a car is already ineffective. We have to resort to tractors and all-terrain vehicles on tracks, but tuning does not stand still, but develops by leaps and bounds, so literally in an hour you can put your jeep, even if it is a UAZ or NIVA, on tracks, removing the wheels, thus, we multiply the cross-country ability ...
The effectiveness of tracks has long been proven, but converting a car to such a chassis would mean a deep modernization of the suspension, which is very expensive and not always possible. Therefore, we needed such tracks that would sit in the regular places of the wheels, practically on standard hubs, without deep technical changes... And you know, such options have been around for a long time! Moreover, you can remodel almost any car, but of course, it is more efficient to remodel frame jeeps, or off-road vehicles with high cross-country ability, such as our "NIVA".
Design principle
Now blocks are sold for all four wheels of a car, we just remove the standard wheels, fasten special adapters to the hubs - we put on the tracks.
No, they are not large, but correspond exactly to the size of your car, they just fit into standard wheel arches, there are options even for cars although this is a bit absurd.
The design is also simple, with a triangular metal frame, with five (sometimes more) pairs of rollers at the bottom and one large one at the top. On which a caterpillar is worn, made using a special technology (many will say it looks like rubber), but this is not entirely true, wear resistance and elasticity are at a high level, they remain soft even at sub-zero temperatures. Of course, no one will give you the composition of the material.

In the upper "large" roller, a standard wheel hub is installed and put on a rigid hitch, thus, the rotating hub will transmit the rotation of the entire structure, so the all-terrain vehicle is ready for you. The big plus is that you can turn the steering wheel as if ordinary car with wheels, also when you need to just remove the tracks and put on the usual wheels.
Track dimensions
Of course, many are now interested in the size. So I want to run through them quickly. I personally will take the option for our cars, for "NIVA" for example, since they are more in demand for it.

Width - ranges from 320 mm to 450 mm
Height - about 700 mm
The length is about 1000 mm.
Weight - 80 - 100 kg.
From the side it resembles a triangle, and therefore will fit into any wheel arch.
Manufacturers
In fairness, it should be noted that they were developed in the United States, and only after that they were dispersed throughout the world. Now do several dozen, and maybe hundreds of companies around the world, including Russia.
If we take imported versions, then the most eminent of all is the company - Mattracks, this is one of the founders of the production of such "rollers". True, their prices bite, for the price of a set you can buy a Russian car.


If we take domestic manufacturers, then here we can highlight Chelyabinsk, it is there that they produce rollers for NIVU, UAZ, etc. The cost is several times lower than that of foreign counterparts.
The main advantages
The advantages are obvious - improved cross-country ability. And also an increase. Deep snow in the fields, swamps of small bogs, and simply "well" washed out roads become easy obstacles. If we take for what these tracks were originally developed, it is overcoming deep snow, they were made for rescuers on mountain roads, where ordinary SUVs simply do not pass. What can I say, the caterpillars have proven themselves only from the best side.
For example, watch the video where NIVA easily passes in deep snow, and "calmly" unfolds.
Re-shoeing from ordinary wheels does not require any changes in the suspension design; you can remove the wheels with your own hands and hang the tracks in literally 1 hour. And if you need to return the wheels back - an hour and they are in place. This adds a very big plus.
Minuses
Of course, there are also disadvantages, where can we go without them. The first, but obviously one of the most important, is the application on asphalt roads - here you need to withstand a special speed mode, almost all manufacturers recommend moving at a speed of no more than 40 km / h, otherwise the track itself is very quickly erased, you will simply throw it away.


Second, it is difficult for such "rollers", and I would even say impossible, to overcome a fallen tree, even not significant at 10-15 cm in height, ordinary SUV wheels would simply run over it, but the caterpillars would not.
Third, this is a fairly high price, although I will dwell on this in more detail.
Price
Needless to say, this is a very expensive pleasure. It is not entirely rational to take for fun and "ride" on snow-covered fields.
Foreign counterparts cost from $ 3,500 to $ 10,500. What is now at the rate of about 230 to 700,000 rubles!
Domestic manufacturers keep amounts from 100 to 250,000 rubles.
Prices "walk" from your car (the more, the more expensive), load, track width, etc.
Can you do it yourself?
YES of course you can, why not! After all, they are also produced by people. However, you will need to do technical research, calculate the load, weld the triangle. Look for rollers and the belt itself (many also make old rubber). As you can see, not everything is so simple - although it should be noted that it is realizable.

When operating in off-road conditions, tracked vehicles have undeniable advantages over wheeled transport due to its all-terrain qualities, allowing to overcome deep loose snow, soggy arable land or stony ford.
The popularity of tracked vehicles among household users is so great that many home craftsmen independently "change" their wheeled vehicles into homemade products - tracks made from scrap materials.
One of the options for retrofitting is to use old tires from MTZ tractors allowing significantly increase cross-country ability personal auto and motor vehicles with minimal financial costs.

For a tracked vehicle of any purpose, be it a tank or a snowmobile, the forward motion is provided by a tracked propulsion unit (DM).
It uses two motivating factors:
- torque M k, transmitted from the engine / power drive to the drive wheels;
- traction of tracks with the ground.
The caterpillar or caterpillar chain of the main engine is called a link structure, which is a solid continuous belt or chain.
For full traction on the ground, the track equipped with embossed protrusions serving as active lugs.
The principle of the caterpillar track is illustrated by the kinematic diagram of the operation of the main engine, located below. The following positions are indicated on the diagram:
- pos. 1 - caterpillar;
- pos. 2 - supporting rollers to prevent sagging of the track belt;
- pos. 3 - a driving sprocket (driving wheel), which converts the torque from the engine into the traction force required for the forward movement of the machine;
- pos. 4 - support rollers, providing full contact of the track bed with the surface of the ground support;
- pos. 5 - shock absorbers;
- pos. 6 - a guide wheel, which serves to direct the forward motion of the machine, and transfers part of its weight to the ground.

Crawler driving is carried out as follows:
- The driving sprocket (pos. 3) is supplied with torque M to.
- The spinning sprocket rewinds the continuous belt / track chain (key 2).
- The caterpillar (pos. 2) is in close adhesion to the support surface (ground, loose soil, etc.). It is affected by:
- force R z - reaction of the support surface, which the caterpillar transmits to the vehicle frame;
- tangential reaction of the soil support Р к.
The rewound belt / track chain is continuously laid in the direction of the forward movement of the vehicle on the surface of the ground support under the track rollers, creating for the wheels of the machine path with lower resistance to movement than on soft ground.
In the process of movement, the track rises from the supporting surface and transmits the pushing force to the vehicle frame.
The specific pressure on the support (soil) along the length of the track is uneven - increased in the area of the driving sprockets, decreased in the front part in the area of the guide wheel (pos. 6). The maximum ground pressure from the main engine is in the area of the track rollers (pos. 4).
Advantages of homemade gas engines from MTZ tires
Due to the continuous insertion of the track under the rollers of the machine, a large contact area of the tape with the ground, significantly reducing the average machine pressure on the ground.
The range of the average ground pressure of the equipment with the main engine is from 11.8 to 118 kN / m2 (from 0.12 to 1.2 kgf / cm2), which is significantly lower than the pressure of a human leg.
Such low pressure indicators provide protection of equipment from immersion in the ground, swampy soil or snow. By varying the size of the surface area in the contact zone of the caterpillar with the support, the optimal ratio of the vehicle's cross-country ability with its tractive effort for towing loads is achieved.
When equipping vehicles with caterpillar tracks, homemade Samodelkins use a transport belt or tires from automobile and tractor wheels.
The photo below shows homemade all-terrain vehicle on caterpillars made of reinforced conveyor belt 250 mm wide. The lugs are 25 mm high.
All-terrain vehicle on a caterpillar track from a conveyor belt:

For most craftsmen, old tires from MTZ tractors of various models are more preferable raw materials for the manufacture of main engines.
Among the main advantages of MTZ tires, as a source material, and the tracks themselves made from these tires, include the following factors:
- Availability old tires MTZ. Quite often, after dismantling, they are stored in the depths of enterprises' utility yards, cluttering up the territory.
- The tire is a closed continuous structure, does not require stitching of the ends ribbons.
- On a tracked platform made of a tractor tire no need to build lugs because the tires have a pronounced factory-made tread pattern.
- MTZ wheel tires have high strength and wear resistance, ensuring reliable, trouble-free operation of the track on soils containing sharp stones.
- Versatility applications - you can choose tires for all types of tracked vehicles, including measures to modernize equipment or increase the width of the tracks.
- Recycling of used tractor tires solves the most important task of recycling dismantled wheels - the possibility of their reuse.
From disadvantages working with tractor tires note two circumstances:
- limited fixed track length due to the dimensions of the blank tire;
- the need to double two tires when mounting a caterpillar with a width exceeding the width of one blank tire.
Requirements for converting equipment to caterpillar tracks
The figure shows simplest in design homemade - a cart with caterpillars made of tires.
Retrofitting of equipment at the main engine house is carried out exclusively for utilitarian reasons of pragmatic owners of wheeled vehicles or motor vehicles who wish improve off-road performance their "assistants".
For all models of equipment intended for driving in field conditions, the market offers serial versions of industrial-made main engines.
However, all this costs a lot of money, and tires free or very cheap.
Many equipment users manage to independently, in a home workshop, make tracks from tractor tires, install them on their cars and successfully operate in off-road conditions.
Regardless of the type of car or motor vehicle, the craftsmen take into account the following factors:
- To install the mechanisms of the main engine, it is necessary to equip special frame structures increased strength and rigidity, capable of withstanding increased weight and dynamic loads.
- When using improvised means, many craftsmen use pneumatic wheels as tensioners as well as a pair of driven and driven wheels. The tape is put on flat wheels, which are then inflated, creating the required track tension.
- The owner of the equipment must clearly define the purpose of the machine in order to select optimal sizes the width and length of the track.
- Taking into account the increase in the weight and traction loads on the engine after the installation of the main engine, it is necessary to optimize the correspondence between the maximum engine power and the track width. Otherwise the engine breaks down quickly.
When choosing the ratio of engine power and belt width of a homemade tracked installation you can be guided by the data of the price lists on all-terrain vehicles equipped with serial tracks.
Below we will consider the categories of machines that are most popular among the masters when re-equipping with crawler.
The main categories of popular vehicles equipped with main engines
The list of models of household vehicles and motor vehicles operating on loose snow and swampy soils is unusually wide.
The names of the machines themselves, adopted in everyday life, indicate their field of application.
Snowmobiles
it vehicle intended for movement on loose snow cover.
Unlike Englishism "snowmobile", which means any vehicle adapted to driving on snow (snowmobiles, all-terrain vehicles on tracks and pneumatic wheels, etc.), in Russia only a snowmobile is called a snowmobile. ski-caterpillar means of movement(rear main engine, in front - skis instead of front wheel) with governing bodies of the motorcycle type.
For utility snowmobiles, the engine power is 30-40 hp, the track width ranges from 38 cm to 50 cm and even 60 cm.
Accordingly, if the master sets as his task the creation of a machine for movement on virgin snow with a load, then he should be guided by these indicators.
Similar parameters must be maintained when creating the so-called snow and swamp-going vehicles.
If the master needs make a faster snowmobile(sports type), the width of the tire tracks can be reduced.
The weight loads of the speeder are much lower than that of the utility utility vehicle.
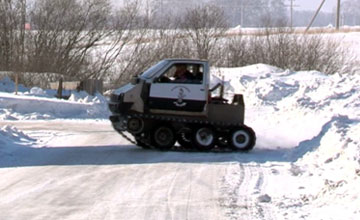
The illustration shows a motorcycle-based snowmobile equipped with a 23cm homemade track cut from an excavator tire.
The rest of the homemade snowmobile track is made by hand according to the basic principle.
ATVs
In everyday life they are considered to be any vehicle capable of off-road driving and even overcome water obstacles.
There are plenty of varieties of all-terrain industrial machinery:
- off-road vehicles;
- swamp walkers;
- amphibians;
- tracked tractors and conveyors;
- ATVs;
- ATV category cars, etc.
Their cost not everyone can afford, therefore, in home workshops they prefer to create their own exclusive products, “changing shoes” on their cars to tracks made of tires made by their own hands for an all-terrain vehicle.
Depending on the power of the vehicle engine, wider webs can be allowed.
For homemade all-terrain vehicles with a 40-70 hp engine. and with a small weight load, a tape width is sufficient 30-40 cm.
 For UAZ vehicles with 110-150 hp engine caterpillar width required 40 cm with track rollers (6 pcs.) and support rollers (3 pcs.).
Naturally, the height of the tractor tire profile will not be enough to overcome the water obstacle, it is necessary to install high lugs.
The figure shows an all-terrain vehicle based on the Oka vehicle with a tracked belt made of tires.
Motoblocks
Represented by numerous mobile devices on the basis of a single-axle chassis... Converted for the State Duma homemade options motoblocks are widely in demand among rural residents and owners of country houses or summer cottages.
The motivation for self-re-equipping the units, bypassing the purchase of serial tracks, is obvious.
The cost of the NEVA wheeled walk-behind tractor does not exceed 1000 USD... USA, while the simplest machines, adapted for driving on snow, are estimated at 5-10 thousand dollars... and higher.
The drive power of the walk-behind tractor (5-8 hp) is quite enough to be successfully operated as an all-season vehicle
Motorized dogs
Motorized towing vehicles, nicknamed in everyday speech motor dogs, are a mechanical coupling of a sleigh with a towing vehicle on the main engine. The driver and the load are placed in the sleigh.
Serial models are produced in a wide range of drive power (from 6 to 30 hp) and are equipped with a main engine made of a rubber-metal band with a width of up to 60 cm.
 Home craftsmen usually make tugs based on a 15 hp engine from improvised means, installing tracks from tires width 500 mm.
Such self-made motorized dogs are capable of transporting sleds with a load of up to 700 kg, developing speeds of up to 40-50 km / h.
Most often, a home-made caterpillar for a motor dog is made from a tire to save money.
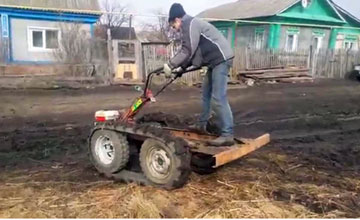
The photo shows a homemade towing vehicle based on a walk-behind tractor.
DIY caterpillar manufacturing algorithm
A caterpillar track for any model from the above categories of equipment is made from tires of various sizes corresponding to the selected design. We will analyze step by step how to make a caterpillar from a tire.
The work on the production of the tape is of a unified nature and is subject to a general algorithm.
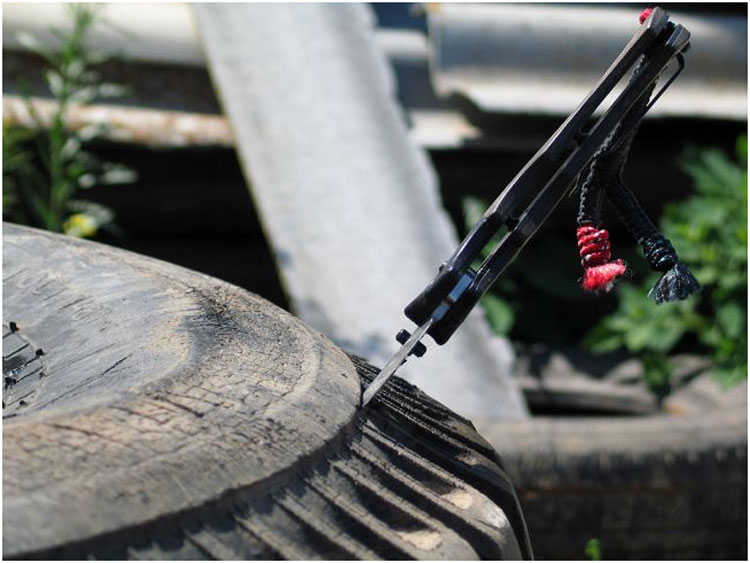
No special knowledge is required when making a track from a tractor or car tire, however you can't do without certain locksmith skills.
The process of forming a caterpillar track from an MTZ tire consists of several stages:
- A tire with a slightly worn tread pattern is selected.
- The track is cut for a caterpillar using a sharpened boot knife. Working with a sharp knife is traumatic and requires increased care and attention.
- To cut the rubber better, it is recommended to use a knife periodically moisten with soapy water.
- Cutting with a knife can be successfully replaced jigsaw, secured against possible injury.
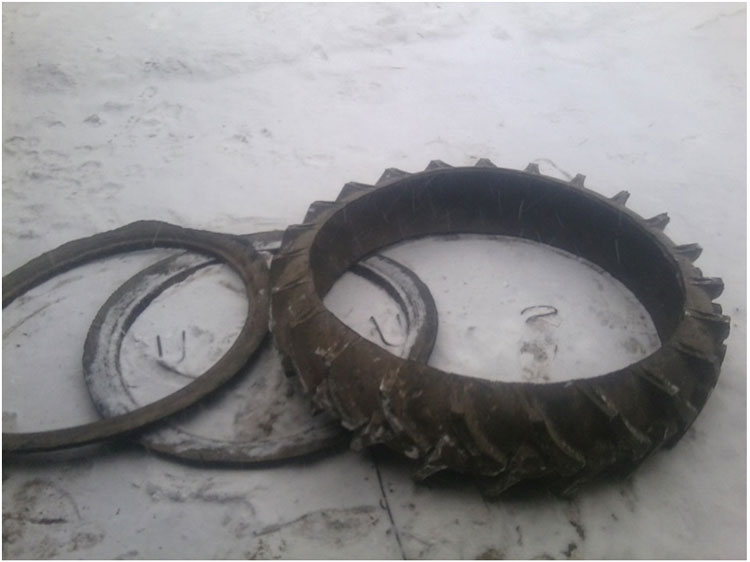
- Both sides are cut off tires.
- Excess material is removed from the inside of the tire.
The criterion for a well-performed work is smooth cut without tousled edges of the resulting tape.
Thus, the track element is ready for use:
Related Videos
You can see a homemade snowmobile track in action in this video:
Conclusion
Manufacturing homemade caterpillars for converting equipment to caterpillar tracks is a very popular way to expand the functionality of machines at minimal cost.
The use of dismantled old tractor tires for the main engine contributes to the solution of the issues of disposal of old tires without the use of traditional waste recycling methods - incineration, grinding, chemical treatment, etc.
In contact with