rules traffic require ignition running lights during the day while driving. This is due to the fact that a car with headlights on is certainly much more noticeable on the road. And this reduces the risk of an accident.
Many drivers consider connecting daytime running lights to a car too expensive - as an alternative, the rules allow the use of dipped beam or fog lights. However, these options are not entirely successful. Always on headlights will lead to the fact that after a short time it will be necessary to replace the lamps - you will not go anywhere from wear. Each product has its own resource: whatever the pattern of use, after the resource is exhausted, a replacement is necessary.
Do-it-yourself daytime running lights on a car
So, what do we have if we use options with foglights and low beam headlights? And here's what:
- premature wear of lamps;
- battery discharge and generator power consumption;
- increased consumption of gasoline;
- danger of forgetting to turn on the lights before starting to move and earn a fine.
Therefore, it is best to attend to the installation of regular running lights and connect them correctly. And best of all, if the connection scheme works on the principle of automatically turning on the lights after starting the car engine.
If you do not want to spend money on the services of specialists in the development and implementation of a DRL switching scheme, you can find options here that you can do yourself.
 Installation of regular running lights
 Necessary materials
Before connecting daylights, you will need to stock up on all necessary tools and materials. To do the job yourself, you will need:
- pliers;
- wire cutters;
- soldering iron;
- insulated two-wire wire;
- LED DRL;
- relay for cars at 12V;
- reed switch;
- single wire;
- plastic clamps.
After everything you need is in stock, you can start connecting the DRL on your car with your own hands.
Scheme 1
The first option provides automatic switch on DRL after the start of the ignition and off after the engine stops. At the same time, the minus is closed to the body of the machine, and the plus is connected to the plus of the ignition switch. All this is quite easy to do with your own hands, even without special knowledge in the field of electrical engineering. The main thing is to carefully monitor what goes where.
 Scheme for automatic inclusion of daytime running lights
 Scheme 2
The second option is essentially a variation of the first. Here, the same operations are performed with one small difference - after turning on the dipped beam headlights, the running lights are turned off. Here, the plus is connected, as in the previous section, and the minus is connected to the plus of the low beam lights.
This is because the incandescent lamp, which is used for low beam, has a lower resistance, and a stronger current flows through it. At the moment when the dipped beam is turned on, a plus appears on the minus of the DRL, and they go out.
This option is also quite easy to implement with your own hands - it is important not to confuse and connect all the contacts correctly.
 Wiring diagram for daytime running lights
 If you have incandescent lamps installed as dimensions, you can use this principle for dimensions.
Scheme 3
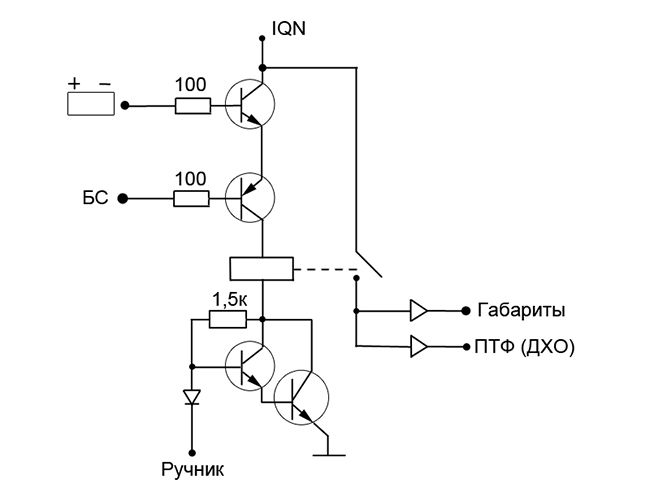
Here, the running lights are switched on after the engine is started. The relay, battery and alternator are activated. We connect the minus of the DRL with the body of the car, and the plus with the relay contact under the label 30. The relay contact with the label 87 is connected to the positive of the battery. We close the relay contact with the label 85 to the mass of the car through the DRL. And with the label 86 we connect to the reed switch, the second contact of which we turn on to the plus of the generator. After starting the engine, we move the reed switch around the generator so that the relay is activated and the running lights turn on. After that, we pack the reed switch in a thermopolymer and attach it to the generator. It is very important that the reed switch is mounted exactly in the place of the generator where the relay is triggered.
 Scheme of connection of running lights from the generator
 Scheme 4
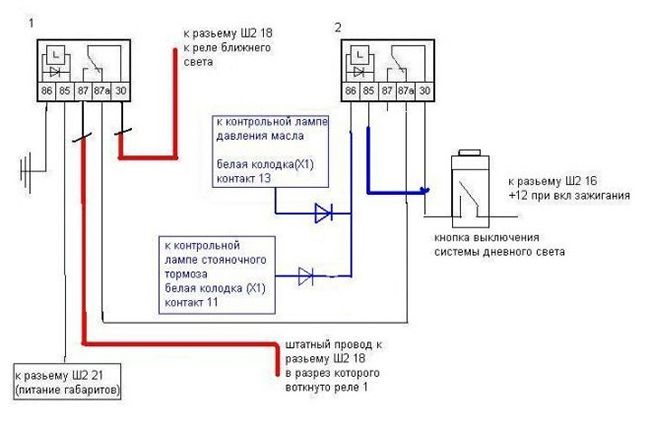
This option is a variation of the previous scheme when a reed switch is not available. Then the contact with the label 86 is attached to the oil pressure lamp in the dashboard. In this case, the lights will also turn on after the engine is started. This option is done by hand a little easier than the previous one.
 How to connect daytime running lights
 Conclusion
According to the rules of the road, the driver is required to turn on the daytime running lights so that the car is more visible on the road. It is allowed to use fog lamps and dipped-beam lamps as DRLs. But this is impractical, because it leads to battery discharge - the generator power is not enough for its constant recharging. This will lead to excessive consumption of gasoline and premature wear of the lamps.
Therefore, there are several options for connecting LED DRLs with your own hands - they provide for their automatic activation after starting the engine or turning on the ignition.
Many motorists have already heard about the benefits of DRL and are starting to look for a decent model in stores. The assortment is widely represented by Chinese junk costing from 300 to 5000 rubles. Some do not understand at all why put them on a car and buy rubbish for 500 rubles, which shines a little brighter than the dimensions, the power is 2 watts. Probably you have seen such ones, they still shine with blue light, and some of the LEDs are not lit or blinking. Then they have a problem, how to connect running lights so that they work longer. Garage craftsmen offer various schemes connecting DRL, the most difficult thing is to choose the right one.
Common names to be used in the text: DRL "Daytime Running Lights", daytime running lights.
- 1. Types of connection
- 2. Mode of operation
- 3. How to connect DRL with control unit
- 4. Choose a stabilizer
- 5. Connection via relay
- 6. Other less popular methods
- 7. Checking the installation
- 8. An example of benefit
Connection types
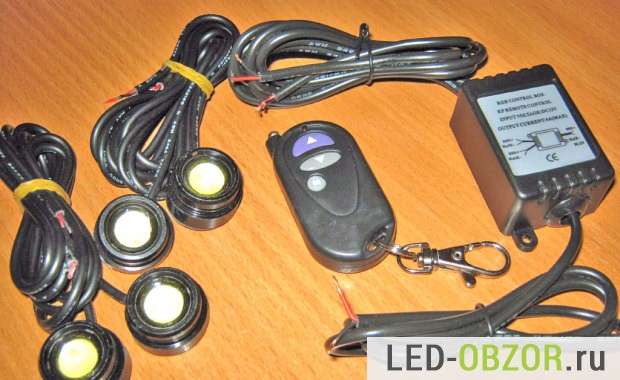 DRL Eagle eye, eagle eye
The wiring diagram for navigation lights depends on the configuration and your budget. There are 3 types of equipment:
- the most inexpensive, only DRL;
- average in price, stabilizer included;
- expensive, with a control controller.
If you have the cheapest and worst ones, then there is no controller or control unit included. Such a unit performs the function of a voltage stabilizer and control on and off.
In the middle configuration there is a voltage regulator for 12v. There are power surges in the car network, and the LEDs do not like this very much and fail. The stabilizer will significantly extend the life of the LEDs. But in this option, you will have to choose a place to connect so that they turn on only when the engine is running. There are many places for this, for example, an oil pressure sensor or a generator.
 domestic model
The expensive version is equipped with a control unit that connects directly to battery in the car. According to the principle of operation, they are of two types:
- determine the difference between the number of volts with the engine turned off and running;
- cheaper, this is the inclusion when the voltage rises above 13V.
The first option is the best, regardless of the voltage on your battery, always turn on and off correctly. The second option is budgetary and does not always work. With the engine off, the volts must drop below 13V for the controller to turn off the DRL. But if your battery is new or well charged, then even after the engine is stopped, the voltage on it will be higher than 13V for up to several hours. That is, the daytime running lights will not turn off on their own until there is less than 13V. The only drawback will be its own power consumption when the controller is waiting for the engine to start. It will discharge the battery along with the burglar alarm.
Working mode

By technical regulations for cars, the DRL should automatically turn on when the engine is started. When you turn on the dipped beam, they should automatically turn off so as not to blind in dark time days.
On sale there are also combined models with installed turn signals. The direction indicator duplication section is connected separately in parallel with the standard turn signals. Having a stable diet is also a must.
DRL with turn signal
For models with additional control, there is an accompanying backlight function that works for 10 minutes after the engine is turned off. It illuminates your path to the house or dugout, depending on where you live. Osram DRL has a mode in which they do not turn off, but dim by 50%. I just don’t know how legal it is and whether it will blind.
How to connect DRL with a control unit
I prefer the DRL connection scheme using the control unit, the most reliable way, suitable for any car and does not require any knowledge. In Russia, they ask for a lot of money for such a block, so I buy it at the Aliexpress market. The price is from 300 to 600 rubles, depending on the functionality.


Choosing a stabilizer
In this form, the first and second methods will be combined. Even if your daytime running lights do not have a stabilizer, I recommend purchasing one or making it yourself.
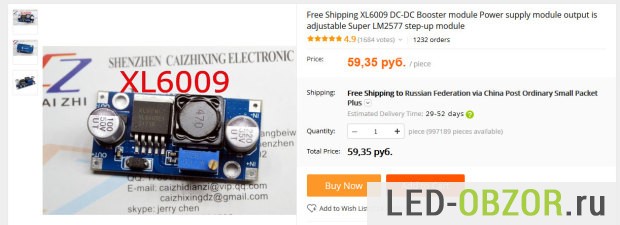
You can buy Chinese modules at a price of 50 to 120 rubles, so as not to order on Aliexpress, look at Avito, there are very reasonable prices. The most common modules are pulse LM2596 and linear LM317. Of course, they are outdated, but the current will be pulled by 1 ampere, it will be a power of 12 watts.
Modern for 2016 are considered on XL6009, XL4015 microcircuits. They have higher efficiency and heat up much less. Withstand a current of 2 Amperes without a cooling system for the microcircuit, this is equivalent to a load of 24 watts.

Connection via relay

On forums and websites, you will find different ways to connect daytime running lights with your own hands, it will be different for each brand. Specialized relays are also sold, for example, Forget-Me-Not, designed for any car.
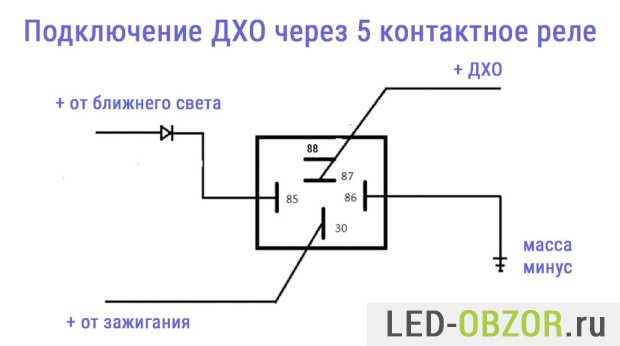
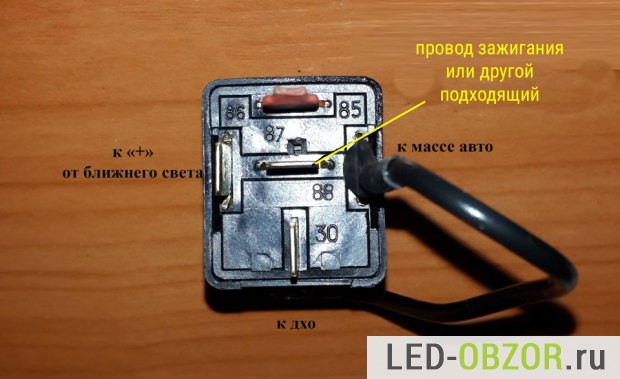
The principle of operation is simple. Power for the daytime running lights is supplied from the ignition switch wire. The positive wire from the far and near breaks the circuit when voltage appears on it. For this, 5 contact relays are sufficient. First, look at the solution on forums that specialize only in the brand of your car. Perhaps you will find a simpler solution.


For example, in the Duster, you can connect the DRL to the cigarette lighter, it is energized only when the ignition is on. It's better than looking for an ignition wire in the wiring. In any case, I recommend putting a fuse in case of a short circuit.
In many circuits, a gauge wire is used to disable the DRL. This is wrong DRL should not go out when the dimensions are turned on, only with low beam.
Another type of daytime running lights connection scheme is the installation of a relay in a regular car relay unit without any upgrades. It includes a distant 30% or 50%, which will be enough to indicate the transport on the road. If the far one consumes 120W, then 30% is equal to approximately 36W, 50% is equal to 60W.

Other less popular methods
Many people are interested in how to connect DRL without a relay on their own, but it depends on the electrics of your car, look for a solution in online clubs dedicated to your car. The most important thing is that power is supplied in this place after starting the engine.
The main DRL connection diagram, through a 4 or 5 contact relay, which turns off when the dipped one is turned on. Whoever is not too lazy to rummage through the wiring of a car is connected from an oil pressure sensor or a generator. On any vehicle, when the engine is started, the oil pressure light on the dashboard lights up, the signal from this wire is used to supply power. The second way, how to connect running lights yourself, is to connect to a generator. They will turn on automatically when the voltage appears on the generator.
Checking the installation

Most car owners, after connecting the running lights with their own hands, like to take a photo of their junk. To make it not so dim, do it at night at close range. Due to their illiteracy, they do not know what to check in sunny weather from a distance of 100 meters. Therefore, they are called daytime, not nighttime.
Benefit example
When traveling in winter for short distances, especially in severe frost, a large amount of battery energy is spent on starting the engine. Over time, the battery loses its capacity and holds a charge worse. Using DRLs instead of low beams will allow you to charge your battery faster while driving.
Let's calculate:
- dipped beam consumes about 100W, 2 lamps of about 50W each;
- decent DRL up to 15W;
- 100W - 15W = 85W of energy will be consumed less.
For example, in my Duster there is a regular heating element that heats the interior until the engine warms up. Accordingly, the car will warm up faster.
Not so long ago, our authorities passed a law that, regardless of the time of day, fog lights or DRLs must work on cars. This decision was due to the experience of European experts, who proved that thanks to the working light elements on the PBX, it is possible to significantly reduce the percentage of traffic accidents. In this regard, since 2010, changes have been made to GOST and SDA, according to which inoperative fog lights or missing DRLs (DRL) can cause a rather “unpleasant” fine (1,500 rubles).
But, despite the fact that the installation of daytime running lights has now become mandatory, some car owners are convinced that they have found a way out of the situation. Particularly enterprising drivers decide to simply connect the dimensions in the low beam headlights so that they turn on with the engine, naively believing that this will be enough. Unfortunately, parking lights they won’t save you when meeting with a traffic police officer, since you can’t use them instead of DRLs. So if you are not the owner modern car, in which “hybrid” fog lights with DRL are already installed, then there is no escape from the installation of new light elements.
You can install navigation lights in a specialized workshop or on your own. If you are confident in your abilities, then before starting work, carefully study the rules for installing navigation lights on a car.
GOST requirements for the installation of DRL
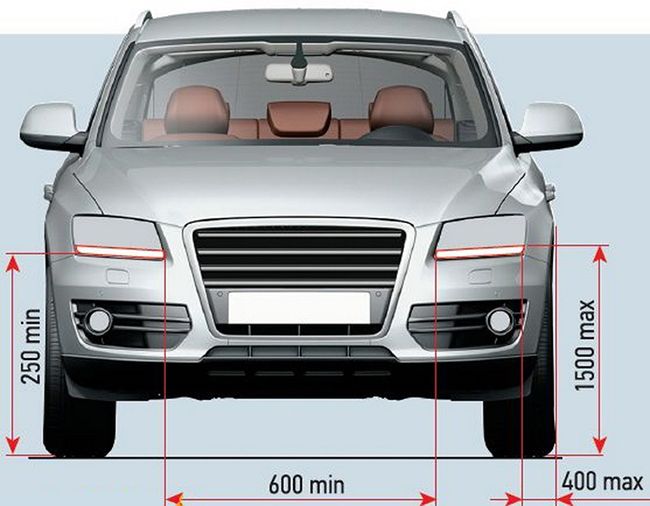
According to GOST R 41.48-2004, installation and connection of running lights with your own hands must be carried out strictly according to the following requirements:
- A distance of 600 mm must be maintained from the edge of the car body to the DRL. It is allowed to reduce this indicator to 400 mm, but only if the overall width of the machine is less than 1.3 m (clause 6.19.4.1).
- The distance from the ground level to the lighting elements should be in the range from 250 mm to 1500 mm (clause 6.19.4.2).
- DRLs should be directed forward and mounted on the front motor vehicle(clause 6.19.4.3).
- A certain geometric visibility is maintained. According to paragraph 6.19.5, the horizontal angle beta should be 20 degrees in and out, and alpha 10 degrees down from the horizontal and up.
At the same time, a certain scheme for connecting navigation lights is not reflected in any way in GOST, so here you are free to make a decision yourself. However, there is a small nuance. The installation of running lights according to GOST also implies the automatic switching on of DRLs together with the engine of the car and turning them off when the headlights are on. The only exception is to turn on the high beam for a few seconds to signal other drivers.
Based on these requirements, the choice of running lights must be approached carefully.
How to choose running lights
The stores offer a wide selection of DRLs from a variety of manufacturers, various configurations and colors. However, not every lamp is suitable for use as running lights. For example, halogens and xenon will not withstand constant work, they will “eat” a lot of energy and discharge the battery. Incandescent lamps are also not the best the best choice, but LEDs are considered the best when installing DRLs.
There are also many diode running lights. The best are considered to be products in glass cases and lensed LED DRLs for fog lights. The rest (on rubber bands, "eagle" and "dragon" eyes, in the form of SOV plates) do not meet the stated GOST requirements.
Before connecting the daytime running lights with your own hands, make sure that:
- DRLs match the shape, type and design of your vehicle's bumper.
- The size of the DRL unit, which is selected based on where the running lights will be installed (in the air box or on the bumper), allows you to mount them in your car.
- The number of LEDs in the block does not exceed 5 pieces for each. If the light is too bright daytime lights will shine as "dimensions", which is unacceptable.
- The DRL luminous intensity indicator must be not less than 400 cd and not more than 800 cd, and temperature Range lamps range from 4,300 to 7,000 K.
- Running lights emit pure white light (yellow and blue products are not allowed).
If we talk about manufacturers, then the most reasonable thing would be to purchase a ready-made Hella or Philips DRL kit. Such blocks are equipped with everything you need (including the controller) and fully meet the requirements of those. regulations.

Having purchased DRLs for a car, or having made them yourself, it remains only to prepare everything necessary so that the installation of daytime running lights with your own hands goes without “surprises”.
What is required for self-installation of DRL
To work, you will need the following materials and tools:
- Any crimping device, such as pliers.
- Wire cutters.
- Blowtorch and lighter. The latter will be required in order to tighten the heat shrink tubing.
- 3-4 meters of insulated two-wire wire, for example, PVA 2x1.5 or 2x0.75 (required when two DRL units are connected in parallel to each other).
- Any sealed contact (reed switch).
- A single-core wire with a diameter of about 1.5-2.5 mm and a length of about 3 meters.
- Plastic clamps.
- The usual four-pin relay for 12 V.
- LED DRLs.
You should also take care of a clean, dry place where you will work. After that, you can begin to install additional light elements.
First of all, decide where exactly the daytime running lights will be mounted. On some cars, there are already ready-made holes for additional foglight modules; in other cars, a radiator grill is used for DRL. The last option is the best, as in this case you will be able to withstand all the necessary distances and boundaries.
Just remove the grille and cut out the holes for future lights yourself. It is important to remember that the light must be supplied at a certain angle of inclination. You may need to drill an extra hole for this.
DRL connection diagrams
Since the DRL can be mounted as you wish, there are many connection schemes that allow you to configure the optics in the most convenient way for the driver. Consider the most popular of them.
Option 1 (to speed sensors)
This connection of running lights through a relay, the diagram of which is shown below, is considered one of the simplest. In this case, DRLs will turn on depending on the operation of the speed sensor. In order to implement this circuit, it is necessary to connect contacts K1.1 to the circuit section (into the wiring break) from the low beam switch button to terminal 85. In this case, you can use any relay with a breaking pair, but experts recommend using the product with the TS code.

If you want the proximity lights to work while the engine is on, and not the parking lights, then the contacts must be “paralleled”.
Option 2 (to oil sensor)
Another scheme for connecting daytime running lights through a relay uses an oil sensor. It’s worth checking right away that it is working, because if the regulator gives incorrect information about the fluid pressure, then the operation of the entire system will be disrupted.
With this installation of DRL, the lights will turn on when the engine is started, disconnected from the dimensions. As optics, you can also use low beam or fog lights.
Option 3
It will be a little more difficult to connect DRLs in such a way that they turn on when the engine is started and turn off when it stops. In this case, the running lights will turn on together with the low beam headlights. This will require two low-power diodes (for example, 1A + KD10), which must be connected in series. After that, wires about 400 mm long are soldered to the bulbs and they are connected. Do not forget that they are polar.

At the next stage:
- Dismantle and disassemble dashboard machine and connect the "blank" to X1 (most often the wire is yellow).
- Remove the button through which the optics will turn on.
- Plug the other end of the wire into the connector.
- Reinstall the button and check if it works.
Option 4 (connecting running lights from a generator)
To implement such a project, you can use one of three schemes.
The first is suitable if only the handbrake and the motor are involved.

The second circuit for connecting navigation lights from the generator will require the use of an additional resistor responsible for turning off daylight at the time of activation of the dimensions or headlights.
The third scheme will allow you to deactivate the running lights:
- When the handbrake is raised, during the start of the internal combustion engine or during the automatic start of the engine along with the alarm.
- When turning on the dimensions (in this case, it is necessary that the headlights or foglights work in normal mode).

Roughly speaking, this type of connection "cancels" the automatic start of the DRL at the same time as the generator is ignited.
Healthy! It is this scheme that is “working” during the passage of the TRP.
Before connecting the running lights from the generator, it is recommended to watch the video at the end of the article. The fact is that there is not one or two ways to activate DRL. However, the connection will be much easier if you have purchased a ready-made set of running lights.
Option 5 (connecting a ready-made kit)
In order not to rack your brains over how to install running lights on a car yourself, the easiest way is to buy ready-made control units to automatically turn off and turn on DRL. To install this module you need:
- Connect the black wire to the negative of the battery, and the red wire to the positive.
- The orange wire (if it comes with the kit) must be connected to the "gauges" or low beam. If the wire is not connected, then the lights will not be deactivated when the dipped beam or parking lights are turned on.
![]()
After installing DRL according to any of the schemes described above, it is necessary to check that the installed elements work correctly. To do this, start the engine and see if the light on the control panel is functioning, if the running lights are activated, and so on.
In custody
In order to activate the DRL on the car, you just need to comply with the requirements of GOST and understand at least a little about electrics. If you bought ready-made LED DRLs from well-known manufacturers, then the process of installing light elements will be much easier.