Each owner of suburban real estate is faced with the problem of processing a land plot. Since most of the local area is set aside for a vegetable garden.
It is very problematic to handle it by hand with ordinary summer cottage tools. It takes a lot of time to cultivate and level the soil, and the process also takes a lot of effort.

The best solution to the problem would be to buy a walk-behind tractor, with its help you can cultivate the land in the shortest possible time, and you do not need to use physical force.

But, not everyone can afford to purchase this unit, since its cost is high. However, you can make a walk-behind tractor with your own hands. In terms of quality, it is in no way inferior to analogues that are sold in stores. And you can make it from scrap materials, of which there are usually a lot in summer cottages. The first such inventor was Valentin Arkhipov.

From scrap metal and a motor from a chainsaw, "Druzhba" was able to construct a walk-behind tractor, which not only plowed the ground, but also hilled plantings. Next, we will consider how to make a walk-behind tractor according to the Arkhipov principle.
Design features
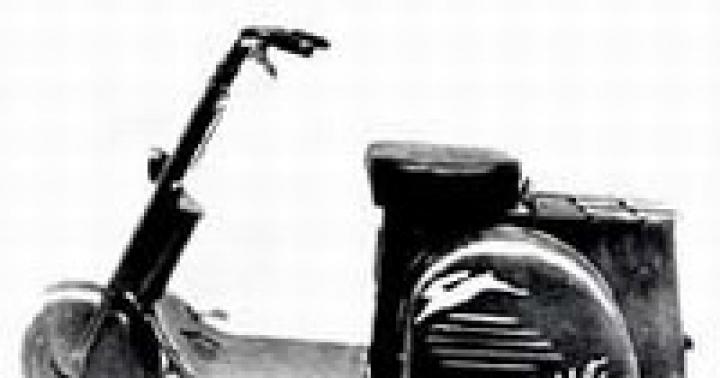
In the photo of the walk-behind tractor, you can see that the structure has two wheels, an engine, a frame and chains. To create a walk-behind tractor does not require a lot of materials. As a rule, they are all in barns. Valentin Arkhipov took the engine from the VP-150M scooter, since it had a cooling system for the cylinder head with the help of air.

The frame was made by the inventor from pipes that were U-shaped. And also an axle was made on a lathe, on which the wheels were subsequently attached. Arkhipov made four rods for them - one main and three regulating ones, which connect the walk-behind tractor with the steering system and the plow.

On the device, the chain pitch is 12.7 mm and 15.9 mm. Number of Teeth Per Sprocket:
- secondary axis - 20, 60;
- output axis - 11;
- running axle - 40.

There are many similar devices that are created on the basis of the drawings of the Arkhipov walk-behind tractor. Since its unit has a number of undeniable advantages.
Tractors and tools that work the ground are connected by means of hinges. This gives the walk-behind tractor more maneuverability. It can change the direction of travel without removing the plow from the furrow.

When cultivating the land with a walk-behind tractor, many are faced with the problem of skidding the unit to the side. Arkhipov solved this problem. He shifted the plow axis slightly to the left in relation to the direction of travel.

The inventor managed to make automatic level plowing depth. Which is very practical, since you do not need to lower or raise the plow yourself every time. Consequently, the cultivation of the land is much faster.

Instructions for creating an aggregate
First of all, you need to make a running shaft. To equip it, you need to connect it to the bearings. After this, the sprocket is welded, and overrunning clutches are installed.
During the operation of the apparatus, they perform a differential function. Finally, the body is complemented by a motor frame and wheels. Can be attached to the motor mount steering system, traction and hiller for the walk-behind tractor.

To connect the frame to the engine, two arc-shaped pipes are needed. Between which, when connecting, it is necessary to leave space for placing a container for fuel.

To connect the resulting structure, a special bracket is used, which is welded to the main part of the unit. Upon completion of all work, you can install the trailer on the walk-behind tractor.

Modernization of the walk-behind tractor
The adapter for the walk-behind tractor can be supplemented with various additional equipment... Which will not only plow the land, but also cultivate. Therefore, the Arkhipov walk-behind tractor is recognized as the most functional and practical.
Note!

Many people use a walk-behind tractor not only for agricultural needs. It is very easy for them to clear snow from the local area. To do this, you just need to install an additional roller and one more sprocket on the unit.

As with any equipment, the unit may fail and breakdown may occur. However, the repair of walk-behind tractors is extremely simple. And there should not be great difficulties with the repair. So no special tools or additional equipment are needed for repairs.

Photo of a walk-behind tractor


Note!


It is not an easy task to process a plot with a large area, in which a significant part of the territory is allocated for a vegetable garden, using only improvised tools. Loosening, digging, and weeding the garden by hand takes a lot of time and effort. It's good when there is an opportunity to purchase a walk-behind tractor, which will become an indispensable assistant on the site. But you can make it easier to work on the ground by making a walk-behind tractor with your own hands.
We build a walk-behind tractor according to the instructions from Arkhipov
The device of the walk-behind tractor is a self-propelled car on two wheels, equipped with an engine removed from the VP-150M scooter. The reason for choosing this particular engine was that it has such a design solution, thanks to which the forced cooling of the cylinder head with air is carried out.
Such a motor from a scooter is capable of operating at lowest speeds at fairly heavy loads

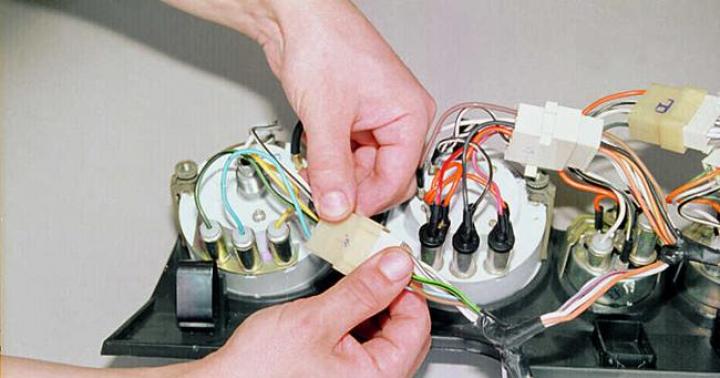
For the construction of the walk-behind tractor, the master used control cables, engine mounts, and also a double arc of the frame, handle and chain taken from the scooter. The rest of the construction details were manufactured
Separately, the designer made a U-shaped frame welded from pipes and a wheel axle turned on a lathe. He also made 3 homemade hinges for the main and control rods. They will be used as connecting elements between the walk-behind tractor itself, its steering wheel and the plow.
A steel pipe is attached to the frame of the unit by welding, ending with an axle, which is necessary to tension the cables going to the engine gearbox. The tension itself is carried out by means of a swinging rocker arm, the gear lever of which is a welded piece of steel pipe.
The pitch of the chains used to create the device is 12.7 mm and 15.9 mm. The number of teeth in the sprockets: output shaft - 11, output shaft - 20 and 60, travel axle - 40.
Why is this particular design good?
There are more than a dozen analogs of such a model, but in comparison with them, the original model of the Kaluga master walk-behind tractor has a number of indisputable advantages.
- Swivel connection. Most of these machines are rigidly coupled with working tools and tractors, which makes it difficult to maneuver the machine and thus make it difficult to work with it. The details of this agricultural unit are connected by means of hinges. This makes it possible to change the direction of movement during work, if necessary, without removing the plow from the furrow.
- Offset of the axis to the direction of travel. Many owners, when cultivating the soil with the use of a walk-behind tractor, faced such a difficulty that in the process of moving forward under the influence of soil resistance, the unit is pulled to the side. A lot of effort should be made to level the furrow. To compensate for such a skid, the foreman positioned the plow axis at a slight angle towards the direction of travel. When plowing, the structure is slightly turned to the left. The desired position can always be adjusted with the three link pivots.
- Level of the set plowing depth. If in other models the plowing depth is maintained by lowering or raising the plow, then when working with this walk-behind tractor, it is performed automatically. Regulation is carried out by changing the angle of the plow in relation to the furrow. The structure is equipped with a field board, which acts as a lifting force when the plow is buried. If, on the contrary, a ploughshare appears above the surface of the earth, then its angle of attack instantly increases, under the action of which it again plunges into the ground to a given depth.
Step-by-step device assembly technology
The assembly of the structure begins with the arrangement of the running shaft. To do this, a housing with bearings is attached to it, an asterisk is welded on and overrunning clutches are mounted, which will perform the function of a differential during operation. After that, the structure is equipped with wheels and a frame. A telescopic rod, a plow and a steering wheel are installed on the fixed frame.

The main elements of the travel shaft: 1 - shaft, 2 - sprocket, 3 - cover, 4 - bearing housing, 5 - support platform, 6 - bearing No. 308, 7 - overrunning clutch housing, 8 - dog axle, 9 - dog, 10 - ratchet, 11 - bearing No. 307, 12 - washers, 13 - wheel, 14 - pawl spring
An agricultural walk-behind tractor is equipped with special wheels, which, unlike rubber counterparts, are capable of providing better grip on the ground.

These metal wheels are not clogged with earth. When in contact with the ground, they do not compact it, but rather loosen it
To connect the frame of the unit with the engine mount and the frame of the scooter itself, two arcuate pipes are used. A place is provided between them for placing a fuel tank.
To equip the engine, a bracket is used, ending with a steel axle with a length of 150 mm. The bracket is welded cantilever to the U-shaped frame of the structure. A motor with a suspension is suspended on the axle itself. The assembled structure is connected to the arched arches of the frame. Only after that the secondary shaft is mounted, the control cables are pulled and the chains are tensioned.

The main elements of the control unit: 1 - connecting axle, 2 - strip, 3 - pipe, 4 - handles

Connecting elements of the structure: 1 - main rod, 2 - control rod
How this whole thing works - video example
An illustrative example of the use of a walk-behind tractor:
How can you upgrade a homemade walk-behind tractor?
The Arkhipov walk-behind tractor is multifunctional. It can be used as a plow, or else. To do this, it is sufficient to replace the detachable parts for the plow with parts with the cultivator blades removed. The walk-behind tractor will deepen the furrows into the ground and place potato tubers in them. To plow the tubers, you just need to put the dumps in place and walk the unit between the planted rows.
The agricultural unit is also convenient for harvesting. Using different plows, you can change the working width. The unit is also good in that it is able to collect missed potatoes and tops of plants left after harvesting. For these purposes, it is equipped with a rake or harrow.
The universal design can be used not only for agricultural work. In winter, it is successfully used to remove snow. A faithful assistant will also come in handy for cleaning the paths of the local area. By installing a roller with a round brush and an additional sprocket on the walk-behind tractor, the owner will make it easier for himself to clean the sidewalks.
Land plots in villages and large summer cottages require colossal labor costs during the period of plowing, hilling and cultivation. The task can be greatly facilitated with the help of a tractor, but its cost for many small farmers and gardeners is prohibitively high. An excellent solution in this case would be to assemble a homemade walk-behind tractor from a chainsaw or motorcycle.
Application area
The advantage of the walk-behind tractor lies not only in its low cost, but also in its increased maneuverability, which allows work to be carried out in areas where the tractor simply cannot pass in size. It can handle plots as small as one square meter.
Depending on the installed additional equipment, the walk-behind tractor is used to carry out certain types of work on the land. Lightweight models are usually equipped with a weeding tool and a milling cutter. Heavier specimens can already be used for plowing, hilling and mowing.
On a heavy walk-behind tractor installation of the following devices is allowed:

With the help of such a device, if you add a seat and a trailer to it, you can transport various loads weighing up to 300 kg over short distances. It is actively used for planting and collecting potatoes and other crops. The walk-behind tractor acts as an irreplaceable assistant when cleaning large areas from snow, drilling and fertilizing the soil.
DIY unit design
Despite the fact that the cost of such a device is many times less than a full-fledged tractor, not every summer resident or villager can afford to buy a factory-assembled walk-behind tractor. Prices for branded products range from 30 to 200 thousand rubles. The cheapest are units made in China, the reliability of which is highly questionable.
Assembling a homemade walk-behind tractor with your own hands is a profitable option. The required costs, in the presence of most of the spare parts, which are usually always available in private households, will be minimal, and the quality is no worse than the factory one.
Necessary components
Before starting assembly work, you should decide what rated power the homemade walk-behind tractor will have. Most the best option- use the IZH Planet 5 motorcycle or a powerful chainsaw, for example, "Ural", as a spare parts donor. But you can use any similar engine.
To assemble a homemade walk-behind tractor you will need:
- blueprints;
- welding machine;
- set of tools;
- steel tubes;
- car wheels or sheet metal;
- donor (motorcycle or chainsaw).
In the process of carrying out the work, additional parts will be required to connect the engine and frame. Attachments can be used from the factory or can also be made independently from improvised means.
Frame making
Since in each case, the design of the unit may differ depending on the parts used and the engine, before starting the assembly, you need to draw up a work plan and make the necessary design drawings, relying on the operating manual of the factory walk-behind tractor.
General principles and the procedure for the manufacture of the supporting structure is as follows:

In addition, you can use a ready-made motorcycle frame, slightly modifying it. You will need to remove the front fork and any parts that interfere with the installation of new equipment. Behind it, a hitch mount should be welded.
With this option, they usually immediately install the wheels from the car, adding an axle made of solid round timber to the design.
Power unit creation
 Regardless of, motorcycle engine installed on a walk-behind tractor, from a scooter or a chainsaw, all of them must have an active air cooling... To facilitate starting, it is required to change the power system by replacing the fuel supply valve with a petal.
Muffler use motorcycle or they make it independently from a pipe with a diameter of 70 mm. To do this, you need to cut off a small part about 25 cm long from it, fill it with sawdust and shavings. The outlet must be narrowed in half.
The muffler should be located so as to completely ensure the removal of exhaust gases away from the person who will operate the walk-behind tractor. A separate steel structure is assembled for the engine from pipes with a diameter of 42 mm. Outwardly, it should resemble a sled with brackets that have holes for bolts with which it is attached to the main frame.
Main nodes
In addition to wheels, an engine and a frame, a multifunctional walk-behind tractor must be equipped with additional units, without which it is impossible to perform a number of basic tasks, and its use will be limited simple transportation of goods.

The travel reducer is a gearbox element that makes possible work machine at the lowest speed. In factory models, the travel reducer is installed on the gearbox, respectively, this must be done on a home-made walk-behind tractor. When planting or harvesting potatoes, sowing or plowing the land from power plant maximum power is required at the lowest rpm. You won't be able to achieve this effect without installing this node.
A gearbox is a mechanism that transfers engine torque to individual units that drive the walk-behind tractor. Install it between the wheels of the unit and the engine.
When working with some additional equipment, the transmission of torque occurs directly to it. If a drill, cutter, snow blower or tracks are installed, the gearbox starts working directly with them. Without appropriate experience and knowledge, you should not try to assemble and install this unit on your own: it is better to purchase it in a store or remove it from old equipment.
Attachments
 A motoblock is a multifunctional unit and, in addition to processing a land plot, it is actively used when cleaning territories, transporting goods and mowing grass. With the help of a bracket mounted on the rear of the frame, the following are attached to it: plow, harrow, rake, milling cutter, digger, bulldozer knife, rollers, brushes and other devices.
Many models, including home-made ones, are equipped only with a steering wheel. In this case, a person walks behind the walk-behind tractor in the process of performing work. However, if necessary, an adapter can be made that will allow the unit to be operated while seated.
For the adapter you will need:
- steel sheet;
- seat;
- a pair of wheels;
- pipe;
- coupling;
- tools and welding machine.
At the end of a rectangular pipe, 1.7 m long and 6 cm wide, 4 cm high, you need to weld a half-meter pipe on which the wheel racks will be located. The height of these racks from the attachment to the center of the axis is 35 cm ... The seat can be of any design, but should not exceed 45 × 45 cm.
After assembling and installing the wheels, the attachment control is attached to the frame and the structure is connected to the walk-behind tractor using a hitch.
Homemade trailer
The trailer can be manufactured in several ways and using different materials. As a rule, homemade structures are made from a metal frame and wood.
Procedure:

The tailgate of the trailer is hinged to facilitate loading and unloading. Metal amplifiers are welded on the sides. The trailer is painted and connected to the walk-behind tractor.
It's one thing to walk on arable land on freshly dug soil, barely moving your legs and sinking into soft ground, and a completely different picture when you sit comfortably, almost like a gentleman on a walk, and just adjust the steering wheel a little. The rest is done by technology. By attaching two motorcycle wheels and other parts of the adapter to the walk-behind tractor, the author of this development greatly facilitated his work. I had to work with metal to turn the idea into a mini tractor.
On the lathe, two hinges were made, on which the entire hitch, bushings, and the vertical tilt hinge relative to the adapter should be lowered and raised. All other works are shown in the video.
What to make an adapter for a walk-behind tractor? 2 wheels, 1.5 kg of electrodes, a couple of circles for a grinder and a bunch of scrap metal and 4 days to work ... I show how I did in the video.
Now the master does not walk across the field. The unit is working fine!
Discussion
Yuri, great adapter and great video! We have already figured out the brakes, but otherwise, interesting solutions and, most importantly, that everything worked out for you and works really well when in household there is an instrument and a head with hands for this instrument and you have once again confirmed this ...
Health and good luck! ...
well, yes, the seat is two-seater ... :-)
then the brakes are all the more necessary, I made an adapter for myself, my son tested it - he drifted into a skid (drifted), and since the speeds are still quite high, the brakes are definitely needed ...
Yura, is it okay that the engine is running loudly in the MCA?
@ Dima Klimchuk if we are talking about MB Motor Sich, then:
filter - any Zhiguli oil filter, but it is desirable all the same imported, for example, I have it installed - MANN W914 / 2
oil in the engine - the manufacturer recommends 20W40, I personally have now filled in 15W40, and Yuri - 10W40. The transmission is of the TAD-17i type, but since this transmission oil has not been produced for 20-25 years (replaced by TM-5-18 85W90), any transmission oil 85W90, domestic or imported, it's up to you to decide.
Napoleon Bonaparte
Actually, it turned out to be a noble gig. Only go out on holidays!
But for fellow craftsmen, the story needs to start like this -
... we throw a wire near the house at the 220 volt input past the counter and start sawing, turning and cooking in a good time. Because You only have to burn one and a half pounds of electrodes. Perhaps something will not work out for you, so at least save money for the light.
Nicky tudor
A year ago
Bravo brother! I always appreciate people who put their brains to work. I want to do something like this and I need inspiration. I'm Romanian, but bravo for the Russians!
Well done, Yuri! I would not be surprised if you earn money in this way and stay at home! After all, only one trunk-trailer or this "extension" in Russia, from welders, is estimated in the range of 25-40 thousand rubles, depending on the size and additions! It will be lucky, of course, if there is something of metal and leftovers in stock, otherwise, now, everything has been plundered and therefore you have to go to the metal warehouse + pay for the delivery of metal + try to sell the finished part without bargaining, so as not to make too much money in relation to the norm. hour of the welder ...) These are the harsh realities!
I want to offer you my own version of a homemade walk-behind tractor. Perhaps it loses in something in terms of compactness, but it has enough power reserve - it has an engine from a motorcycle.
The power plant is borrowed from the old "Voskhod-ZM" with a capacity of 13.5 hp (the displacement is 173.7 cm, the cylinder diameter is 61.72 mm, the piston stroke is 58 mm). The ignition is installed from the Vyatka-Electron scooter. To maintain the normal operation of the engine, forced cooling had to be made; one supply fan can handle this.
The kinematics of my walk-behind tractor is standard, except for the implementation of the reversing mechanism in the chain (more on this below).
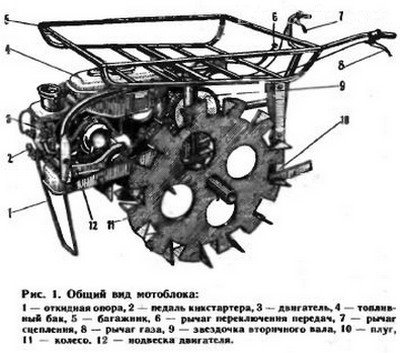
Explanations from the drawing: 1 - steering lever; 2 - gear shift handle; 3 - ignition system; 4 - fuel tank(from moped "Riga"); 5 - the engine itself; 6 - fan; 7 - flexible rod for gear shifting (steel wire with a diameter of 6 mm); 8 - drive chain casing (steel sheet 0.5); 9 - sub-engine frame; 10 - plow (not shown in the front view); 11 - hitch; 12 - wheels; 13 - muffler; 14 - clutch lever; 15 - traction control handle, 16 - reverse control handle; 17 - drive shaft; 18 - gearbox housing
Since the device was conceived without a differential, the use of reverse when turning or sharp turns greatly simplifies management. The implementation principle is simple. From the engine gearbox, through the chain drive, the load is transferred to the reverse shaft with the sprocket installed. Further, through the selected gear pair, it goes to the gearbox shaft, from which, in turn, directly to both wheels.
The general device of a homemade walk-behind tractor
The housing for the main gearbox is taken from the ZIL-130 (steel drum with a radius of 120 mm and a depth of 250 mm) and served as the basis for the frame. I welded the engine subframe struts and fasteners to its body.
A motor with a carburetor, a muffler, as well as a gas tank and an ignition system from a scooter are mounted on a stretcher. A portal is fixed on the subframe struts, to which the steering levers are attached through the connecting flanges. A hitch with a bracket for attaching to a self-made walk-behind tractor is attached to the gearbox housing by welding attachments... I also made awnings myself.
As I already wrote, a part from truck ZIL-130 is an air receiver brake system... The receiver had to be cut to 243 mm. The body is welded on both sides. On the left side, a 7 mm steel sheet with a round flange with a central hole. A cage for the 207th bearing is hammered into the hole and welded.
For the right side, I cut a ring out of the same 7mm steel plate and welded it flush with the rim of the receiver. There are 12 holes for M8 bolts in the ring. A removable flange is attached to it with the corresponding screws, made, like the ring, also from 7-mm steel sheet. As in the left flange, the same cage under the 207th bearing is inserted here and secured by welding.
The casings are closed by covers with stuffing box seals. For this, 4 more threaded holes with a diameter of M6 are drilled in the flanges. I made the covers myself, there is nothing complicated here.
The drive shaft was assembled from three sections of splined shafts: the middle part was taken from the gearbox of the ZIL-130 car, and the two end parts are elements transfer case car GAZ-66. On middle part The first gear of the ZIL-130 gearbox is installed on the shaft.
Reversible mechanism
The reversing mechanism case is attached through a welded rectangular spacer to the gearbox housing. A window is cut out in it for engaging the reverse gears and the reducer. The reverse crankcase gear protruding through the window engages with the gear wheel and is thus set in motion.
From the ZIL-13 power take-off box, I made a reversing mechanism together with a crankcase, the box practically did not require modifications. To the flange of the output shaft of the box (now it has become primary shaft reverse) is attached, through a spacer, a driven sprocket with 40 teeth (from the Voskhod 2 motorcycle). And in turn, this sprocket is connected via a roller chain to the drive sprocket of the gearbox output shaft.
Homemade wheels
The wheels for the walk-behind tractor are completely home-made, steel. The construction is very simple. All parts are made of 4mm sheet steel. A steel rim is welded to the disc with a diameter of 450mm. Sixteen lugs are welded onto the rim, along the entire circumference at regular intervals. The wheel hub is a flange cardan shaft GAZ-66. This makes it possible, when the cultivator is used together with a cart, to install 155 R13 car wheels. See figure for details.
Wheel for motoblock: 1 - lug (steel plate 100x40x4, 16 pcs); 2 - rim (steel strip 100 × 4); 3 - disk (steel sheet 4mm); 4 - spline hub GAZ-66; 5 - M12 bolts (6 pcs.)
The cart itself is homemade, with a brake on both wheels. I also made a trailer for a walk-behind tractor with my own hands, it has the same 155 R13 wheels, in the arsenal there is a home-made plow, a bed-maker, a potato digger, a cultivator.
I made all the control levers of the walk-behind tractor from steel pipes with a diameter of 23 mm. In the upper part, for rigidity, the levers are connected by a cross member made of the same pipe. Flanges are welded at the lower ends of the levers, these are the counterparts of those that are fixed on the gearbox housing. Each flange has four holes for M8 bolts with spring washers, these bolts are used to attach the levers to the base. I placed the shift knob on the left control lever, because in the motorcycle position there were problems with the cable jamming.
To connect attachments, I made a suspension with several adjustment knots. The suspension is attached to the apparatus through the bracket with one kingpin.
Since a self-assembled walk-behind tractor does not have a differential, you have to apply quite a lot of effort on the control levers when turning. But there is also a plus, with a properly adjusted plow, the machine goes very well, almost requiring no adjustment by a plowman.
Cooling system
As I wrote, a forced air-type cooling system is installed on the walk-behind tractor. Otherwise, the engine would overheat very quickly given the standard travel speed of the cultivator. I see no point in making a liquid system.
The principle of the cooling system is taken from motor vehicles. From crankshaft of the engine, through a round-belt transmission with pulleys of the same diameter, the force is transmitted to the drive of the impeller of the cooling system fan.
A thread is cut at the end of the drive pulley and it is attached to the crankshaft with a long M7x1 screw. The supply fan for cooling is made with four blades. I cut it from 1mm steel sheet and mounted it on two single row deep groove ball bearings (80018) with dust washers. The fan shaft is a bottom part with a driven round belt pulley (7 mm diameter).
The shaft bearings are installed in one housing from different sides (for more details, see the figure). I made the protective ring from steel sheet 3mm, the width of the ring is 40mm. The housing with bearings is mounted on four steel spokes in the center. The ring with bearings is attached to the engine with three brackets. From the found duralumin sheet, I made a guiding casing to reduce the flow dissipation from the fan.
I would like to note that it took me about 3 months to create my own walk-behind tractor from the moment of the first sketch. In principle, I am satisfied with the result. Now I'm working on a third version with a differential.
Homemade walk-behind tractor video: