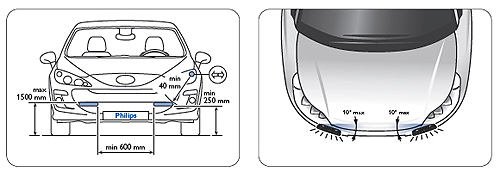
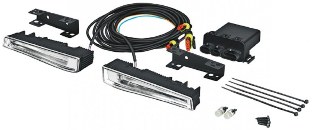
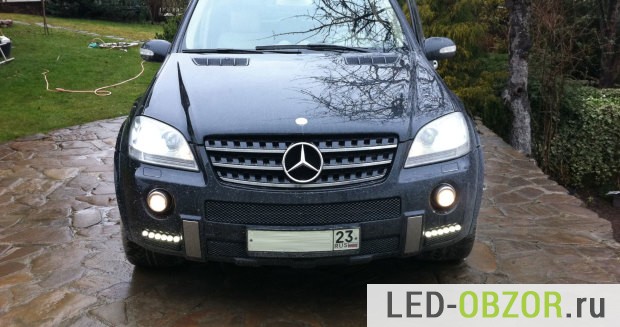
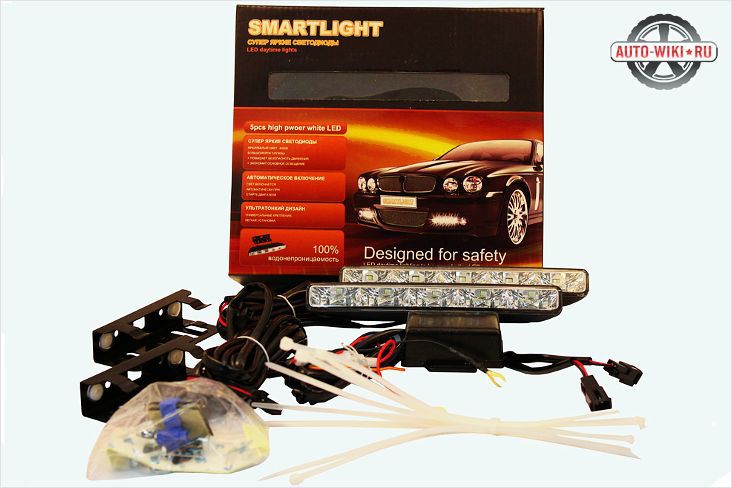
Today, the concept of DRL has often begun to appear with the advent of a law that obliges all drivers to be equipped with lights, universal products have been produced that fit a huge number of car brands. There is a huge number that are put on cars, but before you make a purchase, you must first decide on the installation location of DRLs, as well as their appearance. Let's take a step-by-step example of how the Philips DRL is installed. The picture on the right shows a model with a stylish design and a bright glow.
![]()
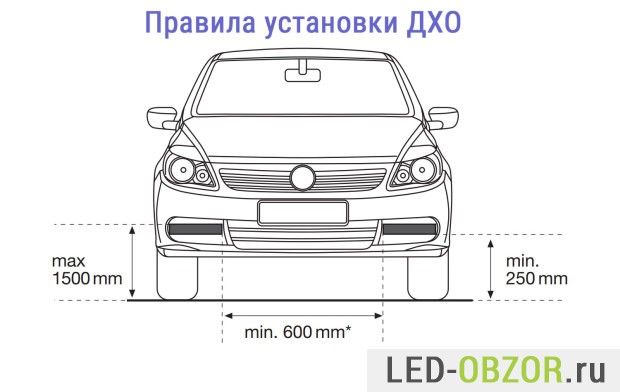
First and most milestone, is to decide where to set the day running lights. It is worth noting that all requirements regarding the location of the dimensions and dimensions of the brackets for fixing, as well as laws, should be taken into account before considering options for installing DRLs. It is recommended to install DRL from 350 to 1500 mm from the ground level, that is, from the road surface. It is worth noting that the legislation allows the installation of DRLs at least 250 mm from the road level, but remember that a loaded car “sits down”, and therefore, the emitted light and the flashiness of the lights will be reduced. It is believed that the most optimal DRL installation height is 400-800 mm.

Also, in the question of how to install daytime running lights, you need to take into account the distance from the side of the car and between the two lights. It is necessary to install DRL from the side of the car at a distance of no more than 400 mm. It is worth noting that in some cars it is very difficult to determine the edge, so it is recommended to measure this distance from the overall width of the car, without affecting the mirrors. In practice, experts who know how to install running lights recommend measuring the distance not from the edge, but from the center, dividing the overall width in two and subtracting the distance to the outer edge of the lamp from the central axis. If you have a balance of 400 mm, then the measurements and calculations were correct. Please note that there must be a distance of at least 600 mm between two running lights.
Installation is in progress, daytime running lights - on your car
After the installation site has been determined, and you have made sure that the measurements and calculations are correct, and compared them with the dimensions of the lamps, you can proceed directly to the installation process itself. If you purchase a kit from us, in the section, we assure you that you will receive a complete kit with all the necessary mounting materials. An example of the dimensions of some Philips DRLs can be seen in the table below.
Very often there is a need to understand each type of lighting fixtures and determine the relevance and practicality of their use. What types of DRLs are divided into and how many worthy manufacturers of high-quality lights, other than Philips, exist, you can read in.

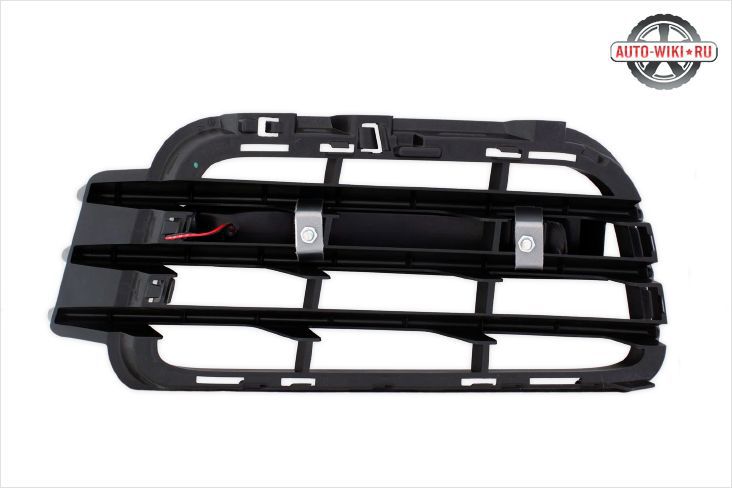
- Stage 1. If you decide to put the lights in the grate, and not in a niche where there is free access, then you need to dismantle it.
- Stage 2. It is imperative to degrease and clean the surface in the territorial place where the bracket will be fastened. This can be done with an ordinary sponge and detergent, it is not necessary to use solvents or other harmful liquids.
- Stage 3. After the surface cleaning process, you need to take the supplied double-sided tape and remove the protective film from ONE SIDE! With an adhesive base, we press the adhesive tape onto the bracket.
- Stage 4. Next, you need to remove the protective film from the second side of the adhesive tape and fix it at the installation site.
- Stage 5. It doesn’t matter whether the mounting is done on adhesive tape or through holes, the bracket is fixed with self-tapping screws. To mount on a vertical surface, the lantern can be fixed without a bracket. To do this, you will need to use the mounting holes with M5 threads.

NOTE!The wire that comes from the lantern should be threaded into a special hole in the bracket before installation. DRLs themselves do not need to be inserted into the bracket, because if the mechanism snaps into place, then extraction will be problematic and time-consuming. The mechanism is designed specifically to prevent theft of the lamp from your car.
IMPORTANT!You can install lights without tape. To do this, you need to pre-drill holes according to the measured marks with a drill. This can be done by attaching a bracket to the installation site and making small holes through the mounting holes.
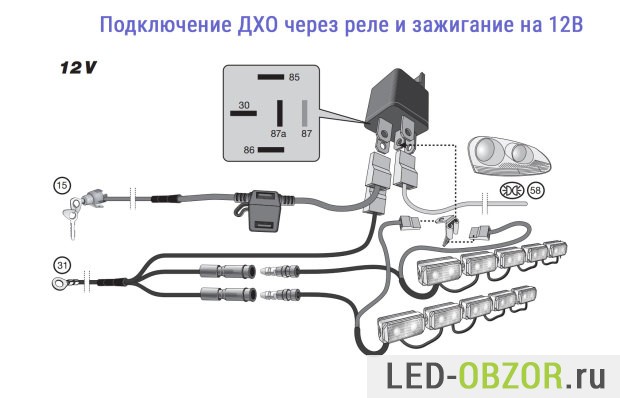
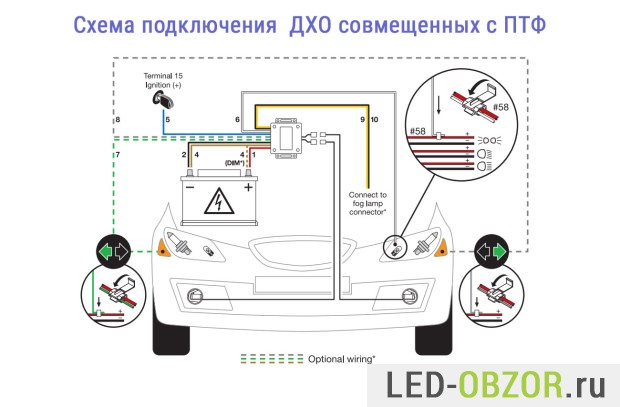
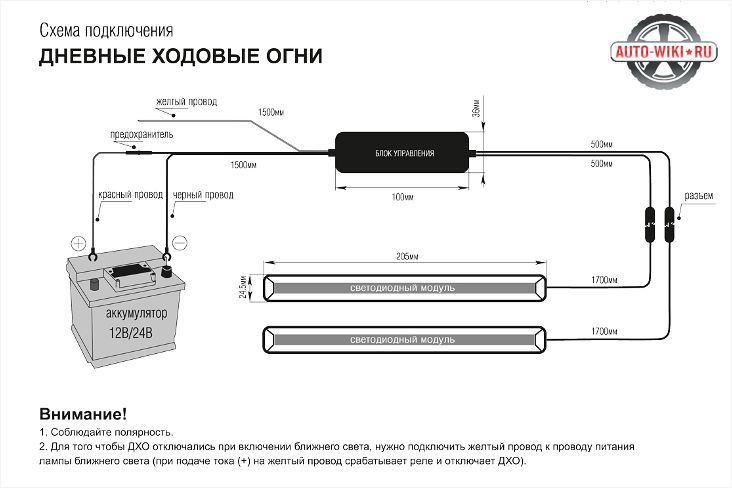
- Stage 1. Without inserting the DRL into the fixed brackets, it is necessary to proceed to the second part of the installation - the installation of the control unit. To do this, you should decide in the engine compartment with its territorial location. The most correct would be to place the block near the battery and as far as possible from the engine in order to prevent the device from overheating. There are no other special nuances in the location of the block, since the device is highly sealed and protected from moisture.
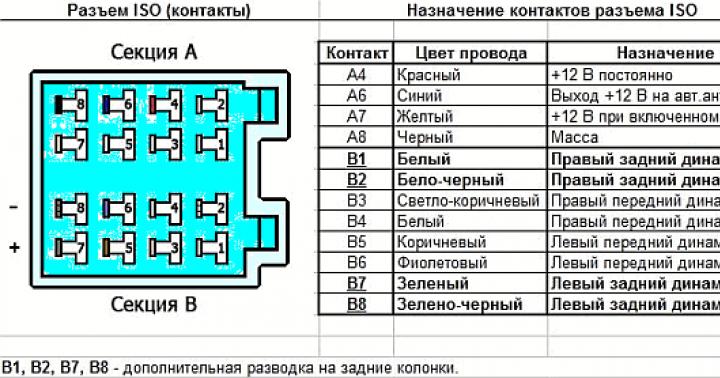
- Stage 2. We connect the unit using the standard scheme - the red wire to the "+" terminal, and the black wire to the "-" terminal. In some DRL models there is another wire - orange, it is necessary in order to turn off the lights when the dipped beam is turned on or to switch the lights to the size mode to avoid blinding oncoming drivers. It is worth noting that if you do not connect this wire, then you are breaking all laws, since DRLs will blind oncoming drivers in dark time days. Thus, the orange wire must be connected to the dimensions or low beam.
- Stage 3. It is necessary to disconnect the head light wires from the lamp to check the correct connection. If the light on the block lights up, then you did everything right!
- Stage 4. Using a special connector, connect the lamps and the unit. Insert the wires into the connector and snap it into place.
- Stage 5. It is imperative at this stage to check the performance of the DRL. To do this, simply turn on the engine, if the lights automatically light up, then you did everything right. Also, turn on the low beam to check the "fading" function of the light intensity of the lights. The lights should automatically turn off when the engine is stopped, but there are some models that dim after 15-20 seconds, this is quite normal, since they are equipped with a driver “accompaniment” function.
Step-by-step process of installing DRL: part three
- Stage 1. If the check was successful, then you can proceed to the final stage of installing DRL. Attach and fix the control box.
- Stage 2. Only now you can proceed to fixing the lantern. To do this, insert it into the bracket and press until you hear a click.
- Stage 3. Pull the wires and carefully place them in the engine compartment. Be sure to fasten them with the plastic ties included in the kit. It is worth noting that in no case should wires be attached to the fuel line, pressure hoses or radiator tubes.
- Stage 4. After fixing and placing the wires, we proceed to the last stage - we return the grate to its place.
- Stage 5. We turn on the ignition and we can enjoy the brightness and catchiness of the DRL. As well as stylish and updated appearance car.
conclusions
Thus, having bought a DRL, you do not need to contact service centers and spend extra money to make the installation. Having spent a little of your own time, enlisting accuracy and patience, you can do it by following these steps. This will not only save you money, but also bring pleasure from the quality of the work done. Enjoy the flashiness and brightness of your car and always be safe on the road.
What is this service?
Due to changes in legislation, daytime running lights have become a mandatory attribute of every car. Installation of daytime running lights necessary to ensure better visibility of the car for other drivers, which in turn increases safety while driving.
Typically, white or bluish LEDs are used for this purpose. Their main advantage is a good level of illumination with low energy consumption. This saves battery power and reduces fuel consumption. Installation of daytime running lights is very simple and usually does not cause difficulties. The main thing is to organize this process correctly and clearly follow all the rules.
Requirements for DHO
Running lights are not regulated as a single lighting device, therefore, they can be used as:
- Low beam headlights on while driving.
- headlights high beam operating at low voltage.
- Or any lighting fixtures made in an industrial environment or manually that comply with GOST.
- Front turn signal lights on all the time.
Before, how to install daytime running lights, you need to carefully read the regulatory documentation governing their correct installation.
- Mandatory placement on the front of the body at a height of 25-150 cm.
- The distance between the light blocks must exceed 60 cm, but not more than 40 cm from the edge of the machine.
- If the light elements are made by hand, then their area should be in the range from 25 to 200 sq.cm.
- As a result, the total radiation strength must be from 400 to 800 Cd.
At the same time, remember that the position lights cannot be used as running lights due to insufficient power.
Daytime running lights: installation
Most modern imported and even domestic cars equipped with running lights, so they do not need to install them. But for owners of older models, such a procedure is essential.
Now in car dealerships there is a wide range of ready-to-install daytime running lights. The main thing when buying to pay attention to their compliance with regulatory documents. With a dim glow of the interior lighting lamp, its periodic extinction or complete absence of lighting, either the bulb itself is necessary. If everything is fine here, then you can proceed with the installation. But before that, there are several factors to consider:
- The shape, design and type of bumper. This information will help you choose the lights of the required shape.
- Block size. This setting depends on where to install daytime running lights you are going to (bumper, air intake).
- The number of LEDs and their brightness. The main thing is that their total power does not go beyond the regulatory framework.
That's all the basic requirements, after which you can easily install daytime running lights yourself. If you do not have the necessary skills or time, then it is better to contact the master, who will perform this procedure as soon as possible. - also a service that mechanics can do on the spot.
Keep in mind
Compliance with all points of GOST is mandatory. Otherwise, you risk getting a fine from the traffic police during the check.
- Before buying LED lights, pay attention to compliance with all regulatory requirements.
- If you install DRL yourself, carefully follow the requirements described above.
- It is best to buy certified products in order to avoid trouble.
There are many options for installing DRLs on the front of the car. From my own experience I can say that if you decide to really be more noticeable on the road, then you need to put it higher. If for you DRL is just an excuse for Mr. Policeman road service, then it doesn't matter where you fix it.
Installing running lights in a car dealership when buying a new car is very expensive. I was offered to put on the Duster for 15 thousand rubles, the price of a Philips kit in the store is 3 thousand rubles. If the DRL is with a good bundle, then installation and connection will take 15-20 minutes.
Abroad they are designated as DRL - short for "Daytime Running Lights.
- 1. Types of daytime running lights
- 2. Rules for installing running lights
- 3. Eye of an eagle
- 4. Modular models
- 5. DRL from foglights
- 6. Some varieties for PTF
- 7. LED strip
- 8. Neon tube with LEDs
- 9. Video analysis of the headlight
- 10. DRL monoblock, classic
Types of daytime running lights
The complexity of installing daytime running lights depends on their design and the provided fixtures.
I will list the main types:
- each LED separately, called the eye of an eagle, eagle eye, Eagle Eyes;
- in the form of a ring resembling angel eyes;
- in the case of fog lamps;
- LED strip installed inside the headlight.
- classic monoblock elongated shape.
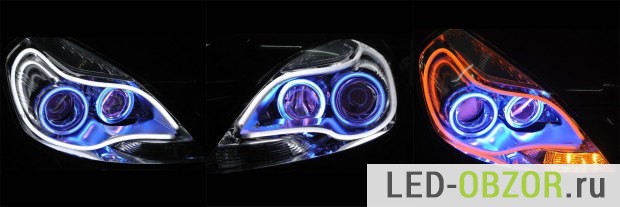
DRLs in the form of angel eyes are the rarest. Unlike ordinary ones, they have powerful LEDs and lenses that focus the light. When you turn on the dipped beam, they dim and become dimensions. Ordinary angel eyes are regularly installed on some cars in expensive trim levels and on BMWs, on which they were first used. They are equipped with some bi-xenon and xenon lenses.
Rules for installing running lights

Most people want to put them in such a way that they look harmoniously with the dipped and main beam headlights. Therefore, half of motorists put at the level of foglights. If you have running lights with a power of up to 5 watts, then at a low setting they quickly collect dirt and dust, lose their luminous flux by 2-3 times. Especially true on country roads with difficult terrain, the light may not be visible because of this. And in the heat, hot air near the asphalt, the density of which is higher, scatters light. If you need them for their intended purpose, in order to increase the level of safety, then put them between the headlights.
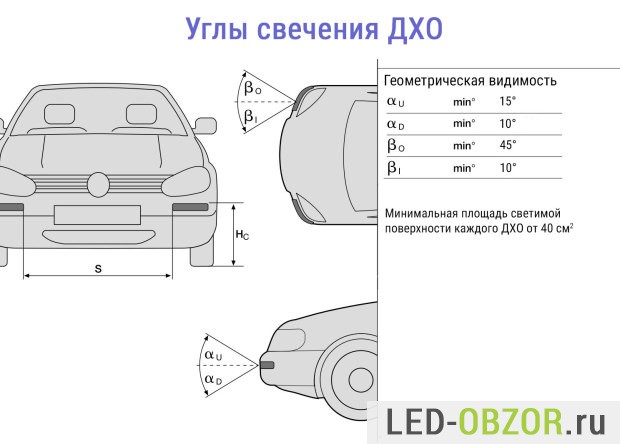
The main requirements for Russia are specified in GOST R 41.48-2004 and GOST R 41.87-99. Depending on the type vehicle, installation options may change.
- light intensity from 400 to 800 candela for each DRL;
- the illuminating surface area of each DRL is at least 40 cm², so that powerful small LEDs are not installed.
To measure the intensity of light with your own hands, measure the illumination with a luxmeter on the optical axis from a distance of 1 meter. This way you will get Candela, not Lux.
After installing the DRL and connecting, it is necessary to check in sunny weather from 100 meters. Half of motorists, after installing Chinese junk with a power of 2 watts (brighter than dimensions), take a photo at night near the car. They take pictures at night so that at least a little light shines.
All these requirements are not invented during a feast by thumping ministers. These requirements, like other rules traffic, written in the blood of traffic accident victims.
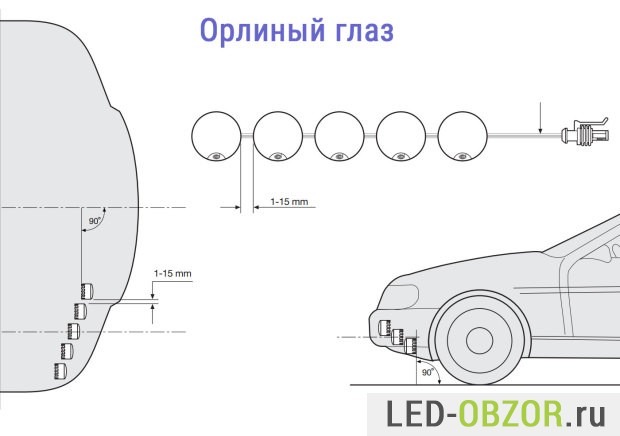
eagle eye
The most difficult do-it-yourself DRL installation is at the eagle eye, which is usually made in the form of a bolt with a nut. Mounting requires a flat surface and drilling holes. Most often put in the bumper, placing in one line. Someone likes to drill foglight plugs so as not to spoil the banner.
After the purchase, I recommend sorting out all Chinese LED lighting equipment. This will greatly extend the service life. According to numerous reviews of the owners, due to poor assembly, once a month you will have to change the eagle eye to a new one. The LED has very poor contact with the body, so it simply overheats and burns out. Under the influence of the sand-salt mixture on our roads, they also quickly deteriorate. The reason for this is poor sealing of the case, salt corrodes conductors, and high temperature acts as a catalyst.
Mounting is of two types, threaded or latched. Sometimes there is an execution for surface mounting on double-sided tape. But the adhesive tape is different, sometimes it immediately falls off, sometimes it lasts for a year. But then they are easy to steal by tearing this garland from the bumper.
With a threaded fastening at the back, it is necessary to tighten the nut, that is, climb inside the bumper with your hand. If they burn out at least 1 piece a month, then they will have to fall under the car once a month to unscrew and tighten the nut and reconnect the wires. Therefore, snap fastening is better.

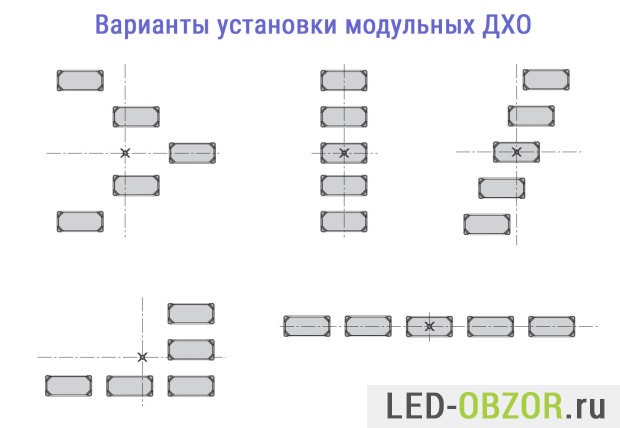
Modular models
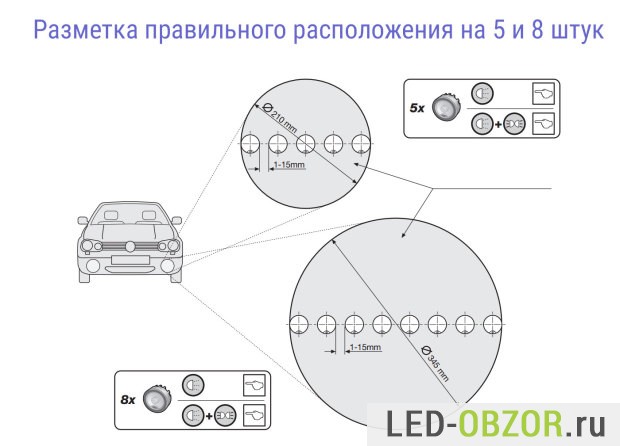
Almost everyone knows how to install daytime running lights in kit modules. Such a design can be placed anywhere, typical layouts are shown in the picture below. You only need to drill holes for the bolts. There is also a mount on double-sided tape, but under the influence of salt and atmospheric conditions, they can simply fall off.


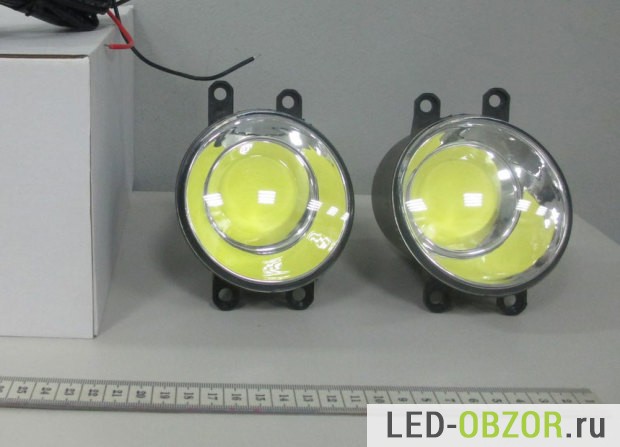
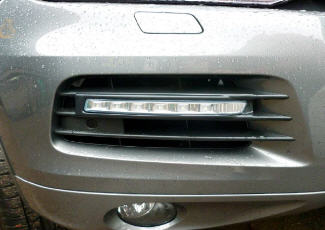
DRL from foglights
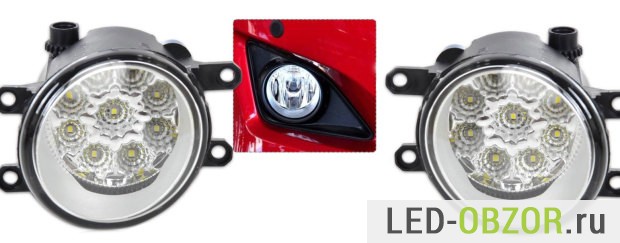
Another way to install DRL according to GOST without changing appearance Auto, is to put LED bulbs in the fog lights. I recommend not to install Chinese junk whose characteristics indicate a power of more than 5 watts and no cooling system. If the power of the LEDs is more than 5 watts, they will overheat and quickly die. For light bulbs without a radiator, to explain too good parameters, the Chinese writes that Cree or Osram diodes are installed. In fact, there are no Cree and Osram, these are fakes that look like real Crees. Any seller, including a Chinese, will swear and swear by his mother that they are real. I communicate with representatives of Chinese factories and carry out examinations of fake KRI LEDs for domestic companies.
If you do not have regular halogen foglights, then you can purchase:
- round DRL in place PTF;
- LED PTF with daytime running lights;
- just LED PTF.
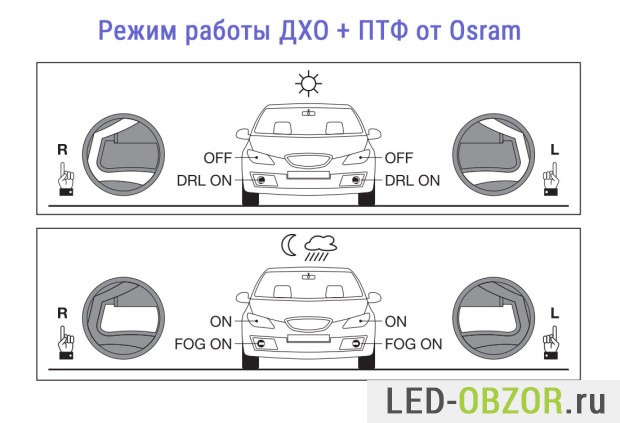
Do not forget that fog lights according to GOST also have a cut-off line. When choosing LED lamps for PTF, try to keep the cut-off line. So that with your LED spotlight you don’t fuck the oncoming people in the eyes.
Some varieties for PTF
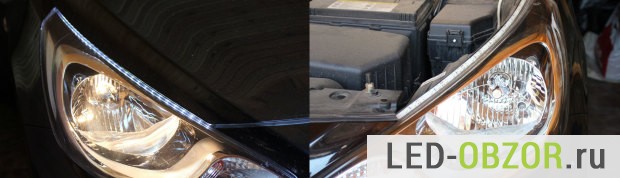
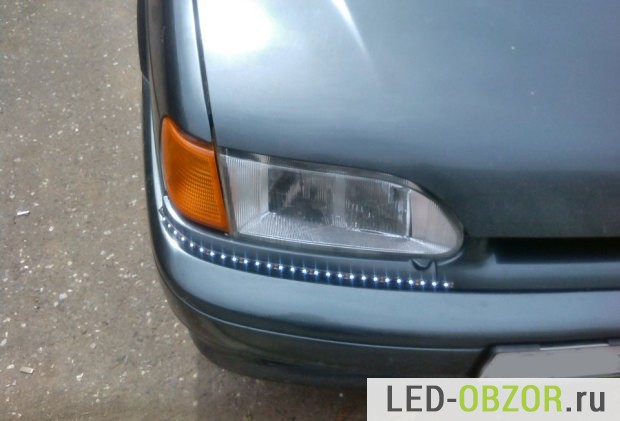
LED Strip Light
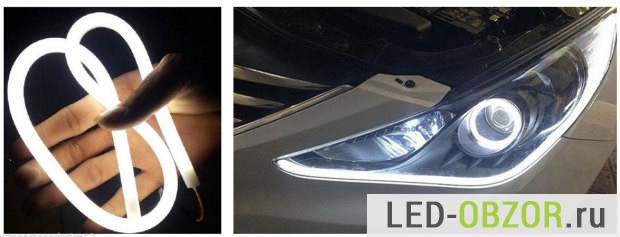
Everyone has the same story, they see enough of the daytime running lights in the form of a ribbon on expensive cars and also want to decorate their shmarovoz with their own hands. As a result, such a tape cannot perform the function of daytime running lights; from the outside it looks lousy, cheap. During the day you can only see at close range, not to mention 100 meters.
Most often buy a car led strip the Chinese, who are smarter, choose a flexible LED tube, such as neon. Whoever is really bad with fantasy, they put a home tape. In any case, a powerful one requires cooling, otherwise it will quickly burn out.
Neon tube with LEDs
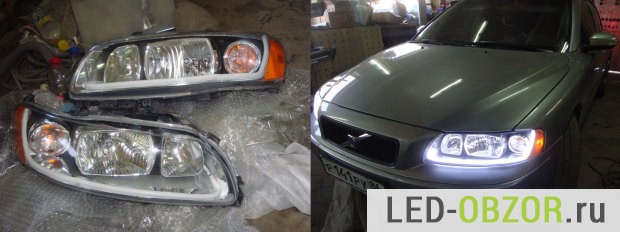
With the correct installation of a flexible tape or tube inside the headlight, you will get decorative lighting that will look decent. DRL from such a tube will not work, even if you try hard.
The most difficult installation option, you have to disassemble the headlight. The hardest part is getting the clear plastic off the front. The headlight is sealed and the glass is put on sealant. There are two types of sealant, which soften at temperatures above 100 degrees, and which do not soften at all even at 300 degrees. I came across non-separable ones, I took one apart for 10 hours, so as not to spoil or scratch it. The sealant was checked with a soldering iron, which heated up to 300 ° and could not melt it in any way.
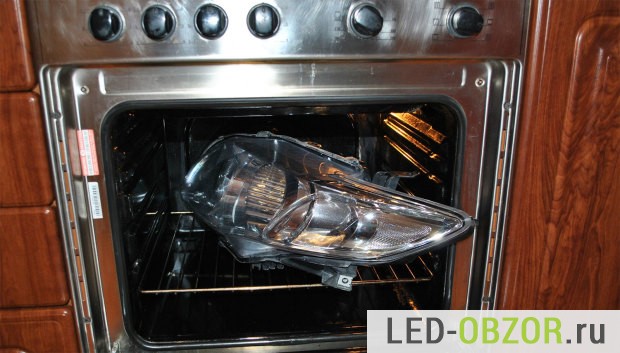
For heating, use an oven or a box heated with a building hair dryer. Once the sealant is soft, the clear plastic will peel off easily. For reassembly, you can buy a special rubber sealant, which is used by xenons.
Video headlight analysis
DRL monoblock, classic
The most common type of daytime running lights is in the form of a monoblock, an elongated square. It is optimal to install in the radiator grille, between the dipped beam headlights. It is very undesirable to put in the grill, which is located in the bumper. For example, in Duster, this grille is located between the PTF, it turns out that the running lights will be even below the level of the fogs. In fact, it depends on the type of car, the PTF of SUVs is higher due to the increased ground clearance And big wheels. In an ordinary passenger car, they are low.
Some put LED work lights or additional lights on the bumper in front. Usually they are too powerful for DRL, but the weakest models can do.
The Chinese sell a variety of LED lines without housings, passing them off as DRLs. Indicate for them high power and low price. Motorists, delighted with the price and characteristics, begin to sculpt them on their cars. But they cannot perform the DRL function, because they shine on all sides, according to the passport 120 degrees. They should shine forward with an angle of 30 degrees, respectively, should have a reflector or a focusing lens. Without a case, they have no cooling and they die from overheating and exposure to salt on the roads.
Following the rules correct installation daytime running lights for a car according to GOST, you will really become more noticeable on the road and increase traffic safety. There are enough fools on the road even without us, so there is no need to replenish their ranks.
Good day, dear motorists! Recently, daytime running lights have become a mandatory attribute of a car while driving. To be precise, since November 2010. But, this is only in Russia, from now on.
Running lights daylight officially began their history in Sweden in 1977. This was due to the fact that there was not enough natural lighting in the North, especially in winter.
Daytime running lights, DRL - daytime running lights began to be used to provide better visibility of the car for other road users, i.e. to ensure traffic safety.
requirements for daytime running lights
Due to the fact that the running lights of a car are not regulated as a single lighting device, the following can act as running lights:
- dipped beam headlights that turn on while driving;
- high beam headlights, switched on to reduce intensity at reduced voltage;
- separate front devices (emitters). These can be industrial devices, as well as do-it-yourself daytime running lights in compliance with the requirements of GOST;
- front turn signals on all the time.
In Russia, based on the international standards that exist in UNECE Regulation No. 48, changes were made to the definition of the category daytime running lights GOST R 41.48-2004.
If you decide to install running lights with your own hands, then you need to know the norms and requirements governing GOST:
- placement on the car body in front, with a height from the ground of 25 - 150 cm;
- the minimum distance between blocks of navigation lights cannot be less than 60 cm, and from the edge of the body no more than 40 cm;
- for do-it-yourself emitters, the area should correspond to 25-200 cm 2;
- the total luminous intensity should be between 400 and 800 cd.
Important! Car running lights are not analogue parking lights, since the latter do not meet the requirements for running lights in terms of power.

How to install running lights?
Owners of cars with standard running lights, which, by the way, include Lada Granta - our first conveyor car with standard daytime lights, this section will not be interesting. But the owners of domestic cars of late releases, the technology of installing daytime running lights may come in handy.
Car dealerships have running light kits from well-known brands ready for installation. Running lights Pilips or Hella, and other brands, in their parameters fully meet the requirements that GOST imposes on running lights. Those. no need to invent anything. I bought a kit and in the garage, for installation.
Before proceeding to self installation navigation lights, consider several factors:
- carefully read the requirements of GOST R 41.48-2004 on vehicle certification regarding the installation of lighting and light signaling devices;
- Be sure to consider the type, shape, and design of your vehicle's bumper. You will need this when choosing a block shape (round or rectangular);
- block size. The size is selected based on the installation location of the DPL unit - on the bumper or air intake;
- consider the brightness and number of LEDs in the block. You need to know the brightness so that it does not exceed the total, according to the installation requirements. And the number of LEDs is already a matter of design.
If you take into account all these factors when installing daytime running lights with your own hands, then you should not have any problems when passing maintenance.
Good luck with your navigation lights, and safe driving.
After the law on the mandatory use of daytime running lights while driving was passed, many motorists took care to install the appropriate attributes on their vehicles. The reason for this was an attempt to improve traffic safety in large cities and on highways.
You need to know exactly how to install daytime running lights. The procedure is not as complicated as it might seem at first glance. But precise instructions can save a lot of time.
So, daytime running lights are designed to provide better visibility of the vehicle for other road users. In addition, they can be an excellent design element.
Benefits and advantages
As a rule, standard LED lights with a bright white or light blue color are used. Their main advantages are efficiency and excellent illumination.
The individual front radiators are special industrial products. Unlike conventional car headlights they allow you to save battery power, reduce fuel consumption and do not cause difficulties during installation.
Primary requirements
There are several GOST requirements that should be considered during installation. They help answer the question of how to install daytime running lights so that there are no problems in the future.
Emitters are installed in front of the machine at a height of at least 25 cm;
The distance between two lights must be at least 60 cm;
The distance from the edge of the body should be no more than 40 cm.
Daytime running lights are auxiliary lighting and therefore cannot be used either as position lights or as main headlights. It is allowed to install no more than two lights at the same time.
Installation process
If you follow all the instructions exactly, then the installation will proceed correctly, and the lights will then turn on immediately after starting the engine. Although many people prefer to mount the system with a dedicated on/off button.
Deviations from accepted norms threaten to cause problems with traffic police.
Where to start
The first step is to purchase the appropriate running lights in the car shop. A wide variety of models from well-known manufacturers are on sale. In this case, you can consult with consultants who will answer all questions. In most cases, they are already ready for installation and fully meet the requirements of GOST.
The car owner must take into account several requirements during installation:
Type, shape, size of the bumper;
Features of a particular car model;
Power and brightness of LEDs.
The size of the block and its shape (round or rectangular) affects the choice of installation location. But it is small, so there are no problems. There are two main installation locations for the emitters themselves: on the bumper or on the air intake. The number of LEDs is an aspect that depends solely on personal preference.
Actually, the installation process itself involves the direct mounting of the headlights, as well as their connection to the car network. There are several steps:
Fastening the unit to the body under the hood using clamps or other means (you may need to remove the battery;
Choosing a place for emitters (for them, you can cut a special place in the radiator);
A sealant is used to prevent moisture ingress;
Wires are pulled from the emitters through the bumper cavity to the control unit (clamps or other means are used to simplify);
Power is connected through the generator (in this case, they will burn immediately after starting the engine).
If you know how to install daytime running lights in accordance with all requirements, then they can increase safety, eliminate problems with traffic police and at the same time not affect fuel consumption too much.

Video
The following video materials will help you understand the process of installing running lights: