Installing or replacing a car radio in a car is possible independently by any motorist who does not spend money on everything in a row. If you have big problems with your hands, then it is better to contact a car service - it will definitely turn out cheaper and many times faster. The following article is for those who have "straight hands" and the surname is not Rockefeller. :) The scheme for connecting various radio tape recorders to various cars remains the same, but there are various nuances and features. Unfortunately, it is still far from universal standardization and interchangeability.
According to the installation method, car radios or receivers are built-in and stationary.
To protect against theft, built-in radios are often equipped with a removable front panel; previously, guide slides with a lock were used to quickly remove the entire device.
Stationary car radios are protected from theft by their original shape and non-standard dimensions. They fit into a certain brand of car, which deprives them of versatility. As a rule, such radio tape recorders are installed by car manufacturers on the assembly line. Containers for the radio in some car models are equipped with a special curtain - the device is quite simple, but very effective from car thieves.
Modern radio tape recorders come in two sizes in height - one block and two block (or one-din and two-din). Most European manufacturers produce car radios of the 1DIN standard (single-block). And in the car there must be a niche of a suitable size. Japanese, American, as well as Korean companies present equipment twice as high in height, under the corresponding niche for installation in a car, which is called 2DIN. This is the main thing you need to pay attention to when buying a car radio for your car.
Next are the connectors. Different radios and cars may have different types of connectors. Therefore, you need to see which connector is in the car before buying a radio. If the connector in the purchased radio does not match the car, then it's okay too.
Option 1 (preferred) - there are a large number of different adapters, the main thing is to choose the right one. Special adapters are also available that allow you to switch from original pads to the ISO standard.
Option 2 - Open the connector and connect directly. An extreme method, but knowing the scheme, you will not be left without music.
The most common connector for connecting a car radio is ISO 10487. First of all, check that it is in your car.
If there is one, then you just need to make sure that the pinout of your connector is correct.

At the entrances to the radio, almost all manufacturers adhere to the standard color marking of wires.
- yellow wire(BAT) - to constant +, regardless of the position of the ignition switch, directly to the battery through a 10-20A fuse;
-red wire(ACC) - to the ignition lock terminal, on which + appears when the ignition key is turned. On many foreign cars, there is already a separate wire in the block. You just need to find it (quite simply with the help of a tester or a control light). Or, if there are difficulties, to any terminal where +12 appears when the ignition is turned on.
- black wire- this is a minus or mass, which is the same. It connects to the body with a good contact. ( there is a permanent negative).
- Blue / white - blue wire(REM) is a control wire that, when the radio is turned on, automatically turns on the car amplifier or active antenna.
- orange wire car radio (or variations) (ILL) - connects to the lighting switch terminal or to any other terminal where +12 appears when the side lights or headlights are turned on.
- yellow - black wire(variations) (MUTE) - this is remote, this is turning off the sound or muffling it. Connects to the corresponding wire of your car Hands. If the kit is missing - do not connect anywhere. This is an option and does not affect the performance of the radio and the quality of work.
The outputs of the radio are acoustic wires to the speakers. They have paired colors. A specific speaker is connected to each color pair:
White pair of wires- front left speaker;
gray couple- front right speaker;
green couple- rear left speaker;
purple couple- Rear right speaker.
Each pair of speaker wires consists of a solid wire and a wire with a black stripe. The black stripe indicates the negative wire.
It is very important to observe the correct connection of acoustic wires., otherwise, if the color scheme is not observed, the balance adjustment will not be correct, if the polarity is not observed, the rear speakers will play in antiphase, this will manifest itself as a lack of bass.
General scheme for connecting a car radio

Schematic, letter designations found in the instructions for connecting radio tape recorders of various brands
Acoustic group:
- R = Speaker right.
- L = Speaker left.
- FR+, FR- or RF+, RF- = Front speaker - right (Plus or minus respectively).
- FL+, FL- or LF+, LF- = Front speaker - left (Plus or minus respectively).
- RR+, RR- = Rear speaker - right (Plus or minus, respectively).
- LR+, LR- or RL+, RL- = Rear speaker - left (Accordingly, plus or minus).
- GND SP = Common speaker wire.
Power connector:
- B+ or BAT or K30 or Bup+ or B/Up or B-UP or MEM +12 = Battery powered (plus)
GND or GROUND or K31 or minus is simply indicated = Common wire (Ground), battery minus.
A+ or ACC or KL 15 or S-K or S-kont or SAFE or SWA = +12 from the ignition switch.
N/C or n/c or N/A = No contact. (Physically, the output is available but not connected anywhere).
ILL or LAMP or sun symbol or 15b or Lume or iLLUM or K1.58b = Panel illumination. +12 volts is applied to the contact when the parking lights are turned on. On some radios there are two wires, -iLL + and iLL- The negative wire is galvanically isolated from the ground.
Ant or ANT + or AutoAnt or P.ANT = After turning on the radio, this contact supplies +12 volts to control the retractable antenna, if one, of course, is present.
MUTE or Mut or mu or crossed speaker icon or TEL or TEL MUTE = Input to turn off or mute the sound when receiving a phone call or other actions (such as driving in reverse).
Other possible contacts:
Amp = External amplifier power-on control pin
-DATA IN = Data input
-DATA OUT = Data output
-Line Out = Line Out
-REM or REMOTE CONTROL = Control Voltage (Amplifier)
-ACP+, ACP- = Bus lines (Ford)
-CAN-L = CAN bus line
-CAN-H = CAN bus line
-K-BUS = Bidirectional serial bus (K-line)
-SHIELD = Shielded wire braid connection.
-AUDIO COM or R COM, L COM = Common (ground) of preamp input or output
-CD-IN L+, CD-IN L-, CD-IN R+, CD-IN R- = Audio changer balanced line inputs
-SW+B = Power switch +B battery.
-SEC IN = Second input
-DIMMER = Change display brightness
-ALARM = Connecting alarm contacts for the radio to perform car security functions (PIONEER radios)
-SDA, SCL, MRQ = Vehicle display bus.
-LINE OUT, LINE IN = Line out and in, respectively.
-D2B+, D2B- = Optical audio link
If radio interference occurs when connecting a DVR or navigator, the reason is not in the radio. Ways to fix the link.

When powering the radio, red and yellow wires are used. Yellow is for powering the memory, and red is for turning off the radio and suggests that there is an output to the ignition switch. This means that after the ignition is turned off, the car radio will also turn off automatically. The most convenient option is the parallel connection of the yellow and red wires, then the radio will turn off only when the button on the radio panel is pressed.
However, in this case, problems may arise due to the fact that the radio amplifiers are powered by a red wire, including in standby mode. Therefore, the current consumption increases, which means that the battery can be discharged faster. In order to avoid this situation, you can put a separate switch on the red wire of the radio, then the power will turn off on its own when the car is parked for a long time.
If you have a radio with an internal battery to save the settings, then use the circuit with a complete power off when you turn off the radio. Then your main battery on the car is guaranteed not to be discharged during a long stop through the receiver.
At the end, we test the sound and the correct operation of all functions (front / rear balance, left / right speakers, frequencies, radio waves). If the phasing and installation of the speakers was carried out correctly, then there should be no wheezing or interference during playback.
Regular car radios, as a rule, do not shine with functionality and high quality sound reproduction. Often the "native" head unit of the audio system does not meet the high requirements of the owner. There is only one way out of the situation: replacing the car radio.
Classification of car radios by size
Car head units present on the market differ in functionality, sound parameters and installation dimensions.
The standard developed by German manufacturers for car head units DIN 75490 was adopted in 1984 as international ISO 7736. It defined the standard mounting hole size for a car radio (1-DIN) - 180 x 50 mm. This size is the 1 DIN size. DIN stands for Deutsches Institut fur Normung - German Standards Institute. The abbreviation DIN stands for German Standard.
Igor Syroedov
http://steer.ru/node/29859
The unification of installation dimensions expands the possibilities of using various radio tape recorders in cars of different manufacturers and models. Currently, all radios are produced in accordance with the requirements of the international standard ISO 7736, but motorists prefer to refer to the similar international German standard DIN 75490.
Usually there is enough free space behind the car console, so the standard regulates only the width and height of the radio, without limiting the depth. There are two formats: 1 DIN (178 x 50 mm) and 2 DIN (178 x 100 mm).
In practice, the seat may be slightly wider and higher. In this case, decorative transitional frames are used to mask the gaps, which can be found on sale for almost any car model.
Transition frames are also used when it is required to install a 1 DIN radio into a 2 DIN slot. The reverse procedure - mounting a radio tape recorder 100 mm high into a 50 mm opening - is impossible without a significant revision of the console.
Video: choosing a radio by size
Wire marking and topography of ISO connectors
Modern head units, as a rule, are equipped with connectors for connection made according to the ISO 10487 standard. Nevertheless, you can still find both radio tape recorders and cars in which manufacturers use connectors of the original design. In such cases, the radios are connected through adapters.
The ISO standard defines the physical dimensions of three lasts:

Despite the fact that the standard does not establish the pin assignment, many manufacturers adhere to the same color marking of wires and topography (pinouts, soldering) of connectors.
Radio began to sound in cars from the beginning of the 20s of the last century. At that time, there were two ways to improve a car: install a motor from a truck in a passenger car or install it in a car radio. The difficulty of the upgrade was the same. Car radios did not exist then, so the problem was solved as best they could. Home radios were converted to a 6-volt on-board car network, or simply ran on batteries. No one thought about sound quality. The home radio in the car did not serve for a long time. Constant shaking did its job, gradually destroying the light bulbs. A huge antenna was located under the ceiling, turning the car into a cage.
Igor Syroedov
http://steer.ru/node/29859
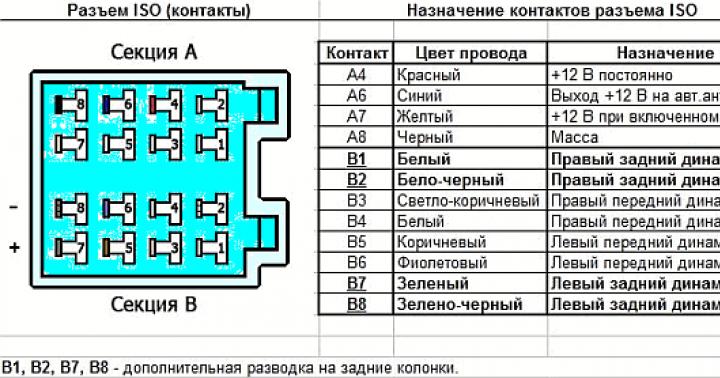
Table: pin assignment and color coding of wires of a standard ISO connector
| Section (block) | Contact number | Possible designation | Wire color | Purpose |
| A | 4 |
| Yellow | Radio power supply +12 V (main) |
| 6 |
| Blue | +12 V output to antenna amplifier | |
| 7 |
| Red | Radio power +12 V (control via ignition key) | |
| 8 |
| Black | Frame | |
| IN | 1 | RR+ | Violet | Right rear speaker (+) |
| 2 | RR– | Violet black | Right rear speaker (–) | |
| 3 | FR+, RF+ | Grey | Right front speaker (+) | |
| 4 | FR–, RF– | Grey-black | Right front speaker (–) | |
| 5 | FL+, LF+ | White | Left front speaker (+) | |
| 6 | FL–, LF– | White black | Left front speaker (–) | |
| 7 | LR+, RL+ | Green | Left rear speaker (+) | |
| 8 | LR–, RL– | green-black | Left rear speaker (–) |
The information given in the table is not exhaustive and completely reliable. It is necessary to clarify the marking of the wires and the purpose of the pins of the connectors in the documentation before connecting the radio.
Video: topography and disassembly of the ISO connector
Radio connection
When both the head unit and the car are equipped with standard ISO connectors with the same pinout, connection takes a matter of minutes. This is the simplest case. All work comes down to dismantling the old radio, connecting a new one to the same connectors and assembling the console.
Connecting the radio in the absence of a standard ISO connector
If there are no ISO connectors in the car or radio, then the best solution to the problem is to buy the appropriate model of the head unit and car adapter and connect through it.
Video: ISO adapter
An alternative option is to cut the standard cable and the cable from the new radio set, and then connect all the wires in accordance with the connection diagram by making a home-made adapter.
When connecting in this way, special attention should be paid to the reliability of the contacts and the insulation of the wires. They are connected by twisting, soldering and clip-on connectors. It is better to isolate the places of twists with heat-shrinkable cambric, abandoning the adhesive tape.
Connection without plug
In some cases, desperate experimenters try to connect a car radio without a plug by soldering wires to the connector pins. If you assemble the circuit without errors, then the radio tape recorder, of course, will work. But the reliability of such a connection is very low.
At best, such experiments lead to periodic blackouts. At worst, a short circuit of a fallen off power wire to the case is possible with unpredictable consequences.
In 1959, Blaupunkt-Werke produced its one millionth car radio, the best proof that radio was truly affordable.
Igor Syroedov
http://steer.ru/node/29859
Alternative ways to connect power to the radio
In standard mode, +12 V supply voltage is supplied to the radio via two wires. Red (signal circuits) is connected to the battery through the ignition switch. The presence or absence of voltage on it is determined by the position of the key.
The yellow wire constantly feeds the radio's memory, where all settings are stored. Therefore, it is permanently connected to the positive pole of the battery directly. When the battery is disconnected from the car's on-board network, the individual settings of the head unit disappear. If there is a control voltage at the signal input (red wire), +12 V from yellow is supplied to all units of the device.
Some vehicles have a lock position marked ACC. In this mode, the ignition is turned off, but power is supplied to individual devices, including the red wire of the radio.
If there is no ACC mode, the signal wire is connected together with the ignition. In this case, the radio will not be able to work autonomously.
The need for alternative power connection schemes arises when the owner wants to use the radio without turning on the ignition.
Connecting the radio to the battery, bypassing the ignition switch
Connecting the signal (red) power wire directly to the battery positive (parallel to the yellow one) will make it possible to turn on the radio at any time, regardless of the position of the key in the ignition. To minimize the consequences of short circuits, a separate fuse is included in the circuit.
Connecting the radio via a button
It should be remembered that the radio even in the off state consumes the energy necessary for the operation of the memory. Current consumption can increase due to leakage if the red power signal wire is permanently connected to the battery, which negatively affects the battery charge level during long periods of inactivity.
The simplest way to eliminate this drawback is to include a button or toggle switch in the circuit that forcibly breaks the control circuit.
Automatic power off of the radio when the alarm is turned on
More sophisticated ways to save energy when connecting the radio, bypassing the ignition switch, involve the use of relays that respond to the activation of the car's security alarm.
In the above diagram, the relay that turns off the power to the radio is triggered by a command coming from the alarm unit.
There are many other similar schemes. The choice of a particular option depends on the capabilities of the signaling.
Connecting the radio to the cigarette lighter
Connecting the radio to the cigarette lighter is a kind of scheme for direct connection to the battery bypassing the ignition switch.
When connecting via a plug, the red and yellow wires are connected together. For long-term parking, it is better to disconnect the plug from the cigarette lighter. This will save battery power, but will lead to loss of radio settings.
Turning on the head unit through the plug makes it difficult to use the cigarette lighter for its intended purpose. The disadvantage is eliminated by connecting the radio without a plug directly to the wires of the cigarette lighter socket.
The red and yellow wires of the radio connected together are connected to the red wire of the cigarette lighter, which is supplied with a voltage of +12 V from the battery. If the head unit is not protected by a built-in fuse, it will not interfere with the installation of an additional one in the power circuit.
Some are misled by the similar color marking of the wires of the radio and cigarette lighter. Without hesitation, they are connected red to red, yellow to yellow. The radio will turn on and so, but the use of signal lights will disrupt normal operation.
The head unit consumes about 10 A. There is a fuse in the cigarette lighter circuit of about 15 A. You should check the current and fuse rating in the technical documentation before connecting the radio to the cigarette lighter. It is possible that the fuse will not withstand the additional load when the radio and cigarette lighter are turned on together.
Connecting the radio via diodes
Diodes are used when there is no ACC position in the lock so that the radio does not turn off along with the ignition.
The scheme for supplying power to the control input of the radio via diodes is shown in the figure. The yellow wire of the main power is connected, as usual, to the plus of the battery. Red (control circuit power) - to the anodes (pluses) of two diodes. The cathode (minus) of one of them is energized through the ignition switch. The cathode of the second is connected to the blue wire - the ANT + contact of section A of the ISO connector - radio or (if any) to the REM signal output to turn on the additional amplifier.
After the ignition is turned on, +12 V is supplied to the ACC input through the red wire through the lock and the first diode. The radio turns on, voltage appears on the blue ANT + wire and through the second diode it enters the ACC input.
Now the head unit will remain on even if the ignition is turned off. You can turn off the radio with built-in controls. To turn it on again, you need to turn the key in the ignition again.
Video: connecting the radio through diodes
Connecting a second (additional) radio
Two radio tape recorders in the car - an atypical case. As a rule, if the owner is dissatisfied with the quality or capabilities, he changes the head unit to a new one. But when the head unit not only reproduces sound, but also performs other important functions for the car, it is difficult to find a full-fledged replacement.
Some owners prefer to solve the problem not by replacing, but by installing an additional device. In this case, it remains possible, for example, playing music on a new radio, use the on-board computer and listen to the radio using the old one.
When installing an additional radio, two main problems have to be solved: placing a second device in the cabin near the driver's seat and independent connection of acoustics.
Free space in the console for additional devices is not available in all car models. Therefore, for the sake of the second radio, they sacrifice low-value cavities: coin boxes, compartments and shelves that are in the area accessible to the driver's hands. Often you have to adjust the holes in the plastic parts or cut out new ones. Sometimes arrange special podiums. Unfortunately, the extra device does not always organically fit into the interior of the cabin.
Gallery: examples of placing an additional radio in the car
 Mounted on the dashboard, an additional radio tape recorder attracts attention
  The 2 DIN slot allows you to place two 1 DIN radios
  The radio in the glove compartment is invisible, but it is not very convenient to use it
  Sometimes you have to cut additional holes to install an additional radio.
If connecting power to the second head unit is not fundamentally different from the case with a single radio and usually does not cause any special problems, the acoustics require more attention.
Speakers cannot be connected in parallel to both devices at once. This significantly reduces the sound quality and can easily lead to a malfunction of the final stages of the radio. Speakers must be connected in turn, i.e. switch between outputs manually or automatically.
To implement this method in practice, various automotive relays are used. One of the possible schemes with manual control of switching acoustics using a button is shown in the figure.
Dismantling and installation of the radio
Before installing a new one, you must remove the old head unit. The sequence of steps required for this may vary depending on the vehicle model. An exact description can be found in the manufacturer's service instructions.
The first radio and tape recorder with stereo sound was introduced in 1969 by Blaupunkt, after another 3 years, the first stereo radio was released.
Igor Syroedov
http://steer.ru/node/29859
Usually the radio is held in place by two or four plastic latches. Access to them opens after removing the decorative frame covering the gaps around the radio. To press the latches, use special pullers in the form of strips or pins. You can buy them, or use homemade devices.
When removing the radio, you should be careful and do not make significant efforts. If the device does not come out, it means that one or more latches are not yet open or some extraneous obstacle is preventing the movement. Brute force will not help the cause, rather hurt.
Removing the radio
To remove the radio you will need:
- pullers or homemade devices that replace them;
- thin screwdriver;
The list of operations for removing the radio
- Before starting work, turn off the power to the car by disconnecting the battery.
- Using a thin screwdriver or knife, remove the front panel of the device (if provided by the design) and the decorative frame.
- Insert the flat pullers into the technological holes along the edges of the radio until a characteristic click is heard.
- Insert round pullers into four technological holes along the edges of the front panel.
- Using the pullers as levers, gently roll the radio out of the niche.
- Disconnect cables.
- If necessary and if there is, remove the metal frame of the radio (sled). When the old and new radios are equipped with the same mounts, it is not necessary to change the frame.
Video: removing the radio
Installing the radio
To install the radio you will need:
- screwdriver,
- side cutters (nippers),
- adapter from the ISO connector to the regular one,
- decorative frame.
The list of operations for installing the radio
- Check the wiring diagram of the car and the radio tape recorder for the correspondence of the assignment of the contacts of the connectors. If necessary, rearrange the pins of the connector contacts to the correct places.
- Disconnect the battery by disconnecting the negative terminal.
- Remove the old radio.
- Install the radio into a metal frame (sled) and try on its position in the console.
- Remove the radio and, bending the petals, fix the frame in the intended position. If available, use the stock mounts.
- Pull the cables with connectors for connecting the radio from the console out through the frame.
- Connect the connectors to the radio. Use adapters if necessary.
- Install the radio into the metal frame without fixing the latches. Turn on the battery and check the operation of the device.
- Press down on the radio to secure the fasteners.
- Put on the decorative frame, fix its position by pressing.
Video: radio installation
To install the radio, it is not necessary to turn to professionals. Doing the work with your own hands, although it will require preliminary preparation, is quite within the power of any motorist.
The connection diagram of the car radio is always described in the instructions for the musical gadget. The manufacturer's recommendations must be strictly observed. If the speaker system is not installed correctly in the vehicle, there is a high probability of its damage or low-quality sound.
1
Modern vehicles are equipped with different options for conductors and special connectors that allow you to install an acoustic system. When installing the radio in a car on your own, you may encounter the following situations:
- The positive cable has its own fuse, the conductors in the car are routed to the front and rear speakers. The audio system is powered by wires connected to the battery. All cables (including the cord from the antenna) that allow you to connect the car radio with your own hands are connected to a connector that is completely identical to the socket in the music device.
- Editing cables are connected to the jack, but the shape of the audio jack does not fit the plug.
- The power wires are not routed to the loudspeakers, there are no conductors for the speakers (or there are cables, but they are connected incorrectly).
In the first case, there are no connection problems. It is necessary to connect the power wiring and insert the connector. At the same time, before performing such simple actions, it is recommended to make sure that the power of the car radio corresponds to the technical capabilities of the speakers.
If the music system's socket does not match the vehicle's wiring socket, there will be more connection problems. Many car audio manufacturers supply their devices with different, often very specific, outputs. Such radios are connected using a special adapter that complies with the ISO standard. Finding the right adapter is easy. In car dealerships there is a huge selection of adapters for any type of automotive electrical wiring. And their cost is minimal.
Adapter for car radio connection
If there are no wires in the car, it is impossible to find a suitable adapter, you will have to remove the existing connectors (dismantle them), and then directly twist the new cables. This method is laborious and rather complicated. But it is it that is most often used by motorists, and many technical centers (especially when it comes to the need to connect Chinese inexpensive car radios). More on this later.
2
If you decide to twist new wires yourself, you should understand in detail their color marking. There is nothing complicated here. Wires are marked as follows:
- A +, ACC (red) - plus the ignition switch;
- GND (black) and BAT (yellow) - minus and plus of the battery;
- FL + (white without stripe) and FL- (white with stripe) - plus and minus of the left front speaker;
- FR + (gray without stripes), FR- (gray with stripes) - plus and minus, respectively, of the rear left speaker.
The plus and minus of the rear right speaker are marked RR + and RR- (purple wire without and with a strip), the rear left - RL + and RL- (green without and with a strip). In fancy systems, there are additional cables. Usually, the orange wire is responsible for starting the backlight. And the antenna is connected using blue wiring, on which a strip may or may not be present.

Car radio connection diagram
After you understand the markings, you need to check whether the wires on the auto connector match (in color) with the cables of the audio system planned for installation. If they match with each other, you can disconnect the battery (battery), and then disconnect the connectors of the car radio and the vehicle (the operation is performed using ordinary wire cutters). In order not to get confused, immediately connect the required connector to the audio system (strictly by color or letter marking) and cut off the remaining piece. It is advisable to solder the connections and, using heat shrink tubing, isolate each wiring. In this way, you will ensure a long service life of the system.
If the wires do not match in marking (this is often noted if you purchase a Chinese gadget), they will need to be called. The procedure is carried out using a special multimeter equipped with a nine-volt battery and an audible alarm. The ringing is performed with the car battery disconnected.
The battery is needed in order to correctly identify pairs of cables for each speaker in the car. It is connected to two tested wires and see how the diffuser reacts. If it moves inward (pulling in), the polarity is wrong. In cases where the diffuser moves outward, you have done everything right. Mark with a plus the cable connected to the positive input of the battery. Important! The battery connects to the speaker literally for 1 second.
3
Purchase a set of cables to connect the power of the car radio and its speakers. Wiring length may vary. It all depends on the size of the transport and the features of its design. Ideally, if the length is chosen so that subsequently there is no need to add and twist additional pieces. You don't need to save money on wiring. Invest in high-quality stranded copper cables with extra silicone insulation. For most modern car radios with a power of not more than 120 W, wires with a thickness of 1.5–2 mm (for connecting loudspeakers) and 3.5–4 mm (for power) are suitable.
If you want to install a standard audio system with four speakers (two front, two rear) in the car, the speaker connection will be made using four pairs of wires.
You know how they are marked, I think there will be no problems with the connection. Try not to confuse polarity. The radio tape recorder, if the pluses / minuses are incorrectly connected, of course, will not burn out, but the sound quality will not please you. Medium and high power speakers always have wide and narrow terminals. You just need to properly insert the wires into them.

Connecting speakers
A negative wire goes to a narrow input, a positive wire goes to a wide input. On low-power car radios, there can be only one terminal. In this case, a positive cable should be connected to the loudspeaker, and the negative cable should be thrown to the common minus of the music car center. With incorrect phasing, as we have already noted, the quality of the sound produced by the speakers of the car radio may deteriorate. The fact that you have confused the pros with the cons is usually evidenced by the following phenomena: the inability to adjust the bass, the low-quality sound of low frequencies.
You can check the correct phasing in a simple way:
- Transfer all the sound to the front speakers of the radio and put the balance on any of the two speakers.
- Raise the sound until a noticeable distortion appears (or to the maximum).
- Move the balance to the middle position.
If, after all these manipulations, low frequencies disappear, the phasing was done incorrectly. You need to recheck the pros/cons of the wires and reconnect the problem pair. A similar operation (check and reconnect) is performed on the rear speakers.
4 We connect the audio system - diagram and procedure
Now let's figure out how to properly connect the car radio directly. The wiring diagram is shown below. Almost all car radios in vehicles of the last 15–20 years of production use three wires for power supply:
- yellow feeds power consumers, it goes to the plus of the battery;
- black goes to battery minus;
- red is the plus function of the ignition switch.
Professionals say that installing a car radio with your own hands should be done exactly according to this scheme. It is not recommended to connect the yellow wire to the cigarette lighter or the ignition switch, and the black wire to the ground bolt, as many motorists and handicraft "specialists" in car audio do. This option is incorrect. Proven and verified. Proper connection guarantees a truly high-quality sound of the music system.
One more moment. Some technical centers and motorists are smart. They connect the red and yellow wires together. In this case, the installed music center pleases the driver with his favorite music tracks all the time - regardless of whether the ignition is turned off or on. But it should be understood that with such a connection scheme, the battery will be discharged very quickly (the audio system, in fact, is constantly in standby mode and consumes energy). If you want to install a Chinese-made car radio, we do not recommend using the described method. The battery charge will not last long.
5 Add an Antenna to the Car Music Center
We figured out how to connect a standard type car radio. On this, in principle, you can finish. But many drivers like to listen to radio stations while driving. Let's figure out how to set up an antenna to receive them. This operation will take a minimum of time and will give you the opportunity to enjoy music that sounds on your favorite radio wave. Antennas can be active or passive. Their connection scheme is simple, but different. The passive receiving device is connected directly to the appropriate socket. Difficulties at least.
To install an active antenna, you will have to supply power to it. You need:
- Find a special entrance with wiring marked with the letters ANT (sometimes REM). It usually has a blue color. In modern cars, there are even two such wiring. They only turn on the antenna when you turn on the car radio.
- Connect the receiving device.
- Insulate wires.
Now you know how to install an audio system and any type of antenna. To improve the sound quality, we recommend that you play in order to enjoy every musical chord in the interior of your vehicle. Happy travels!
Most car enthusiasts who have changed several cars have had to deal with the process of replacing a car radio or installing a new device. The head unit of the speaker system is changed in the process of car audio tuning, in case of critical damage to the car radio.
Car music lovers definitely install a new high-quality car radio when buying a used or new car. Many basic models of domestic cars are sold with the “audio preparation” option. This means that the “dashboard” is equipped with a niche for installing the head unit (with electrical wiring), speakers are installed in the door cards.
Many car enthusiasts install car radios in specialized car services, but a simple installation process is available to any driver who knows how to hold a screwdriver in his hands and knows the basics of electrical engineering. Some installation nuances affect the operation of the head unit. From how to connect the car radio in the car, its full functionality, ease of use, and the safety of other car mechanisms will depend.
The procedure for disassembling the old car radio
Before connecting the radio in the car, you need to dismantle the old head unit. For this you need:
- Remove decorative frame. If you are going to sell a car radio, all operations must be carried out carefully, without using brute force. Plastic fasteners break easily.
- Pull out the radio housing. To do this, there are special grooves from the side ends through which you can squeeze the spring clips.
- Carefully disconnect the electrical connector and compare the connectors of the old and new head unit.
- If the old speaker system does not have a connector, you need to carefully disconnect the wires. You may need to mark automotive wiring cables with colored electrical tape.
- Take out the old slides. To do this, press the spring antennae with a screwdriver.
Installation of a new device
With the help of an adapter
To insert the case of a new car radio into the “dashboard” niche, you need to repeat the dismantling operations in reverse order. In new cars with "audio preparation" it is enough to compare the connectors of the head unit and the car wiring from the battery and speakers. Each of the well-known brands of car acoustics uses connectors of its own design, which differ in configuration

If the connectors of the car electrical wiring and the new car radio coincide, it is enough to connect them, insert the body of the head unit on a slide into the niche. For mismatched connectors, you will need to purchase an adapter, which is available for all models of car speakers.

To search for an adapter in retail or in the car market, you cannot remove the connectors from the car radio. The easiest way out is to take a picture of both connectors and write down the exact marking of the car radio model.
Connection without connector and adapter
In order to independently connect the wires in the absence of a connector in the speaker system of the car, you need to remember the color pinout of car speakers, which is used in standard systems.

Connected to the car radio:
- yellow cable (from the positive terminal of the battery),
- black wire to the ground of the machine, red (to the ignition switch).
Wires of the following colors and purposes depart from the head unit:
- purple (plus right rear speaker);
- purple with black stripe (minus right rear speaker);
- gray (plus right front speaker);
- gray-black (minus the right front speaker);
- white (plus left front speaker);
- white-black (minus the left front speaker);
- green (plus left rear speaker);
- green-black (minus the left rear speaker).
In expensive car radios, non-standard connectors with additional outputs are used.

The head unit can be equipped with outputs:
- MUTE (mute function, can be automatically linked with the connection of the "free hands" option);
- REMOTE (used to connect an external amplifier, additional speakers, subwoofer to the head unit);
- ANT (adjusts the automatic extension of the car antenna in cars equipped with such a device);
- ILLUMINATION (decreases the brightness of the screen when driving, at a stop increases the illumination of the display for ease of adjustment).
If you feel that you cannot figure out the difficulties of connecting an expensive device on your own (there is no Russian-language instruction for the car radio), it is better to contact a specialized car service.
You can see in detail how to connect the car radio correctly in the video:
Errors when connecting the car radio
A common mistake is to connect the yellow power wire not to the battery, but to the ignition or cigarette lighter. This error is not dangerous, but reduces the power of the head unit and the sound quality (increases the amount of interference and interference).
The most dangerous mistake when installing a car radio is the incorrect connection of the positive and negative battery terminals. Such a connection burns the electronic circuits of the receiver, radio, speakers. If you select the wrong power supply terminals (connecting the red wire to the battery), the car radio can discharge the battery during a long stop.
When self-tuning the wiring of the speaker system, it is necessary to use not aluminum wires, but a stranded copper cable with a cross section of 3-4 square millimeters. On the cable from the "plus" of the battery, you need to install an additional fuse (with a capacity of 15 - 20 A), which insures the head unit from excessive inrush currents.
With self-assembly of car acoustics, excessive length of wires and their intersections should be avoided. Twisted, bent wire can quickly fray, causing a short circuit. Intersections of wires cause electromagnetic pickups, noticeable in wheezing, crackling of the speakers.
If the niche in the “dashboard” of the car is larger than the dimensions of the car radio body, you need to fill the side slots and the lower clearance with sheet foam or polyurethane foam. This will get rid of the rattles of plastic and metal, vibrations of the speaker system.
Taking the time to install ISO connectors and fuses, search for adapters, mark wires, in the future you can easily replace the radio with the latest model.

A properly installed radio will give you a lot of pleasant minutes, brighten up the hardships of a long stay at the wheel or parking in city traffic jams.
Many domestic motorists quite often ask themselves the question: “How is it right?”. The reasons that push them to understand this issue may be the following:
- The radio tape recorder is outdated and requires urgent and urgent replacement
- The speaker system is broken and cannot be repaired
- There is no sound system in the car at all
Any of the cases cited above forces the owner of the vehicle to understand the connection diagram of this element of the car. If desired, the radio can be connected independently. To do this, you do not need to understand much in electronics and in the theory of electrical circuits. There is nothing complicated here, and a graduate of the 11th grade can even perform a similar procedure without any problems.
Connecting the radio is an easy process
Connectors and their marking
Connector "A"
As mentioned earlier, this is a power connector. You can connect the radio with it to the power circuits and the antenna. Despite the fact that it has 8 contacts, only 4 of them are involved.
Contact "A4" - provides power to the volatile memory of the radio, which stores the settings of the device. If you accidentally turn it off, then all the parameters of the radio will be reset, it will return to the factory settings. A red wire is connected here, which goes through the fuse to. The voltage that is present here is 12 volts.
The output to the car antenna is marked "A5". This is where the blue wire comes in. The maximum current allowed at this output is 300 mA. If the value is exceeded, then not only the output amplifying stages, but also the radio as a whole, may fail.
The next contact element provides power to the radio and has the reference designation "A7". Through this yellow wire, the entire speaker system is turned on. Through the fuse, this wire must be connected to the ignition terminal, and from it to the battery. When the key is turned, it is fashionable to turn on the radio and listen to music. The organization of power through the ignition protects the battery from discharging. Even in standby mode, the output stages consume electrical energy and may cause the battery to drain. Such a scheme is not always convenient and domestic motorists have redone it.
In the first case, power is organized through an additional toggle switch, bypassing the ignition of the car, on the vehicle control panel. The disadvantage of such a connection is that the driver himself must turn the toggle switch on and off. In the second case, put the toggle switch in parallel with the ignition, and regardless of whether there is a key or not, the radio can be turned on. The disadvantage of such a scheme, like the previous one, is that the control lies with the driver, and if he forgets to turn off the toggle switch, the battery will be discharged and it will be quite difficult to start the car. The third scheme was the most optimal solution. It consists in the fact that a relay winding is installed in the car lock alarm control circuit, and the contact group is installed in the power circuit of the acoustic device. If the car is alarmed, the radio is turned off and the battery is protected. A simple and elegant solution that has already become very popular among .
The last wire that is used in this connector connects the radio to ground. The contact is designated "A8", and the insulation is black here.
This section provides recommendations on how to properly connect the radio - namely its power part. Any incorrect connection of these wires can lead to the fact that it will fail and you will either have to repair it or buy a new one. Therefore, to check the connection, it is recommended to use a tester or multimeter to check the switching and continuity of electrical circuits.
Connector "B"
Through the second contact, which has the designation "B", the periphery of the acoustic system, that is, the speakers, is connected. Most radio tape recorders are designed to connect 4 channels (that is, speakers) and 8 wires are used for this purpose (2 for each and speakers).
Pins "B1" and "B2" are connected with purple and purple-black wires to the rear speaker on the right side. Moreover, the first one must be connected to the positive terminal of the speaker, and the right one to the negative terminal. If you confuse them, then nothing terrible will happen, it will only work in a non-standard mode and the sound quality will be “lame” - one of the speakers will work in antiphase, and the music will be worse.
The front right speaker must be connected to the terminals marked "B3" and "B4". Gray and gray with black wires are respectively connected here. The first must, for the reason indicated earlier, go to the positive terminal of the speaker, and the second to the negative.
Next comes a part of the circuit, with the help of which the left speaker, located on the left side of the car, is connected. For this, terminals with the designation "B5" and "B6" are used. Wire insulation marking - black and white-black. The first goes to "+", the second to "-".
The last, fourth element that connects to this connector is the speaker, which is located in the left rear of the vehicle. It is hung on terminals "B7" and "B8" using green and green-black wires. The first of them goes to the positive terminal of the speaker, the second - to the negative.
Possible extensions
Some professional-level radio tape recorders today have an expanded set of functions. These extensions allow them to be used more flexibly in modern vehicles, making them an order of magnitude higher.
Among the extensions are:
- ANT output
- REMOTE output
- Login
- MUTE output
Consider each of them separately.
The ANT output is used if the car has an automatic retractable antenna. That is, if you want to listen to music on the way, you don’t need to go out and. It is enough just to give a command to the radio, and she will do this work for you herself.
The next output marked REMOTE allows you to connect an external amplifier to the radio and significantly expand the number of speakers used. This design solution is best used in large cars, since it is in them that the proper sound background can be created due to this. You can not put more than 4 speakers in, as this will create a great burden on the hearing organs and may adversely affect your health.
Nutrition
The radio is powered by 2 wires. Each of them, in order to protect acoustic equipment, must be equipped with a fusible insert. If there are periodic interruptions in the operation of the radio, it is best to add a capacitor between the terminals "A7" and "A8", which should stabilize the power of the radio and eliminate possible loss of sound. Capacity is best chosen empirically. Essentially, it will be a filter that smooths out fluctuations in the electrical supply circuit of the vehicle's speaker system.
wires
To connect the elements of the acoustic system, it is necessary to use wires with a cross section of 1.5 - 2 mm at least. In this case, wires with the largest cross section must be used in power circuits without fail. A smaller cross section is not allowed. This can cause the sound to deteriorate, disappear and the car's sound system will not work.
Car radio installation
In order to connect the radio, it is necessary to study in detail the installation instructions that come with the kit. You also need to check the presence of all fasteners that may be needed during the installation process. Perform installation in accordance with the instructions and install in the radio. Large gaps and openings are not allowed - dust can enter through them and lead to damage to the speaker system. The situation is similar with vibration, which is also unacceptable.
Conclusion
The technique presented in this article allows you to perform switching of any acoustic device. And now the question of how to properly connect the Pioneer radio, for example, or Blaupunkt is not entirely relevant. If you want and have free time, you can do it yourself. Special knowledge is not needed for this, as well as special training is also not needed. So you can safely take and do. There shouldn't be any problems.
- News
- Workshop
Limousine for the President: more details revealed
The site of the Federal Patent Service continues to be the only open source of information about the "car for the president." First, NAMI patented industrial models of two cars - a limousine and a crossover, which are part of the Cortege project. Then, the namishniks registered an industrial design called “Car Dashboard” (most likely, it was ...
AvtoVAZ nominated its own candidate to the State Duma
According to AvtoVAZ's official statement, V. Derzhak worked for more than 27 years at the enterprise and went through all the stages of career development - from an ordinary worker to a foreman. The initiative to nominate a representative of the AvtoVAZ labor collective to the State Duma belongs to the enterprise's staff and was announced on June 5 during the celebration of the day of the city of Togliatti. Initiative...
Self-driving taxis coming to Singapore
During testing, six modified Audi Q5s capable of autonomous driving will hit the roads of Singapore. Last year, such cars easily covered the path from San Francisco to New York, according to Bloomberg. In Singapore, drones will move along three specially prepared routes equipped with the necessary infrastructure. The length of each route will be 6.4 ...
Demand for Maybachs has risen sharply in Russia
Sales of new luxury cars continue to grow in Russia. According to the results of a study conducted by the AUTOSTAT agency, following the results of seven months of 2016, the market for such cars amounted to 787 units, which is immediately 22.6% more than in the same period last year (642 units). The leader of this market is the Mercedes-Maybach S-Class: this...
Every fourth accident in Moscow is due to bad roads
This was told by the deputy head of the UGIBDD of the Main Directorate of the Ministry of Internal Affairs of Russia for Moscow, police lieutenant colonel Alexei Diokin, the Moscow agency reports. Diokin also added that since the beginning of 2016, the traffic police issued 6,406 orders to eliminate shortcomings in the transport and operational condition of roads and violations of regulatory documents. In addition, 788 ...
Suzuki SX4 survived restyling (photo)
From now on, in Europe, the car is offered only with turbocharged engines: petrol liter (112 hp) and 1.4-liter (140 hp) units, as well as a 1.6-liter turbodiesel that develops 120 horsepower. Before the upgrade, the car was also offered with a 1.6-liter 120-horsepower naturally aspirated gasoline engine, but this unit will be retained in Russia. In addition, after...
Snails cause accident in Germany
Snails during the mass migration at night crossed the autobahn near the German city of Paderborn. By early morning, the road had not had time to dry from the mucus of mollusks, which caused an accident: the Trabant car skidded on wet asphalt and turned over. According to The Local, the car, which the German press ironically refers to as "the diamond in the crown of the German...
Lotus will release a crossoverLotus will release a crossover
In fact, the first Lotus crossover was supposed to appear a few years ago. In 2006, the Lotus APX conceptual crossover was presented at the Geneva Motor Show (pictured), which in a couple of years was supposed to turn into a production model. A year later, its electrified version was presented, but the Malaysian company has financial problems ...
The new Kia sedan will be called the Stinger
Five years ago at the Frankfurt Motor Show, Kia unveiled the Kia GT concept sedan. True, the Koreans themselves called it a four-door sports coupe and hinted that this car could become a more affordable alternative to the Mercedes-Benz CLS and Audi A7. And now, five years later, the Kia GT concept car has transformed into the Kia Stinger. Judging by the photo...
How to respond to street flooding. Video and photo of the day
The fact that this thesis is more than just beautiful words is clearly proved by the videos and photos that appeared after the flood that occurred in Moscow on August 15. Recall that in less than a day, more than a month's rainfall fell on the capital, as a result of which the sewerage system could not cope with the flow of water, and many roads were simply flooded. Meanwhile, as...
The best gifts for a car owner
The best gifts for a car owner
A car enthusiast is a person who spends a lot of time driving his car. Indeed, in order to ensure the necessary comfort in the car, as well as traffic safety, you need to make a lot of efforts when caring for a car. If you want to please your friend...
The best cars of 2018-2019 in different classes: Hatchback, SUV, Sports car, Pickup, Crossover, Minivan, Sedan
Let's look at the latest innovations in the Russian automotive market in order to determine the best car of 2017. To do this, consider forty-nine models, which are distributed among thirteen classes. So, we offer only the best cars, so it is impossible for a buyer to make a mistake when choosing a new car. Best...
The device and design of the car rack
Whatever the expensive and modern car, the convenience and comfort of movement primarily depend on the operation of the suspension on it. This is especially acute on domestic roads. It's no secret that the most important part of a suspension is the shock absorber. ...
Rating of reliable cars 2018-2019Reliability, of course, is the most important requirement for a car. Design, tuning, any "bells and whistles" - all these trendy tricks inevitably pale in importance when it comes to vehicle reliability. The car should serve its owner, and not cause him problems with his own ...
All cars in the world can be divided into categories in which there will be an indispensable leader. So you can select the fastest, most powerful, economical car. There are a huge number of such classifications, but one is always of particular interest - the most expensive car in the world. In this article...
The fastest cars in the world 2018-2019 model year
Fast cars are an example of the fact that automakers are constantly improving the systems of their cars and are periodically developing to create the perfect and fastest vehicle for movement. Many of the technologies that are developed to create a super fast car later go into mass production ...
Overview of the most popular crossovers and their comparison
Today we will consider six crossovers: Toyota RAV4, Honda CR-V, Mazda CX-5, Mitsubishi Outlander, Suzuki Grand Vitara and Ford Kuga. To two very fresh new products, we decided to add the debuts of 2015 to make the test drive of 2017 crossovers more...
Which hatchback Golf class to choose: Astra, i30, Civik or still Golf
Central figures Local traffic cops do not show any reaction to the new "Golf". According to observations, they like the catchy Honda (apparently rare in Ukraine) much more. In addition, the traditional proportions of the Volkswagen hide the updated body platform so well that it is difficult for the layman ...