A cardan shaft is a device that rotates and moves parts in space. It locks the axle, supports the shaft and takes over radial loads. But like other parts, the outboard bearing cardan shaft("Mercedes" or VAZ - no difference) sooner or later will require replacement. In this article, we will consider the stages of this process using the example of domestic VAZ models 05-07.
Instrument preparation
In order to replace the bearing of the outboard propeller shaft, you will need 2 open-end wrenches of 12 and 13 millimeters, a hammer, a steel guide, and pliers, with which you will remove the circlips. Also, do not forget about the special one without which this process is simply impossible.
How to remove the propeller shaft outboard bearing?
VAZ "five", "six" and "seven" have a similar chassis design, so the instructions for installing and replacing this part are suitable for all of the above models. So let's get to work. First of all, we put the car on the inspection hole and remove the propeller shaft, and also dismantle the crosspiece (using a 27 key, unscrew the bolt). It is worth remembering that the nut should not be completely removed - you need to leave a little space on the thread for further extrusion of the fork. 
And now we need a puller. In general, it can be of different designs - when choosing, be sure to ask the seller about which car model it is intended for. Using this tool, we press in the propeller shaft plug. It is possible that this part may get stuck and not stick out. For this we use a hammer. Do not knock hard, otherwise both the puller and the fork will deteriorate. Next, we press out the desired part and remove the base plate. Then the bearing itself should be pressed off the shaft. To do this, find 2 corners (50 to 50) and with the help of them, leaning on the universal joint, press out the worn out part. If necessary, you can take a metal guide and lightly hit with a hammer through it. That's it, the bearing of the outboard propeller shaft is removed.
But our work does not end there. After we have removed the bearing of the outboard propeller shaft, remove the retaining ring and mud deflectors. Then you can start installing a new part. Installation is carried out in a similar way, but here it is worth noting one nuance - before work, a new part should be lubricated. As a rule, manufacturers lubricate it in advance, but this is not enough. In order to provide the machine with normal rotation of the propeller shaft, you need to carefully pry off the bearing cover (wall) with an awl and process it. Everything, now new part ready to install. By the way, if you notice that this part is scrolling with hooks, it is better to change it to another one, since such a part is either defective or forged. 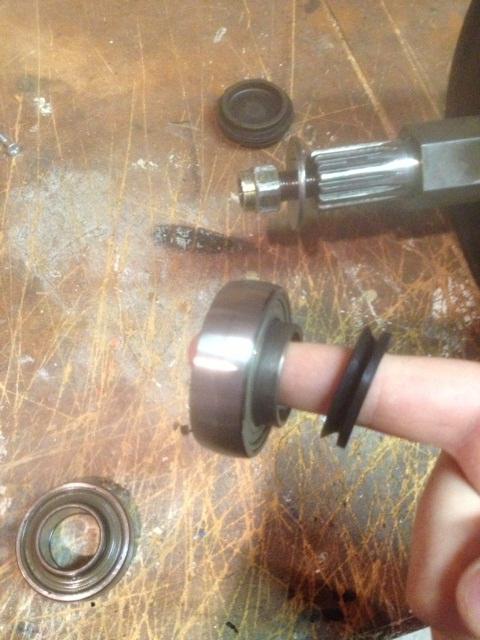
By following these instructions, you can easily replace an obsolete part with a new one, ensuring your car has a long and trouble-free operation.
Offers outboard bearing replacement service.
When do you need to change the outboard bearing?
The main signs of failure of a part include the following:
- all sorts of sounds and noises (hum, hum, crunch), as well as vibration (beating, twitching) while coasting at speed;
- visual and instrumental examination - the presence of play in the bearing.
Causes of breakdowns of the propeller shaft outboard bearing:
- natural wear of the part, including the destruction of the rubber holding the bearing;
- features of operating conditions (low and high temperatures, dirt and dust on the part, off-road driving, sharp gear shifting, high loads, etc.);
- installation errors;
- low quality of the parts used (parts must be either original or from well-established manufacturers on the market, for example, FAG, KOYO, Meyle, NACHI, NSK, NTN, SKF, SNR. It is important that the bearing has a smooth running and elastic rubber).
Features of the outboard bearing replacement process
In order to replace this part, it is necessary to dismantle the propeller shaft. If possible, change the elastic coupling and the crosspieces at the same time. In the process of installing a new part, it is important to press it in correctly, and at the end of the assembly, balance the propeller shaft. When conducting renovation works of this type, it is necessary to comply with certain technological requirements imposed by the manufacturer. By contacting us, you can be sure that all important conditions will be met. We do it quickly and efficiently the first time and give a guarantee for all types of our own service work.
The task of the cardan shaft of a car (in a simple way - cardan) is to transfer the torque from the gearbox to the gearbox. In turn, thanks to the gearbox, there is an even distribution of forces on the axle shafts. vehicle... If the propeller shaft breaks down, you cannot do without replacing the outboard bearing, shaft (in case of mechanical damage) and replacing the crosspiece.
The outboard bearing is located on the cross member of the vehicle to which it is attached with two bolts. When dismantling the bearing, you cannot do without removing the universal joint. There is no other way to install a new part.
When do you need to change the outboard bearing?
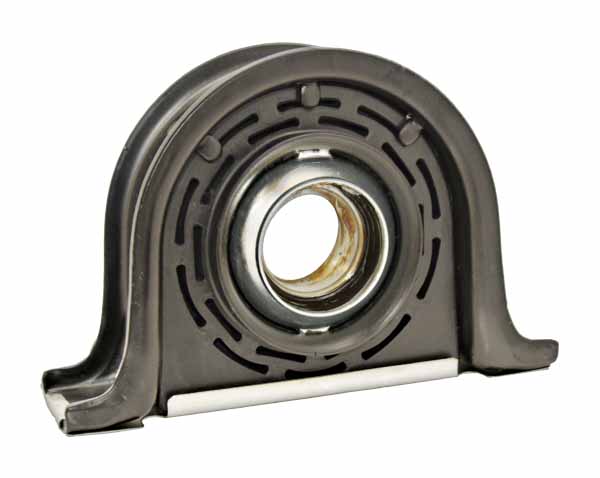
Structurally, the device is a rolling bearing, which contains a pair of bushings of various diameters, with a ball cage installed between them. A mount is provided on the outer race, with which the bearing is held on the underside of the vehicle.
To protect the balls and the lubricant from dust and dirt, the outer cavity of the part is closed with an insert. If the latter is damaged or fails, the life of the outboard bearing is reduced and may need to be replaced prematurely.
As for the tasks that are assigned to the outboard bearing of a car, there are several of them:
- Reduce vibration of the propeller shaft.
- Relieve most of the load when turning the gimbal and also eliminate the risk of deviations from the original axis of rotation.
First of all, the malfunction manifests itself as a knock that occurs when the car starts off, or when the gearshift knob is moved to another position. But this is not the only sign. It is also possible that beats or vibrations of the propeller shaft may occur, which are transmitted through the bottom and seats of the machine.
It happens that extraneous noises appear only when a specific speed is reached. Such a malfunction shows that there is no centering in the rotation of the cardan. Strong vibrations lead to a decrease in the service life of the secondary shaft of the gearbox and the gearbox installed on the rear axle. In order to eliminate the occurrence of the mentioned problems (vibration and noise), it is important to identify the problem in time and replace the outboard bearing.
Getting Started: What is Required to Install an Outboard Bearing?
If strange noises appear while driving, indicating a broken outboard bearing, inspect the part and assess its condition. It is easiest to identify a breakdown by curvature or other deformations of the protective insert, the presence of grease on the case, or mechanical damage to the device. In each of these cases, replacement of the outboard bearing is required.
- To successfully complete the work, drive the car into the inspection hole and move the gearbox selector to the first speed position. Thanks to this, you exclude the displacement of the car and accidental scrolling of the gimbal. For better fixation, substitute wheel chocks under the car, thanks to which the risk of accidental displacement of the cardan is eliminated.
If this work is not done, the machine may roll into the pit and injure the participants in the repair process. So it is forbidden to ignore such preparation.
Due to the regular ingress of moisture and the impact of other negative natural factors, the joints and fixing elements of the cardan gradually rust.
- To simplify the work process, apply a special WD-40 agent to the joints and leave the knot to "turn off" for a while. Without using the aforementioned lubricant (or equivalent), twisting the rusted bolts is a difficult task.
While the WD-40 is performing its functions, prepare the tools and assemblies for installation. Please note that replacing the outboard bearing is often accompanied by the installation of a new universal joint cross. The lifespan of these nodes is approximately similar, and therefore they break almost simultaneously. If the crosspiece is not replaced, then, soon, the work on dismantling the universal joint will have to be performed again (in particular, a new crosspiece must be installed). Taking into account the low price of a part, it is better to change it right away. It will be cheaper than paying to dismantle and install a propeller shaft.
- In advance, before removing the cardan, make notes on it, the gearbox and gearbox elements. Thanks to this foresight, the process of mounting the cardan in its original place is simplified.
This eliminates the risk of vibrations due to imbalance. The balancing of the universal joint in relation to the axle takes place at the factory. Therefore, it is possible to return the propeller shaft to its place without marks, by placing the device arbitrarily.
How do I change the outboard bearing?
One of the biggest challenges for car owners is replacing the universal joint outboard bearing. (see helpful video below)... The algorithm of actions is as follows:
- Using a wrench, twist the bolts holding the gimbal in the gear shank.
- Twist the outboard type bearing fasteners.
- Flare the petals holding the gimbal, and then remove the assembly from the rubber sleeve.
- Dismantle the shaft by first pulling the circlip off the crosspieces. This work is easiest to do with special forceps. As a last resort, use a screwdriver.
- Place a spacer, and then knock the cross from the installation site. Use a chisel and hammer to solve the problem.
- Clamp the universal joint in a vice and twist the nut in the place of fixing the suspension type bearing.
- Using a puller, squeeze out the fork, and then knock down the bearing. Strike evenly, gradually moving around the circle.
- Clean the area where the bearing is installed from dirt, rust and other deposits.
- Place the new part on the propeller shaft. If the bearing is installed correctly, the stopper should lock towards the rear axle of the vehicle.
- Replace the shield washer.
- Secure the retaining nut and counter it with a hammer and chisel.
- Install new crosspieces and fix the universal joint according to the algorithm, which is the reverse of dismantling.
Video: Removing the outboard bearing VAZ 2101-2107
If the video does not show, please refresh the page or
Replacing an outboard bearing on a VAZ-2107 is a job that is available to a novice car owner. The main thing is to prepare a suitable tool, find a place with a lift or a viewing hole. Without preliminary preparation and knowledge of the features of the replacement, it will not be possible to complete the work.
In order to replace the outboard bearing of a VAZ 2107, it is necessary to remove the propeller shaft assembly. For this it is not necessary to contact a service station, but you can perform DIY auto repair. For replacement, you will need a viewing hole or overpass, as well as the required minimum of tools, a puller, a workbench and a locksmith's vice.
A new pendant is best purchased factory-made, since there are a lot of frank "levers" on sale today and such a replacement "awl for soap" will only be a waste of your hard earned money.
Finding a factory part is not so difficult, you just need to contact trusted sellers who sell parts from the manufacturer.
Front replacing the outboard bearing VAZ 2107 it is necessary to make sure that the crosspieces of the propeller shaft and the elastic coupling are intact, so that during operation you do not face the fact of the need to replace these parts, which will not be at hand.
In addition, if you do not have the skill in cardan shaft crosspieces, then it is best to purchase one crosspiece together with the outboard bearing, since in the process of replacing the "outboard" one of the crosspieces will have to be removed and, most likely, it will be damaged.
Scheme of work on replacing the outboard bearing VAZ 2107 - machine on the inspection pit
The attachment of the cardan flange to the gearbox shank flange is given rear axle and the flanges are disconnected
The petals of the protective boot (cuff) at the entrance of the splined part of the universal joint are bent into the connection of the flange of the elastic coupling and the boot moves
The fastening of the outboard bearing bar is given
Given a safety bracket for the cardan (attached at the edges of the tunnel under the cardan shaft)
The propeller shaft is removed from the flange connection of the elastic coupling
The front of the gimbal goes down and the entire gimbal is removed
Next, the propeller shaft is removed from the inspection pit and you can start replacing the outboard bearing of the VAZ 2107. To do this, you first need to dismantle the crosspiece in order to gain access to the bearing. Before removing the cross, it is necessary to mark the relative position of the forks of its fastening, so as not to confuse them during the subsequent installation of the cross. Otherwise, the balance of the propeller shaft will be lost and vibration will appear during movement.
After removing the cross and disconnecting the propeller shaft, the rear part of the propeller shaft with the outboard bearing must be clamped in a vice for ease of operation. In this case, you also need to mark the relative position of the fork and the cardan body by applying paint or punching parts.
The outboard bearing is fastened through the support of the cross yoke by means of a nut that must be returned. To do this, you need a head and a crank. The nut is blackened from the factory and you will have to make some effort to remove it.
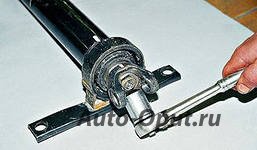
After unscrewing the nut, you need to remove the plug, for which it is best to use a puller. If there is none, you can insert a piece of pipe into the eyes of the fork and try to gently knock out the fork from the splined joint with the cardan. This is a forced measure and is used only as a last resort, since it is possible to damage the mounting holes for the crosspiece with subsequent problems.
![]()

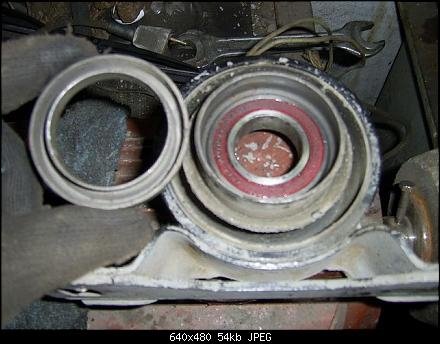
After dismantling the fork, for the convenience of further removal of the outboard bearing, its rubber base can be simply cut off, which will make it possible to remove the bearing with a puller or "by blow" through the spacer of their wood or non-ferrous metal.
Having removed the old bearing, you need to see if the bearing protective linings are crumpled during removal and, if necessary, align them. First, the inner protective washer is installed, and then the new bearing. Before installing the fork, check the coincidence of the punched marks on the fork and the body of the propeller shaft. Next, an outer protective washer is placed - a pad, a fork and a nut. The nut is tightened and cracked. Before installing the cross, the previously applied marks are also checked, and everything is assembled in the reverse order.
The cardan shaft can be of two types - both removable and non-removable. In the first case, there should be no problems with the replacement. In the second - most likely - you will have to buy a new propeller shaft, along with a bearing, which will not be cheap at all. Let's go through as much detail as possible on this topic.
How to diagnose a problem with your car's propeller shaft outboard bearing?
- If there is a hum that comes from an unknown source while coasting, this could be a sign that the outboard bearing is defective.
- Drive the machine onto a lift, as you will need to make sure that the noise is coming from the area of the outboard bearing
- Noise may be accompanied by vibration
- If you are convinced that the beating, vibration and various kinds of jerking come from this area - unscrew the mounting bolts and lower the propeller shaft to the ground, but be careful - the joint of the propeller shaft should come out of the transfer case and oil will flow from there.
- Next, check the bearing for play. If it is serviceable, then there should be no backlash.
It is possible to replace the outboard bearing without the help of specialists, the main thing is to carefully read the book on the repair and operation of your particular car, to have necessary tool and it is desirable to have a flyover or lift. You may need vinegar or a special liquid to decarbonize the bolts if they have rusted over time.
Replacing a VAZ 2107 or VAZ 2106 outboard bearing, in principle, will not differ much from replacing the same part on a Toyota or Ford car. The scheme is, in principle, the same everywhere, with differences, but not cardinal.

- Bet if possible original spare parts, but if they are not there, try to choose a substitute approved for installation by the manufacturer of your car.
- Try to check the bearing when buying for backlash, especially when it comes to Russian parts. Most often, half of them are sold with backlash, which means they are no different from faulty ones.
- The bearing may be lubricated when assembled at the factory, or it may be sold unlubricated. Check and perform the necessary actions according to the instructions.
- It may also be that the semi-axle outboard bearing for a new Ford transit is very expensive, and perhaps there are suitable substitutes from Soviet cars mobiles.
- Try not to buy the outboard bearing on parse or second-hand. It is not known how much he went through and how much he has left
Can the outboard bearing be repaired?
Yes, it is possible to repair the outboard bearing. In fact, there are two options - either you disassemble the outboard bearing housing to lubricate it, or to replace the bearing itself. In the second case, it is advisable, if not difficult. For example, for a Toyota Cross car, such an alignment of events is possible - a new part costs from 1,500 to 6,000 rubles, and a regular bearing of the same size is 100-300 rubles.
So much for saving from scratch. If you think you can handle it, go for it, but if you can't tell the difference between a wrench and a screwdriver, then it's better not to meddle. It is worth noting here that you can run into a bearing in the store. made in China... The advice is the same - do not buy anything, and check what you are going to buy. In other words, the enterprising Russian people have already found a way to repair Toyota's outboard bearing.
If you are disassembling a suspended one for the first time - the advice is incredibly simple, but important and forgotten by everyone - remember what you are unscrewing from where, what you are removing from, put the bolts and nuts in a jar or box, if the nuts do not unscrew - soak them special liquid, otherwise you can either strip the threads or break off the bolts altogether.
note
It should be noted that not only the outboard bearing, but also the rear axle gearbox can buzz. First, make sure that everything is in order with the gearbox, otherwise you will have to do a lot of unnecessary work. As a rule, most car owners forget that there is never a lot of grease in bearings. Whether it is a Tuareg or Volga outboard bearing, you should not forget about lubrication. The only thing, as mentioned earlier, is that a new suspension assembly is usually very expensive for foreign cars. The best advice is to replace it with an analogue from Soviet cars or replace the bearing itself with replacing the crosspiece. It's up to you to decide what to do, besides, examples of "collective farm" methods exist in abundance and most of them are successful.
Firstly, low winter temperatures negatively affect even the lubrication in bearings, and this is not surprising.
Secondly, the cardan is usually located above the exhaust system, which heats up during engine operation and dries the lubricant in the bearings.
All this happens slowly, over the years, but when it comes to Chinese or korean cars, then it is better to put a high-quality Russian bearing at the first symptoms. Yes, by the way - bearings from Soviet and Russian cars, so pay attention to this.
Prevention is needed in everything
And prevention can only be the following:
- Make sure that elements of this kind are reliably protected from dirt and dust.
- Try to drive off-road without touching the ground. Sitting belly on into a good pothole, you can not only tear off the muffler, but also hook the mounting elements of the outboard bearing. Cardan, of course, is almost impossible to bend, but the metal bearing bracket can be bent easily.
- Try to shift gears as smoothly as possible, and do not give heavy loads in cold weather.
Summing up, we can say that replacing an outboard bearing is not such a difficult task. Do not confuse the knock of the spider with the hum of the bearing. As a rule, the first manifests itself when starting off - a sharp dull metallic sound, and the second - a hum, similar to the grinding of wheels in the snow, accompanied by vibration, is felt only at speed. And one more note - as a rule, this problem occurs on cars with solid mileage, so if you recently purchased new car, then this problem does not threaten you. In addition, this problem becomes serious only when the bearing is not removable and it needs to be changed along with the crosses and cardan shaft... Almost everyone is susceptible to bearing diseases soviet cars and most of the foreign cars. It turns out a kind of lottery - someone drives a 20-year-old car and does not even think about it, while someone is already changing bearings under warranty on a new car.