Cardans on the Chevrolet-Niva are completely inherited, as well as a lot of components and assemblies, from the VAZ-21213. However, unlike its "progenitor", the mechanism on the new model is somewhat different. So, it is worth noting that the basic dimensions of the rear and front shafts are exactly the same.
True, for a large number of car enthusiasts, it is somewhat of a delusion that devices from various manufacturers are used in the production. They may differ in the way which plant produced them. Moreover, the front and rear on the same car can be from different manufacturers. The fact is that they are slightly different in appearance, so it is not surprising and, in fact, correct is the statement that the Chevrolet Niva has different mechanisms.
Even with the use of the same rear and front universal joint on the Chevrolet-Niva, the problem that all Niva cars are characterized by - shaft vibration, did not disappear. This upsets many owners of these cars, because the Chevrolet-Niva is considered an SUV, which, according to all the rules, should be distinguished by increased comfort.
In 2006, the Sonda company put into production a shaft that is intended to be installed exclusively on the Chevrolet-Niva. In the specified shaft there is no spline movable connection, which is almost traditional for Niva.
A plunger SHRUS is also used, due to which the change in the distance between the various transmission units that occurs while the vehicle is moving is compensated.

For this design, engineers have developed several modifications, while the CV joint could be used on the front or rear universal joint of the Chevrolet-Niva from various manufacturers. Thanks to the accumulated experience and mass operation of the presented devices, some manufacturers have successfully managed to develop a unique and uniform design of the original shaft on the Chevrolet-Niva.
This unified design is characterized by a movable spline that differs from the previous one. For example, manufacturers declare that it does not have those shortcomings that characterized standard models.
It is worth noting that today the presented CV joint joint on the Chevrolet-Niva has been improved so much that it can fit all cars of the Niva family. True, the manufacturers had to completely abandon the use of wheel joints, which are mass-produced, but they replace it with a self-developed CV joint of the "tripod" type.
Highly important feature the operation of the new CV joint is considered to be the fact that it was in it that it was possible to successfully connect the spline involute joint and a standard dirt-protective cover made of rubber, which has already proven itself quite well. High resistance to wear is noted, which is guaranteed due to the absence of kinks and folds.
The use of the reinforced crosspieces of the Chevrolet-Niva cardan has changed its transmission to a very insignificant extent, because the layout itself has remained practically the same as we have known it for many years. This was not even influenced by the complaints of car owners, who constantly complain about the imperfection of the Niva transmission.
The biggest problem of both the Niva in general and the Chevrolet-Niva in particular is, as noted above, the vibration of the shaft, which the manufacturers are trying to fix in some way. So, for example, special designs of subframes were developed, which should be vibration damping.
It is on such subframes that various transmission units are located. Explaining the unchanging operating angles of the devices, manufacturers did not try to eliminate the root cause of vibration, but thanks to some improvements, vibration was absolutely not transmitted to the car body itself.

In the event of malfunctions of any components or assemblies this mechanism repair of the Chevrolet-Niva cardan may be required. Regardless of what is broken, this is not an easy task. But experts say that motorists can solve it on their own. Systematic diagnostics will not be superfluous, which will allow you to identify malfunctions in the early stages and eliminate them without additional negative consequences.
If you need to purchase or sell shaft elements on a Chevrolet Niva or all of its parts in a complex, then you can do this using our website. Both the first and the second problem can be solved in two ways: either place an ad so that the supplier / buyer can find you, or contact the supplier / potential buyer yourself.
As a car from the SUV class, the Chevrolet Niva, respectively, is equipped with four-wheel drive wheels. But how not cardan transmission th torque can be transmitted from the transfer case to the wheels. Today we will consider complete picture rear propeller shaft of a Chevrolet Niva car, its features, structure, how it is replaced if faulty breakdowns occur.
The cardan drive is a hollow steel tube. The tube metal thickness is 1 to 2 mm. Welded to this tube on both sides:
- Splined tip;
- Hinge fork.
The fork of the second hinge is connected to the splined tip and is put on it. Thus, a splined connection is provided. This connection is necessarily sealed with a gland, which is installed on the slide fork.
So, the torque on the Chevrolet Niva car is transmitted through cardans (front and rear), but we are only interested in the rear. On the Chevrolet Niva, the design of both the front and rear universal joints is almost the same, the difference lies only in the length of the device.
On restyled models, the design of the propeller shaft has an improved look, and on models since 2010, the Chevrolet Niva has been equipped with a drive shaft with hinges of equal angular ends. The components of the rear universal joint of the Chevrolet Niva models up to 2010 and the CV joint shaft of models from 2010 are shown in the photo below.

Image "A" shows a steel base called a shaft (2). On both sides at the ends are connected on one side by a shaft flange (1) and a sliding fork flange (4). There is also a sliding fork (3). On restyled models, the cardan design has already acquired a distinctive appearance from earlier modifications of the Chevy Niva, and is a shaft with hinges of equal angular velocities (B). The image shows that the shaft consists of a tube (7), the SHRUS device itself (5) on both sides and, of course, anthers. The boot is designed to protect the connection from the ingress of not only dust, but also water and dirt. It also keeps the grease from flowing out.
Checking the serviceability of the cardan transmission
The performance check is carried out on the included neutral gear of the PP box. The car is driven onto an overpass or inspection pit and shoes are placed under the wheels so that the car can move without rolling off the overpass. We proceed to verification activities. The check is carried out for both types of structures:
- External examination. All joints are inspected, whether there are any loosening of the bolt tightening, in what condition the boot is.
- Then, with both hands, the shaft is grasped on the side where the connections are checked, and the shaking is carried out with sharp movements. If there is a slight backlash, then the design is faulty. There should be no backlash.
- With sharp movements, it is necessary to turn the shaft around its axis of rotation, while holding the plug-flange of the hinge with one hand. There should be no circumferential gaps.
When is a device replacement required?
When the design of the device, so to speak, loses the balance of the plates, or all parts of the product are replaced, then upon completion it is imperative to re-balance the propeller shaft. If, after balancing, the product malfunction problems are not eliminated, then the shaft is replaced with all the elements. If the shaft is not balanced, this will gradually lead to an increase in the number of vibrations, especially at a speed of 60-80 km / h.
Cardan balancing is carried out either by visiting a service station, where the masters will perform all related work, or independently, which will save finances. But that is another story.
Removal and replacement of the propeller shaft
Removal and then replacement of the cardan on Chevrolet Niva trim levels until 2010 is carried out in the following order:
Removing the universal joint from the CV joint
Many Shniv owners drive exactly new models, so it will be relevant for them to present the procedure for removing the universal joint from the CV joint. 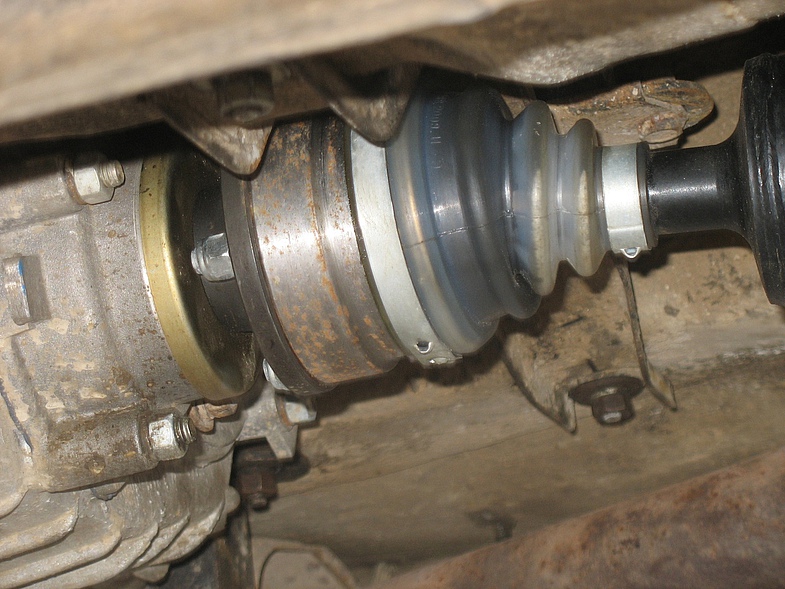
- First of all, the car is put in neutral and parking brake down position.
- Under transfer case an emphasis is placed that can be adjusted.
- Unscrew the nuts for securing the side brackets for the transfer case suspension and two nuts for the rear attachment.
- The box is lowered until it comes off the pins of the brackets.
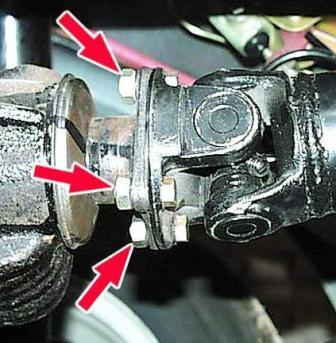
- The cardan is rotated and the nuts securing the shaft to the drive axle flange are unscrewed and removed.
- To unscrew the nuts, you will need to install a special blade in the hole between the flange and the CV joint. After that, the CV joint is squeezed out by this blade until it moves slightly from the shaft splines and, thus, allows the nuts to be unscrewed.
- Now, using two blades, it is necessary to squeeze the CV joint until the fastening pins come out of the slots in the drive axle flange.
- The transfer case, which has been removed from the studs, will allow this manipulation. If you do not remove the distributor, then the free play of the joint of the splines of both CV joints will be too little.
- Now you need to hold the shaft with one hand, and with the other unscrew the four nuts securing the shaft to the transfer case flange. The shaft can be removed.
- The shaft is removed from the Chevrolet Niva car. Repair or replacement with a new one is carried out, and then the assembly is carried out in the reverse order of removal.
You can not hold the shaft, but fix it with a strong rope to the bottom of the car, well, or use the help of a friend.
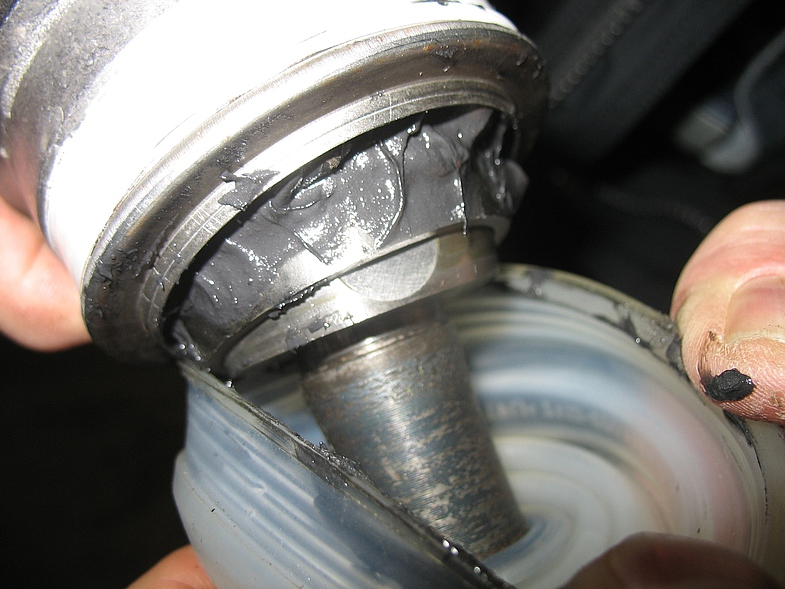
Replacing the boot with CV joint
It is worth paying special attention to such an important question: How to put the boot correctly on the CV joint? This question is replete with its popularity on the forums, but unfortunately few people pay attention to such custom sites. So, how the boot on the cardan joint with CV joints of the Niva Chevrolet SUV is replaced is described below:
Thus, each driver of a Chevrolet Niva car will be able to independently replace the cardan using this information, regardless of what year of release his SUV is. Successful renovation works, dear Shnivavody!
Do you still think that car diagnostics is difficult?
If you are reading these lines, then you have an interest in doing something yourself in the car and really save because you already know that:
- STO lomat big money for a simple computer diagnostics
- To find out the error, you need to go to the specialists
- Simple wrenches work in the services, but you can't find a good specialist
And of course you are tired of throwing money away, and there is no question of driving around the service station all the time, then you need a simple ELM327 AUTOSCANNER that connects to any car and through a regular smartphone you will always find a problem, redeem CHECK and save a lot! !!
Is your Shniva reliable?
On the new Sheviks, CV joints are now being installed, they are ideal for comfortable driving on the highway and weak off-road. However, one has only to stick into the mud more seriously and the CV joint will instantly "die".
I have a 2004 Chevrolet Niva and the cardans are on the crosspieces here. About a year ago, I changed the rear one, since the mileage is already over 100 thousand km. Then I put on Belkardovsky reinforced and I don’t know grief. I drive no more than 90 km / h on the highway, so I don't feel much discomfort.
About a week ago, my right internal grenade flew, it broke specifically. I went to change, the guys in the service looked and said that the front universal joint should also be changed. Well, or at least put new crosses, but one fig will not last long. Without hesitation, I decided that there was nothing to fix and fix, to do everything at once. Therefore, I went to the store and bought a new reinforced Belcard gimbal, the same as the one I have in the back.
The price for Belcard is 4600 rubles. Well, I paid 500 rubles for the installation in the service.


Now I have both Belkardovsky cardan shafts, you can drive off-road, for which, in fact, the Chevrolet Niva was created. Yes, and the people in the reviews write that even if you have a minimum lift on the Niva, then the rear cardan must be on the crosspieces. In the future, repairs will also be easier and cheaper, because when the crosses become loose, it’s easy to replace, one piece costs about 400 rubles.
Before the replacement there was vibration, now it is much better. All the same, the front shaft and crosspieces were badly worn out. And now it's just gorgeous, before, at a speed of 80 km / h, vibration already appeared, now I tried to drive a sotochku - class, it feels like I put CV joints))
If you are rushing about before a choice - CV joints or crosspieces, then the nivovody have already decided everything a long time ago. Ride often and a lot in mud - crosspieces. A lot on the highway, you drive down to the maximum dirt road - the CV joints.
The main distinguishing features of shafts for production vehicles "Belcard".
0:588Today on secondary market there are a lot of products of dubious origin. This material is intended to help motorists in identifying cardan shafts. 2121-2201012-04 production OJSC "Belcard".
0:985When choosing a propeller shaft, first of all, you need to devote a little time to a visual inspection. The shaft must be painted with matt epoxy enamel, while the connecting surfaces of the flanges are protected from painting at the factory, the presence of traces of corrosion is not allowed.
0:1493 1:20001:9
Pay attention to the welding of the balancing plates, they must be installed evenly and tightly to the propeller shaft tube. The absence of balancing plates, careless welding indicates that the shaft was manufactured in "artisanal" conditions. The propeller shaft tube must be flat, no dents are allowed. In the manufacture of cardan shafts on OJSC "Belcard" applied pipe OD 59 mm (inner diameter 55 mm, wall thickness 2 mm).
1:873![]()
If possible, it will not be superfluous to stretch the splined joint of the propeller shaft. Free movement indicates that there is a circumferential clearance in it, which can lead to premature failure. If it was not possible to stretch the propeller shaft, or for this it was necessary to exert significant effort, the spline connection was selectively not selected. Find the marks of the relative position of the balanced set, they should be located strictly opposite to each other.
2:2244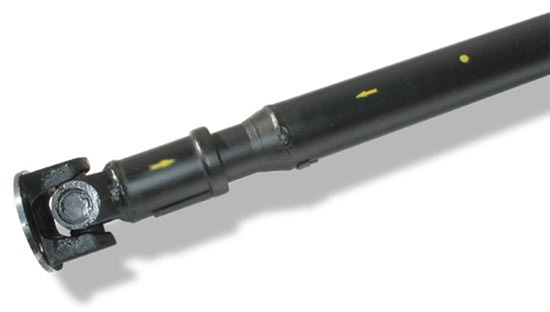
Try to turn the joints of the propeller shaft, they should not turn too tight, check for grease fittings, rubber caps.
3:774
Distinctive feature of cardan shafts manufactured OJSC "Belcard" are also:
4:14461. Original self-adhesive label, which reflects the date of manufacture, the designation of the propeller shaft, the barcode (smeared in the figure).
4:1706
2. Duplicate self-adhesive label in the flange cavity.
5:106
3. Trademark of OJSC "Belcard" on a sliding fork.
6:709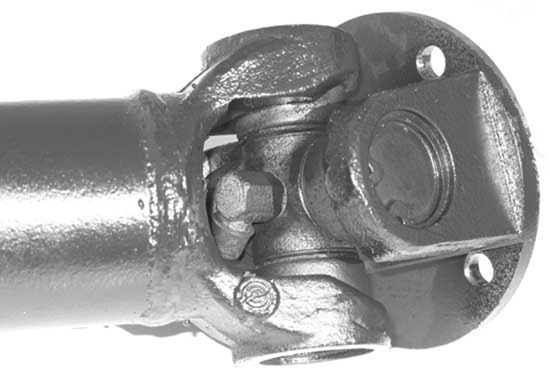
4. Lack of grease nipple in splined connection. The design of the spline connection is characterized by increased reliability and does not require Maintenance during operation. For its manufacture, advanced technologies were used, such as polymer coating of the spline sleeve and knurling of the sliding fork splines by cold plastic deformation. Such a connection significantly reduces the load on the units of the units mated by the cardan shaft.
The absence of any of the above signs should alert you, because upon shipment, each propeller shaft undergoes strict multistage inspection by the Quality Control Department.
The speed limit for my Niva was 90 km / h, then there was such a vibration that there was a crackling and there was a feeling that the Niva would explode.
7:311 7:349Everything was great up to 90 km / h.
To solve this jamb, what only I did not do:
Put new crosses;
The shaft on the crosspiece was fingering and sprinkling;
I put spacers of different thickness under the supports of the distributor (in neutral, in the 5th gear, the distributor sways a little);
I did dynamic balancing (the car on chocks, the razdatki mountings and the gearbox are relaxed and everything is tightened on a working transmission with the least vibration).
And the reason for all the hemorrhoids was cardan joints, which had noticeable backlash in the splined joint plus an elevator rear suspension 3-4 cm.
7:1357I drove so without exceeding the speed of 90 km / h (oh, how sad it is to drive a dalnyak at such a speed on the highway, you overtake the truck and wonder if the car will fly apart before the end of overtaking).
7:1662At my leisure, I delved into the theory of the cardan transmission:
7:1762
If we use a cardan shaft with one cross (as in the old promaplu with a cross), then with a uniform rotation of the shaft, the angular velocity is uneven and changes according to a sinusoidal law. Graphically, it looks like this:
8:407
The uneven rotation of the shaft will be the more significant, the greater the angle y between the axis of the shaft and the flange. If the uneven rotation of the shaft is transmitted to the shafts of the units, additional pulsating loads will arise in the transmission, which increase with increasing angle.
When used in cardan transmission, two cardan joints, they are set so that the angles y1 and y2 are equal; cardan joint forks fixed on an unevenly rotating shaft must be located in the same plane.
There is even a basurmanskaya picture, which shows the correct position of the universal joint to the axes of rotation of the flanges.
9:2036
In such harsh conditions, a schiz was born in my head about the installation of cardan shafts on CV joints.
10:677For a long time and carefully weighed all the PROS and CONS of their installations walking across the vastness of the different Internet there.
PER:
reduction of vibrations;
prolongation of the life of the output bearings of the RK and gearboxes;
increase in efficiency due to the elimination of energy losses due to vibration.
AGAINST:
The risk of tearing the CV joint boot by sitting in a rut or on branches;
The lower strength of the CV joint in relation to the cross (I put this in great doubt).
I decided to decide, but I could not buy everything, then there is no money, that is, but it's a pity. I also wanted to buy two cardan shafts at once and to coincide with this the introduction of double-row bearings on the output shafts in the Republic of Kazakhstan.
10:1774
That eliminates the backlash of the flanges, even rather of one flange - the rear one, since there the shaft is short to the point of not being decency, because of this, the splined joint of the cardan wears out more.
11:306
Not like that
12:835


Here is such an unexpected service.
15:75The next day I jumped into the garage for half an hour, scratch the cornfield's belly and screw on a new bun.
15:256True, I had to tinker a little ... On the universal joint with CV joint, instead of bolts, studs are inserted into the flanges
15:443
and in order to fasten it, you need to move the RK and RPM apart by a distance of two lengths of these pins. In addition, my RPM is untied from the engine. To do this, first I screwed the cardan to the RPM, then unscrewed the ski mounts (the lower cover of the RPM) from the anti-roll bar
16:1446
And unscrewed the side supports for attaching the RPM to the front beam
17:2059

Along the way with this procedure, I replaced the oil seal of the front universal joint flange in the RK,
19:1284
otherwise he turned into a writer, which is not permissible in view of the coolness of the oil poured into it
20:1970And now about the sensations after replacing the cardan.
With intensive acceleration at the end of the first gear and the beginning of the second, there was a raskolbas RK, and then silence. The speed limit moved up to 110 km / h, and then the shaking was not the same as it was before after 90 km / h, there were no more conditions to accelerate, there was heavy traffic, although the vigorous engine allows it. Now I want to unfasten the rear universal joint and test for vibrations with a new universal joint and try to swing the flange shaft onto the CV joint.
So far, I am completely satisfied with the replacement of the universal joint. The first step is now to model double-row bearings in the Republic of Kazakhstan and buy a rear universal joint.
20:231Unlike the "Classic" models on Zhuguli, the retaining rings on the Niva universal joint cross are located inside the entire structure, and not outside, and they had to be removed a little differently. But thank God, everything turned out to be very simple, just use a thin screwdriver to move the ring outward on one side:
20:844
Then, again with a screwdriver, we pry the retaining ring and take it out:
21:1491
After that, we hit the cup with a hammer from the opposite side until the lower one flies out:
22:2156
Here's the result:
23:534
Then we turn the cardan over and insert a bolt or a breakdown in diameter into the recess of the cup:
24:1198
and hit it with a hammer until the second cup of the cross flies out:
25:1844
One side of the cross is now free. We do the exact same procedure with the second side.
26:194
And after that, we insert a new cross into the cardan, setting back the retaining rings. Be careful when inserting the rings, as they might bend slightly after removal. If this happens, squeeze them slightly with pliers or lightly tap with a hammer.
27:1219After 9 months of rather active operation and 25,000 kilometers, the first repair of my "Niva" took place. Moreover, completely ignoring the not yet expired Warranty Period, I decided to do everything myself.
27:1689And the first to make itself felt is the Suspended Bearing Cardan shaft, which recently began to "rustle" strongly, straight from the speed of 5 kilometers per hour, here, listen:
27:1992Please note that for this event it is not at all necessary to do everything on the flyover or above the "observation pit"! "Niva" is already high, and even more so it was raised rear wheel, so I easily settled on a soft mat on the floor in my Garage and, even without any Instructions, got down to business!
27:2570We take a jack:
27:29
Raise the rear wheel so that you can rotate the cardan, and so that it is freer under the Typewriter:
28:728
Remove the Rear Cardan from the Suspension Bearing side (from the rear axle there is no need to remove it at all), for which we hold the bolt with a "minus" screwdriver, and unscrew the nuts with a "13" key, and at the same time two more nuts holding the Suspended Bearing housing:
29:1711

Then you need to "pull off" what is holding back outboard bearing, well, the bearing itself:
31:853
And at that moment I was faced with the fact that I could not "pull it off" in any way. And so I crawl with a hammer and somehow differently. In general, it was decided to completely remove the cardan, on which this Bearing directly "sits". And it can be removed very simply - you need a key for "13", without a screwdriver:
32:1879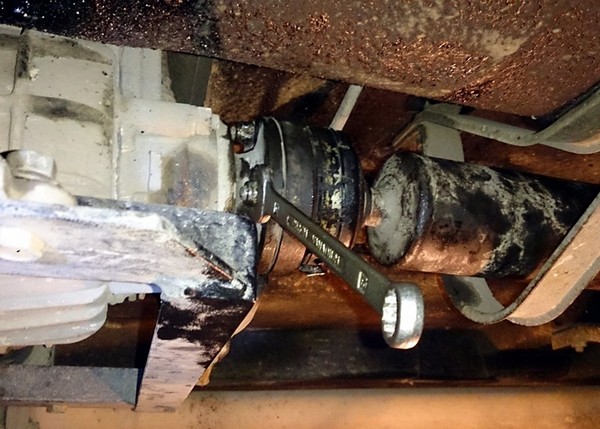
Having placed the cardan vertically and neatly with a hammer alternately on all sides, now everything is easily pulled together:
33:216
We change the bearing, lubricate and assemble everything in the reverse order
34:862
Now it's a completely different matter and nothing "rustles":
35:1460