| no comments
Pressing out old jet thrust bushings.
Having removed the first lever, we inspect the bushing, if it is very old, then it will be very difficult to extrude it, in this case, burning it out will help. To do this, light a fire and use fire to burn out the old sleeve, you can also do this with a gas burner. 
If you have a powerful grip you can try to squeeze it out.
Pressing in new bushings.
After the old bushings are pressed out, we proceed to pressing in the new ones; before that, you need to clean the inner part of the rod with a file. If you want your new rubber bands to last longer, I recommend installing polyurethane instead of rubber. 
Such silent blocks are much more durable than standard rubber ones. To press them in, you need a vise, or a pipe section of a suitable diameter and a bolt. 
This is how it all looks, before pressing the silent block, it is necessary to thoroughly lubricate it with soapy water in order to facilitate its installation. I recommend watching this car repair in the video below.
Also read other interesting articles about that on our website and join our Vkontakte group.
Safe driving is based on vehicle stability on the road. This rule applies to both cargo and Cars... And VAZ 2107 is no exception. The handling of this car has always left much to be desired. To somehow make life easier for drivers, engineers have developed a system for the "seven" jet thrust... But any detail, as you know, can fail. And then the driver will be faced with the question: is it possible to change the broken traction with your own hands? Yes, you can. Let's try to figure out how this is done.
The appointment of jet rods on the VAZ 2107
The purpose of the jet rods on the VAZ 2107 is simple: do not allow the car to "walk" along the road and swing strongly when entering sharp turns and when colliding with various obstacles. This problem has been known since the early days of automobiles. They did not know about any jet thrust then, and the cars were equipped with ordinary springs. The result was logical: the car easily overturned, and it was incredibly difficult to drive it. Over time, the car suspension was improved: a system of long rods began to be installed in it, which were supposed to take on some of the loads arising from uneven roads or due to an overly aggressive driving style. On the VAZ 2107 and other classic Zhiguli models, there are five jet rods: a pair of long ones, a pair of short ones, plus a large transverse rod, which serves as the basis for the entire traction system. All this is installed near the rear axle of the car.
You can see this system only from the inspection pit, where all the work is done to replace broken rods.
On the choice of jet thrust
Currently, there are not so many large manufacturers producing jet thrust for the VAZ 2107 and other classics. Their products differ in both price and reliability. Let's consider the most popular products.
Rows "Track"
The Trek products are very popular among the owners of the sevens. These rods are distinguished by their high reliability and high price, which starts from 2,100 rubles per set.
The main difference of the "Track" is the head for the bushings. They are, firstly, large, and secondly, they are attached to the rods by welding. And also the silent blocks on "Tracks" are made of extra dense rubber, which significantly extends their service life.
Rods "Cedar"
The overwhelming majority of "sevens" that had previously rolled off the assembly line were fitted with jet thrust precisely from "Kedr", since this company has always been and remains the official supplier of "AvtoVAZ".
In terms of quality, "Kedr" is somewhat inferior to "Trek". This is especially true for bushings and silent blocks. All this wears out rather quickly, and therefore, they will have to be changed more often. But there is also good side- affordable price. A set of rods "Kedr" can be purchased for 1,700 rubles.
Rods "Belmag"
With all the simplicity and reliability of Belmag rods, they have one significant drawback: they are not so easy to find on sale. Every year they are less and less common on the shelves of auto parts stores. But if the car owner still manages to find them, then he can be congratulated, since he got a reliable product at a reasonable price. The cost of Belmag rods starts from 1800 rubles per set.
That, in essence, is the entire list of large manufacturers of good rods for the VAZ 2107. Of course, now there are a lot of smaller firms on the market that are rather aggressively promoting their products. But none of these firms gained great popularity among the owners of the classics, therefore it is inappropriate to mention them here.
So what should a driver choose from all of the above?
The answer is simple: the only criterion for choosing jet rods is the thickness of the car owner's wallet. If a person is not constrained in funds, the best option there will be a purchase of "Track" rods. Yes, they are expensive, but installing them will allow you to forget about suspension problems for a long time. If the money is not enough, it makes sense to look for Belmag products on the shelves. Well, if this venture is not crowned with success, there remains a third option - "Cedar" rods, which are sold everywhere.
A few words should be said here about fakes. Knowing that car owners most often choose the products of the three above-mentioned companies, unscrupulous manufacturers have now literally filled the counters with fakes. Moreover, in some cases, forgeries are made so skillfully that only a specialist can identify them. An ordinary driver in such a situation can only focus on the price and remember: good things are expensive. And if on the counter there is a set of "Track" rods for only a thousand rubles, then this is a serious reason to think about it. And take your time with the purchase.
On the modernization of jet thrust
Sometimes drivers decide on their own to improve the reliability of the VAZ 2107 suspension and extend its service life. To this end, they are modernizing jet thrust. Typically, the modernization of rods means two operations. Here they are:
- installation of twin jet rods;
- installation of reinforced jet rods.
Now a little more detail about each of the above operations.
Twin rods
Most often, drivers install double rods on the VAZ 2107. The reason is obvious: you don't have to do almost anything with the rods for this procedure. It is just that not one, but two sets of rods are purchased, installed in a regular place near the rear axle of the "seven". Plus, not ordinary, but elongated fastening bolts are purchased, on which this whole structure is held.
The obvious advantage of such modernization is to increase the reliability of the suspension: even if one of the rods breaks off while driving, the car is unlikely to lose control and the driver will always have a chance to notice the problem in time and stop (the breakage of the jet thrust is almost always accompanied by a strong knock on the bottom of the car, not to hear this is simply impossible). This design also has a drawback: the suspension becomes stiffer. If earlier it “ate” small irregularities of the road without any problems, now the driver will feel even small pebbles and pits while driving.
Reinforced traction
If the car is operated in extreme conditions and drives mainly on dirt roads or on roads with very bad asphalt, the car owner can install enhanced jet thrust on it. As a rule, drivers make such traction themselves. But lately and large producers began to offer reinforced rods of their own production. For example, on sale you can find Track-Sport rods that differ large size silent blocks and an adjustable transverse bar. A pair of nuts on the transverse bar allows you to slightly change its length. This, in turn, affects the handling of the car and the overall stiffness of its suspension.
Of course, the driver will have to pay for the increased reliability: the cost of the Track-Sport set of rods starts at 2600 rubles.
Checking the condition of jet rods on the VAZ 2107
Before talking about testing jet thrust, let us ask ourselves a question: why is there a need for such a test at all? The fact is that when driving, the jet thrust is subjected to both lateral and twisting loads. Torsional loads occur when the wheels hit large potholes or run over large rocks or other obstacles. This type of load is especially harmful for the rods, or rather, for the silent blocks in the rods. It is the silent blocks that are weak point jet thrust (there is simply nothing to break in the thrust itself: it is a metal bar with two lugs at the ends). In addition, the rubber parts of the silent blocks are periodically exposed to reagents that are sprinkled on the roads during icy conditions. As a result, cracks appear on the rubber and its service life is rapidly reduced.
If you believe the operating instructions, then the new jet thrust on the VAZ 2107 can travel at least 100 thousand km. But taking into account the conditions listed above, the actual service life of the rods rarely exceeds 80 thousand km.
From the same instructions it follows that the condition of the jet rods must be checked every 20 thousand km. However, the masters in car services strongly recommend checking the traction every 10-15 thousand km in order to avoid extremely unpleasant surprises. To check the condition of the silent blocks in the rods, you will need an inspection hole and a mounting blade.
Check sequence
Video: checking jet rods on a VAZ 2107
Replacing jet rods on a VAZ 2107
Before starting work, let's decide on the necessary consumables and tools. Here's what we need:
- a set of new jet rods for the VAZ 2107;
- composition for removing rust WD-40;
- mounting blades;
- set of open-end wrenches;
- hammer.
Sequence of work
First of all, it should be said about two important points... Firstly, the rods should be changed only on the inspection pit or on the overpass. Secondly, all five rods from the VAZ 2107 are removed in exactly the same way. That is why the procedure for dismantling only one central boom will be described below. To remove the remaining four rods, you just need to repeat the steps listed below.
- The car is installed above the inspection pit. Silent blocks, lugs and nuts on the central rod are carefully treated with WD40 (as a rule, the lugs rust very badly, so after applying the liquid you will have to wait 15-20 minutes for the compound to properly dissolve the rust).
- After the rust dissolves, the WD40 application area should be thoroughly wiped with a rag.
- Then, using a socket head with a ratchet, the nut on the silent block is unscrewed (it is best if it is a socket wrench with a ratchet wrench, since there is very little space next to the rod). With a second open-end wrench for 17, it is necessary to hold the head of the bolt so that it does not turn when unscrewing the nut.
- Once the nut is unscrewed, the retaining bolt is gently knocked out with a hammer.
- A similar procedure is carried out with the second silent block of the central rod. Once both mounting bolts have been removed from their lugs, the rod is manually removed from the brackets.
- All other rods from the VAZ 2107 are removed in the same way. But when removing the side rods, one caveat should be taken into account: after removing the mounting bolt, the upper edge of the wheel may fall out. As a result, the holes on the silent block and on the mounting bracket are displaced relative to each other, as shown in the figure below. And this creates serious problems when installing a new rod: the fixing bolt cannot be inserted into the bracket.
- If such a situation has arisen, then the wheel will have to be lifted with a jack until the holes on the bracket and on the silent block of the new thrust are aligned. Sometimes, without this additional operation, it is simply impossible to install a new side draft.
Video: changing the jet for the VAZ 2107
Replacing the bushings on the rods of the VAZ 2107
VAZ 2107 jet thrust bushings are disposable products that cannot be repaired. It is not possible to restore a worn out bushing in a garage. The average motorist has neither the necessary equipment nor the necessary skills to restore the inner surface of the bushing. Thus, the only option for repairing damaged traction bushings is to replace them with new ones. Here's what we need to replace the bushings on the rods:
- a device for pressing in bushings (can be purchased at any auto parts store);
- hammer;
- barbs with a diameter of 10 mm.
Sequencing
The rods are removed from the car according to the instructions above. Eyelets and silent blocks should be treated with WD40 liquid and thoroughly cleaned from dirt and rust using a metal brush.
- Usually, after removing the thrust, the bushing is removed from it freely. But this only happens if it is badly worn out and not very rusty. If the bushing is literally welded to the rod due to rust, you will have to knock it out with a hammer, after inserting a beard into it.
- If the rubber part of the silentblock is badly damaged, then you will have to get rid of it too. These scraps of rubber can be simply pried out by prying them off with a screwdriver or an assembly trowel.
- Now the inner surface of the eyelet should be carefully cleaned with a sharp knife or sandpaper. There should be no rust or rubber residues on the eyelet.
- Now a new bushing is installed in the eyelet (and if the rubber was also removed, then a new silent block is installed). It is pressed into the eyelet using a special tool.
- If the press machine is not at hand, you can use the same beard. However, you will have to be very careful not to damage the inner surface of the bushing.
So, to replace jet rods with a VAZ 2107, the car owner does not have to drive the car to the nearest service center... All the work can be done by hand. Even a novice car enthusiast who has held a hammer and a wrench in his hands at least once can cope with this. All you need to do is follow the above recommendations exactly.
Jet thrust (rod) - element car suspension, limiting the movement of the front steering knuckle or rear axle, depending on the installation location. For durability under high loads, the jet thrust is mainly produced from cast resilient steel. But besides the steel base, this part has important element silent block (or eyelet).
Interesting! A silent block is a non-separable rubber-metal hinge in which the metal outer and inner bushings are non-separable to each other using a layer of elastomer vulcanized between them, usually rubber. But collapsible rubber-metal hinges, in which the rubber sleeve is replaceable, are also simply called silent blocks.

Rubber-metal hinges (hereinafter RMSH) are attached to the rod base by welding. One of the reasons for the malfunction of jet rods is the appearance of cracks at the place of welding. The second reason for the breakdown of jet rods is wear of the rubber bushing of the silent block which deforms over time and can break. It should also not be ruled out corrosion of the base of the jet rod, especially you need to watch out for those made of pipes.
Important! A malfunction of the jet thrust can be seen by a knock in the suspension, which manifests itself while driving. If a knock appears, inspect the suspension for a malfunction as soon as possible.
How to replace jet thrust and what is needed for this
Place the machine in a suitable location to replace the jet rod. It is best to carry out the work on an overpass or in a pit.
Required tool
To remove the jet thrust, you will definitely need:
- a set of keys,
- brush for metal processing,
- WD-40 lubricating fluid.
Removal of jet rods
To remove the jet thrust, start on the looser side. First you need to clean the junction, then sprinkle with WD-40 grease and wait until it gets wet. Then you can unscrew the nut. If this does not work, you need to reapply the WD-40.
You can also use a longer wrench to make it easier to unscrew. Usually the bolt sticks hard in the bushing. Therefore, in order to move it from its place, you need to tighten the nut to the edge of the bolt and hit it with a hammer. You need to completely unscrew the nut and get the bolt. Then go to the other side.
 When removing long longitudinal reaction rods, to gain access to the reaction rod bolt, unscrew the lower part of the shock absorber, remove the spacer sleeve and move the shock absorber to the side. Carry out the operation of cleaning the connection, as in the first case, and unscrew the nut. If you cannot remove the bolt, then you will not be able to hit it, because access is closed by a brake disc and a semiaxis. In this case, it is best to cut the bolt at the gap between the silent block and the bracket.
Attachment of new jet rods
It is necessary to install the rod first in the front bracket, and then in the rear one. Pre-lubricate the bolt with gear oil.
When inserting the torque rod into rear bracket usually the holes do not match. This is because, with a broken thrust, the bridge was constantly moving under the influence of loads.
 To align the holes, use a spudger, rest it on the bracket, and unscrew the bridge until the holes align. When the openings are level, insert the bolt and tighten the nut.
All work on replacing jet rods should be carried out alternately, replacing, for example, first two long ones, and then short ones, or vice versa.
Replacing the bushings of the jet rods of the car
If, when examining the jet thrust, you see that it is not bent, not broken, the eyes are not broken, then it means you can simply replace the rubber bushings RMSh. To replace, you will need:
- buy a set of rubber and metal bushings,
- it is advisable to buy new fasteners (nuts and bolts),
- two spanner keys on "19",
- hammer,
- device for pressing out and pressing in bushings,
- vice (you can do without them)
Note!To lubricate the rubber bushings, it is necessary to use soapy water, because they are made of rubber, which is not resistant to oil and gasoline. Using oil for lubrication can shorten the life of the jet thrust.
What an untimely replacement can lead to
 With strong wear of the silent block at high speed, you can lose control of the car, it will simply be driven from side to side. If the link breaks, the car will immediately lose stability, which could lead to an accident. Do not take matters to the extreme. As soon as you hear a knock in the suspension, notice a sharp increase in vibration when driving or unevenly worn tires - immediately inspect the jet rods. Also worth doing after every 50 km. mileage.
Did you know? That the creation of jet thrust was preceded by the work of automakers aimed at removing the influence of forces that can turn the car.
Good afternoon, dear site visitors. In this article I will tell and show you how to make the replacement of the VAZ 2107 jet thrust bushings yourself. The replacement principle is the same for all Classic VAZ models.
In the last article "Replacing the jet rods of VAZ cars", I showed how the thrust completely changes, but if only the rubber bushing (silent block) has worn out, then it makes sense to replace only it.
First, we need to carry out diagnostics and find out if bushings need to be changed on all jet rods. How to correctly diagnose the front and rear suspension(running), I recommend that you read a special article (I will put a link later).
To perform this operation, we need a viewing hole. It's good that I have it. Previously, when she was not there, I kept running to the neighbors so that they would let me dig deeper into my car, but now everything is much simpler.
Having rolled the car into the inspection pit, I determined that the rubber bushings on the transverse link were worn out. Now let's start working.
The first thing to do is remove the transverse thrust. I took a metal brush and thoroughly cleaned all the threads on the bolts from dirt and treated with WD-40 fluid.

Now that we have everything ready, I unscrewed both nuts without much difficulty.
We faced the next test, it is to pull out the bolts. Why test? Because if the gum is loose, then moisture gets between the bolt and the metal sleeve and corrosion begins. All this leads to the fact that, under the influence of corrosion, the bolt sticks to the bushing and sometimes it is simply not possible to pull the ego out.
In my case, I was very lucky and the bolts went very easily. The left bolt came out perfectly, but the right one rested against the lower spring cup.

In the photo above, you can see where the bolt rested. To remove the bolt, you need to load some scrap metal into the trunk or ask a friend to press down a little on the back of the car. Thus, the bracket will drop down slightly and the bolt can be pulled out freely.

Now we just extract the thrust, there should be no difficulties here. If the jet thrust is going to be tight, then you can help it with a crowbar.

Replacement of rubber bushings for jet rods.
In order to pull out the rubber bushing, we need to knock out the metal inner race (bushing). After digging through the toolbox, I found a suitable guide. I don't know what it is, but it just came up. In my opinion, this is a tool for punching holes in the wall, like an ancient puncher :).


A few more blows and the sleeve flew out along with the guide. Here, be careful not to hit your fingers with a hammer when the bushing comes out abruptly.
After all the efforts, this is the picture.

In the photo above, you can see how the rubber bushings are cracked and this is not a lot of wear. With more wear and tear, the inner metal clip falls out by itself and the rubber band also falls out.
The next step is to extrude the old rubber band. We need an extrusion rod and a thrust stop.
I was too lazy to make a special puller and I rummaged in the garage and found a suitable tool.

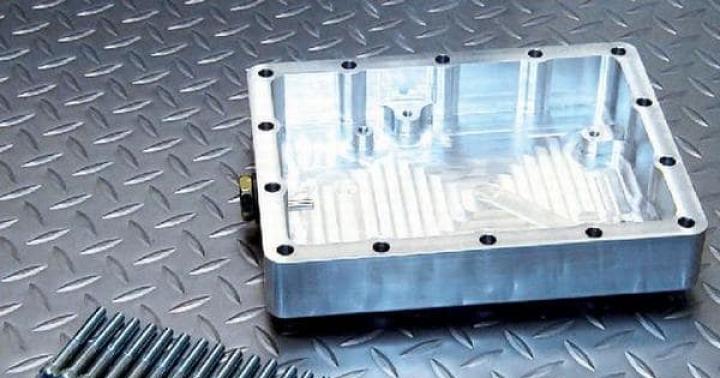
Instead of a thrust sleeve, I used a holder for large dies (with which threads are cut), and for extrusion, I used ordinary metal round timber with a diameter of 25 mm.
The photo above shows how I installed this structure. With a little pressure, the sleeve will easily be squeezed out.

The photo above shows how the sleeve began to come out.
With a little more effort, she jumped out.

Preparation for installation of jet thrust bushings.
Before installing a new bushing, it is imperative to clean out all dirt and rust inside the metal reaction rod housing. If this is not done, then when pressing in, the new bushing can be wrapped and damaged, which we do not need in any way. And the installation of the sleeve itself will be problematic.

The inner bushings are also subject to wear and tear and see if they are badly worn out, then feel free to replace them with new ones.
If it is still suitable for further use, then be sure to make chamfers along the edges.

This is so that when we press in the metal bushings, they will not damage the rubber bushing. Why do I say this, because there were cases when it was necessary to change new rubber bushings due to their damage.
I bought new rubber grommets in advance. I wasn’t trying to buy expensive and branded bushings, because ordinary bushings go for quite a long time. Of course, you can buy expensive self-stabilizing ones, but I took the simple ones.

We proceed to the installation of VAZ 2107 jet thrust bushings.
In order for the bushing to easily fit into the jet thrust holder, it must be lubricated with soap. Then we install the bushing and jet thrust, as shown in the photo below.

Under the influence of the vice, the sleeve will go into place. When squeezed, the elastic will begin to bend to one side and it would seem that it does not want to enter, but you do not pay attention and squeeze further, it simply has no chance and it will eventually enter. The main thing in this business is to quickly squeeze the vice.

After the work done above, we got the following result.

And now, the most important task remains. We need to press in the inner metal sleeve.

I made this bullet from a regular bolt. I happened to have a lathe, and I just sharpened the head of the bolt, but you can grind it off with a sharpener.
I don't remember exactly the thickness of the bolt, but, in my opinion, 10 millimeters. This bullet goes into the sleeve and looks like this.

Lubricate the bullet with soap and then, as before, press the sleeve with a vice.

Everything quietly falls into place, but since a bullet is installed in the metal sleeve, it will not reach the end, because it rests on the cheek of the vice.

Now we need a stand in order to annoy the bushing. I used an inch sleeve, it just fit.
Having placed the sleeve, we add the sleeve.

After all the work done above, I got the following result.

If the inner metal clip protrudes slightly from one side, you need to level it with a hammer.
And now we just have to install the traction in its place. Do not forget to lubricate the bolts with nigrol, you never know what quality the rubber bands will be.
This, perhaps, is all, we replaced the VAZ 2107 jet thrust bushings.
Until new publications.