Fastening heating radiators to the wall is a fairly simple process, and does not require specialized skills from the installer. It is enough to know some of the basics of fluid circulation inside the heating system, the functional purpose of each element, and have an idea of how to properly position the battery in the room in order to ensure the most efficient heat transfer without loss. This article will be devoted to this interesting process.
Instructions for wall mounting for heating radiators will be discussed in the second part of the article. In the meantime, let's talk about modern radiators, what they are, and what properties they have.
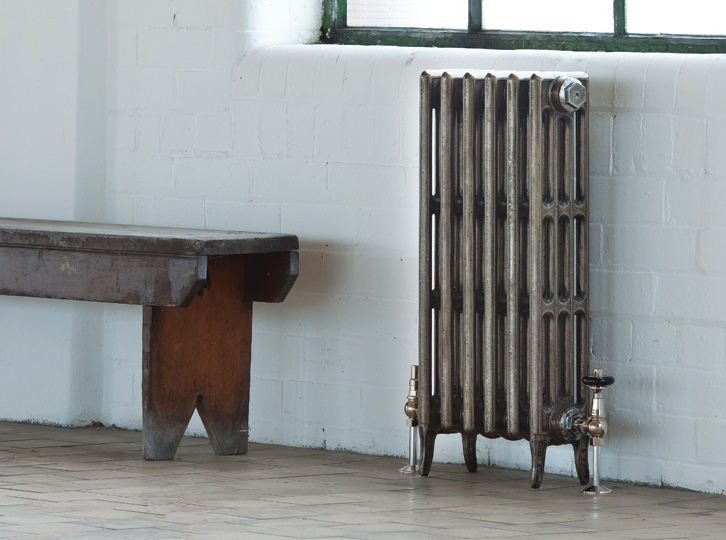
Cast iron radiators
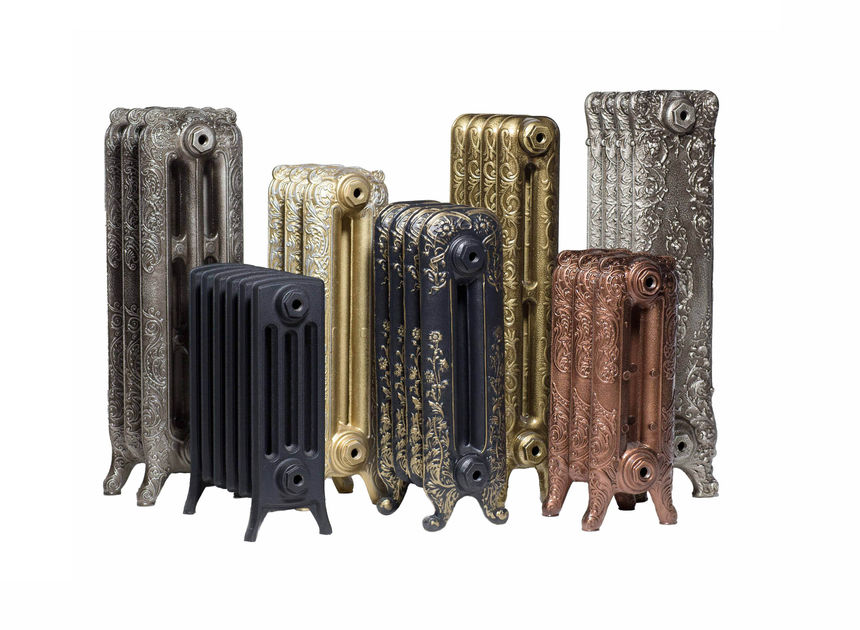
The kings of the "Russian style" are cast iron radiators. They have been made for more than a hundred years, but they are still popular among buyers. Models such as those shown in the photo above are elite, and it is rather difficult to see them on the shelves of ordinary home improvement stores.

The situation is similar with budget models, but, nevertheless, we are all familiar with these radiators. Many of us still have simplified versions of these products from the recent Soviet past in our apartments, which few are in a hurry to change to more modern, aesthetic analogues. And the point here is not at all that people cannot afford something else.
The reason is that cast iron batteries have a number of advantages over other competitors:
- High corrosion resistance- due to constant contact with liquid, a plaque forms on the inner walls of cast-iron radiators, which is called "dry rust". This is a kind of coating and protects the metal from destruction.
- High heat dissipation- this indicator for cast iron is twice as high as for steel radiators.
- Immunity to water chemistry circulating in the heating system - cast-iron batteries have thick collector walls, so they are not afraid of acid and salt impurities in the coolant.
- The service life of this product is 40-50 years.... Due to the fact that the diameter of the internal collectors of a cast-iron radiator is much higher than that of steel, aluminum and other analogs, rust, scale and other foreign fragments that inevitably form in the system during operation can quietly circulate in the system.
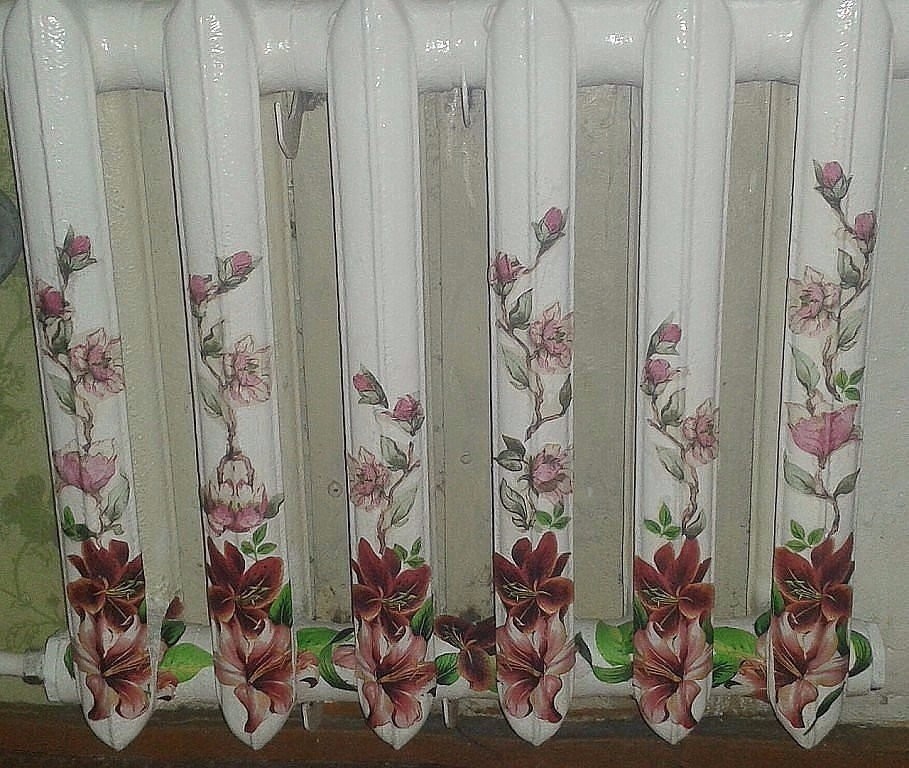
- Acceptable cost, apart from the models released by well-known brands, is also an advantage of these batteries. Well, as for the aesthetics of this plumbing fixture, with a creative approach, it can even become an interior decoration. Above you can see a nice example of the finish of an old radiator.
All of the listed characteristics of batteries are provided by the chemical properties of cast iron.
But, like any other material, cast iron radiators have their drawbacks:
- Very heavy product weight – this feature significantly complicates the ascent to the floor and the installation process, which will require at least two strong people;
- Low aesthetics- this especially applies to models from budget segment, which competently fit into a modern interior is a rather difficult task;
- High heating time- this fact is the reason that cast iron batteries are poorly suited for rooms where continuous heating is not required, for example, a country house.
Advice! When determining the capacity of the battery, remember that the manufacturer indicates the capacity of only one section, and not the entire structure.
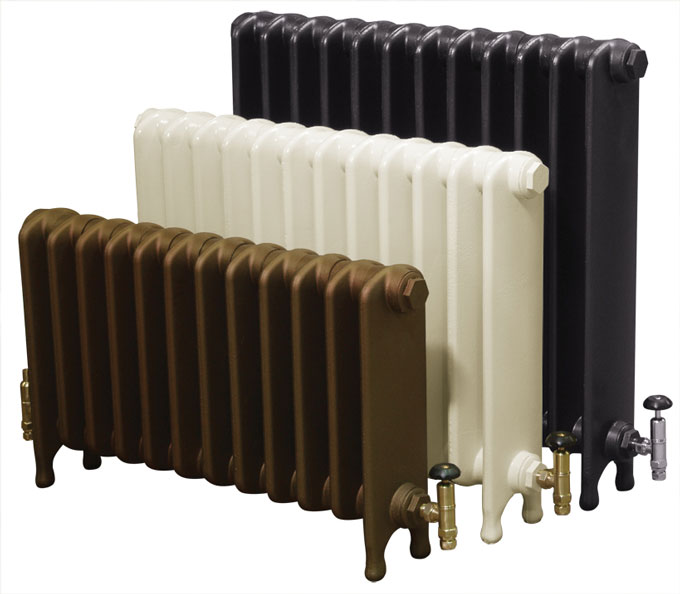
Steel batteries

The heating system assembled from steel panel radiators is an excellent solution for use in public premises, private houses or country cottages. Their popularity, these products are due to the ratio of cost and quality.
- The average price of a product with a heat transfer of 1900 W is 5000 rubles;
- The heat transfer of the material, although lower than that of aluminum counterparts, is still at an acceptable level;
- Modern urban aesthetics are also inherent in these products, which allows them to be combined with a variety of design styles.
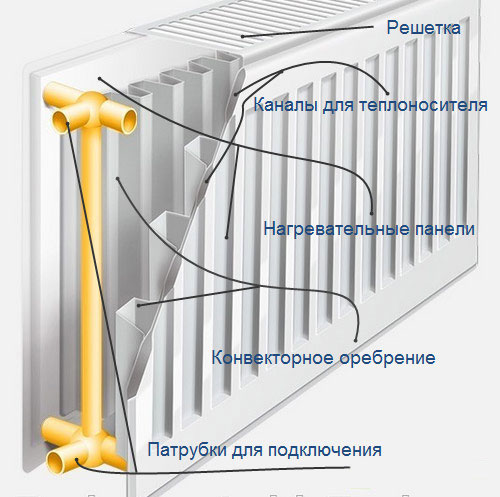
The design of steel radiators is a kind of layered "pie" consisting of panels, each of which includes channels for the coolant and a steel crate (convector fins). The more the panel contains layers, the higher the heat transfer it will have.
- By the number of layers, steel radiators are divided into three types: 11; 22; 33. Each of them has one, two and three layers, respectively. The front sides of the batteries are covered with a blank panel. From above they are covered with a lattice, and from the sides they have decorative panels with outlets for reinforcement.
- The front one-piece panel is designed to radiate heat into the room, and the inner grill heats the air around it due to the convection effect. The combination of these effects increases the heat dissipation of these batteries.
- Steel radiators can have side or bottom connections. In the second case, the models are often equipped with a built-in thermostatic valve, which allows you to regulate the heat transfer of the battery with your own hands.
Advice! The purchase of a steel radiator can be time-consuming due to the fact that not many shops can afford to keep the entire rich range of these products in stock. Therefore, more often than not, you have to wait for the order of the model you need, sometimes even from abroad.
Aluminum radiators
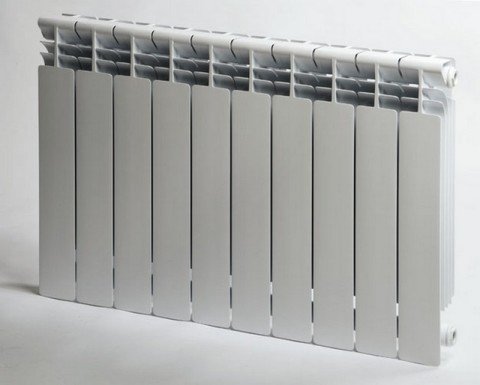
This type of battery has excellent design features, which allowed him to become the most demanded product in the niche of heating equipment.
What attracts buyers so much about this product:
- These batteries are still among the most affordable on the market;
- Aluminum has a high heat transfer coefficient;
- The light weight of the structure allows installation by one person;
- Many models have a built-in thermostat;
- Ease of maintenance and modular design - if necessary, you can always complete the purchased radiator with additional sections, which will increase heat transfer;
- Radiators of this type have a service life of 20 to 25 years.
However, these models of radiators also have some disadvantages that we must mention:
- Convection heat dissipation is significantly lower than that of steel radiators;
- Uneven temperature distribution over the radiator surface;
- Corrosion susceptibility: over time may require special treatment of the battery to prevent premature deterioration of the material.
What should you know when choosing an aluminum radiator? These batteries are of two types: Reinforced and Regular. The first is designed for operating pressure inside the system up to 16 atmospheres, and the second - up to 6.
- Conventional radiators are intended for use in private homes, as the pressure in them heating systems ah is much lower than in general-purpose heating systems.
- When making the right radiator, the manufacturer must provide an internal protective coating for the aluminum against acidic and alkaline environments.
- If there is no information on the label about the presence of such processing, then be sure to study the specification of the product on the Internet, or ask the seller. Otherwise, it is better to refrain from buying such a radiator.
Today on the market there are options for bimetallic radiators that combine the properties of steel and aluminum. Outwardly, they resemble aluminum models, so be careful not to buy the wrong one.
Other solutions

There are times when it is required to organize autonomous heating of individual rooms, without connecting to the heating network. For these purposes, oil and water radiators are used, powered by an electrical network. They are produced in two versions: floor and wall.
- The first ones are a mobile structure, and wall-mounted ones are stationary options.
- It is very easy to hang the oil cooler on the wall, since the installation does not require a connection to the heating network. It is enough to bring an electric cable to the installation site and install the battery on special brackets.
- Oil coolers consist of several heating plates that are welded together. The plates are molded in such a way that when they are connected, channels are formed inside the panel for the movement of the coolant, which is oil. Heating elements are installed at the bottom of each channel.
Due to the peculiarity of their structure, these radiators can be very narrow, but at the same time wide and high. Therefore, it is convenient to place them in narrow aisles, behind furniture or under window openings without a window sill.
Fittings for installation
When choosing brackets for a canopy of heating batteries, you should pay attention not only to the design of the fasteners and the radiator itself, but also to the material from which this element is made.
To secure a heavy cast iron battery, massive holders are used that can withstand a lot of weight over a long period of operation. Such fasteners are made of thick durable metal, which is marked as "reinforced".
In addition, you can purchase legs that are adjustable in height, which will further facilitate the installation process. This element will be indispensable when you need to hang a cast iron radiator on.
For other radiators, similar fasteners are used, but made of thinner metal. For batteries of this type, there are also special stands, thanks to which you can fix to the floor.
Mounting radiators on the wall
In this chapter, we will theoretically mount to the wall, radiators made of aluminum. This instruction is applicable to almost any type of radiator, with amendments for design features and product weight.
Battery mounting subtleties

First of all, in order to provide yourself with the most comfortable conditions for installation, you need to familiarize yourself with the type of heating system. So, with a one-pipe connection, a bypass is required, with which you can shut off the water flow without disconnecting the entire riser from the heating. Otherwise, you will need to coordinate your actions with heating networks, the installers of which can turn off the central heat supply.
If we are talking about connecting the entire system in a private house, then you do not have to worry about this.
The diagram below shows how to properly position the battery in space. These recommendations are necessary for the organization of normal heat exchange, and are regulated by building codes.
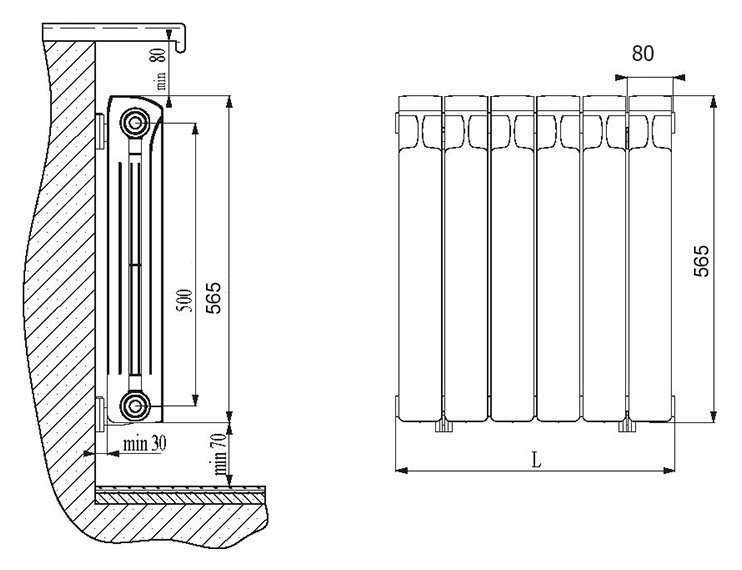
- So, the minimum distance of the lower edge of the radiator from the floor should not be lower than 70 mm;
- The distance to the sill is kept approximately equal to the previous indicator - this ensures uniform air circulation;
- The distance from the radiator to the wall is 30 mm.
It is necessary to install radiators on brackets, the number of which should be at least three, which makes it possible to ensure the immobility of the structure.
Advice! Do not rely on the position of the pipe to fix the lower part of the radiator. When pressed, both of these elements will experience deformation - and this is highly undesirable.
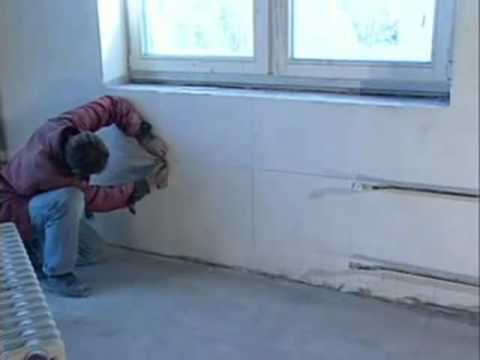
Before installation, part of the wall behind the radiator must first be putty (see), and, if necessary, painted, since after installing some models of batteries, access there will be limited.
Radiator installation procedure
Before proceeding with the installation work, in addition to the battery, you should make sure that there is a Mayevsky crane, plugs, plugs (these elements are supplied with a radiator, or sold as separate sets), brackets, taps and dowels. From the tool, prepare a building level, a puncher, a tape measure and a pencil.
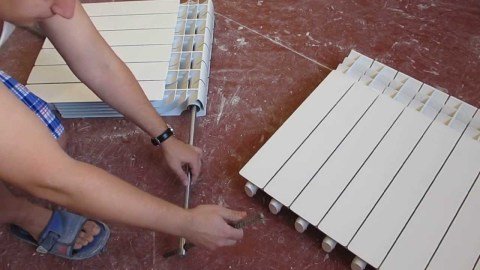
We start by assembling the radiator, which is performed on the floor:
- If necessary, you can increase the number of sections. For this, special nipples are used, in the center of which gaskets are installed.
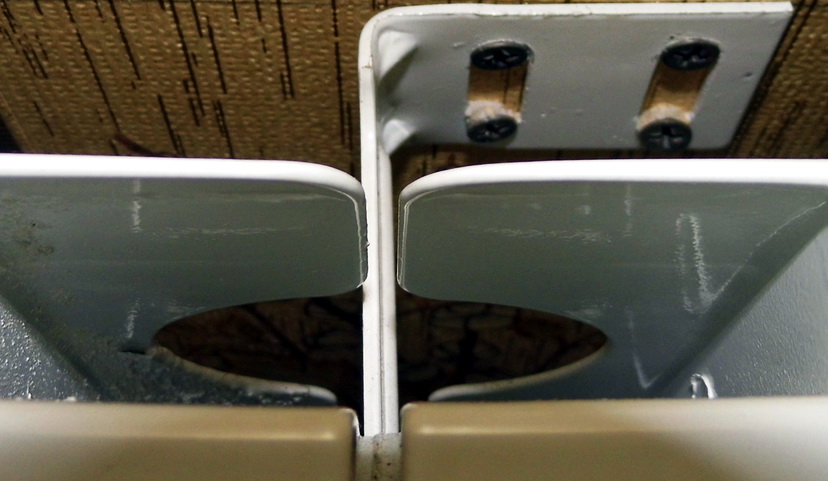
- The nipples are slightly screwed onto the radiator terminals, then additional sections are brought to them, after which, using a special key or a 22 mm wide chisel, the elements are pulled together (see photo above). This is done in stages and alternately in order to prevent a strong skew of the elements relative to each other, from which the nipple can jam.
- Place the radiator in front of you face side... At the four corners on the sides, it has leads for connecting fittings and other elements. The thread applied to these pins is different: on the right it is right, and on the left is left.
- The plugs (adapters) supplied in the kit also differ in the direction of the thread. The right ones are marked "D" and the left ones are "S". Sort them out and screw onto the radiator.
- When assembling the radiator, it is most convenient to use a special key, which has all the necessary holes. Tighten the plugs with it, but do not overdo it so as not to squeeze the silicone gasket from the connection, which must be mandatory.
- Next, look from which side the pipes will be connected to the battery. With a side connection, a plug and a Mayevsky tap are screwed onto the opposite terminals. They can be installed in any order, but for better bleeding of air from the system, it is recommended to place the Mayevsky valve on the upper outlet of the radiator.
- When connected at the bottom, a tap and a plug are placed on both top terminals.
- Then carefully tighten both of these elements.
- Now, on the remaining terminals, you need to screw an adapter under the tap, which is called "American". This element has a movable union nut with which the structure is pulled together.
- That's it, the battery is ready for installation.

So that after installation the battery is located exactly at the level, we must take the correct measurements, and accurately drill the holes for the fasteners, preventing the drill from shifting.
- Measure with a tape measure the distance between the sections in which the brackets will be located, as well as the height seats relative to the top edge of the radiator, and write it down on a piece of paper.
- Transfer the dimensions of the radiator to the walls, focusing on the heating pipes, at the ends of which there should already be taps. With their help, you can shut off the heating supply in the future.
- Mark the first hole, and using the level and previous measurements, find the exact position of the second and third.
- Also, measurements can be made in fact, having previously wound the radiator. But in this case, you need to be extremely careful, and most likely, you will need the help of a partner.
Advice! In cases where angle brackets are used, there is no overhang adjustment, so we recommend using pin brackets.
Now, all you have to do is put the battery on the brackets, pull the crane and the American woman together, and test run the system to make sure that the connection is secure.
What about fixing wall-mounted radiators? The whole procedure is absolutely similar to the one described above. At the same time, the radiator grill will hide the battery from view, so that during installation, minor errors in the location can be allowed. It is advisable to install a heat-reflecting screen behind the radiator in order to redirect heat rays going into the wall towards the center of the room.
This completes the fastening of the heating radiator to the wall. Of course, it is difficult to describe in words the entire installation process in detail, so we suggest watching the video in this article so that you can see everything clearly.
If you plan to install radiators yourself, then one of the important issues that you should study before getting down to business is the technique of securely attaching the radiators to the wall. The peace of mind of you and your neighbors for many years to come depends on how correctly you choose the fasteners and carry out the installation work.
Is it worth taking on the independent installation of radiators
- Installing a radiator requires a certain amount of time, even for craftsmen. If you don't have experience, it will take a lot longer. And for the period of work, it is necessary to turn off the heating throughout the riser. Although, of course, you can postpone everything for the summer, when there is no coolant in the system.
- In addition to time, as we said, experience is required. - it is a very responsible business. It is worth slightly under-tightening or overtightening any of the connections, and after some time it may lose its tightness. You will fill not only yourself with hot water, but also your neighbors.
- Correctly attaching the battery to the wall is also very important. We will talk about this further.
In fairness, it should be noted that all of the above applies to the performance of work in your own home. But in this case, all the damage will concern only you, so the degree of responsibility is still somewhat less.
Wall mount
In the vast majority of cases, heating radiators are attached to the wall. They are installed under the window to create a thermal curtain for the cold air streams passing through the glazing.
The radiator must be wall-mounted taking into account its weight and wall material.
The heaviest are cast iron batteries. They can be hung on a brick or concrete wall using standard dowels, but in the case of a wooden or plasterboard surface, a special floor base must be provided. It should bear the main load, and in this case the wall bracket is only needed to support the radiator body in an upright position.
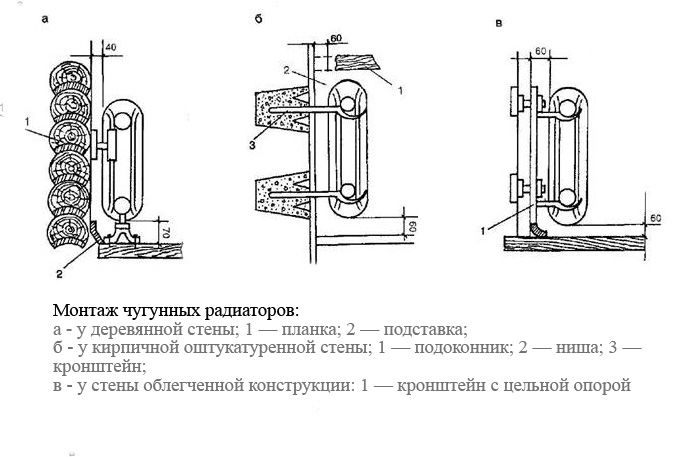
You need to choose fasteners for bimetallic radiators just as carefully. Although they are slightly lighter than cast iron, the load on the surface of the wall can create a very impressive one. A floor support may also be required depending on the weight of the radiator.
But aluminum radiators are light enough, so they can be attached to any wall.
In fact, a wall mount for a radiator is no different from, for example, installing a bracket for a flat TV - the requirements for matching the type of materials used are the same.
Work order
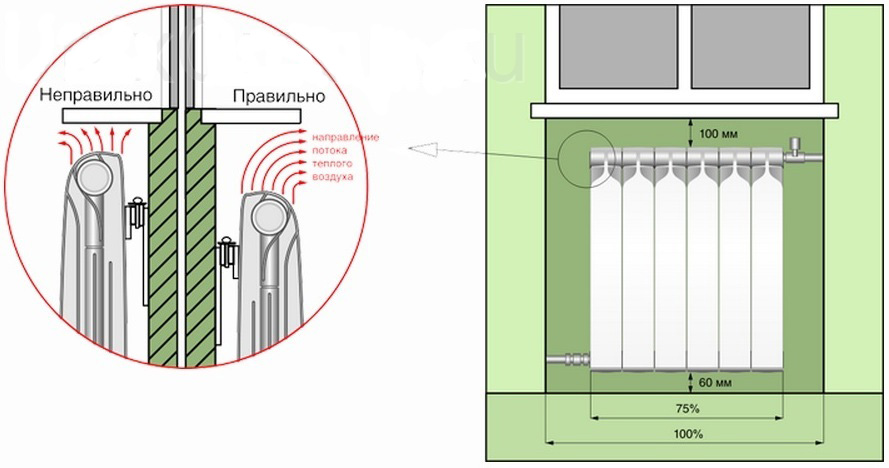
First of all, you need to mark the surface of the wall and determine the place where each bracket will be installed. The requirements for the placement of radiators are as follows:
- the distance from the radiator to the window sill and the floor plane is at least 10 cm;
- the distance from the wall to the rear surface of the case is at least 5 cm;
- it is necessary to provide a slight horizontal tilt so that air bubbles do not accumulate in the upper part;
- the heating radiator plugs must be at the level of the installation of the coolant supply pipes.
The number of attachment points depends on the size of the battery. If the number of sections is not more than six, then in a brick or concrete wall it is enough to fix one bracket from below and two from above. For larger radiators, it is better to increase the number of points by one in each row.
After all the points are outlined, it is necessary to drill a hole for the dowels, install all the fasteners and fix each bracket.
After all operations, it is better to check the reliability of the fastening by applying a force to all holders approximately equal to the weight of the radiator. The bracket must not move in any direction and must not bend under the applied load.
If you use a floor base, then the requirements for the rigidity of the installation of wall elements are somewhat lower - in this case, they perform an auxiliary function.
After checking, you can hang the radiator on the fixed holders and connect the main heating pipes.
Floor installation
Floor mounting of radiators is much less common and may be due to several reasons:
- there is no niche on the wall of the required size. For example, a room has a large window, under which there is not enough space for a radiator;
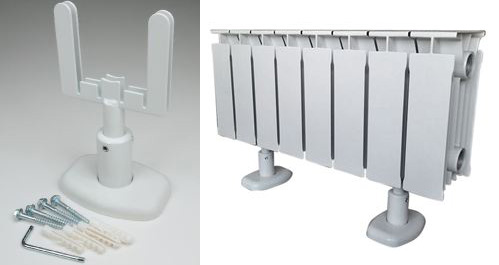
- for aesthetic reasons. The features of the design radiators used or the general style of room decoration may require installing the battery on legs or on a special floor pedestal.
The floor mount has a number of advantages, including speed, reliability and the ability to accommodate any, including the heaviest, types of heating batteries.
The process of fixing a radiator to the floor is not too different from a wall one. Since the floor is initially a hard and solid surface, there are no problems with the choice of materials - you can use standard fasteners.
The only exception is wooden floors in country houses, in such cases, for especially heavy radiators, it is better to play it safe and try to use at least one wall bracket to reduce the load on the logs.
Before installing the radiator, it is necessary to mark a place for each floor bracket, and then using fasteners to securely fix all holders to the floor surface. If the radiator is lightweight, then instead of massive brackets, there may be small legs in its kit, the fastening of which is carried out in the same way.
Now it remains only to carefully fasten the radiator body to the installed elements and connect the necessary communications.
Remember that everything threaded connections must be performed with a certain effort, which is dangerous to exceed. Therefore, it is better to stock up on a torque wrench in advance and find the corresponding tightening torques in the instructions.
Replacing the heating batteries yourself will not only save you a certain amount of money, but also get complete confidence in the reliability and quality of your heating system. But in order to ensure that its further operation does not bring unnecessary worries, it is better to approach the issue of mounting radiators with maximum attention and accuracy.
Finally, we suggest that you familiarize yourself with the video, which describes in detail the process of preparing the radiator for installation, as well as its fastening to the wall:
One of the important aspects of the installation of heating system elements is the installation of the battery on the wall. At first glance, the elementary questions - how and how to fix this device on a vertical surface - are not so unambiguous and therefore deserve special attention. This is what we will talk about in this article.
Radiator installation
Instructions for connecting devices to the piping system and the fastening of heating radiators to the wall depend equally on:
- Battery type selected for heating.
- The material from which the load-bearing walls are erected, because it is on them in most cases that these products are fixed.
Those who decide to start creating a heating system with their own hands should understand this issue in detail.
Types of heaters and features of their installation
The classical fastening of batteries is carried out on the wall under the windows to create a thermal barrier to cold air coming from the glazing. The selection of the type of fastening is carried out taking into account the mass of a specific heating product.
Cast iron models
Cast iron batteries are the heaviest of all known heating devices.
At the same time, they have a number of undeniable advantages that explain the popularity of cast iron heating products:
- Thick-walled sections of such a unit keep heat well and give it to the room for quite a long time even if the coolant supply is turned off.
- Cast iron is highly resistant to corrosion and therefore radiators made of this material are as durable as possible.
The disadvantages of cast iron devices include their large weight and significant massiveness. However, modern manufacturers have learned how to make rather elegant products from this material, not only heating the room with high quality, but having aesthetically attractive forms.
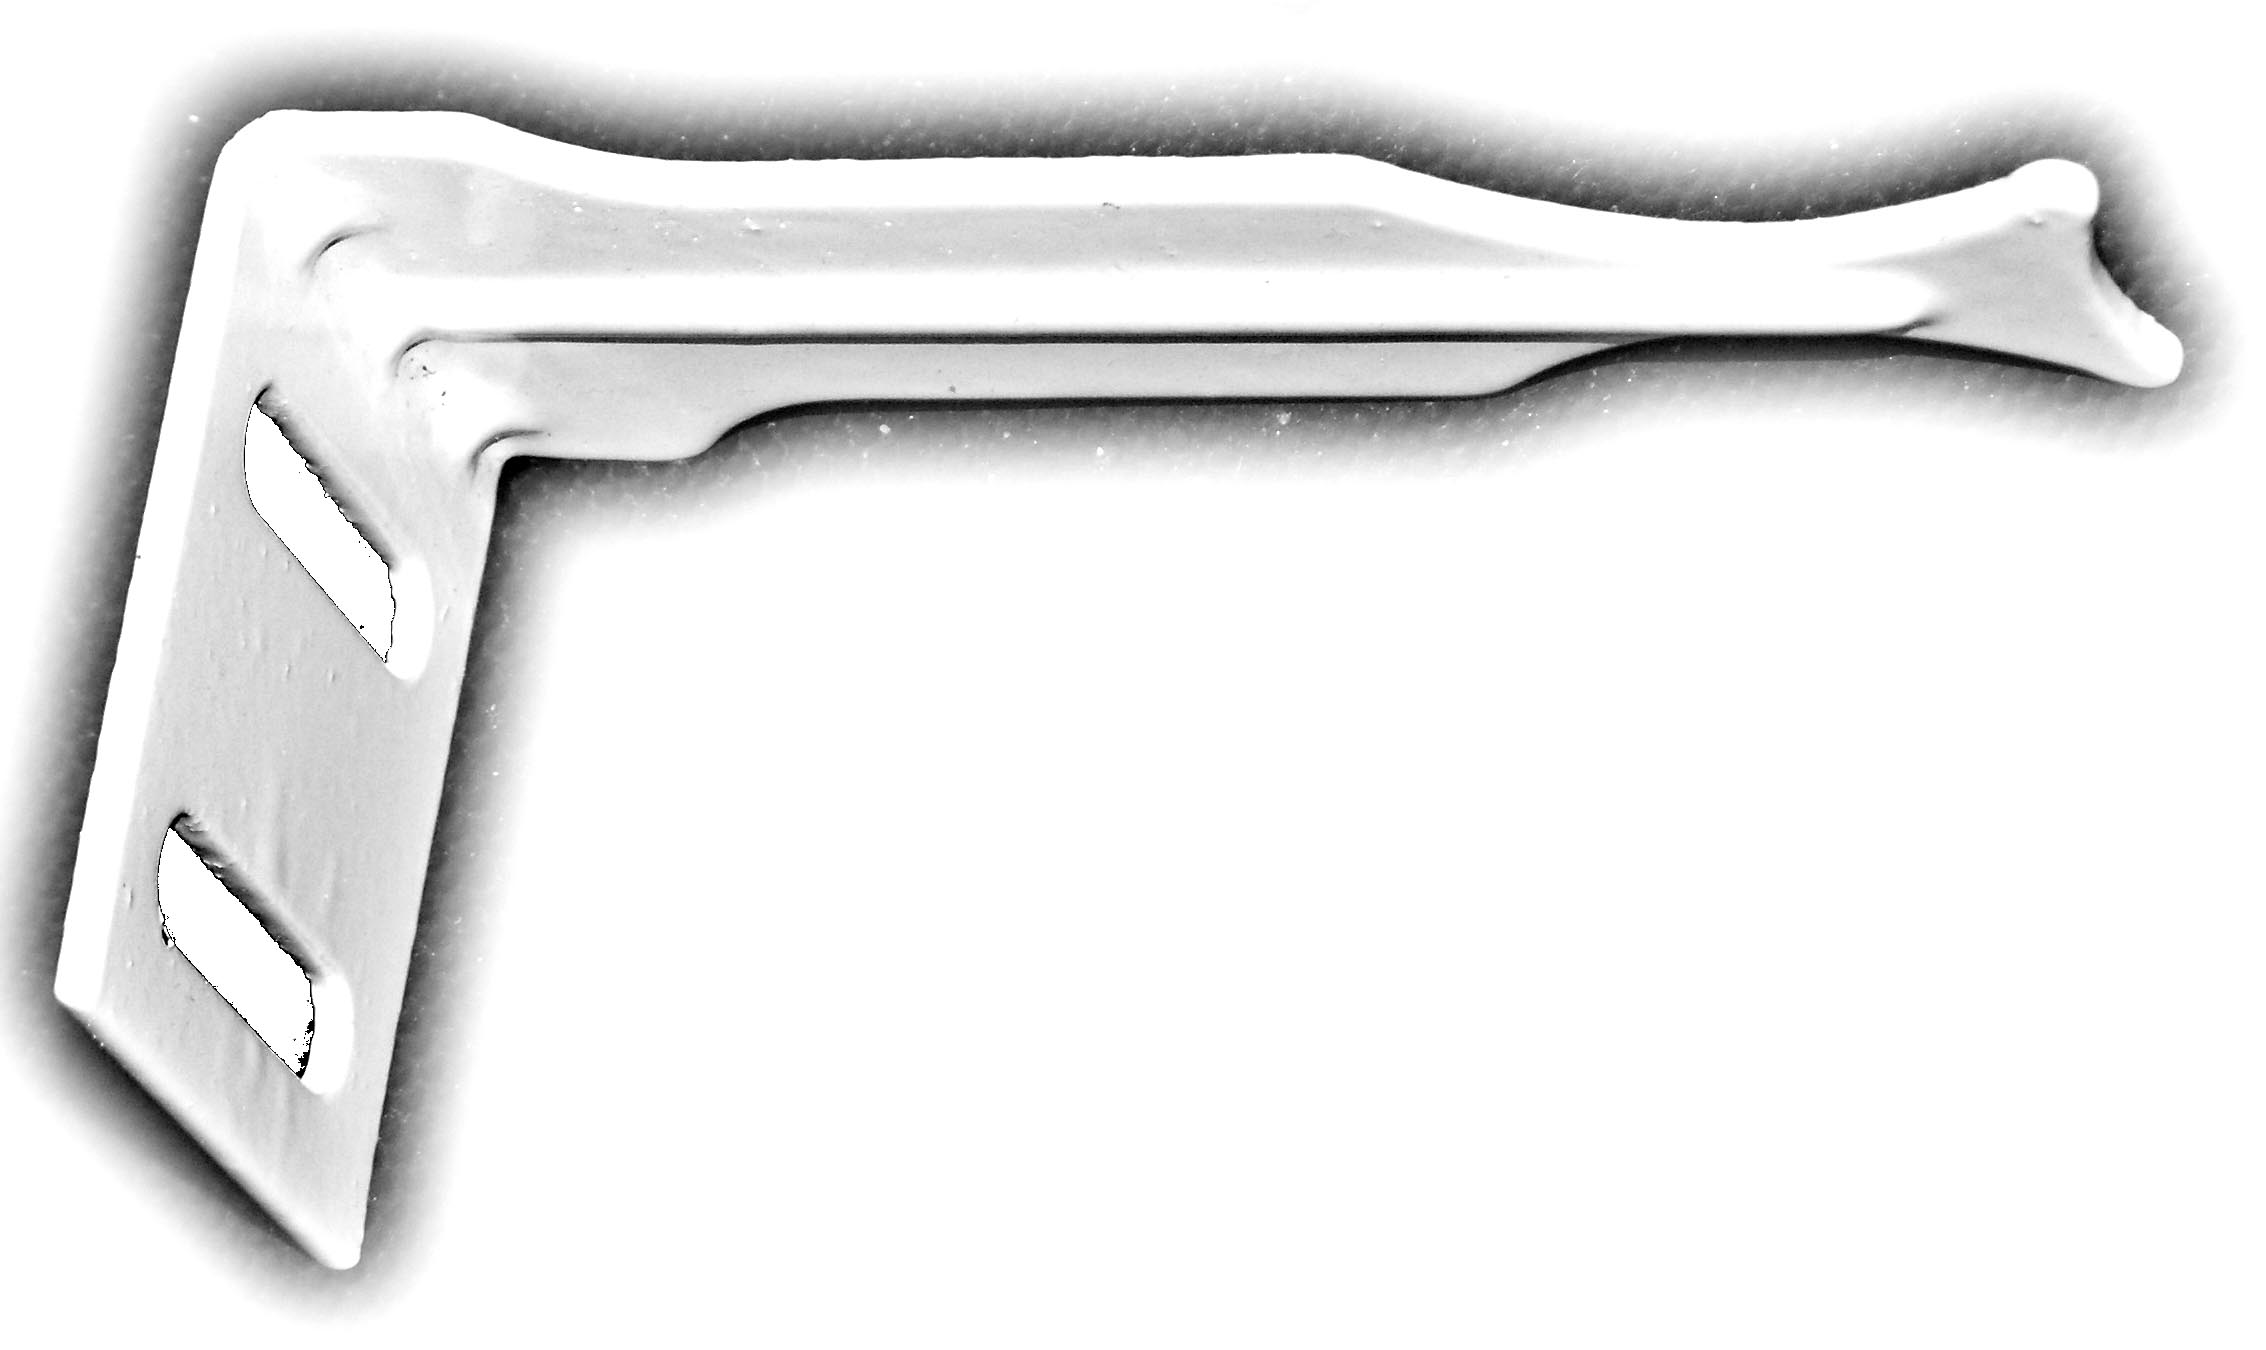
The fastening of cast iron radiators to the wall is carried out in various ways:
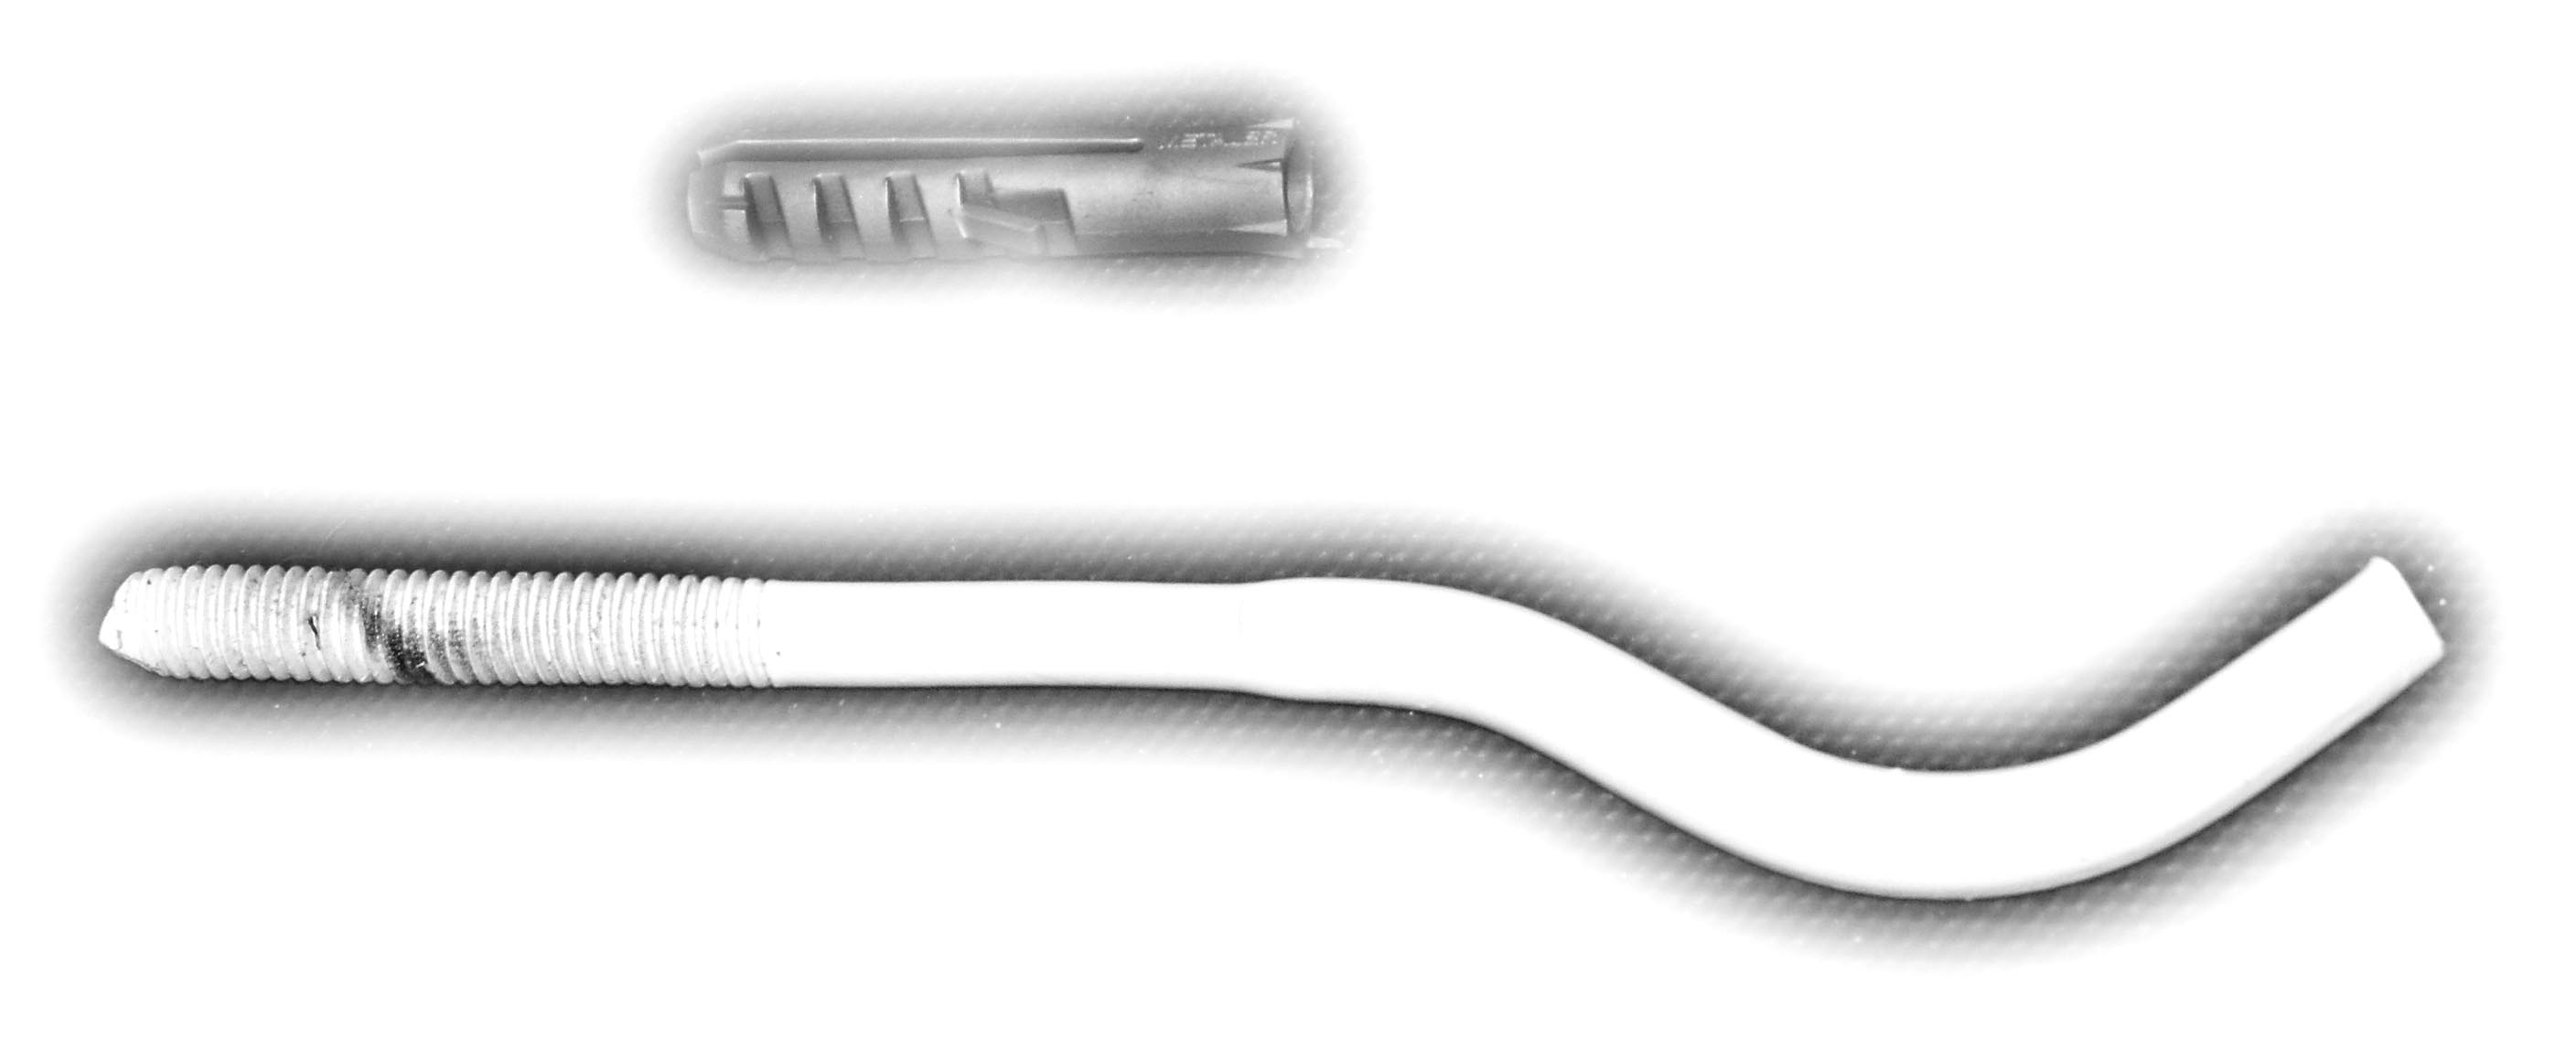
- For walls made of bricks, cinder blocks, concrete, it is possible to mount using special brackets or bent pins made of thick metal on simple dowels.

- For wooden walls and plasterboard structures, you will have to build a floor base, which will have the main load. And the fastening of cast-iron heating radiators to the wall will perform a supporting function.

To work on installing the heater you will need:
- Drill or hammer drill with attachments appropriate for the wall material.
- Building level.
- Brackets.
- Dowels.
The rules for fixing a heating radiator to the wall are common for all types of devices:
- The distance from the top of the appliance to the window sill is about 100 mm.
- From the floor to the bottom surface of the battery -100-120 mm (this is especially important in cases where you have a "delicate" floor covering).
- From the wall to the battery 30-50 mm.
Important!
When these parameters are changed, the heat transfer of the heater is significantly reduced.
- The number of fasteners is calculated according to the dimensions of the battery (at least two fasteners at the top and one supporting one at the bottom). This is for a six-section radiator mounted on a concrete or brick surface.
- For sectional devices, the brackets are located in the gaps between the sections.
- The markings for the fasteners are carried out in compliance with the vertical and horizontal lines of the future product (use a level).
Attention!
A slight horizontal slope must be provided to prevent the accumulation of air bubbles at the top of the product.
- Strictly observe that the inlets on the battery are located according to the heating main.
The instructions for the workflow are very simple, so anyone can handle this work with their own hands:
- The marking of the battery attachment points is carried out with a simple pencil using a building level and a ruler.
- Further, holes of the required diameter are drilled in the designated places.
- Dowels are inserted into them, into which the brackets are then screwed in, they must be securely fixed (motionless).
- It's time to "try on" the battery. If all the rules for mounting the device are observed, and it fits well on the mounts without wobbling, you can continue to mount the radiator to the wall - fix it with.

Steel radiators
Steel heaters:
- Much less massive, which greatly facilitates their installation.
- They warm up very quickly and begin the process of giving off heat.
Steel batteries are sectional and panel. Sectional models are hung, like their cast-iron counterparts, with the only difference that the bracket for attaching the radiator to the wall is less powerful.
To fasten panel products, brackets are welded on the back wall, which are hung on the brackets. The number of brackets depends on the size of the panel (at least four pieces).
Advice!
The markings for must be done with special accuracy so that the welded brackets fall without effort on the installed brackets.
In addition, the wall surface must be perfectly leveled.
With a small mass, the fastening of heating radiators to the wall can be facilitated and performed using a set of special brackets and stops. With this method, the upper hinges of the device are hung on the brackets, and the lower one is fixed in a device that rests either on the floor or on the wall (more often).
For your information!
In this way, it is better to mount the heating radiators to the aerated concrete wall.
Aluminum radiators
Aesthetic and neat aluminum models:
- Have lovely appearance.
- Very light weight, which makes the fastening of aluminum radiators to the wall quick and easy.
- Designed for operating pressures in the system up to 20 bar.
- They are characterized by the maximum heat transfer rate.
Unfortunately, aluminum heaters are prone to corrosion and quickly deteriorate when they join with other metals.
Bimetallic radiators
Truly, a universal type of radiators - bimetallic heating devices:
- Unite in themselves best qualities steel and aluminum batteries.
- Fastening bimetallic radiators to the wall is easy and simple.
- The steel inner surface of the product reduces the risk of deterioration due to corrosion.
- Bimetallic radiators are designed for the optimal pressure level in heating networks.
Interesting!
When choosing heating devices, professionals advise you to stop your choice on bimetallic products.
Before attaching the bimetallic radiator to the wall, markings are performed in accordance with the dimensions of the device. Fastening to stone and concrete walls is carried out on brackets by analogy with the above technology.
For structures made of plasterboard and other lightweight materials, you need to use double-sided fasteners.
If you still have doubts about the reliability of fastening the radiators to the walls so that they do not sag under their own weight, purchase and install floor stands. They will help distribute the weight of the appliance and relieve some of the stress on the wall mountings.
Conclusion
Now you know how to fix a heating radiator on the wall without any difficulties, if, of course, you have all the tools necessary for this process. But this is not a problem either, since there are shops that provide tools for rent, in the event that you do not want to buy yourself a hammer drill, and yet you cannot do without it.
The price of the service is not high, and you will calmly cope with the task in a couple of days. In the video presented in this article, you will find Additional information on this topic.
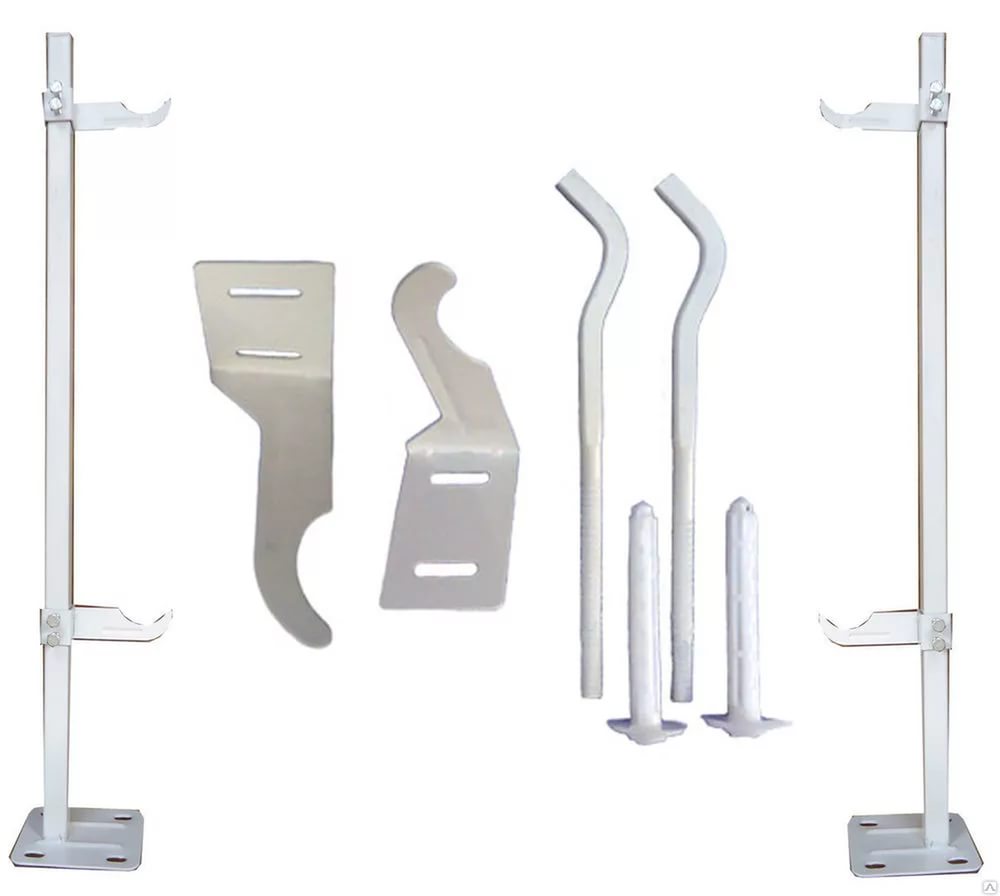
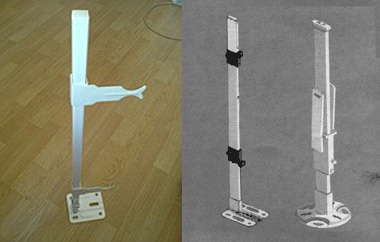
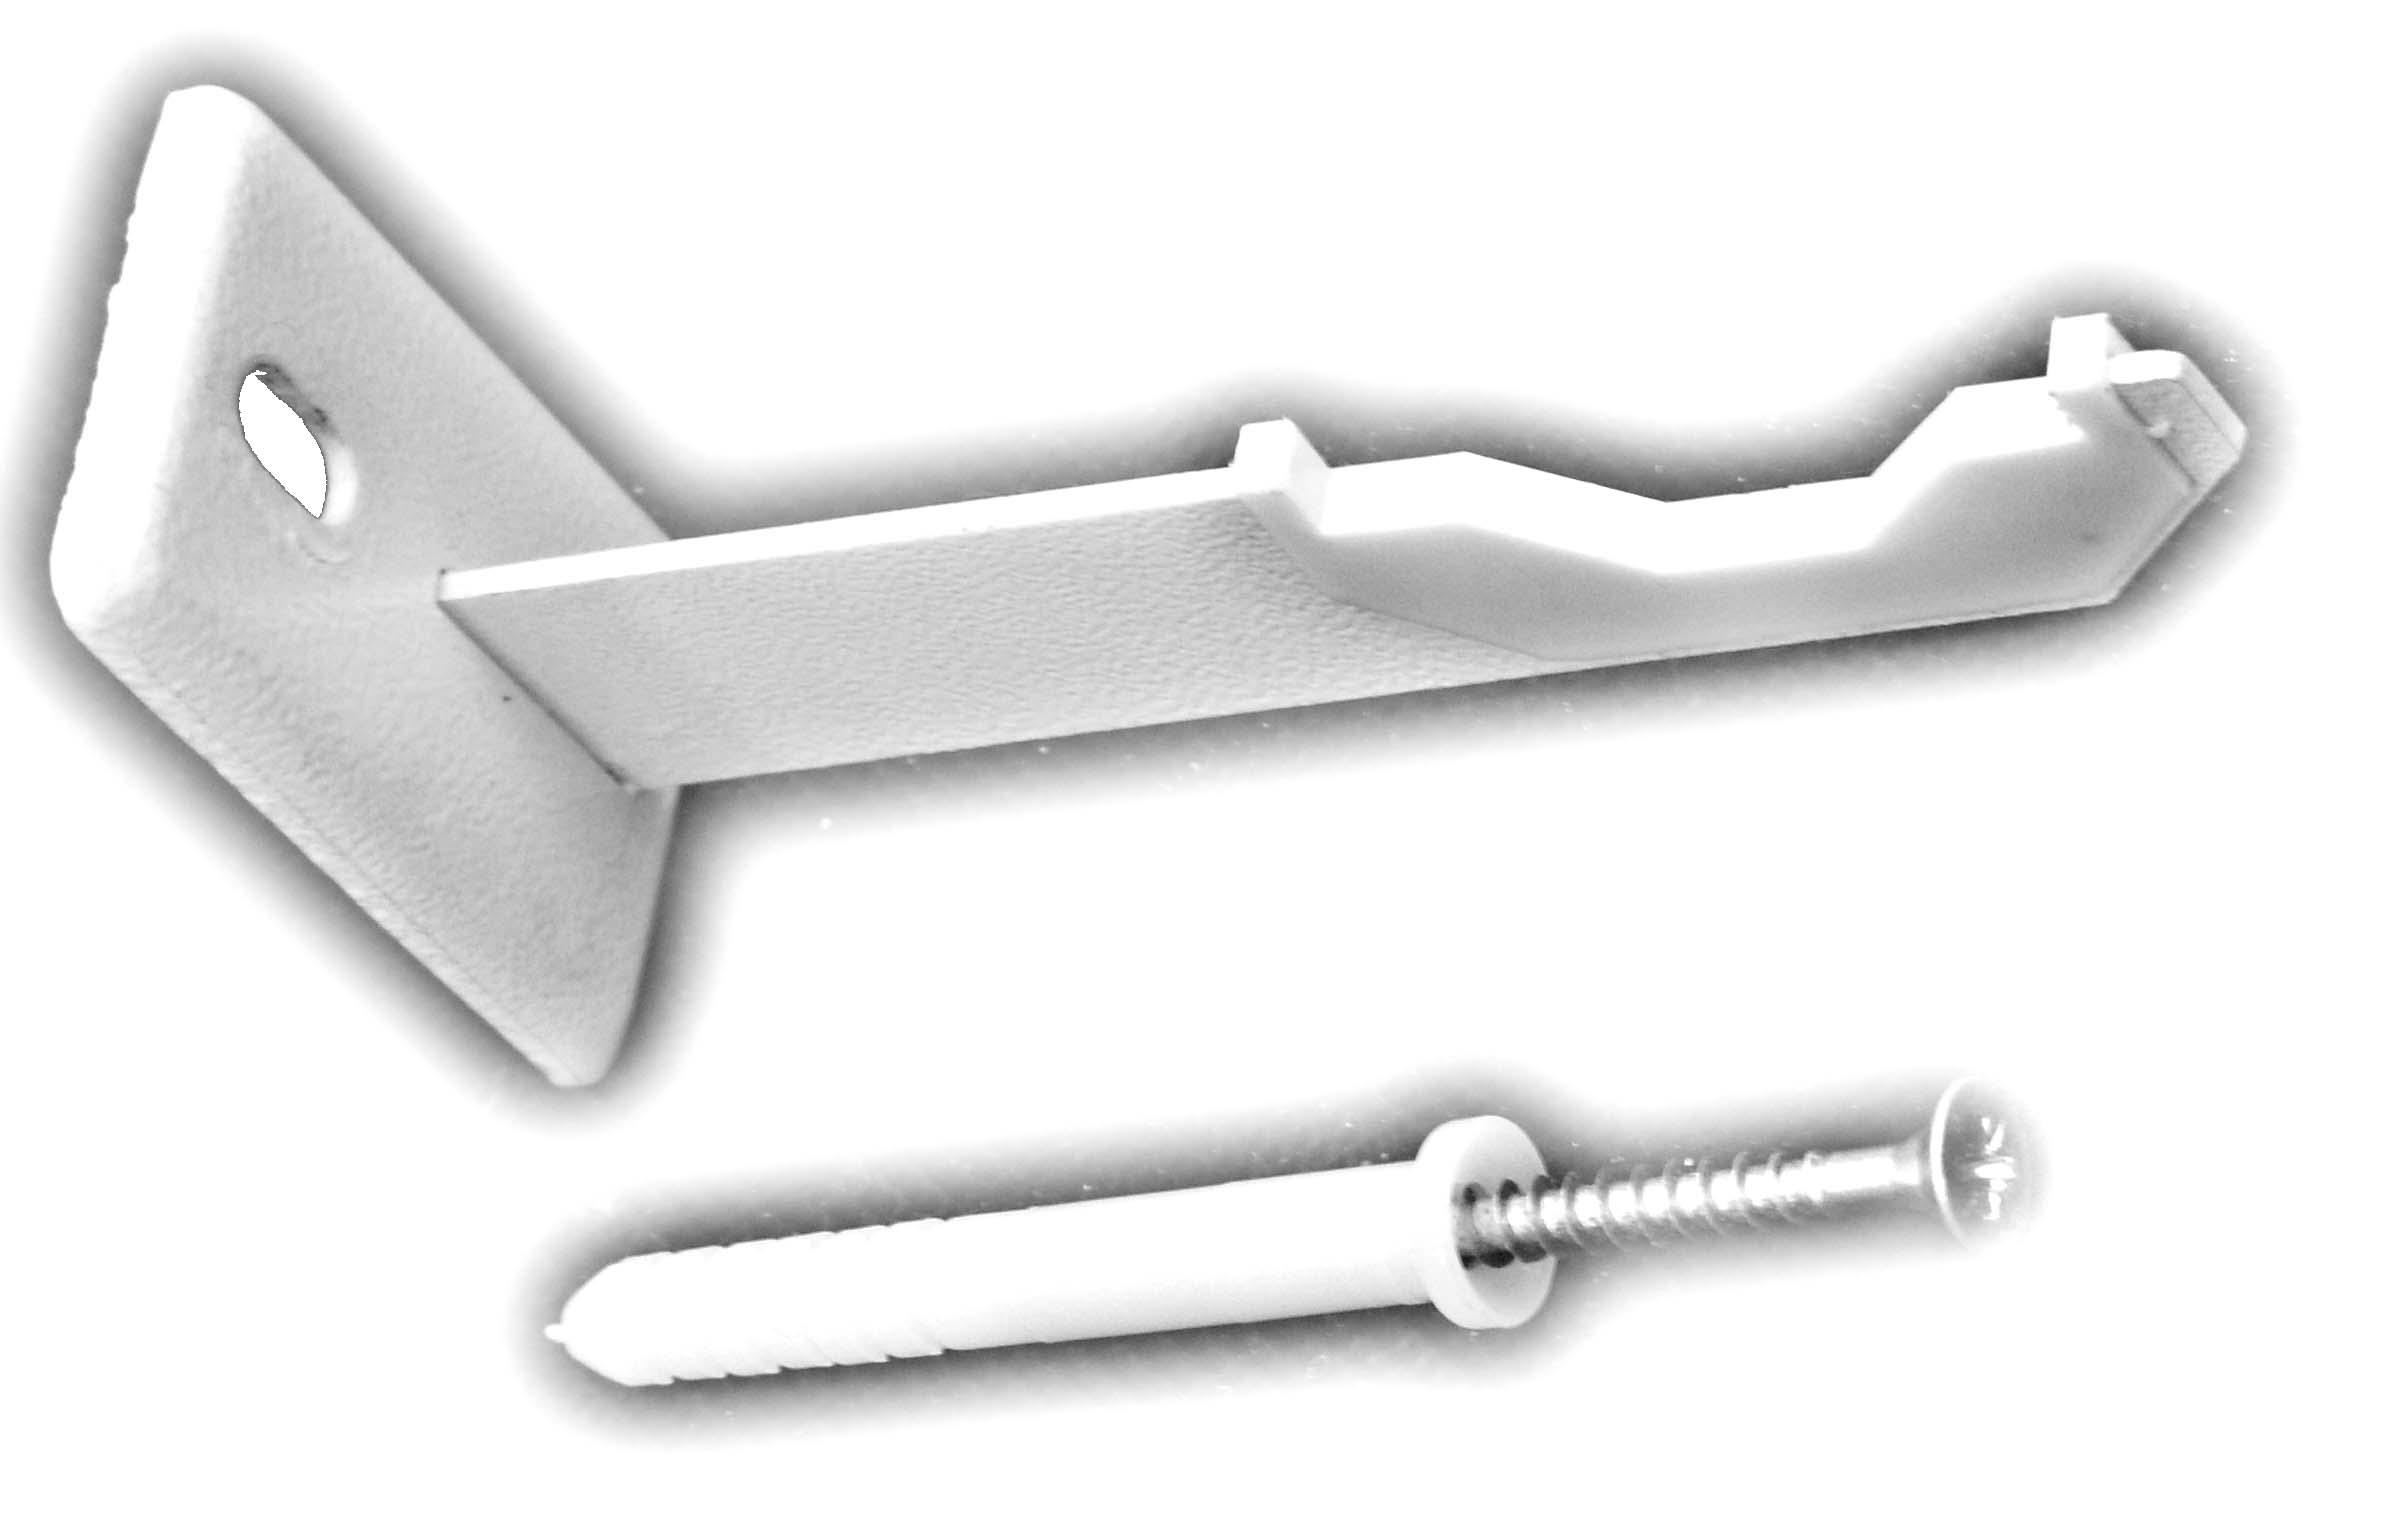
Brackets - devices used when installing heating equipment. Between themselves, they differ in their original dimensions. The reason for this is the variety of radiator models - cast iron, steel, aluminum, bimetallic and others. The weight of these units together with water will be different.
In general, brackets for heating radiators are divided into types:
- Adjustable. Such radiator fasteners can be varied in height and horizontally. You just need to use a wrench.
- Unregulated. They are mounted by means of anchor, dowel fastening, or they are hammered directly into the wall, where the radiator section will be located. Small offsets in height or width are allowed.
Brackets for radiators simplify the procedure for removing the batteries in order to insulate the wall behind it, in this way to increase the temperature in the room by several degrees.
One of the most common difficulties when installing heating equipment is how to fix radiators on a plasterboard sheet? As a rule, it is solved by using the so-called corner-type overhead brackets. Their design is special in that it has a part bent at an angle of 90 ° with horizontally (vertically) located longitudinal holes. Such a structure is attached to anchors pre-installed in the wall, construction dowels by means of screws, nuts or rivet bolts. Having adjusted the location of the radiator battery, the fasteners are tightened - the heating equipment is installed.
Kimry Thermal Equipment Plant offers you brackets for radiators of its own production. The assortment range is large and includes such models as:
- White brackets;
- Pin brackets with dowels;
- Universal fasteners with a plastic cover, screws and dowels;
- Reinforced brackets;
- Fasteners on the strip H = 2.5 and H = 4.0;
- Floor brackets in white.
We also offer manufacturing of fasteners to order according to affordable prices... We guarantee high quality and operational execution.
Radiator Brackets Prices
|
APPEARANCE |
Name |
from 500 pcs |
from 5000 pcs |
from 10 000 pcs |
||
|---|---|---|---|---|---|---|
|
|
White bracket (analogue "ELEGANCE") |
|||||
|
|
Pin bracket |
flat white (7x180) |
||||
|
white (10x200mm) |
||||||
|
uncoated (10x200) |
||||||
|
|
Universal bracket (with plastic plate + screw + dowel) |
white short |
||||
|
white din |
||||||
|
|
Reinforced bracket |
white short |
||||
|
uncovered short |
||||||
|
white long |
||||||
|
uncoated long |
||||||
|
Bracket on strip |
300/100 uncoated |
|||||
|
300/140 uncoated |
||||||
|
500/100 uncoated |
||||||
|
500/140 uncoated |
||||||
|
Bracket on strip |
300/100 uncoated |
|||||
|
300/140 uncoated |
||||||
|
500/100 uncoated |
||||||
|
500/140 uncoated |
||||||
|
Floor bracket white |
for radiator -ROVALL, ALUX |
|||||
|
for radiator FARAL GREEN |
||||||
|
universal short for bimetal radiators |
||||||
|
universal long for bimetal radiators |
||||||
|
for cast iron radiators |
||||||
|
for steel. panel rad. |
||||||
|
for steel. panel rad. |
||||||
|
|
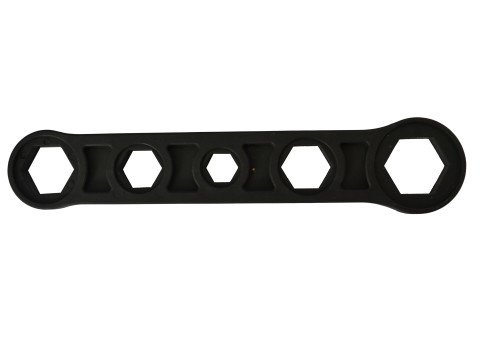
Key with handle for assembly / disassembly import. radiators of all types |
up to 4 sections |
237-00b / r |
|||
|
up to 7 sections |
296-00b / r |
|||||
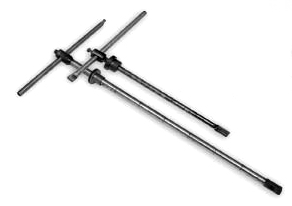
|
Wrench with handle for assembly / disassembly of cast iron radiators |
up to 4 sections |
169-00b / r |
|||
|
up to 7 sections |
218-00b / r |
* - made to order
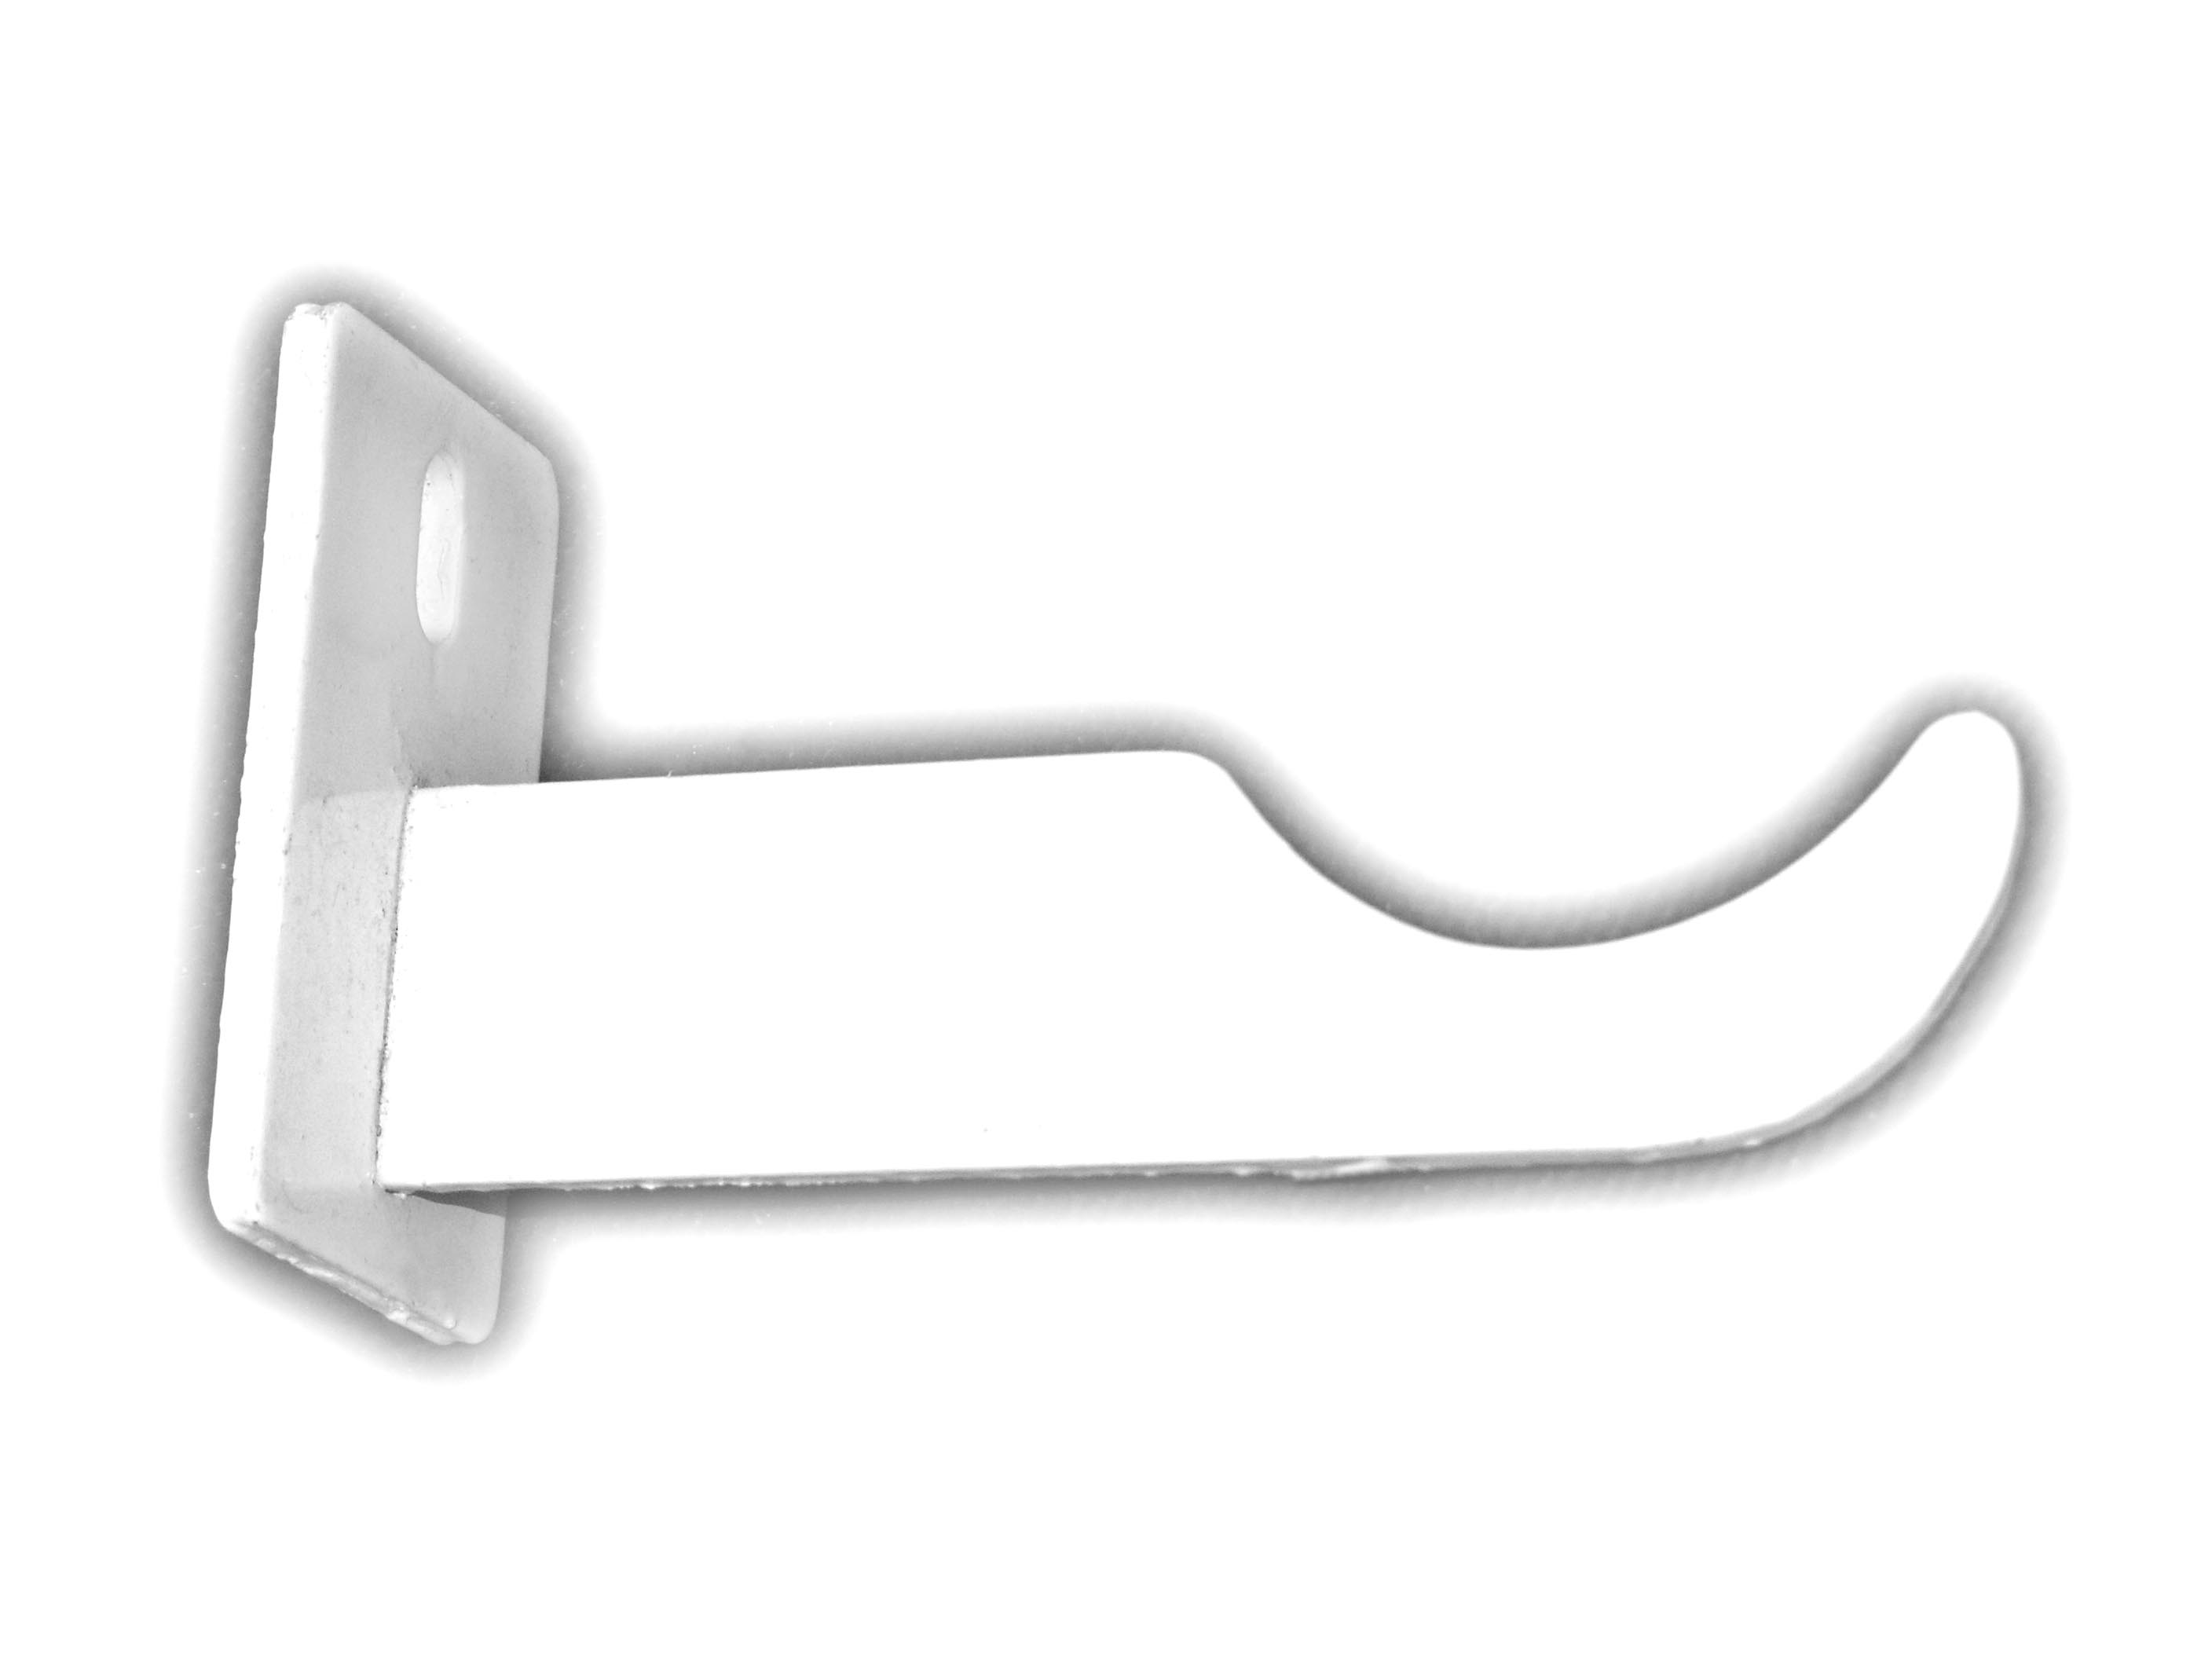
At self-installation or replacement of batteries, it becomes necessary to select related equipment. One of the fastening elements is a bracket that allows you to securely fix the heating radiator and thereby ensure the proper operation of the entire system. The latch is a galvanized steel hook with a round or rectangular cross-section with a fastening plate or thread at the other end.
The correct choice of brackets is very important, since equipment should not be allowed to sink, collapse from sudden seismic activity or from an accidental impact.
Types and applications of holders for radiators
Batteries are made of copper, aluminum, cast iron and bimetal (their inner layer is steel, the outer layer is aluminum). They are either suspended from the wall or rest on floor units, it is possible to combine these options. Some fasteners can be adjusted in height and length. There are many types of brackets, divided into 2 large groups:
1. Wall mounted:
- pin (anchor) fixed (short and long) holders for bimetallic or steel radiators;
- adjustable in height (variation range of about 20 mm) with a mounting plate, allow hiding installation errors, surface irregularities or hanging ideally horizontally batteries with a large number of sections (more than 6);
- corner - for small or light heating elements.
There are also anti-noise holders with a special coating (rubberized). Specifications of this bracket for attaching radiators: material - steel, diameter - 7 mm, withstands weight up to 82 kg. They are usually taken for bedrooms so that you do not hear the slight knocking that occurs in the equipment when heated.

2. Overview of brackets for mounting a floor radiator.
They come in the form:
- an independent stand with a sole, is used for massive structures that are impractical to hang, for example, near a too thin (plasterboard) partition or display windows;
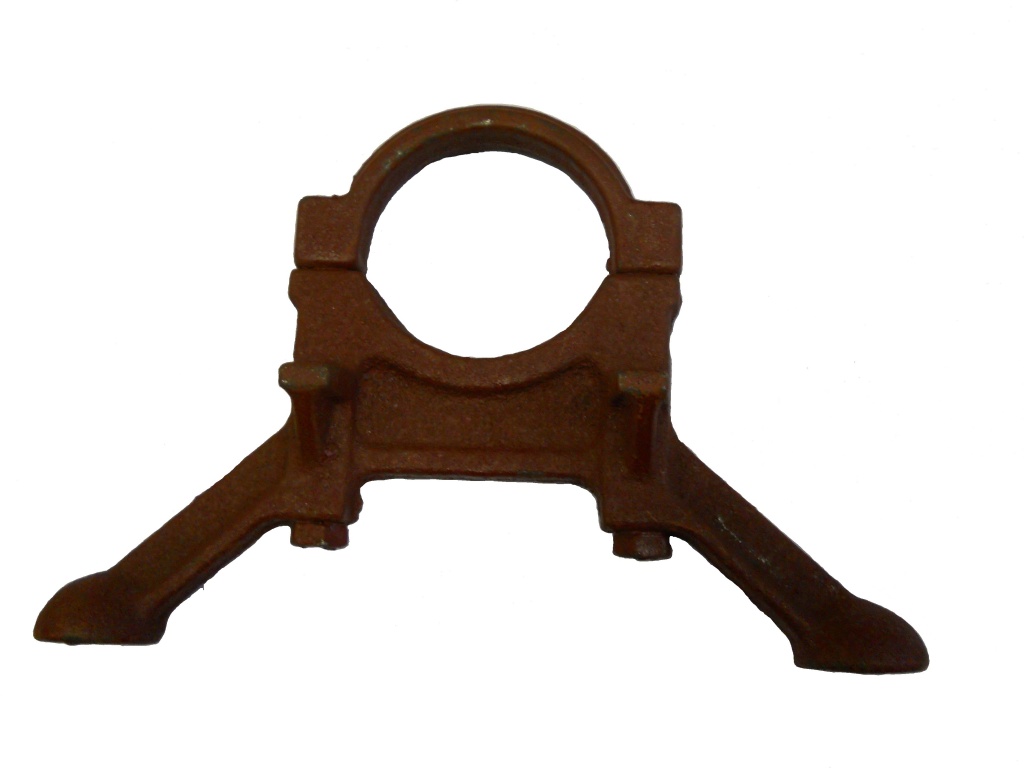
- additional for batteries bolted to the wall - these are the most suitable brackets for cast-iron radiators;
- rack with hooks that can be screwed to the floor and to the wall; It is also intended for dimensional equipment, but it is used to distribute the load between the planes (for example, in a wooden house).
The floor holders can also be height adjustable. There are options:
- in the form of a stand without fixing the radiator;
- with additional holding elements: with a chain or a clamp;
- on a sole or on a tripod, can be screwed to the floor or simply placed on it.
How to choose the right bracket
The main rule when buying a retainer: it must withstand the weight assigned to it. The maximum load is usually indicated in the attached instructions. The easiest way is to choose a bracket for an aluminum radiator, as it is lightweight and any type is suitable for it.
Use floor stands for very powerful batteries. But if the covering in the house is wooden, then you need to make sure that the clamps are equipped with additional fasteners to the wall. This is to reduce the load on the boards. For light heating elements that will be located in a deep niche under the window, it is better to buy a long bracket.
It is recommended for cast iron radiators to take holders with the ability to slightly change the height, otherwise difficulties with installation may arise. The price of an adjustable bracket is not so high as to give up the convenience of mounting.
It is important that the alloy contains no toxic substances released during heating. It is not worth buying parts hand-held, especially without the appropriate accompanying documents. Please note that the lightest - the corner bracket - is designed for aluminum and copper radiators only.
| Brand | Production | Specifications | Price, rubles / piece |
| Omec | Italy | fixed, wall-mounted, anti-noise, steel, up to 70 kg, anti-corrosion galvanized | 130 |
| Konner | China | floor-standing, to strengthen the lower part of the radiator, uncoated steel, up to 100 kg | 255 |
| Royal thermo | Italy | for bimetallic batteries, adjustable in the range of 2 cm, up to 70 kg | 170 |
| Tiarun | Russia | anchor, made of galvanized steel, painted with epoxy enamel, lengths 170, 220 and 250 mm, up to 150 kg | 35, 50, 70 |
| 08ps - GOST1050-88 | angular, made of sheet steel, covered with powder enamel, according to the description, the weight of the bracket is only 52 g / pc., designed for aluminum radiators, up to 50 kg | 25 |
How to do it yourself
First, markup is done according to the following rules:
- the distance to the floor and windowsill should be about 100 mm;
- for every 6 sections, 2 brackets are placed at the top and 1 at the bottom.
The installation of the clips is simple:
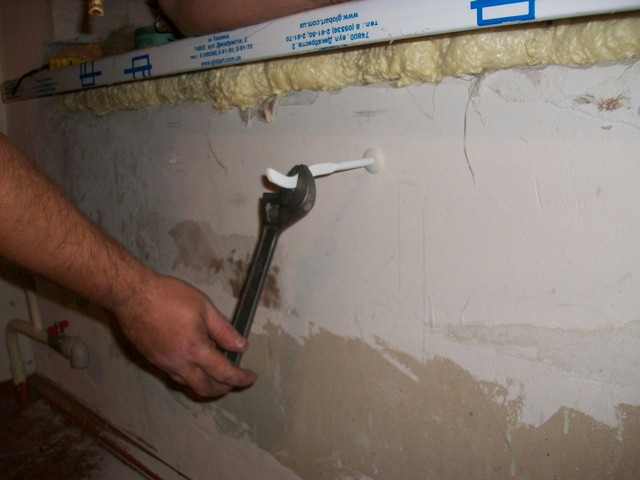
- holes are drilled in the concrete wall, dowels are inserted and threaded holders are screwed into them;
- in a brick - the junction is additionally strengthened (hidden) with cement mortar and is expected to solidify;
- fasteners with a special plate are screwed to a wooden surface using nuts;
- if necessary (for cast-iron batteries), install a stand on the floor, carefully screwing it on;
- all holders are tested for security by manually turning or sliding them.
Then a radiator is hung on the brackets. After that, the strength of the structure is tested again.