Brushes and winding, rectifier and pulley. That's the whole generator. It seems like there is nothing to break, but the VAZ 2110 generator also takes out the brain from time to time. Fortunately, all its dirty tricks are in sight, so it is not difficult to determine the breakdown. Yes, and it is not required to eliminate her special skills. The main thing in any repair is to understand why it is screwed here and why it turns around when it clicks there. That's all the tricks. And now to the point.
Contents:
Why is it needed and how does the 2110 generator work?
The tens generator is an ordinary commonplace three-phase dynamo. Like an electric motor, just the opposite. The generator is driven by a crankshaft pulley and outputs a rated voltage of 13-14 volts. at least should give. Stop. And therefore, then it is three-phase, if we need a constant +12, and not alternating current? very simple.

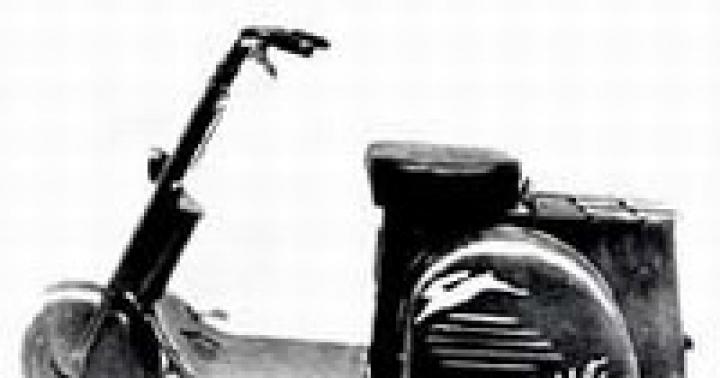
To answer this question, you need to find a grandfather who has a Moskvich 403 in his garage. Look for him when he goes fishing at five in the morning and ask him to open the hood. The nuclear warhead, which occupies half of the engine compartment, is the generator direct current... If grandpa does not leave for a long time, then here is a photo of this generator.
It is natural that modern car, even a dozen, cannot afford such a luxury, to give half of the engine compartment space for a generator, so you have to convert alternating current into direct current. always several times more compact. And for conversion to constant, there is a rectifier unit in the generator case itself. It is he who converts the break into the +12 volts we need. A more detailed picture with a generator device for the curious here,
but for now we will talk about malfunctions, mechanical malfunctions that can take a car enthusiast by surprise.
Possible malfunctions of the VAZ 2110 generator
We will leave electrical breakdowns of the generator aside for now, not the time now, but talk about its mechanical part. With an electrician, everything is clear for two reasons: if the generator does not give a normal charging current, the rectifier unit or the relay-regulator, which is also screwed to the generator, is to blame. But with mechanical damage to the device, everything is a little more complicated, and here's why.
It would seem, what kind of damage is there - two bearings, and that's it. In fact, in order not to do a bunch of unnecessary work, you need to identify the malfunction correctly. A bearing, when it is about to jam or crumble, will first make some noise for several hundred kilometers, but the problem is that there are many such bearings under the hood, each of them can make noise.

Replacing the bearings of the VAZ 2110 generator is carried out only with one hundred percent certainty that the bearing is noisy. The belt tensioner pulley can be confusing in the first place. he also makes similar sounds, and even squeaks as if the belt is slipping. Therefore, it is worth checking it first. If, nevertheless, there is confidence that the bearings are howling, we will change, but first, let's not forget a few rules:
- repair of electrical equipment is carried out only with removed terminal Battery;
- it is not allowed to operate the generator without load;
- when welding, both terminals are removed from the battery.
Features of replacing generator bearings

In principle, the replacement of bearings would not have caused any difficulties that would cause panic if the economical AvtoVAZ had not made another economical saving. From the point of view of engineering logic, their action is quite difficult to explain, the point is this. The generator has two bearings - front and rear. to replace one of them, it is enough to remove the diode bridge, and the bearing is in our hands. The second bearing is pressed into the cover, and according to the manufacturer's recommendation, it only needs to be replaced with the cover together. Good deal. the factory saved on the unfortunate retaining ring, and we also have to buy the cover. Dudki. Let's change only the bearing.
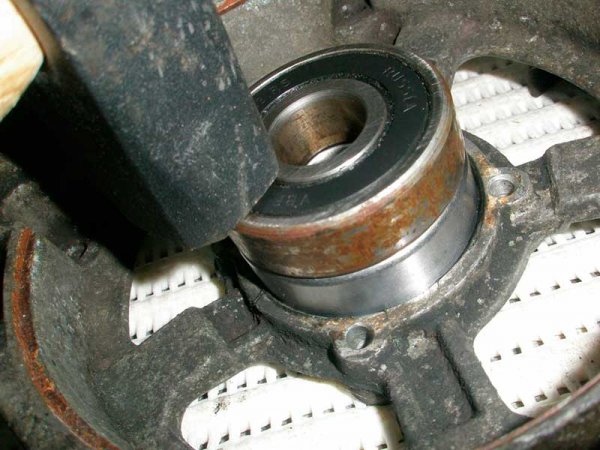
To do this, removing the generator from the car, which should not cause difficulties, remove the cover and make sure that the bearing is expanded with radial impact punching. Apparently, this is how they decided to deal with the rotation of the outer cage and save on the spring stopper. Now the task is to knock out the bearing without damaging the cover. To do this, you need to take a drill with a diameter of 3-4 mm and drill the floor with an angle of 45 ° into the rivet itself. Now, knocking the bearing out of the seat, we will not damage the cover, because the excess metal will simply go into the drilled holes.

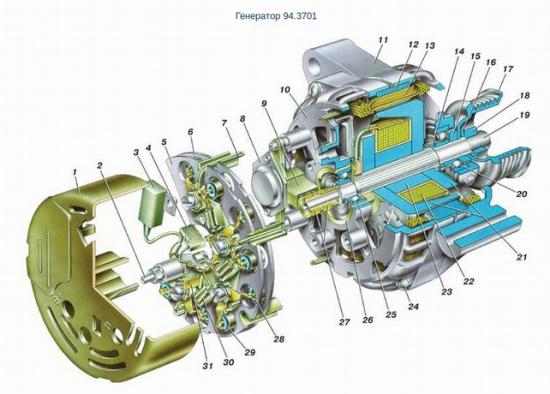
A device designed to convert mechanical energy of rotation into electrical energy. It consists of a stator and a rotor, on the shaft of which 2 bearings are pressed.
Replacing the bearings of the VAZ-2110 generator and other front-wheel drive models of the Togliatti automobile plant is generally similar, despite the fact that the units themselves may have some differences.
You can perform the replacement procedure yourself. This will require:
- Set of wrenches;
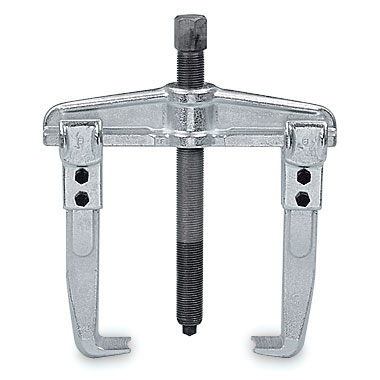
- Pulley puller;
- Vice;
- Hammer;
- Pliers;
- Extruders (pieces of pipe of a suitable diameter).
The replacement procedure on "viburnum" cars and other VAZs should be performed when squeaks and rattling appear in the generator, jamming of the rotor shaft or its noticeable lateral backlash. Performing the manipulation at home takes about 2 hours on average. 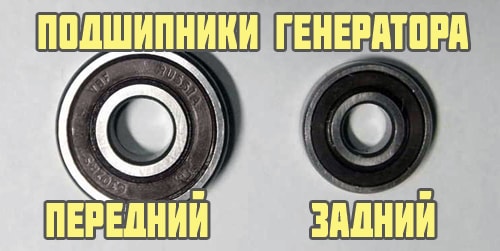
Most often, it is planned to replace only the front bearing, which has a larger diameter. However, after dismantling, it turns out that the rear element also needs to be replaced. In this case, the complexity and operation time increases, since it becomes necessary to completely disassemble the unit.
Dismantling the generator
Replacing the bearing of the VAZ-2109 generator and cars with similar generators requires dismantling the power source. This requires:
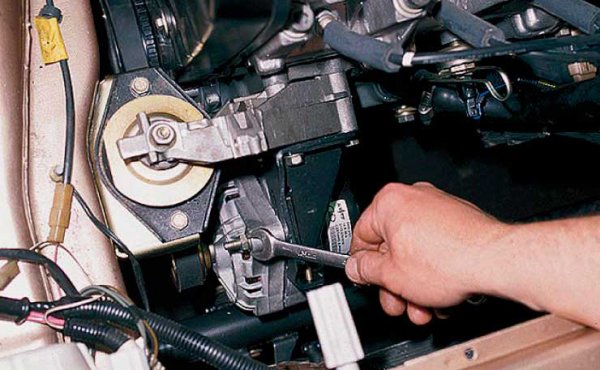
- Loosen the tension of the drive belt by loosening the adjusting screw and the upper fixing screw;
- Remove the drive belt;
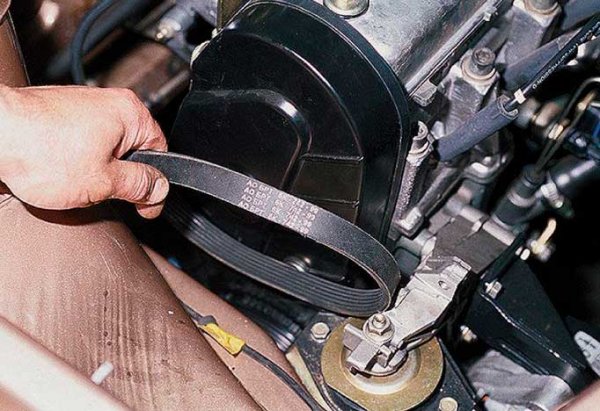
- Unscrew the adjusting bolt with a 10 key;
- Unscrew the upper fixing bolt with the key "13";
- Unscrew the bottom fastening bolt with the “17” wrench;
- Remove the generator.
Important! You can perform work on replacing the generator bearings on a flat surface. However, for the convenience of unscrewing the lower bolt, it is recommended to hang the front of the car on stands.
 After removing the unit, it is required to disassemble it.
Disassembly
When performing the procedure for replacing one or both bearings of the VAZ-2114 generator, disassembly begins with dismantling the pulley. To do this, use a 24-inch key-head with an internal insert. The latter is necessary to fix the pulley itself from turning.
It is better to grip the body of the device itself in a vice. After loosening the nut, the pulley is removed with a puller. In the absence of a special puller, the pulley can be removed by evenly tapping on all sides with a hammer (through a soft metal drift). The method requires a certain amount of care. 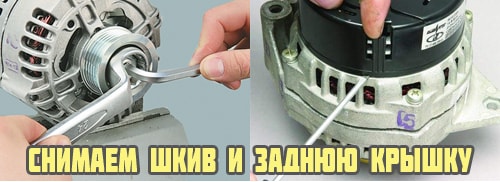
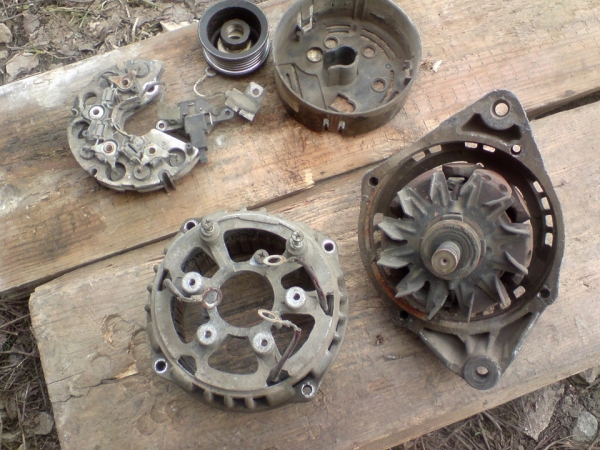
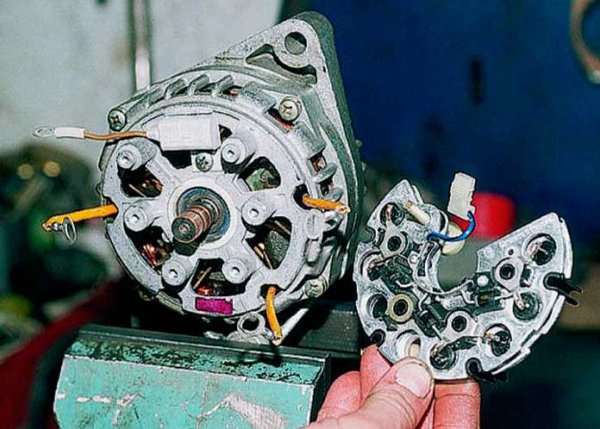
After removing the pulley, it is necessary to remove the plastic cover at the rear of the housing, dismantle the diode bridge and other units, unscrew the 4 bolts holding the two halves of the housing.
After the bolts are unscrewed, it is required to remove the front cover of the generator. When it "sticks", you can gently tap the front of the unit with a light hammer. The lid will come off and can be easily removed. If only replacement is required front element, the disassembly ends there.
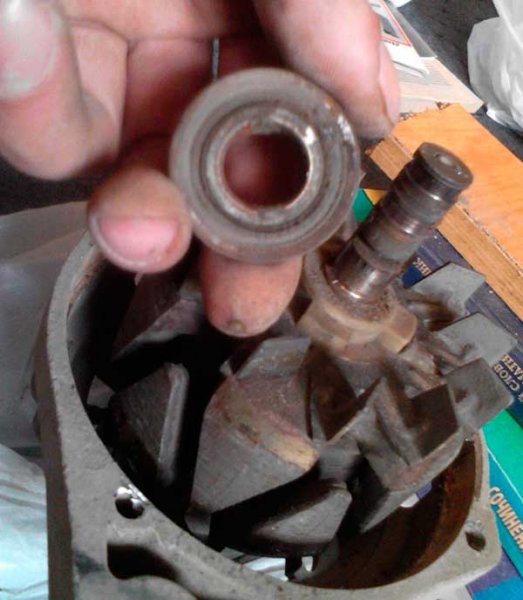
To dismantle the rear pivot element, remove the rotor from the housing, remove the plastic retaining ring and remove the rear bearing. For this, the same puller is used as in the previous case. 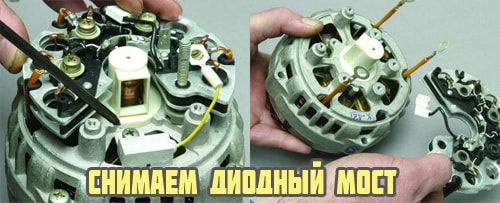
The front bearing of the generator is located in its cover. For extrusion, it is better to use a piece of pipe that coincides in diameter with its outer ring. The pipe is installed on the ring and the faulty element is removed by tapping with a hammer. Pressing in a new bearing is carried out in the same way. For better fit, the part can be treated with graphite grease.
The rear bearing is pressed in, placing a puller on the inner ring. Hitting the outside will damage it. The rotor shaft must not be clamped in a vice. It is better if at the time of pressing it is installed on a soft wooden surface. 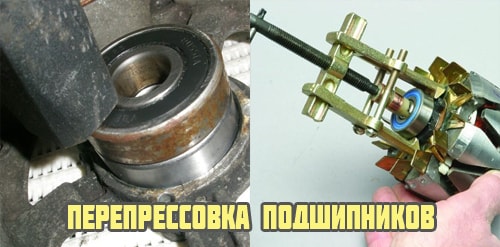
Generator assembly and installation
The assembly and installation of the generator is carried out in the reverse order. When tightening the fastening bolts, it is permissible to lubricate them with graphite grease to avoid complications during the next disassembly. In parallel with the bearings, "brushes" are usually changed. The belt tension is set with an adjusting bolt or pry bar.
In the latter case, the unit is deflected from the engine, after which it is fixed in a given position. After replacing the generator bearings on the VAZ-2112 and other cars, the belt is tightened so that the characteristic whistle is not heard when the engine is running.
The replaced bearing has a service life of about 100 thousand kilometers.
Some novice motorists are sure that the source of energy in a car is exclusively the battery. But this is not the case. Task battery consists in supplying the necessary current in order to start the engine, to give power to the starter, so that it cranks the crankshaft.
The engine starts, and at this moment the electrical equipment begins to be powered by the generator. The quality of operation of electrically dependent equipment and timely recharging of the battery depend on the generator. In the event of a generator breakdown, the entire load is transferred to the battery. Once it is discharged, and the whole car will be left without power.
In almost 90% of cases, generator failure is associated with its bearings. Therefore, we will talk about them in more detail today.
When replacement is required
If you hear a creak and a howl while the generator is running, then you have discovered the main symptom of bearing failure. The only correct solution is a replacement.
Squeaking and howling occurs due to the fact that lubricant disappears in the bearing cages, they wear out, and are destroyed as a result of prolonged operation under heavy loads.
Sometimes a subtle creak can be heard from the side of the generator, which is often confused with bearing failure. In fact, it can be a timing belt roller or a water pump. So just remove the belt to make sure. If the sound persists, then the bearing is the culprit.
What to use
Before you start replacing bearings on the generator, you need to determine what elements are on your car, as well as what they can be replaced with.
|
Bearing |
Number |
|
|
Old generators |
New generators |
|
|
Front |
||
Pay attention when choosing bearings to hub manufacturers. For VAZ 2110, bearing hubs are produced in the city of Samara and marked with SPZ-4. But there are also Vologda and Saratov hubs with markings of 23 GPPs and 3 GPPs, respectively. It is not recommended to purchase bearings with unmarked hubs, and even more so to use Chinese generator elements.
Dimensions (edit)
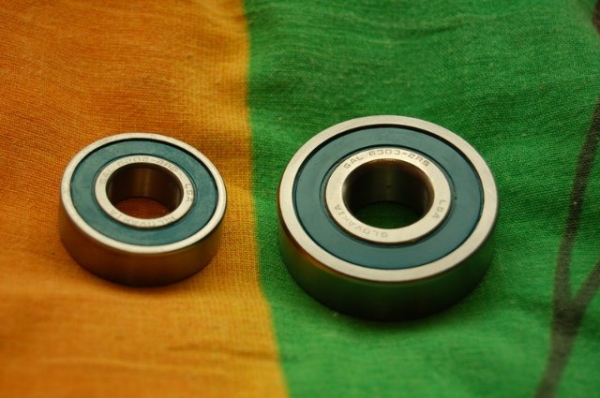
It will not be superfluous to know what dimensions the standard front and rear bearings of the generator should have for your "dozen" in order to make sure that you have chosen the right parts.
The rear bearings of the new design, marked 6202, have the following dimensions:
- Inner diameter - 15 mm
- Outside diameter - 35 mm
- Width - 11 millimeters.
For front bearings marked 6303, the dimensions are:
- Inner diameter - 17 mm
- Outer diameter - 47 mm
- Width - 14 mm.
Based on the size, you can understand why the rear and front bearings are often referred to as small and large, respectively. It is easy to visually distinguish them from each other, therefore you will definitely not mix up the elements in places when replacing them.
Replacement
The procedure cannot be called complicated, but here it is very important to strictly follow the instructions. Based on our recommendations, as well as video tutorials, you can make a replacement yourself without any problems.
You have already learned about which bearings are on the VAZ 2110 generators, you have purchased a set of new spare parts, so you can start repairing.
Front bearing
- Slightly loosen the fixing nut on the generator, and also loosen the adjusting bolt.
- Reset the alternator belt and start the engine. This will allow you to verify that the problem is with the generator.
- If the noise is gone, then move on. There is still a lot of work ahead of you.
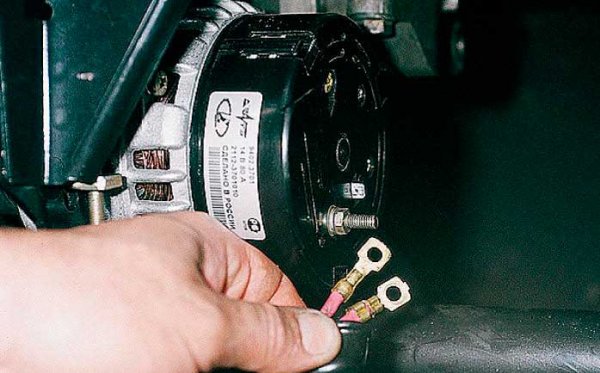
- We pass to the storage battery, from which the negative terminal should be removed. This is important from the point of view of safety and protection against accidental short circuits during the repair process.
- When the terminal is removed, unscrew all wires going to your generator.
- If you have a crankcase guard, unscrew the mounting bolts and remove it. This will allow you to reach the bottom generator mount and remove the device. Remove the generator by inserting it through the engine compartment.
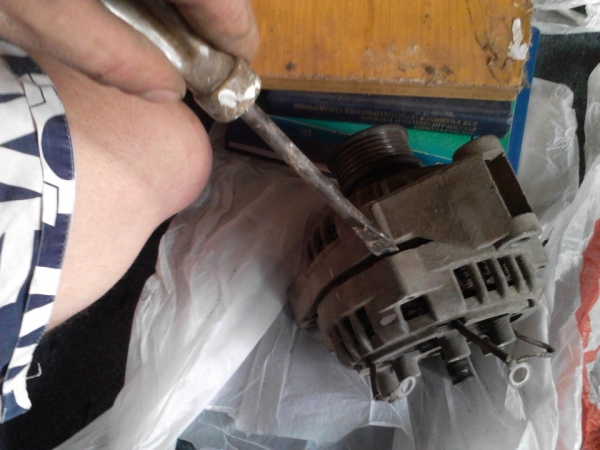
- Using an ordinary screwdriver or other handy tool, you need to block the generator rotor and then unscrew the pulley.
- The next step is to find special latches. By pulling them to the side, you will be able to dismantle the device case.
- Next, the generator brushes are unscrewed, as well as the fastening bolts holding the halves of the generator assembly. There should be 4 of these bolts in total.
- We recommend that you mark both halves of the generator housing to avoid problems during reassembly.
- Use a flat screwdriver to pry up the cover and remove it.
- Practice shows that it is more convenient to remove the rotor from the bearing of the front cover in the following way. A nut is taken and screwed onto the rotor thread. Then hit the hammers under it, first substituting a wooden block.
- Find a part that matches the diameter of the bearing to be removed. For example, a 27mm head might work just fine.
- Gently start tapping on the element so that the bearing comes out of its seat.
- Take a new bearing and prepare for re-installation.
- The first step is to treat the new bearing with grease so that it will last as long and reliably as possible.
- To install a new component, you need an old bearing. Place it on top of the new device and install it with light hammer blows.
That's it, the front bearing has been removed and replaced. We pass to the back.

Rear bearing
- To dismantle the rear element, you need a special puller;
- In the absence of a puller, you will have to knock out the component with a chisel. Alternative option- this is a metal rod and a powerful, sturdy screwdriver;
- The selected tool hits the bearing with a hammer. Here it is imperative to move along the surface, moving in the opposite direction;
- Some easily cope with dismantling, use a regular strong open-end wrench;
- Now take the head with which you removed the front bearing and the old removed generator element. With their help, he is hammered into his own seat new bearing;
- If you don't like this method, use a pipe wrench or metal pipe that matches the diameter of the rear bearing.
After finishing the work, you just have to assemble the node, the steps are in reverse order. Start at the front cover of the generator, followed by all other components of the assembly.
If you carefully study the instructions, watch training videos, understand the device and the principle of operation of the generator, replacing its bearings will become quite simple for you. repair work which will take no more than an hour of your time.
After completing the replacement, be sure to check the machine for noise. If done correctly, the next bearing change operation will not be required soon.
Sooner or later, the owner of a VAZ 2110 car will have to change the bearings on the generator, since all parts wear out over time. Of course, bearings can be replaced in a car service, but this service is not cheap. Meanwhile, you can change the bearings with your own hands. We will talk about how to make the replacement correctly in this article.
The purpose of the bearings of the VAZ-2110 generator
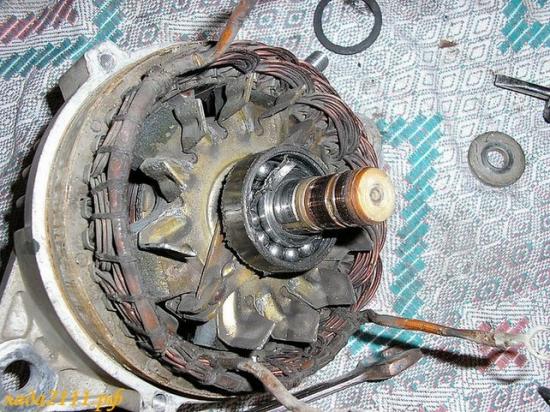
Front and rear bearings of the VAZ 2110 generator
It is simple: to ensure smooth and uniform rotation of the generator rotor. Both bearings, front and rear, are located under special covers. And you can get to them only after dismantling the generator and removing the protective covers.
When should you change?
If the car's generator starts to creak and howl during operation, this is the main sign that the bearings need to be urgently replaced. Howling, as a rule, occurs due to the lack of lubrication in the separators of these parts. Alternatively, the bearing cage may simply fail due to wear or fatigue.
There is one nuance here that should definitely be mentioned. Sometimes a VAZ 2110 from the generator area does not hear a howl, but a thin, barely discernible creak, which the car owner may take for the creak of a failed bearing. But most often it is a pump creaking or this sound is made by a roller on the timing belt. To understand that it is the generator bearing that creaks, the belt should be removed. If the sound persists, then the problem is in the bearings.
What types of bearings are in the top ten: numbers and sizes of parts
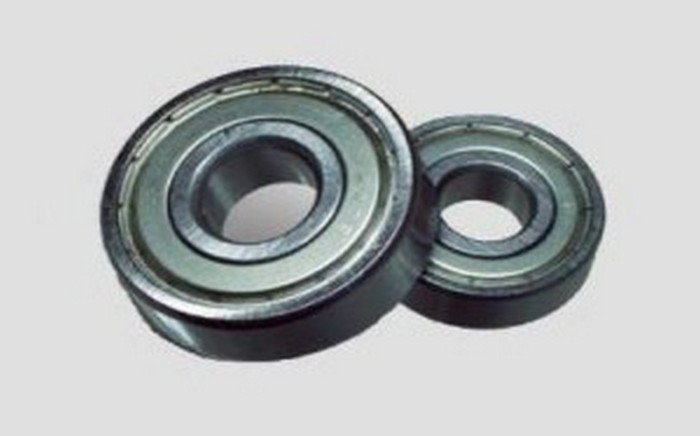
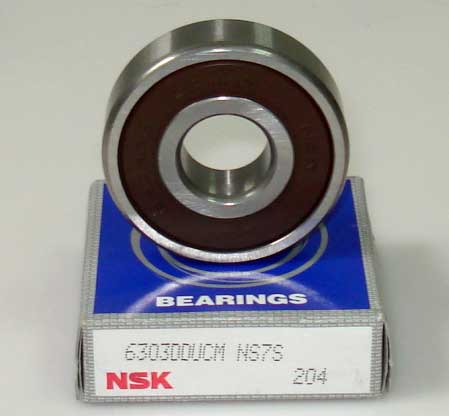
Bearings in generators of VAZ 2110 cars of a closed type, ball, single-row, have a double-sided seal.
- Front marking - 6202 2RS (in domestic catalogs under the number 180202).
- The rear bearing is 6103 2RS (aka 24940220).
An important point: when choosing bearings, special attention should be paid to the manufacturers of their hubs. Typically, VAZ 2110 bearing hubs are manufactured in Samara, their marking is SP3-4.
Also on the market you can find the hubs of 23 GPPs (this is Vologda) and 3 GPPs (this is Saratov). It is strongly discouraged to buy bearings on which the hubs are not marked. Also, you cannot buy Chinese generator bearings, which are now ubiquitous, since the quality of these bearings does not stand up to criticism.
DIY replacement tools
- Generator bearing set (front and rear).
- Open-end wrench set.
- Flat blade screwdriver (medium).
- Hammer.
- Vise.
- Puller for alternator pulley.
Sequencing
- The positive terminal of the car battery is disconnected.
- Now it is necessary to remove the timing belt, for this, using a 13 open-end wrench, the fastening nut is unscrewed, after which the fixing bolt is unscrewed from the tensioner with a 10 open-end wrench.
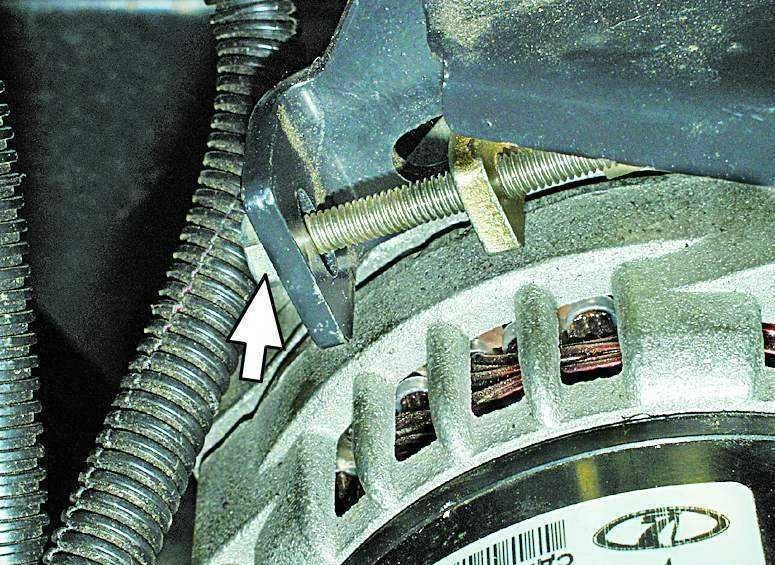
The arrow indicates the location of the alternator tensioner mounting bolt
- All wires are disconnected from the generator, then its lower fastening is unscrewed with a key of 13, the bolts are removed and the generator is removed from the car.
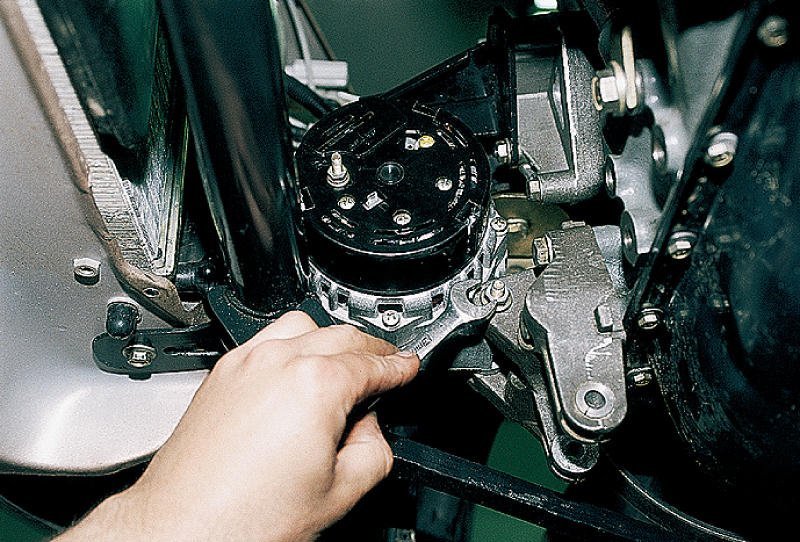
Removing the bottom generator mounting
- The next step is to disassemble the removed generator. A key is taken for 24 and the generator pulley is unscrewed. Unscrewing it is not so easy, so it is best to use a vice.
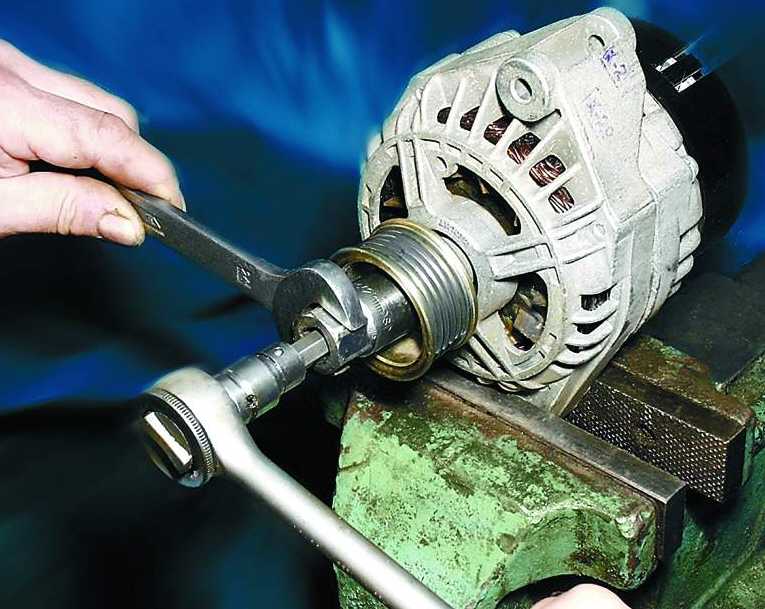
It is more convenient to unscrew the generator pulley in a vice
- After the pulley nut is unscrewed, it must be removed from the generator axle. To do this, you should use a puller, which can be purchased at any auto parts store.
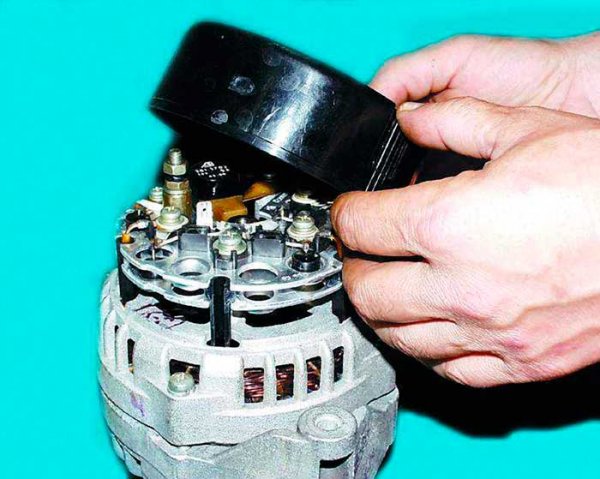
- After removing the pulley, you can proceed to disassembling the case, but before that you need to remove the brush holder, voltage regulator, capacitor and diode rectifier. All this is under a plastic cover.
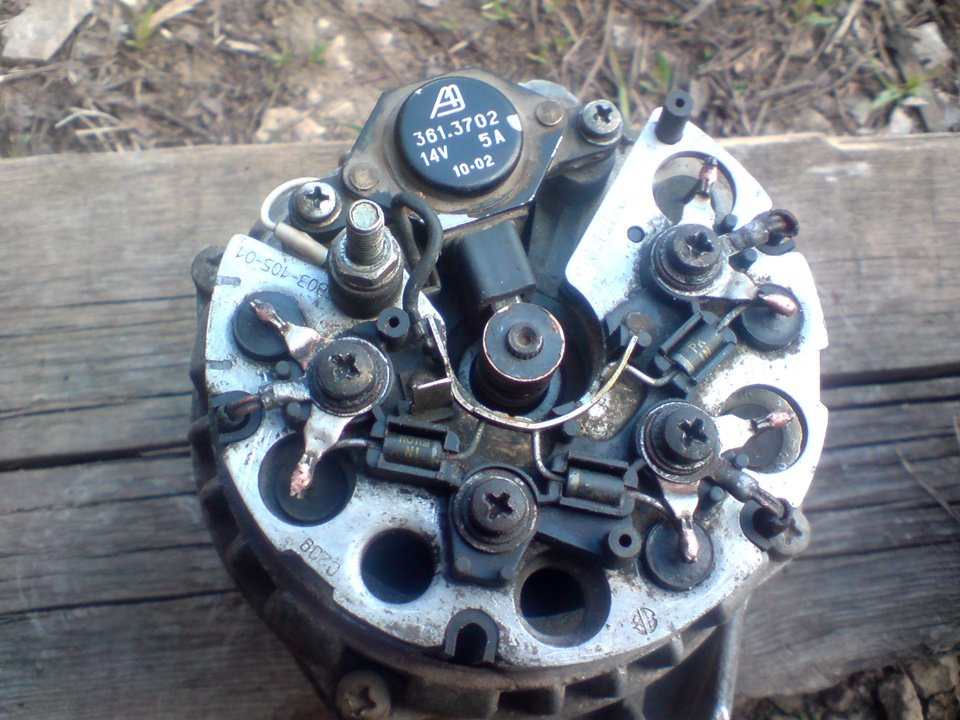
It looks like a VAZ 2110 generator without a brush holder
- To disassemble the case, you will need to unscrew 4 mounting screws. It is they who hold the 2 parts of the body together. It is not always possible to unscrew these screws, since they are often literally welded to the body. So before unscrewing them, it makes sense to take special liquid(best of all - WD40), fill in these screws and wait a little.
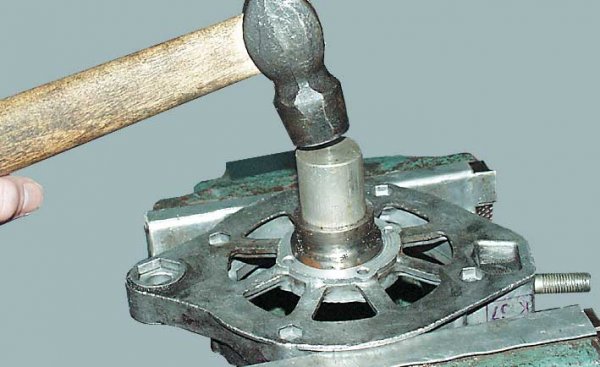
- After removing the screws, the front generator cover can be removed. It is into it that the front bearing is pressed. In order to remove it from there, you will need a mandrel, the diameter of which is slightly less than the diameter of the outer ring of the bearing (a piece of pipe of a suitable diameter is suitable as such a mandrel). The pipe is installed on the ring and the bearing is knocked out of the cover with several hammer blows.
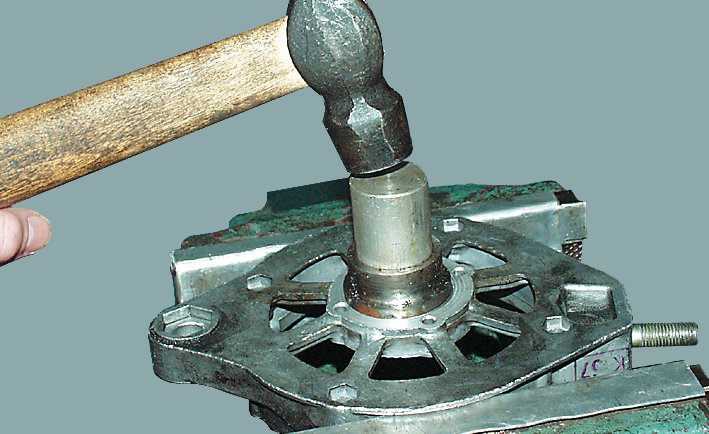
Pressing out the front bearing of the VAZ 2110 with a mandrel should be done without unnecessary efforts
- A new bearing is installed in the vacant space and pressed in using the above mandrel and a hammer.
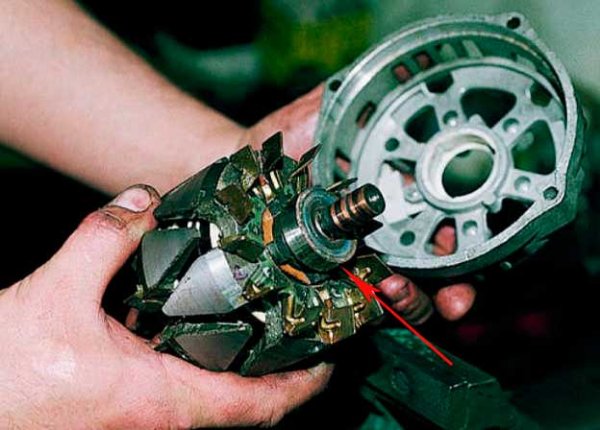
- The next step is to replace the rear bearing. To replace it, you will have to remove the stator from the generator. Then the plastic support of this bearing is pushed outward (this can be done with your fingers) and removed from the rotor. Only then will it be possible to reach the rear bearing.
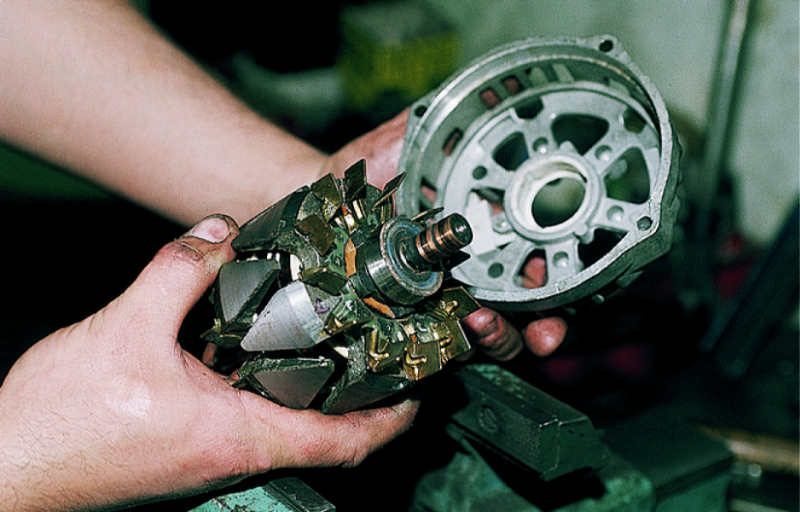
The generator rear bearing will only be accessible after removing the rotor
- You can remove it from the pulley with the same puller that was used to remove the front bearing. After the bearing is removed, a new one is pressed in with a hammer and a mandrel, but the diameter of the mandrel must match the inner, not the outer, ring of the bearing. Damage to the outer ring should be avoided in every possible way. In addition, it is categorically impossible to clamp the generator rotor in a vice when pressing in the rear bearing: the rear of the rotor is very soft, and from the vice, scuffs form on it, which can interfere with the correct assembly of the generator.
- Ideally, the rear bearing on the rotor should be mounted using a hydraulic press. If this is not possible, the rotor must be placed on a wooden surface during pressing. And on the thread (on the one along which the rear pulley is screwed onto the rotor), it is imperative to screw some kind of nut. This will protect the threads from damage (these threads are also very soft, like the rest of the rotor).
- After the rear bearing is pressed in, the alternator is reassembled.
How to change: a step-by-step video tutorial with the master's comments
The conclusion from today's article is simple: if the bearings in the generator whistle, they must be replaced, and immediately. Because not only they can fail, but the entire generator. One day it will simply jam, its rotor will stop rotating, and the fragments of the scattered separator will damage the generator windings. And such a breakdown cannot be restored. The entire generator will have to be replaced, and this is a very serious amount of money.
Every car owner has a moment when a hum or squeal starts to come from under the hood when the power plant is running.
This phenomenon is usually caused by bearing wear. Most often, this problem occurs with the idler pulley or generator.
High rotational speeds and loads lead to wear on these components.
Elimination of the problem of increased noise from under the hood comes down to replacing worn-out elements.
But first you need to figure out which element's bearings create noise and need to be replaced.
It is not difficult to make a check, you just need to loosen the tension on the alternator belt, remove the belt and start the engine. If the noise stops after removing the generator drive, then it's time to change the bearings.
Malfunction symptoms
The main sign of generator bearing wear is the appearance of a distinct noise when the rotor rotates.
Usually, the bearings begin to make noise due to insufficient lubrication, mechanical damage (destruction of the separator, severe wear of the tracks) or due to the rotation of the outer race in its seat, although this happens very rarely.
It is believed that in the absence of lubricant, it is enough to lay a new one to get rid of the problem.
But this is not always the case, the operation of this element without lubrication is accompanied by intense wear, therefore, after laying a new lubricant, the noise may stop, but not for long, the bearing will fail very quickly.
In any case, if problems are found with the generator bearings, it is better to replace them immediately.
The design of the generators is practically the same, so the sequence of work will be the same for generators of other cars.

What bearings are needed?
Before starting work, you need to buy new bearings. In general, the manufacturer recommends replacing the front bearing (the one on the pulley side) along with the cover. But in this case, the cost of repairs will increase, and significantly.
It will be cheaper to simply replace the components without a cover. Going to a car shop, you need to remember or write down the dimensions of the elements that you need.
It is important to note that on earlier VAZ-2110 models, bearings with numbers were installed in the generator: front - 6302, rear - 6202.
On the more modern VAZ-2110, bearings have already been used in the generator: front - 6303, rear - 3203.
Front bearing.
Set: front and rear bearings.
![]()
Required tool
After purchasing new items, you can start work, but to complete them you will need the following tools, devices and materials:
- Open-end and capscrew keys (8, 10, 13, 27);
- Flat and Phillips screwdrivers;
- The puller is universal;
- Marker;
- WD-40;
- Rags;
- Vice;
- Hammer.
Disassembly, replacement
Having prepared everything you need, you can start work. The sequence of actions is as follows:
- We put the VAZ-2110 in the garage or on the site. Disconnect the negative terminal from the battery. Disconnect all wiring from the generator.
- We unscrew the fixing nut and the adjusting screw, completely push the generator towards the motor and remove its belt.

We unscrew the bolts securing the adjusting plate and remove it.
- We take away under the car. We dismantle the front part of the crankcase protection from the car, unscrew the nut of the lower mounting of the generator, remove the bolt and take out the generator.
 All subsequent work is performed on the removed generator.
- We unscrew the pulley fastening nut. This can be done in several ways. The first of them is if a hole for a hexagon is made in the rotor shaft. With the help of a hexagon we hold the shaft, and with a spanner wrench we unscrew the nut.
 If in this way it was not possible to loosen the fastening of the pulley, we use the second method. It boils down to fixing the rotor with a screwdriver. We install it in the slots made in the rotor through the ventilation holes.
 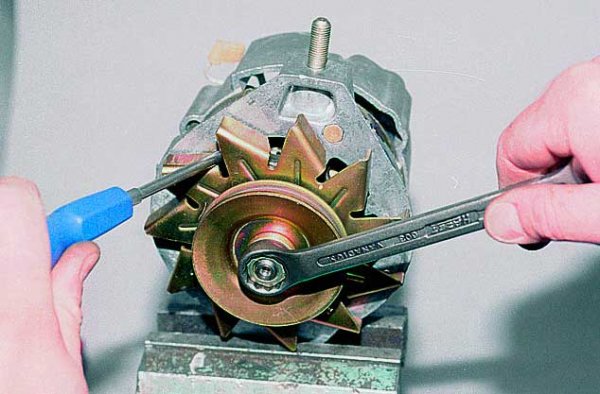 Having fixed the rotor, unscrew the nut with a wrench. If in this way it was not possible to unscrew it, for now we leave attempts and move on to further work.
 - Removes the protective cover installed on the back of the generator. To do this, we pull back the three latches and carefully remove the cover.
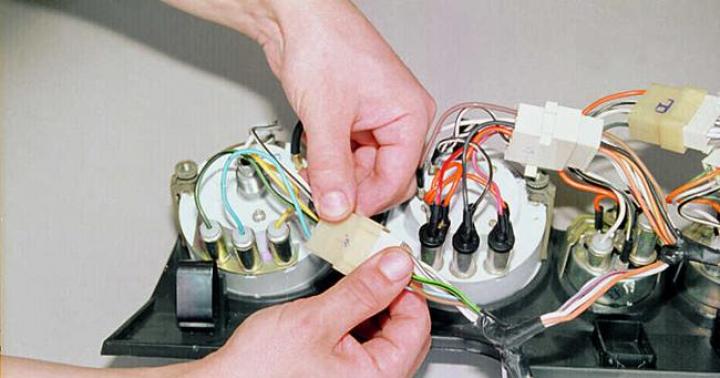
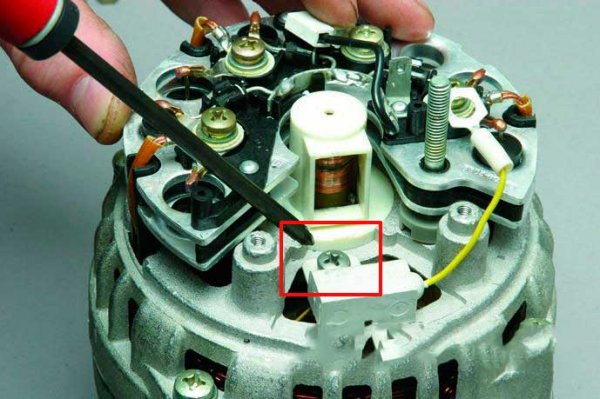
- In order not to damage the generator elements installed in the rear part (brushes, regulator, diode bridge, capacitor) in the course of further work, it is better to remove them by unscrewing their fastening bolts.
- Remove the back cover. It is attached to the front with 4 bolts. In some models, the bolt heads are made for an 8 socket wrench, in others - for a Phillips screwdriver.
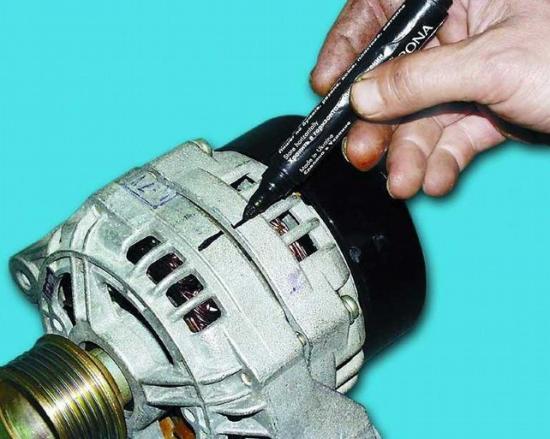
 We fill these bolts with WD-40 beforehand, as they often turn sour. We also mark the position of the back cover to the front with a marker. You can do this in advance.
  Having unscrewed the bolts with a screwdriver, carefully squeeze the back cover and remove it. In this case, the rear bearing must remain on the shaft.
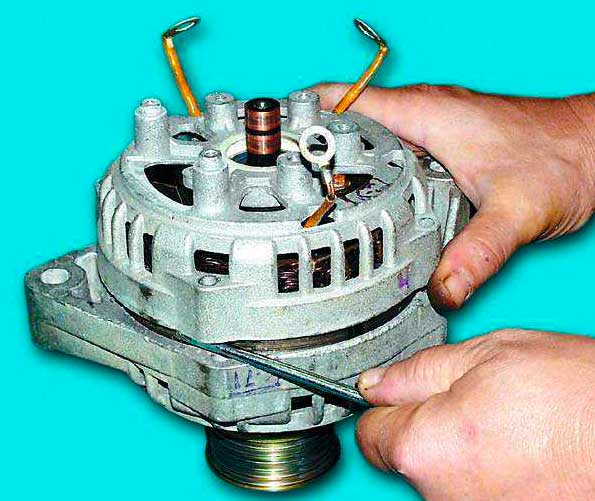
- If before that it was not possible to remove the pulley, after dismantling the rear cover, this can be done by holding the rotor in a vice. If the pulley was removed earlier, knock out the rotor from the front cover. To do this, screw a nut onto the thread of the shaft, holding the front cover of the generator, hit the shaft with a nut on a wooden stand - the rotor should come out of the front bearing. We unscrew the nut and completely remove the rotor.
- We knock out the bearing from the front cover. To do this, we use a pipe segment of a suitable size or a 27-inch head from a set of keys.
 Or with a pipe with a suitable diameter.
 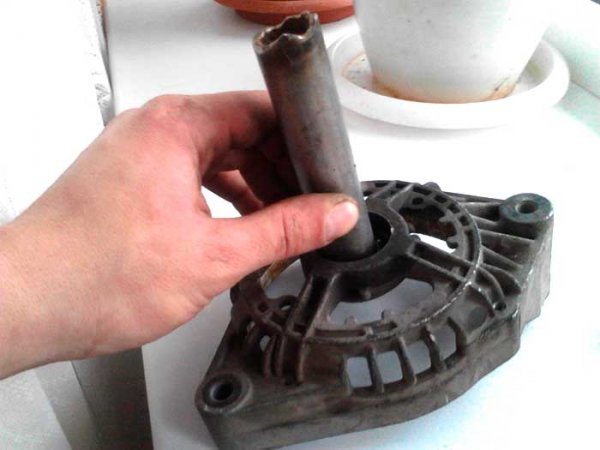 If you immediately purchased a cap with a bearing, it will be much easier.
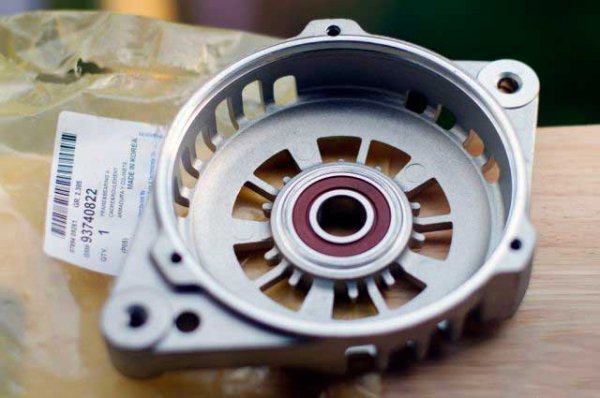
- We lubricate the new bearing and drive it into the seat using the old one. The old bearing is used as a guide, it is hit with a hammer until new item will not completely sit in place.
 After that, we flare the edges of the cover to fix the bearing in it.
- Remove the rear bearing from the shaft. For this we use a puller.
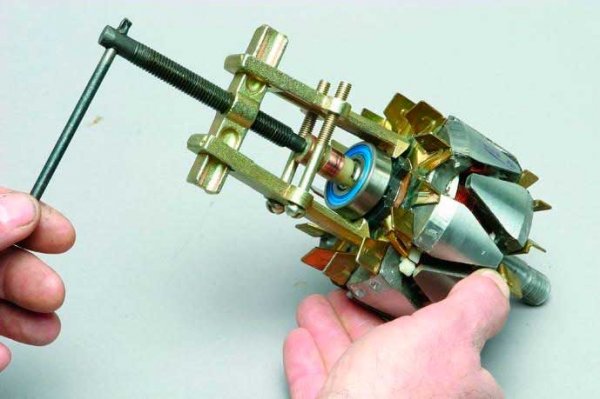 If this is not the case, you can use a regular large open-end wrench. We put one jaw of the key under the bearing, while the rotor will play the role of a stop. We use the key as a lever, inflicting light blows on it with a hammer. The key must be moved in a circle so that when removed it does not skew.
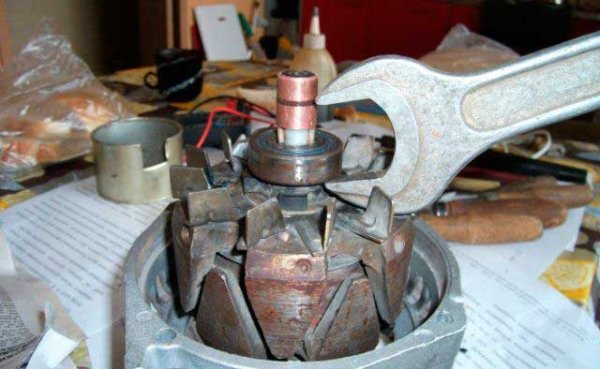
- Having removed or knocked down the rear bearing, we install a new one in its place. We stuff it to its location using a tube or socket wrench. It is important that when fitting, the diameter of the tube or wrench is equal to the diameter of the inner race of the bearing.

- Before assembling, we once again qualitatively coat new bearings.
Assembly
The assembly of the generator is carried out in reverse order. First, we install the rotor into the front cover. Since it will go tight in the bearing, it can be hammered, but only through a wooden spacer.
Then we put the back cover in place, it will also have to be stuffed, and also through a spacer made of wood.

We tighten both generator covers with bolts, having previously installed the back cover according to the marks.
We reinstall the removed elements (regulator, diode bridge, brushes, etc.) and fix them.
With strong wear of the brushes, it is better to replace them immediately so that after a short interval you do not have to climb into the generator again to replace them. We put in place the protective cover.
We install the assembled generator on the car, fix it with fasteners, connect the wiring, check the performance.
If all work is done correctly, it will run silently.
All replacement work takes no more than 2 hours and allows you to completely restore the generator's performance.
If there is a video in the article and it does not play, select any word with the mouse, press Ctrl + Enter, enter any word in the window that appears and press "SEND". Thanks.
IT MAY BE USEFUL.