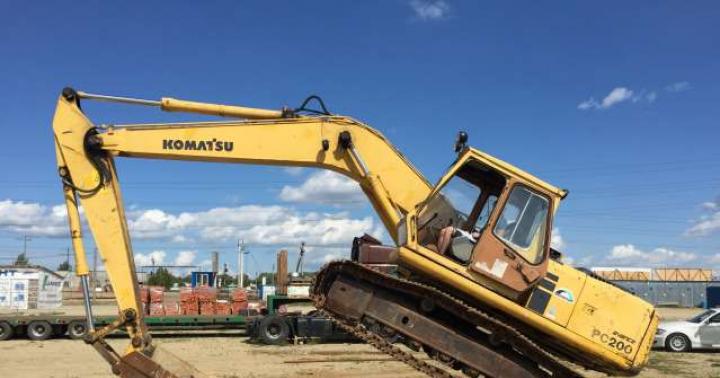
In photo 1, the sewing machine is Lada 237-4. Manufactured in Czechoslovakia. By design, this machine has a programming (copier) device.
Photo 1.
On photo 2, sewing machine Lada 237-1. Look at the stitch length knob, it is the same as for Lada 236 and Lada 233.
Photo 2.

On photo 3, three knobs - left long - Stitch selection, On the upper scale, there is a number indicating the position of the Right lever in the shape of a cross.
Photo 3.

On photo 4, sewing machine programmer Lada 237:
a - in working position, b - bottom view; 1 - body, 2 - lever handles, 3 - plate, 4, 7 - rocker arms, 5, 11, 15, 20, 24 - levers, 6 - hairpin, 8, 21, 29 - springs, 9, 23 - rods, 10 - eccentric, 12 - screw, 13, 16, 19, 26 - axles, 14 - bridge, 17 - stop, 18 - nut, 22. - articulated screw, 25 - body, 27 - cam drum, 28 - leash.
Photo 4.

Principle of operation:
The programming device is mounted in case 1 and is attached to the arm of the machine with three screws. Eight programming cams, on the drum 27, put on the axis 26, receive small turns, clockwise, (during the periods of the position of the needle above the fabric) from the main shaft, through the conical eccentric 10, the shoe and the lever 11. The angle of rotation of the lever 11 is set ( limited) by the lever pin, using the handle 2. After the next rotation of the cams, with the help of the friction clutch, the lever 11, under the action of the spring, returns to its original position, that is, it is pressed against the eccentric 10, and the cams, under the action of the brake device, remain motionless until the next move. To any of the cams, with the help of the stitch axis offset handle, a lever 20 can be brought, which, through the lever 24 and the rod 9, transfers the movements to the left, the rocker arm 7, This changes the position of the stitch axis. In its original position, the rocker arm is returned by the spring 8, and the lever 24, under the action of the spring 21.On the other hand, a lever can be brought to any of the cams by the handle for changing the zigzag width, which is turned clockwise by the cam, and in the opposite direction - under the action of a spring. Handles 2 have pointers opposite the corresponding number on the body. The programming device is turned off by turning the middle knob 2 to the left by zero division. In this case, the lever, under the action of the stud, will turn clockwise and the block will come out of contact with the eccentric. The stitch width and offset from the center of the stitch plate are set with the handles.
On photo 5, View of the car, from the top.
Photo 5.

Disassembly and correct installation of the clutch screw:
The working stroke and winding of the bobbin is carried out by turning, the clutch screw, by 1/3 of a turn. On the head of the Friction clutch screw, there is a screw - it is without a head,
- It is necessary to unscrew it by 4 - 5 half revolutions.
- Now you can unscrew the clutch screw completely.
- By removing the ring, you can pull the flywheel or pulley off the shaft.
- The seat of the pulley, we clean it from rust, so that it shines, with sandpaper. And also, inside the pulley hole. And we grease everything with oil, I - 18 A or I - 20 A (spindle).
Assembly:
- We put on the flywheel in place. It should spin easily.
According to photo 5, we put the ring with the inner antennae, up!
- We tighten the clutch screw.
- We are tightening.
- We tighten the small screw on the clutch screw.
Photo 6.

- If he has nowhere to turn, we disassemble it again - we unscrew the clutch screw.
- We turn the ring 180 * - but with the antennae, still up.
This ring has only one, the correct position, when, when screwing into the clutch screw, a small screw seems to between the outer tendrils, rings, while, without interfering with tightening the clutch screw stronger - including the working stroke of the machine, and when unscrewing, the screw clutch, appeared idling... That is, the pulley rotates and the needle is in place. The outer lugs on the ring are the clutch screw rotation limiters.
On photo 7-1, diagram from the passport of the car, for Lada 237-1.
An addition to the device is the # 1 eccentric cam, mounted on the main shaft, in front of the small gear. And the Levers, one of them, I marked with the number 2. All other mechanisms are exactly the same as on these machines, which are given in the links.
Photo 7.

Blue
To align the presser foot bar with the grooves in the throat plate and possible malfunctions read the article:
On photo 8, shows the installation principle, side reel - holder. In order to be able to fold the machine without disassembling the reel-holder.
It can be telescopic, and with a rod - an axis, under a coil, on plywood. Instead of the bottom nuts, there may be a stand. With screw fixing. All dimensions are shown in photo 9.
Photo 8.

On photo 9, homemade reel - holder when working with reels. It is enough to drill one hole in the table and the lower rod, install in this hole. The most important dimension is 400 mm and the alignment of the rod with the hook.
Otherwise, the thread will jump off or get tangled. Foam rubber, holds tightly twisted loops so that they do not pass from the hook of the stand to the needle. And the fur keeps on the upper villi the thread that has fallen from the spool. This prevents the loop from getting under the bobbin.
Photo 9.

On photo 10, shown in numbers, details of the needle bar mechanism, here are their names:
- Needle.
- Screw for attaching the needle clamp to the needle bar.
- Needle bar.
- Offset frame, needle bar, when zigzag.
The number pointer No. 4 points to the lower needle bar bushing.
- Screw on the needle bar clamp.
For adjusting the needle height!
- Needle bar leash.
- Screw for attaching the leash to the crank.
- Thread take-up.
- Rocker arm.
- Mounting screw, rocker arms, to the machine body.
- Upper bushing, needle bar.
- The rod is connected to the programming device.
This thrust transmits movement from a three-center cam mounted on the pinion shaft.
- Screw securing the rod to the needle bar frame.
- Spring, needle bar return frame. (I don't remember the exact location!)
Photo 10.

For Lada 237-4 and Lada 237-1, adjustment to the needle entry and exit should be done only by turning the small gear relative to the main shaft. Well, in 12 years of practice, I did it only 1 time, and then only to improve my skill. And not because there was a failure.
On photo 11, the shafts from the bottom of the Lada 237-1 machine are shown; Lada 237-4. Lada 236 and Lada 233.
Photo 11.

These are the names of these shafts. And on photo 12 their location.
- Fork Row - Responsible for moving the material.
- Shaft - Responsible for moving the material.
- Rod with a clamp. Responsible for raising and lowering the conveyor shoe.
- Shaft - Responsible for raising and lowering the conveyor shoe.
- Bracket - A finger is inserted into it. From the finger, pull, to the shift knob, to the height of the conveyor block. Platform handle on top! Photo 1 and Photo 2.
- Bracket, with conveyor block.
- Shaft that transfers movement to the shuttle. Through a belt, with braces.
- Carter. In it, the movement is transmitted from shaft No. 7 to the shuttle shaft.
- The shuttle is the same as on class 22 cars; 322 classes; Veritas 8014/43.
- Belt with braces.
Photo 12.

On photo 13, shuttle machine 22 class. Its seat is 7, 2 mm. The maximum outer diameter is 34.5 mm. The maximum hook length is 26.5 mm.
Shuttles industrial machines 1022 and 1022 M also has an outer maximum diameter of 34.5 mm. But the seat diameter is 8.2 mm. Maximum length, both shuttles 26.5 mm.
Photo 13.

On photo 14, seat, shuttle Lada 237-1; Lada 237-4. Lada 236 and Lada 233.
Photo 14.

On photo 15, shuttle machine Lada 237-1; Lada 237-4. Lada 236 and Lada 233. Seat diameter 7.2 mm. The maximum outer diameter is 34.5 mm. The maximum hook length is 26.5 mm.
Photo 15.

On photo 16, the crankcase and on the shuttle shaft, the shuttle is installed, Lada 237-1; Lada 237-4. Lada 236 and Lada 233.
Photo 16.

On photo 16-1, View of the gear that transmits the movement of the shuttle gear. Lada 237 car first release.
Photo 16-1.

On Photo 16-2, the shaft is removed from the machine.
Photo 16-2.

On Photo 16-3, the place of the rupture, crown is shown. The gear teeth are made of nylon.
Photo 16-3

On photo 17, A shuttle with a seat of 8.2 mm is installed in a Lada 236 machine. A "sleeve" made of foil 0.6 mm thick is wound onto the shuttle seat. Such a shuttle also works well. I do not know which plant produced such shuttles. The numbers indicate the details involved in the installation of the shuttle:
- Screw, setting pin.
- Positioning finger.
- Bobbin.
- Bobbin thread guide.
- Leaf spring, cap.
- Crankcase access cover.
- The restrictive thrust sleeve, with two screws, is designed to eliminate the axial play on the shaft, on which the gear is mounted, in the crankcase.
Photo 17.

On photo 18, seat, shuttle, machines Veritas 8014 / 3. The numbers indicate the parts involved in the installation of the shuttle:
- Positioning finger.
- Dowel bolt.
- Shuttle seat.
- Crankcase cover retaining screws.
- Distance, retaining sleeve, on the shuttle shaft.
Designed so that the shuttle seat does not have an axial play.
Photo 18.

Device. Preparing for installation. Installation and exhibition of the shuttle For machines Lada 237-1; Lada 237-4. Lada 236 and Lada 233.
-- --Shuttle device.
On photo 19, the shuttle is shown, it consists of:
- Spring screw, bobbin case.
- Second screw, bobbin case springs.
- Spring, bobbin case.
- Latch, bobbin case.
- Landing axis, bobbin case, in the bobbin case.
- Seat, in the bobbin, for the locating pin.
- Bobbin belt.
- Technological holes.
- Thread guard screw.
- Thread fuse. - I call the plate "Dovetail".
- Seat, bobbin belts.
- Seat, thread fuse. "Dovetail".
- Screws, 3 of them, shuttle attachments to the shuttle shaft.
- Cogs, there are 3 of them, attachment of the patch plate.
- Cover plate.
- Large, technological hole in the shuttle.
- Shuttle nose.
- Thread gripping slot in the bobbin girdle.
- Positioning finger. Photo 6.
- The screw securing the setting pin to the machine body.
- The plate is the body of the locating pin.
- Half hole, for fixing, latch, bobbin case.
- Bobbin thread guide.
- Bobbin. Spool.
- Hole for removing the lower thread from the cap. But the machine works well without threading it.
- Pin shaft, bobbin case latches.
- Cam, handles, latches.
- Cover plate, bobbin case.
- Locking screw, cover plate. Designed to limit travel, cover plate.
- Lock, overlay plate.
- Tongue, slip plate.
- The handle is a latch.
- The spring, against which the tongue rests, of the overhead plate.
- Lock slot in the bobbin case.
- Spring seat in the bobbin case.
- Restriction hole, for cam, handles-latches.
Photo 19.

On photo 20, the shuttle of Lada 237-1 machines is shown; Lada 237-4. Lada 236 and Lada 233.
Photo 20.

Preparing for installation.
Sharpening the nose.
On photo 21, Shown is a shuttle from machine 1022 disassembled.
- Pressure plate.
- Shuttle body.
- Dovetail. Or thread guide plate.
Similarly, shuttles from machines are disassembled:
- 1022 M class.
- 22 classes;
- Lada 236.
- Lada 237.
- Lada 233.
- Veritas 8014/3.
- Veritas 8014/43 and so on.
Photo 21.

On photo 22, sharpening of the spout, shuttle is shown, for all machines with this type of shuttle.
Blunt nose, these are skipped stitches! You can't sharpen from the top and the outside! Otherwise, the shuttle will have to be thrown away! The red lines show the plane to be sharpened! The point of the shuttle must be as sharp as the point of the needle!
Photo 22.

On photo 23, thread guide plate, shuttle. - " Dovetail". The needle broke - a notch. Shuttle jammed - notch.
The red lines show the places where the notches are formed. If there is at least one notch on this edge, the machine will tear the upper thread, even when sewing thin fabrics.
Photo 23.

Elimination method.
When at least one notch appears, it is necessary to remove a layer of metal, along the entire length of this rib, to the depth of the notch. Then walk, with polishing sandpaper, or even better, polish, on a felt wheel.
At the place where the notch appears, an experienced mechanic will immediately tell you what happened to the machine. For frequent thread breaks, look here!
Shuttle installation and exhibition.
Pay attention, in photo 24, to the position of the adjusting pin! The gap between the bobbin and the locating pin must be at least 0.8 mm! If less, the upper thread will break! And the finger should rise above the top of the bobbin by 1 mm! If the top of the locating pin is flush with the top of the bobbin, it will loop on the bottom of the fabric! And the upper thread will not be adjusted by the upper thread adjuster. But with a strong compression of the plates, it will simply break off. Setting pin, can be bent 1 - 2 mm up and down!
Here is the procedure for installing the shuttle:
- Remove the throat plate.
- Remove the transport block.
- Place the machine on the back wall.
- Loosen the hook fastening screws, (Photo 15) so that they do not look out, along the inner diameter, of the seat - in the shuttle.
- On the landing axis of the shuttle, put on the shuttle, photo 19.
- Loosen the screw that secures the adjusting pin photo 41.
- Put on the axle, shuttle.
- By photo 41, install the locating pin.
Insert the screw of the adjusting pin, but do not tighten it!(photo 44)
For a better understanding of the material, I use photographs from a Veritas machine with a class 22 shuttle! In the absence of a photo, from the car Lada 237-1; Lada 237-4. Lada 236 and Lada 233.
- On photo 24 the needle is shown.
- The needle goes down.
- Needle point, level with the outer diameter of the shuttle.
- Shuttle screws are loose. So that you can turn, the shuttle is on the landing axis.
Photo 24.

- On photo 25, the needle remained at the same point as in the previous photo 24. But keeping the flywheel from turning, we turned the shuttle to the right around the axis. The tip of the needle, flush with the imaginary plane of the "dovetail". In this position, we need to tighten one of the screws, fastening the shuttle, to the landing axis.
Photo 25.

- On photo 26, slowly rotate the flywheel towards ourselves. The needle dropped to the lowest point zero (0). Top of the needle hole, flush with the bottom bar of the bobbin.
For all Lada 233 cars; 237-1; 237-4; 236 and so on.
By photo 26, it can be said that the flat of the needle is not parallel to the plane of the shuttle. This is how the needle bar unfolds, only when sewing leather. So that there are no skipped stitches. This car is a seamstress. And such an arrangement of the needle will lead to rapid wear of the nose, shuttle. You need to do the following:
- Check the needle. On the parallelism of the slot on the ampoule, with a flat on the stem.
- Not parallel - replace the needle.
- Photo 10 № 5, loosen the screw.
- Rotate the needle bar with the needle inserted around the axis. So that the flat of the needle is parallel to the plane of the shuttle. And at the same time, the top of the needle hole was flush with the bottom bar of the bobbin.
Photo 26.

- On photo 27, the same as in photo 26, but only with the bobbin removed. The needle is twisted together with the needle bar.
Photo 27.

- On photo 28, shown:
- while slowly rotating the handwheel, the needle, being in the straight stitch position, rose by 1.5 - 1.8 mm.
- And the flat of the needle crossed with the nose of the shuttle. This should happen exactly in the middle of the flat, the needle.
Photo 28.

- On photo 29 the same as on photo 28, only a side view.
- The clearance between the flat of the needle and the nose of the hook should be 0.1 mm.
- The gap between the bobbin and the locating pin is 0.8 -1.5 mm. More precisely, it should enter the groove, half the depth of the groove.
- The top of the spout of the locating pin is 1 mm higher than the bobbin. in this position, we clamp the second screw.
Photo 29.

- On photo 30, turning the handwheel, we observe the exit of the needle from the surface of the shuttle. Corner of the plate. (Photo 23 second notch). Correct position: the arrow shows the screw behind the needle. We wrap the second screw, fastening the shuttle to the axis.
We check all the points three times, after that we tighten the last screw. The previous cogs are tight! To prevent the shuttle from turning during operation!
Photo 30.

On photo 31, The locating finger, in red lines, indicated the edges to be blunt chamfered.
Sharp edges, contribute to the breakage of the upper thread, when pulling the thread, the thread take-up from the hook.
In the bobbin, the locating pin should enter no deeper than half the depth of the groove! If it goes deeper, then when inserting a thick thread into the needle, there may be problems with the upper thread tightening!
Photo 31.

On photo 32, shows the trajectories of the shuttle, with the maximum width of the zigzag.
Photo 32.

On photo 33 right needle prick.
Photo 33.

On photo 34, needle, on the left injection.
Photo 34.

If you have skipped stitches, on the right or left stitch, then this means the gaps are broken. Between the flat of the needle and the point of 0.1 mm! These gaps will also be on a straight stitch in the position of the needle shift, to the right, relative to the center. On the right injection
Upper thread tension dial.
On photo 35. upper thread tension regulator, Lada 236 has the same as Veritas 8014/3
Photo 35.

On photo 36, unscrewed the nut, it is on the right, loosened the screw on the base, by 1-3 half turns. And everything lies unfolded.
- Base. Photos 36
- An axial rod is inserted into the base.
- On the rod, a compensation spring.
- Inside, a pusher rod is inserted. One edge, with plus. L - 27 mm. Diameter 1.8 - 2 mm. It is inside the axial rod, it should walk easily, without jamming.
- An axial rod is inserted into the base, in the place where the slot is made on the base. In case of loss, it is easy to make from a stud of a suitable diameter.
- Compensation spring, slipped onto the axle rod. Axial rod, inserted into the base. And then it turns, at the base, at such an angle that the bottom of the compensation spring does not reach the right stop - 0.5 mm. In this position, tighten the screw on the base! If it stops, the tension of the compensation spring will be strong. And when the nut is loosened, the thread tension will practically not be adjusted.
- Now on the axle, I put on a small washer. It prevents the spring coil from jumping out of the base.
- Now, we put on the first plate on the axial rod.
- Spacer washer, so that you can sew on the machine with two threads.
- The second plate, with the curved part, to the spacer washer.
- Washer with a jumper. A bent jumper, to the side, of a pressure nut. Very often, it is installed back to front.
- Now the big washer, with holes. The concave part towards the base.
- Spring with a wide end to a cylindrical washer, bent, narrow, the end of the spring, into the slot, of the axial rod.
- We tighten the nut.
Here is a list of parts, from left to right:
- Base.
- Axial bar, upper thread adjuster.
- Compensating spring.
- Upper thread regulator pusher rod.
- Slot for cone spring.
- Limiting washer.
- Plate, concave.
- Washer distributor.
- Plate, concave.
- Washer with a jumper.
- Washer with holes in the inner diameter.
- Cone spring.
- Compression nut.
Photo 36.

For all classes of cars.
Adjusting the tension of the upper and lower threads.
The guideline for adjustment is the thread tension, in stitching!
When changing the thickness of the thread, between the plates, tighten the nut, if the thread is thinner, unscrew it. If the thread is tightly pinched, it will break.
If the thread is thicker, unscrew it. Imagine that one full turn of the nut is a watch face.
So, having made a mark on the nut - with a felt-tip pen, you need to tighten it for 15 minutes, a little for another 15 minutes, a lot - loosen it by 7.5 minutes. Then by - 3.25, etc. If knots are visible at the top, in the line, it is the upper thread that is tightly stretched. If we lift the material, then we will see the bobbin thread. If it is free and not pulled into the punctures of the needle, this means that the upper thread is loosely clamped in the plates.
Example:
The bobbin thread is not taut in the bobbin case. This photo suggests that the upper thread must be loosened. That is, unscrew the nut for 15 minutes. Flash! Few? Another 15 minutes. Until a line appears, as in photo 39.
Photo 37.

In photo 38, the upper thread, in discs, is strongly weakened. You need to tighten the upper thread. To do this, tighten the nut for 7.5 minutes! Few? Another 3.2 minutes. Until a line appears, as in photo 39.
Photo 38.

In photo 39, The thread tension is adjusted correctly! But in order to see such a line, it is necessary to tear off the threads from the sewn piece of fabric. And try to slightly separate the upper fabric from the lower one, as in photo 40.
Photo 39.

In photo 40, The thread tension is adjusted correctly! The interlacing of the threads occurs strictly along the axis of the materials being sewn.
Photo 40.

On photo 41, the positioning finger is shown in pencil. And the screw of its fastening.
Photo 41.

On photo 42, the top of the positioning pin is shown. It is located above the bobbin plane, more than 1 mm. This causes the edge of the dovetail thread guide plate to be sharpened. Which will cause the upper thread to break. And to very quick wear of the shuttle.
Photo 42.

For all classes of machines, with this kind of shuttle!
On photo 43, shown because of what, it is not possible to adjust the tension of the upper thread.
- Needle. Right!
- Shuttle nose. Right!
- The top of the locating pin is lower, the top of the bobbin. And it should be 1 mm higher than the top of the bobbin!
- Correct clearance 0.1 mm!
Photo 43.

On Photo 43 - 1, bobbin machine Lada 237 - 1.
Photo 43 - 1.

The sewing machine was brought in for repair, a crown gear breakage, in the crankcase under the shuttle. Two months later, a detail appeared. Replaced. Configured. Checked all kinds of stitches. The machine is equipped with an electric motor.
Selling sewing machine, Lada 237 - 1. Crown on the shuttle shaft, replaced. I set up the car. Here is a photo:
On Photo 44. shows the complete set of the machine. The only thing missing is the top cover, the wooden casing
Photo 44.

On Photo 45. the passport is shown - instructions, cars Lada 237 - 1. Here are all these parameters, the machine is debugged.
Photo 45.

On Photo 46. shows the types of stitches made by this machine.
Description of the settings of the stitch block Lada 237-1
- Set the zigzag width to 4 mm.
- Move the needle shift knob to the left position.
- Photo 46. In the table, choose a line pattern.
- In the left vertical column of the table, choose in which row your drawing is. Your line is Leverage it-
a
- In the horizontal part of the table, select the vertical column of your stitching and set the lever - this is the lever -
v
- The length of your pattern, set with the Lever -
with
(it has values from 0 - 5) - The width of the zigzag, put on 0 mm.
- Needle offset knob, move to position to the right!
Photo 46-0 shows levers with names.
The block setup is complete!

The first three lines are the main patterns on them, a
- in position - 0.
Left - vertical column - in the table - the position of the handle is shown - the offset of the needle.
- - left.
- - Centre
- - right.
Third - vertical - column - above it there is an icon - Zigzag - 0 mm.
The fourth is vertical - there is an icon above it - Zigzag - 2 mm.
First - Top - Horizontal = Icon = Zigzag 0 mm.
Photo 46.

For the purchase of a Lada 237 - 1 machine, please contact. Here is my Email: This email address is being protected from spambots. You need JavaScript enabled to view it. ,
I am in Kharkov!
Hello little asses! As a large part of the local population, I ask for help in choosing a typewriter. Since the end of November I periodically read different topics , and for the last month I have practically not crawled out from behind the computer, since two cars broke down at once. Summer is on the nose, you have to sew. I sew for a long time, already more than 30 years, for myself and family members, but not to say that there are a lot, about 5 to 10 things a year and some little things; things are diverse: from thin blouses to insulated jackets made of raincoat fabric on synthetic winterizer, bed linen, curtains, dolls and clothes for them, I also occasionally sew from coat fabric and jeans (since the figure is non-standard, you have to sew or alter many things bought in the store, well, for fun). First, I sewed on a Czech machine Lada T 237-1 of about 1967 (the machine was with a foot drive, then I installed a motor). The machine, in principle, is not bad, but it is a very capricious regulator of the upper thread tension (which was also discussed by the adjusters). When the machine was in a good mood, it sewed perfectly, in a bad mood, there were only tears, and the thread tension could change during the sewing process, regardless of the quality of the thread, the type of fabric, etc., that is, the machine lived its own life. I tried to clean, regulate, change something, but in vain. After several attempts to fix it, the repairman from the studio suggested not to suffer and buy another one. There was also a donated electromechanical Seagull in a suitcase from the mid-80s with a factory marriage, which left terrible memories. She had 1 nightdress sewn on her and jeans were sewn a couple of times (on the latter she died and there is no desire to revive her). Having suffered a lot, 8-9 years ago I bought an electromechanical Brother Star 50. I did not have the Internet then, I bought a car on the recommendation of a friend who said that she sews any fabrics. At first, it was so, the machine sewed perfectly any fabrics and knitwear, but a month before the end of the warranty period, an electrician suddenly flew. In the warranty workshop, it seems, they repaired, the cause of the breakdown was explained indistinctly, but after this repair the quality of the stitches became worse, it became more difficult to adjust the tension of the upper thread. It's too far from us to drag back to Moscow (120 km to the Moscow Ring Road), and I sewed on it: not bad compared to Lada, but the joy faded somewhat. In the summer of last year, significant problems arose, I took the car to a local workshop, but the foreman said that many parts needed to be replaced, he did not have them and suggested contacting a Moscow service center. In December, the car finally died and I decided that the repair, taking into account the travel, would cost at least half the cost of a new similar car, which means that I should think about replacing it. And here the problem of choice arose in full growth, and taking into account the prehistory, I would like sewing to bring mainly joy, since I love sewing, well, I would have to think about new opportunities.
I reread almost the entire topic, many others, individual topics on the cars that interested me, on malfunctions ... The result is a mess in my head, the characteristics and opinions are messed up, my eyes no longer look at the extracts and compiled tables, so I ask for help. Respected and knowledgeable men of the aspen may also respond.
I will not be original: you need a car that:
1. Qualitatively sews any fabrics and knitwear (jeans 2-3 times a year, occasionally warmed things from raincoat fabric, including difficult to sew, with quilting; there is no overlock yet, but I'm going to buy it).
2. Makes decent loops and quality stitches (I love finishing stitches on products).
3. Has decent decor capabilities (I do not pretend to be global, but my granddaughter is growing and I want to have some choice of beautiful decorative stitches).
4. And most importantly - reliable: wear-resistant and maintainable (for the rest of my life - this is, of course, from the realm of fantasy, but I still want it for a long time) and not capricious - easy to set up so that I rarely need adjustment (I'm not very friendly with technology , rather "on you"), as well as condescending to the choice of threads, because within the range of availability, their choice is very limited.
The budget is a maximum of 25-27 thousand rubles.
Preselection is also mostly traditional:
Astralux R20, Juki F-600 - the latest reviews are somewhat alarming;
Janome 6500, Janome 6600 - seemingly recommended for mini-ateliers, but there is no sleeve platform and I read that they are somewhat capricious;
Husqvarna Emerald 203, Husqvarna Saphir 835 (a little beyond financial capabilities, but you can dig in) - the touch controls and the size of the platform are embarrassing (either too small or too much).
I would like to know which is preferable, taking into account reliability, non-capriciousness and omnivorousness.
I also considered Pfaff Select 4.0, but did not dare, because Nikolay wrote that it requires quite skillful hands in terms of adjustment. Alas, I do not have such.
And a few more questions. As I understood, the lighting of all these cars is LED with cold white light, my eyes quickly get tired of it. Are there any yellow LED bulbs and, if so, can they be replaced?
How much less efficient are the walking feet of the above machines compared to the built-in top conveyor and is the quality of the Astralux R20 and Janome 6600 top conveyor results different?
I also didn't quite understand from the shuttles: which one can still work longer without repair - horizontal or vertical rotary, and is there a difference in cost in case of replacement? Also, are all horizontal shuttles made from the same materials (and in the above machines in particular)?
I am going to go to Moscow this week, maybe I will be able to test the technique live, but I would like to shorten the list a little.
Thank you in advance for your response!
GENERAL INFORMATION ABOUT HOUSEHOLD SEWING MACHINES
The book deals with some sewing machines intended for the population. Podolsk Mechanical Plant produces sewing machines of different classes for the population:
2-M, 100 cl. and the Seagull car.
In addition to the machines of the Podolsk Mechanical Plant, the population acquired other sewing machines of domestic production, for example, "Tula", "Rzhev" ( Machines "Tula" and "Rzhev" with built-in electric motors are called electric sewing machines.), and imported, for example "Veritas". "Naumam", "Keler", "Radom", "Archer", Khosta "," Freya "," Panonia "," Knoh "and others.
Domestic sewing machines were produced with different drives:
manual drive (manual machines) - machines, PMZ (Fig. 1, a B C) and "Rzhev" (Fig. 1, d);
with a foot drive (foot machines) - PMZ machines (Fig. 2, a, b);
driven by an electric motor (Fig. 3, d, b, c)- machines PMZ, "Tula" and "Rzhev".
Imported sewing machines also come with different drives. For example, machines "Archer", "Chepel" can be with manual or foot drive, machines "Nauman", "Veritas", "Tikka-Khosta", "Keler", "Knokh", "Lada" 236 cl. and "Lada" 237 cl. - only with a foot drive, the "Radom" machine - with a foot drive or an electric motor drive. Cars "Lada" T-132 class. and "Lada" T-132-2 class. and the Freya car is only electrically driven.
All sewing machines listed above can sew, embroider and darn. Moreover, the usual straight two-thread stitch can be sewn on all machines, and with three-thread and zigzag stitches - only on zigzag machines ( A zigzag machine is a machine that performs a zigzag stitch.). For example, on cars "Tula" (see Fig. 3, b), "Lada" 236 cl. (fig. 4, a),"Kehler" 53-2 class (fig. 4, b),"Radom" 84 cl. rice. 4, v),"Radom" 8b class. (fig. 4, G) etc. On automatic zigzag machines ( Zigzag machines are conventionally called automatics, which have a built-in copier that allows you to mechanically perform various pattern stitches.)
, such as "Kehler" 51-2 class. (fig. 5, a),"Lada" 237-1 class. (Fig. 5,6), "Veritas" 8014/33 cl- (Fig. 5, c) and "Lada" T-132-2 cl. (fig. 5, G), you can make patterned seams using a copier, and on the Veritas 8014/35 - a software one.
Fig. 1 Domestic sewing machines.

Rice. 2. Domestic sewing machines with a foot drive: a - PMZ 1, b - PMZ 2

Rice. 3 Domestic cars driven by an electric motor:
a - PMZ; b - "Tula"; c - "Rzhev"
All machines are supplied with various additional presses and accessories, with the help of which you can facilitate and speed up the process of sewing stitches and seams and perform them more accurately.
Stitches and stitches such as regular straight stitch, hemming, linen and other seams can be made on any household sewing machine, and such as three-thread stitching, embossed seams, as well as buttonholes, button sewing, etc., can perform only on zigzag machines.

Rice. 4 Imported zigzag sewing machines:
a -"Lada" 236 cl. with foot drive; b - "Kehler" 53-2 class. with foot drive; v -"Radom" 84 cl. with foot drive; G- "Radom" 86 cl. with electric motor

Rice. 5. Machine with automatic equipment:
a - "Keler" 51-2 class, b - "Lada" 237-1 class; c - "Veritas" 8014/33 class; g - "Lada" T-132-2 class.
Some stitches and seams (for example, hemming) can be sewn using the normal presser foot, while there are seams that can only be sewn using the special presses supplied with the machine or purchased separately.
What stitches and seams, what paws or devices are more convenient to perform and how to use the paws and devices, is described in chapters II and III of this book.
All household sewing machines are designed for sewing products from various fabrics: cotton, woolen, silk and non-woven fabrics. Knitwear can be processed on zigzag machines.
On household sewing machines, unlike industrial sewing machines, they do not sew from very thick and dense fabrics, for example, from tarps or coarse wool fabrics.
The advantage of zigzag machines over machines with straight stitches (straight stitches) is that they can be used to overcast seams (fabric cuts), buttonholes and other works that, when done by hand, take a lot of time and are less durable and beautiful. On lockstitch machines, these operations (seams) are not performed, with the exception of overcasting seams when using a special device called a "zigzag" ( All these adaptations have not particularly justified themselves.).
Even more advantages are offered by machines that have built-in automation, a program device or exchangeable copiers.
For a sewing machine to work well, you need to know how to handle it, take regular care of it and be able to adjust the stitching and fix minor problems with the machine.
Improper threading, needle insertion, control levers setting, improper cleaning and lubrication of the machine may cause malfunctions.
The ability to handle the machine will prevent or promptly eliminate minor malfunctions in the machine.
Before starting work on the machine, check:
Is it lubricated enough, is it easy to move, is the foot, needle and throat plate well attached to it;
whether the needle is inserted correctly in the direction of its grooves and in height, whether the thickness of the needle corresponds to the thickness and density of the fabric from which it is supposed to sew;
whether the thickness of the needle matches the thickness of the threads to be sewn. The threads are selected according to the fabric and the nature of the work.
The manual (instructions) supplied with the sewing machine gives a table of the ratio of needle and thread numbers.
Table 1 Selection of needles and threads
Fabrics |
Needle numbers |
Thread numbers |
|||
|
cotton |
silk |
||||
|
Thin silk, cambric. |
|||||
|
Sheet, calico, chintz, satin, silk |
|||||
|
Heavy cotton fabrics, calico, flannel, fine woolen fabrics, heavy silks |
|||||
|
Woolen fabrics, teak |
|||||
|
Thick woolen fabrics, thick teak fabrics, thick trousers and suiting fabrics |
|||||
Some instructions accompanying imported sewing machines, not everything is said about preparing the machine for sewing, or it is said very briefly, so this book provides additional explanations. For example, the instructions do not say that for winding thread on a bobbin in machines "Lada" 236 cl., "Lada" 237 cl. and "Lada" 238 cl. the bobbin is put on the reel spindle and to connect the reel to the flywheel of the machine, press on a special metal bar located above the reel.
If you press the winder, as is done with the machines of the Podolsk plant (PMZ), then the winder in the machines "Lada" class. 236, 237, 236-1, 237-1 and 233 will stop working. How to wind threads on a bobbin on Lada T-132 cl. and "Lada" T-132-2 class. said at the end of the book.

Rice. 6. Winding thread on a bobbin on the Köhler machine.
To wind the thread on the bobbin on the Koehler machine, you need to pass it from the bobbin to the bobbin through the tensioner. In order for the thread to wind on the bobbin evenly and in tight rows, it is necessary to put the spool on the spool pin that is closer to the flywheel 1 (Fig. 6, a), and the bobbin on the spindle (pulley) 2 of the winder. Moreover, the bobbin is put on so that the key 3 (Fig. 6, b) of the spindle 2 enters the slot 4 of the bobbin 5. Next, they lead the thread from the bobbin to the bobbin (Fig. 6, c), wind several turns away from themselves on the bobbin thread. Then take the thread going from the spool to the bobbin, as shown in fig. 6, G, turn it over as shown in fig. 6, d, and the resulting loop 6 put on a tensioner 7 (fig. 6, e). The thread that runs from the bobbin to the bobbin should pass under the thread that runs from the bobbin to the bobbin.
The tensioner for winding the bobbin thread is the screw 7, under which there is a spring. This screw in the Koehler machine is located on the left edge of the cover 8 sleeves of the machine. After that, turn the rod to the left 9, located on the right-hand side of the machine arm cover (see fig. 6, a, f). From turning the rod 9 to the left (fig. 6, g) to the flywheel 1 the spindle will move 2 winder, and with it the bobbin put on it 5.
At the same time, under the sleeve cover, the rubber rim of the winder (winder ring) will move close to the flywheel, i.e. the winder will be connected to the flywheel of the machine. At the same time, the restriction plate (finger) 10
will turn towards the bobbin and enter between its walls (flanges), as shown in fig. 6, f.
When winding the thread onto the bobbin in hand-operated and foot-operated machines, the handwheel must be idle so that the needle does not work when the thread is wound onto the bobbin. To do this, holding the flywheel with your left hand, turn the friction screw 11 towards you (in the direction of the operating) slightly with your right hand (see Fig. 6, f.), as a result, the clutch of the main shaft with the flywheel is opened. Therefore, the main shaft will not rotate during the rotation of the flywheel, and the rubber rim of the winder, which is moved to the flywheel, will rotate and rotate the winder pulley connected to it, on which the bobbin is put on, when the flywheel rotates. The bobbin will continue rotating until it is full. When the bobbin is completely filled with threads, the winder will be disconnected from the flywheel by a special device and the winding will stop.
At the end of winding, the spindle is moved to the left by hand 2
from the flywheel to the end of the slot 12
(see fig. 6, a, g) cover 8
sleeves of the machine. Remove the bobbin from the winder pulley and cut off the thread going from the bobbin to the bobbin.
In sewing machines "Tula", "Rzhev", "Radom", "Lada" T-132 class. and "Lada" T-132-2 class, driven by an electric motor, to wind the thread on the bobbin, the machine is not set to idle, since when the bobbin is put on the spindle, the flywheel is automatically disconnected from the electric motor, so the flywheel of the machine is not touched.
The wound bobbin is inserted into the bobbin case, the thread from the bobbin is passed through it, and the bobbin case with the bobbin is inserted into the machine. In cars "Lada" 236 cl., "Lada" 237 cl. and the "Koehler" bobbin case is inserted from the bottom of the table through the hole provided in the table cover. To see how to insert the bobbin case, open the slide plate of the machine. In the car "Lada" 238 cl. the bobbin case can also be inserted through the hole formed when the slide plate is opened.
To properly thread the bobbin case into the machine, bring it to the bobbin hook of the machine, holding the bobbin up by the latch and holding the bobbin so that it does not slide out of the bobbin case. After inserting the bobbin case into the machine, lower the latch and press the cap until it clicks when the bobbin case is locked on the center pin of the shuttle. To avoid skewing, press on the middle of the cap.
In the bobbin cases (bobbin holders) machines "Rzhev", "Tula" and "Lada" T-132-2 class. no latches. The bobbin holder, with the bobbin in it, for example, in the Tula machine, is brought to the shuttle set of the machine, holding it by the body, and placed on the stand of the shuttle set so that the stop 1 (Fig. 7, a) holder 2 fell into the groove 3 of the bobbin case 4 and did not come out of it until the holder was closed 2 (Fig. 7, b), since when the stop comes out 1 holder from the groove 3 bobbin case, the bobbin case may rotate, its needle slot 5 (fig. 7, v) deviates from the needle slot 6 (see Fig. 7, b) of the carbon plate 7 and the needle will not fall into the needle slot 5 of the cap, but will hit its body 4 (see Fig. 7, c) and will bend or break.

Rice. 7. Inserting the bobbin case (bobbin holder) in the Tula machine
When preparing the machine for sewing, set the required stitch length. If, for example, you need to grind parts from linen or satin, then they are grinded with a stitch with a stitch length of 2 mm. The stitch length on the machine is set with the stitch regulator lever, which in the book will be conditionally called lever 1. The thread tension is adjusted with the upper thread tension regulator (Thermometer).

Rice. 8. Tension regulator of the upper thread of the "Radom" machine
When adjusting the tension of the upper thread on machines "Keler" 53 cl., "Keler" 51 cl., "Lada" 236 cl. and "Lada" 237 cl. it should be noted that these machines, in addition to the general regulator of the upper thread tension, also have upper regulators near the machine sleeve cover.
The upper thread tension can only be adjusted with the general or upper thread adjuster, or both ( How to switch from one tension to another is described in the "Troubleshooting" section.).
If you sew with a regular needle, then regulate with the regulator through which the thread is passed, and if you sew with a double or double needle, then with both regulators, since one of the two upper threads passes through each of them. With two upper thread adjusters, the machine can be threaded with different thread thicknesses (by inserting the appropriate twin needle needles). This three-thread stitch with upper threads of different thickness is used as a decoration of products.
In cars "Keler" 53-2 class., "Keler" 51-2 class., "Lada" 236-1 class. and "Lada" 237-1 class. there are no upper upper thread tension adjusters.
In the car "Radom" 84 and 86 cl. there are two adjusting nuts on the screw pin 1 of the adjuster (Fig. 8) of the upper thread tension 2 and 3 and two pairs of washers (tension plates) 4
and 5.
When adjusting the upper thread tension, turn one of the adjusting nuts. For example, if the thread is passed through metal (light) plates 5,
then the tension is also adjusted with a light metal adjusting nut 2,
and if the thread is passed between the black plastic tension plates 4,
then you need to turn the black plastic adjusting nut 3.
After checking any machine, threading it, setting lever 1 to the required stitch length, test stitches should be sewn. Stitch on a piece of the same fabric from which the product will be sewn. Test stitches are needed to check their quality and adjust the thread tension.
In machines "Tula" and "Rzhev" they check to what voltage the electric motor built into the housing of the sleeve rack of the machine is set. If it is set, for example, to a voltage of 127 V, but 220 V is required, then it is switched to the required voltage and at the same time the lighting is matched, that is, a backlight lamp is also installed of the corresponding voltage.
Car "Radom" 86 cl. is produced with an electric motor only for a voltage of 220 V, if this voltage does not correspond to the mains voltage in the apartment, then the electric motor is connected to the mains through a transformer.
Cars "Lada" T-132 class. and "Lada" T-132-2 class. have an electric motor for a voltage of 127V or 220V without switching from one voltage to another.
Hand and foot machines can also be operated with an electric motor, if installed near the machine body and connected to the flywheel with a belt.
For example, a foot machine with an electric motor can be operated both with a foot drive and with an electric motor, depending on whether the flywheel of the machine is connected with a belt: with the starting wheel of the machine or with an electric motor. PMZ 1-M and PMZ 2-M machines are sold with and without electric motors installed on them. If the machine does not have an electric motor, you can buy and install it yourself.
The box in which the electric drive for the sewing machines is sold contains an electric motor, a pedal-rheostat, a connecting cord and spare brushes for the electric motor.
When buying an electric drive, they look at what voltage it is designed for. The electric motor is attached to hand-held machines with the same screw as the hand drive. For foot machines, they buy a screw for attaching an electric motor. When buying a screw for a PMZ machine, you must specify which machine the screw is required for: to the PM3 1-M machine or to the PMZ 2-M machine. Moreover, the screw from the PMZ 1-M machine goes to the PMZ 100 class machine, and from the PMZ 2-M machine, to the “Chaika” 115-1 class machine.
The electric motor is installed behind the arm of the machine (see Fig. 3, a) so that the threaded hole on the machine below the flywheel is visible through the groove of the motor bracket and secure with a screw. Then the electric motor is connected with a belt to the flywheel of the machine (see Fig. 3, a).
Electric motors were sold for the Tula car, designed for both voltages (127 and 220 V), that is, with switching to any voltage. The electric motor for the "Tula" machine can be installed (changed) only by a specialist mechanic for these sewing machines.
PLAIN STITCH STITCH
To perform a regular two-strand rectilinear stitch on a zigzag machine, that is, one that is performed by straight stitching machines (old Zinger, PMZ machines PMZ 1-M and PMZ 2-M, "Rzhev", etc.), it is necessary that each lever control of the zigzag machine was in a certain position.
Unlike the straight stitch machine, which has only one lever (stitch length adjuster), the zigzag machine has four machine control levers, that is, in addition to the stitch length regulator lever, there is also a zigzag stitch lever, a needle shift lever and a change lever the position of the rack (The lever for changing the position of the rack teeth is also available for the PMZ 2-M straight stitching machine.).
In the book, all these machine control levers are listed under numbers: stitch length lever - lever 1, zigzag stitch lever - lever 2, needle shift lever - lever 3 and lever for changing the position of the rack teeth and their lifting height - lever 4.
From this page and further in the text and in the figures under the numbers 1, 2, 3 and 4, only machine control levers will appear, and all other designations will begin with the number 5.
For machines with automation (for example, "Lada" 237 class., Chaika 142, 144) and machines with replaceable copiers (for example, PMZ 122-1 class. And "Lada" T-132-2 class.) And with a software device ( for example "Veritas" 8014/35 class), in addition to these four machine control levers, there are also automatic control levers, but they will be discussed when considering machines with a copier.
In order to sew on a zigzag machine with a regular straight stitch, the machine control levers must be in the following position:
-lever 1 on the scale division, indicating the required stitch length, for example, 2 mm;
-lever 2 must be in zero position;
-lever 3 can be in any position, it has three positions in total: center, left and right;
-lever 4 must be in the working position, since when sewing with a regular stitch, like any other stitch, the rack (fabric motor) must advance the fabric. If lever 4 is in the non-working position, that is, the rack teeth are lowered under the throat plate, the rack will not advance the fabric. Machine control levers are set differently in different machines.
Consider the shape of the handles of the machine control levers and their installation for sewing with a conventional straight stitch using the example of specific machines.
Tula car. Levers 1 and 2 (Fig. 23, a) have oval handles. They are located on discs that have scales for these levers. Levers 3 and 4 have neither scales nor handles.
Lever 1 is located in the middle of the lower part of the arm 5 of the machine arm. Its scale 6, located on disk 7, has 0, divisions and letters. At the very top of the scale is 0, to the right and to the left of it there are three divisions. On the left, the scale ends with the letter B (forward), and on the right, the letter H (backward).
When lever 1 is turned to the left from 0 towards the letter B, the fabric will move forward during sewing, i.e. away from the worker, and when lever 1 is turned from 0 to the right towards the letter H, the fabric will move backwards, i.e. towards the worker.
If you set lever 1 to 0 (Fig. 23, b) of its scale, the fabric will not advance. This is the zero position of lever 1, i.e. its inoperative position.
The stitch length on the Tula machine is adjusted from 0 to 4 mm in forward and backward directions. There are divisions on the scale of lever 1, each of which corresponds to a stitch length of 1 mm.
Rice. 23. Installation of control levers of the "Tula" machine to obtain a regular straight stitch
For sewing with a regular straight stitch with a stitch length of 2 mm, lever 1 is turned to the left and set at the end of the second from 0 division, as shown in Fig. 23, a, b and slightly tighten the screw 8 for attaching the lever 1. To obtain a smaller stitch, lever 1 is brought closer to 0, for a larger one - by slightly loosening the limit screw 8, lever 1 is advanced beyond the second division, for example, to the third division (Fig. 23, d) or even further and set on the letter B (Fig. 23, d), which corresponds to a stitch length of 4 mm.
After setting the required stitch length with the lever 1, tighten the screw 8.
Setting the lever to B or H produces the largest stitch. When you turn the lever 1 from the letters to any division, that is, closer to 0, the screw 8 is not loosened.
To obtain a regular stitching, it is required to install not only lever 1, but also the rest of the control levers of the zigzag machine, namely, lever 2 - to 0 (see Fig. 23, a), lever 3 - to its central or other position, lever 4 - into working position.
Consider levers 2, 3 and 4 of the machine control and how to install them.
Lever 2 in the Tula car is located exactly above lever 1. Scale 9 of lever 2, like scale 6 of lever 1, is located in a circle, but there are no letters on the scale of lever 2, but there are numbers from 0 to 4 and risks between them. When the lever 2 is set to 0, it does not participate in the operation of the machine, that is, the mechanism with which the zigzag stitch is obtained is turned off. When installing the lever 2, it is not necessary to loosen or fasten the screws. The screw 10, located on the lever 2, and the heads 11 and 12 of the stop plates, located on both sides of the disk on which the lever 2 is located, are not touched.
The groove (slot) of the screw 10 of the lever 2 must always be along the lever (as shown in Fig. 23, a), and the plates 11 and 12 are located exactly to the right and left of the middle of the disc of the lever 2, as shown in Fig. 23, a.
If the groove is across the lever 2, then the head of the screw 10 is pulled towards itself and rotated. It is better not to use screw 10 and plates 11 and 12, since not in all Tula machines they are then easily and accurately installed in their original places. If the lever 2 is inaccurately set to 0, it is impossible to obtain a straight regular stitch.
Lever 3 is located under the middle of the arm 13 of the machine. It consists of a rod with a head at its end. Lever 3 when sewing with a normal straight stitch can be in any position (left, center or right), but in order for the needle to pass in the center of the needle slot of the foot and the needle slot of the throat plate, it is set to the center position, as shown in fig. 23, a.
Lever 4 in the Tula machine is located under the sliding plate 14. It consists of a lever and its head 15, similar to a knurled nut. The non-working position of the lever 4 is considered to be when its head 15 is turned away from the worker, and the working position when it is turned towards the worker. Moreover, when sewing, the lever 4 can be turned and not to failure (not to the stop), but only as much as it is required to turn it for a certain rise of the rack teeth above the throat plate. For example, when sewing a product from a very thin and soft fabric, the teeth of the rack (with its upper position) should protrude above the throat plate by 1 mm, from thick fabrics to a greater height, i.e., by 1.75-2 mm.
For a non-working position, that is, to lower the rack teeth under the throat plate so that they do not advance the fabric, lever 4 (its head) must be turned from the working one all the way to the stop.

Rice. 24. Setting the control levers for a regular straight stitch:
a - by car "Lada" T-I32 class; b - by car "Lada" 236 class; c - by car "Lada" 238 cl.
In fig. 23, a shows how the control levers of the "Tula" machine should be set to obtain the usual straight stitch 16.
Lada car. Different Lada machines have levers 1 and 4 have different shapes and installation methods, and levers 2 and 3 have the same shape and the same installation methods on the machine.
Lever 1 for machines "Lada" T-132 class. (fig. 24, a) and "Lada" 236 cl. (Fig. 24, b) protrudes from the slot 5 of the rack 6 of the machine sleeve. Scale 7 (see Fig. 24, b) of lever 1 is located vertically and it is motionless, and lever 1, when it is moved up or down, slides along the scale.
The cars "Lada" 236-1 class. and "Lada" 238 cl. (Fig. 24, c) lever 1 has a round shape and, when it is turned, rotates together with its scale 8.
Lever 2 for all Lada cars has a round shape. Scale 9 (see Fig. 24, b, c) it is motionless and is located on the oval shield 10.
Lever 3 for all Lada cars has an oval shape, but it is located in different Lada cars in different places. For example, the cars "Lada" T-132 class. (see Fig. 24, a) it is located above the lever 2, and for Lada 236 cl. (see Fig. 24, b), "Lada" 237 cl. and "Lada" 238 cl. (see Fig. 24, c) under the lever 2 on the same shield 10.
Lever 4 for different Lada machines is not in the same places, is not the same in structure and is brought into working and non-working positions in different ways.
The cars "Lada" T-132 class. lever 4 (see Fig. 24, a) has the shape of a circle. It is located at the bottom of the arm 6 of the machine arm. The cars "Lada" 236 class., "Lada" 237 class. and "Lada" 238 cl. lever 4 (see Fig. 24, b, c) has the shape of a rod. It protrudes from the slot of the machine platform near the arm 6 of the machine arm.
For sewing with a normal straight line with 2 mm stitches on Lada T-132 cl. (see fig. 24, a) and "Lada" 236 cl. 1cm. rice. 24, b) lever 1 is taken from 0 down and lead along the slot 5 of the machine sleeve to the third long mark 11. The distance between the long marks corresponds to the stitch length of 1 mm, and the distance between the long and the nearest short line corresponds to the stitch length of 0.5 mm.
There are a total of eight divisions on the scale of lever 1, each of which corresponds to a stitch length of 0.5 mm. On the left side of the first long risk is the number 0, and the rest of the risks have no letters or numbers.
The farther from 0 you set lever 1, the larger the stitch is, and the closer to 0, the smaller the stitch.
If you want to fasten the end of the line, then for reverse machine lever 1 is raised above 0.
By cars "Lada" 236-1 class. and "Lada" 238 cl. to obtain a conventional straight line, turn lever 1 in a circle to the left (see Fig. 24, c) and set the number 2 of its scale 8 upwards, that is, aligning it with the relief point 12 located on the sleeve stand above the scale of lever 1.
On the scale of the lever 1 for cars "Lada" 236-1 class. and "Lada" 238 cl. not risks, but numbers from 0 to 4 (see Fig. 24, c), each division (distance from one number to another) corresponds to a stitch length of 1 mm.
To secure the end of the stitch, that is, to reverse the machine, press the head 13 of the rod 14 protruding from the center (handle) of the lever 1 and keep it pressed against the machine until 2-3 stitches are made. Then the head 13 of the rod 14 is released. The rod will immediately move out of the lever 1 by itself, and the machine will again move the fabric forward (away from the worker).
Lever 2 of all Lada machines for sewing with a normal straight stitch is set to the zero position in the same way, that is, by its pointer 15 (see Fig. 24, e), available on the rim 16 of lever 2, against 0 of scale 9. But the scales have levers 2 cars "La-da" have a different number of digits, for example, in the car "Lada" 238 cl. (see Fig. 24, c) - six, and in the "Lada" car 236 cl. (see Fig. 24, b) - four. They will be discussed in detail when describing sewing with a zigzag stitch.
Lever 3 for all Lada machines is placed vertically. This is its center (zero) position.
Lever 4 at the "Lada" T-132 class. set with a risk 17 (see Fig. 24, a) against the uppermost point 18, that is, against the middle of the three points available on the sleeve stand above the lever 4.
For all other Lada machines for straight stitching, lever 4 should be tilted (turned) to the right. Lever 4 protrudes from the slot 19 (see Fig. 24, b, c) located on (the machine platform near the arm 6 of the sleeve. It has neither a head nor a handle. The tilt of the lever 4 to the right is its working position. and stands in the machines, and turns it to the left only when it is required that the fabric does not advance during the operation of the machine, for example, when embroidering, when the fabric pulled into the hoop is moved by the worker himself, or when sewing on a button, when it is required that it be stationary. Consequently, in order to sew with a regular stitch on Lada machines, their control levers must be in the position shown in Fig. 24, a, b, c.
The Seagull car. In 1965, the Podolsk Mechanical Plant (PMZ) produced for the population a new sewing machine "Chaika" 115-1 class. (Fig. 25, a) and 116-1 cl. This zigzag machine, like all zigzag machines, has four control levers.
When you change the position of lever 1 (Fig. 25, a, b), it turns together with its scale 5. Lever 1 is set to one of the digits of its scale under the index 6, that is, the required digit or the interval between the digits (division), up. For example, to obtain a straight stitch, the stitch length of which should be equal to 2 mm, the lever 1 is placed with the number 2 up at a risk of 6 (see Fig. 25, b).
Lever 2 has a movable scale 7. (Fig. 25, a, c, d, e), on which there are six digits (0, 1, 2, 3, 4 and 5). When installing the lever 2, it is turned by the handle until the desired number of its scale, for example 4 (see Fig. 25, c), is under the risk-indicator 8. Lever 2 withdrawal from its zero position is necessary to switch the machine to sewing with a zigzag stitch, and for sewing with a regular straight stitch, lever 2 must be set to 0 (Fig. 25, d, e).

Rice. 25. Installation of control levers on the PMZ "Chaika" machine to obtain a regular straight stitch
Lever 3 is located in the middle of the disc of lever 2. When sewing, lever 3 usually stands upright, that is, it takes its central position (see Fig. 25, c), but it can take the right or left position, as shown in Fig. ... 25, d, e. In order for the lever 3 to take one of these positions, it is turned to the right or left.
If you set it with the letter P up, we get the right position, and with the letter L up - the left.
Lever 4 (see Fig. 25, a) in the "Chaika" machine is located on the platform 9 of the machine near the rack 10 of the sleeve. It has a pointer 11 (in the form of a groove), with which the lever is installed against one of the two letters of the scale 12, that is, against the letter H or against the letter B. The letter H means sewing, and the letter B means embroidery, that is, when installing lever 4 to the letter H, the machine advances the fabric, and when set to the letter B, the fabric will not advance, which is necessary when sewing on buttons or embroidering.
The Koehler car. Lever 1 (fig. 26) is located on the right side of the lower part of the arm post of the machine. It is made in the form of a handle attached to a disk on which there is a scale.

Rice. 26. Installation of control levers on the machine "Keler" 53-2 class. for a regular straight stitch
Lever 1 rotates along with its scale 5. On the scale of lever 1 there are numbers 0 and 5 and between them there are four marks, the distance between which corresponds to a stitch length of 1 mm. In addition to numbers and lines, there are two letters V and R on the scale of lever 1, which indicate the direction of the fabric advance. The V stands for forward and the R stands for back.
The Koehler machine gives a maximum stitch length of 5 mm. Levers 2 and 3 for the Koehler machine are located near the sleeve cover, they are made in the form of stars attached to a disk (circle) with a scale. The scale 6 of the lever 2 and the scale 7 of the lever 3 rotate together with the levers. The stars have six teeth, all the teeth, except two, have the same distance, and the distance between the two teeth of each star is much greater. It is in this larger interval between the teeth that the scales of the machine control levers are located. In the left star 8 - the scale 7 of lever 3, and in the right star 9 - the scale 6 of the lever 2. On the stars themselves, the Kohler machine, which does not have the so-called automation, has no signs, and the zigzag machines that have a built-in copier with automatic elements, on the stars there are patterns depicted in red paint, which can be made on the fabric with this copier.
Lever 4 is located on the lower part of the arm of the machine to the left of the lever 1. It is made in the form of a five-pointed sprocket, on one of the teeth of which there is a point 10, on the other there is a grid 11.
In order to sew on the Kohler machine with a straight line 12 with a stitch length of 2 mm, turn the lever 1 to the left and set it with the second line from 0 upwards, against the triangle 13.
Lever 2 is turned to the right and set 0 of its scale upwards under the triangle 14, which is located above the lever 1 on the cover of the machine sleeve. Such an installation of the lever 2 is called zero, in which it does not participate in the operation of the machine.
On the scale 6 of the lever 2 of the Koehler machine, there are five digits, each division between the digits corresponds to 1 mm.
Lever 3 has a scale with three signs: one of them, depicted in the form of diamond 15, is in the center of the scale, and two signs 16 and 17, depicted in; the form of triangles, are located one on the left, the other on the right side of diamond 15. To set lever 3 to the central (zero) position, it is turned with a rhombus upward, that is, the rhombus of its scale is brought under triangle 18.
Lever 4 is set point 10 upwards against the triangle 19 on the arm of the machine.
Therefore, in order to sew on the Köhler machine with a normal straight stitch 12, the machine control levers should be as shown in fig. 26.

Rice. 27. Installation of control levers on the "Radom" machine to obtain a regular straight stitch
Car "Radom". Lever 1 (Fig. 27), located in the Radom machine, in the lower part of the sleeve stand, has a round head with a scale at its outer end, rod 5 protrudes from the center of this head.
Scale 6 of lever 1 rotates with it. On a scale of 6, there are six numbers from 0 to 5. They are located in a circle, from right to left. Each division on the scale corresponds to a stitch length of 1 mm. For sewing with a conventional straight stitch with a stitch length of 2 mm, lever 1 is set with the number 2 against the pointer 7, which is made on the rod 5 in the form of a shallow groove (groove).
Lever 2 is located above lever 1, has the shape of a handle and is located on the disc. The scale 8 located in the upper part of this disc of the lever 2 is stationary. It has numbers from 0 to 6. Lever 2 of the "Radom" machine, when moving up the teeth 9 on it, is locked, and when the teeth are pressed down, it is unlocked and can move along the scale. In addition to the lock, the lever 2 has stops 10 and 11, which, when the screws 12 and 13 are loosened, it is possible to restrict the movement of the lever 2 along the disc 14 between any digits of the scale.
On the scale 15 of the lever 3 there are three signs: one middle at the top of the scale, it is depicted by a broken line 16 (such as a zigzag line) and two signs 17 and 18, located one by one on the sides of the middle sign and depicted, although also a zigzag line, but slightly different from central mark, as shown in fig. 27. The side mark shows what the zigzag stitching becomes when the lever 3 is set to one of the side marks.
To set the lever 3 to the central (zero) position, it is turned against the central mark 16 of its scale, that is, the lever 3 is placed in a vertical position.
Lever 4 in the "Radom" machine is located on the platform 19 of the machine near the arm post. It protrudes from the platform opening in the form of a cylindrical rod, on the left side of which there is a transverse groove 20.
For sewing with any stitch, the lever 4 must protrude from the platform so that its groove 20 is above the platform 19 of the machine, and it is installed on the machine. In the event that it is required that the rack teeth do not advance the fabric, for example, during darning, the lever 4 is recessed. How this is done, that is, how the lever 4 is brought to an inoperative position, will be discussed below.
Therefore, in order to sew with a straight stitch on the Radom machine, the control levers must be set as shown in fig. 27, namely:
lever 1 - number 2 against groove 7 of rod 5,
lever 2 - against 0 of its scale,
lever 3 - to the central (vertical) position and
lever 4 - to the working position, i.e. its groove 20 must be above the platform 19 of the machine.
By cars "Lada" 237-1 class. and "Lada" 237 class., "Keler" 51 class., "Keler" 51-2 class., "Veritas" 8018/3 and 8014-33 class. with a copying device (automatic) for sewing with a straight stitch, it is also necessary to set the levers and stars of the automatic to the zero position, in the PMZ 122-1 cl. and the car "Lada" T-132-2 - a template on the so-called automatic machine and in the car "Veritas" 8014/35 class. - the lever of the software device.
When the control levers are installed on a regular straight stitch on a zigzag machine, you can perform all the same stitches and seams that are done on the PMZ 1-M and 2-M, "Rzhev" and others, but you can also make other seams (for example , sweep loops, hem the bottom of jerseys, etc.).
SENDING KNITWEAR
The jersey is sewn with the same presser foot as the zigzag stitching, that is, with the same presser foot with which zigzag machines are sold.
The preparation of a zigzag machine for hemming knitwear consists only in taking out a regular machine needle, inserting a double needle and threading it with two upper threads corresponding to the needles and fabrics, that is, preparing the machine for sewing with a three-thread stitch (The third thread is bobbin thread.).
Twin needles (fig. 28, a) are included in the set of the zigzag machine and are sold separately. They come with a different distance between the blades (rods) 5 and 6, namely 1.8; 2; 2.5; 3 and 4 mm. Double needles have two blades, and one bulb is common. The blades are connected to the bulb with a plastic plate.
Twin needles with a distance of up to 2 mm between their blades in stores are usually called narrow, 2.5 mm - medium, and from - 2.5 mm to 4 mm - wide twin needles.
If you wish to sew with a twin needle (A twin needle differs from a twin needle in that two ordinary machine needles are inserted into a special needle holder supplied with the sale of Lada 233 cl. And Tula model 7 machines), and not with a twin needle , you need to change the needle holder. This is possible in machines "Tula" model 7 and "Lada" 233 class, to which additional needle holders are given, especially for double needles. Moreover, a needle holder is given to the Tula model 7 machine, which can form a double needle with a small distance (2 mm) between its rods (blades), and to the Lada machine, 233 cl. included three needle holders to form twin needles.
One of them is for the formation of a double needle with a distance between the rods of 2 mm, the other - in 3 mm and the third - in 4 mm. For machines "Lada" 238 cl., "Lada" 237 cl. and "Lada" 237-1 class. additional needle holders are not attached, but needle holders for the Lada machine 233 cl. can be used on all Lada machines and even on some other machines *.
These needle holders were sold in stores.
The Tula Model 7 Twin Needle Holder is not suitable for other machines.
To use a double needle, the needle holder is removed on the Tula model 7 machine and an additional needle holder is installed. But before putting the additional needle holder on the machine, two ordinary machine needles are inserted into it.

Rice. 28. Twin and twin needles.
Both needles are inserted so that their long grooves are directed towards the screws on the needle holder, so that the bulb of the needles to the very rods (blades) enter the needle holder 7 (Fig. 28.6). Both needles are fixed with one screw 8. Then, having loosened the upper screw 9, the needle holder 7 is placed on the lower end of the needle bar 10 and the screw 9 is fixed. In additional needle holders (Fig. 28, c) to the Lada machine 233 cl. each inserted machine needle is fixed with a separate screw: one needle with a screw 11, the other with a screw 12, and the needle holder 13 is attached to the needle bar 14 with a separate third screw 15, which is located on the right side of the needle holder 13.
If you wish to sew with a double needle with a flask 16 (see Fig. 28, a), a double needle is inserted into the machine like a regular machine needle, without replacing the needle holder 17. Therefore, any twin needle can be used on any zigzag machine (except for the Radom 431 cl .).
Therefore, if, for example, you need to sew on a Tula model 7 machine with a wide double needle (with a distance between its blades of 3-4 mm), then they do not use an additional needle holder, but buy a wide double needle and insert it into the same needle holder as and an ordinary machine needle.
The double needle can also be used on the Tula model 1. The double needle is inserted into the zigzag machine in the same way as a conventional machine needle, that is, with the flat side 18 (Fig. 28, d) of the bulb away from you towards the foot holder ( see Fig. 28, a). With this position of the double needle, its long grooves 19 and 20 will be turned towards the worker, that is, correctly.
When threading the upper threads, they are carried out along the thread guides in the same way as one thread, and when they reach the upper thread tension regulator, they are held between its washers (plates) tension in different machines in different ways.
In the Tula machine, model 1 threads are drawn as one, that is, both upper threads are drawn together between two plates, and in the Tula model 7, each thread has its own passage between the tension plates, because the Tula machine has a model 7 not two, but three plates. The middle plate is thicker and has bevels on both sides.
All zigzag machines, except for the machines "Radom" and "Tula" model 1, have three tension plates, each upper thread is carried out separately between two tension plates.
In cars "Lada" 233 cl. and "Kehler" 49 cl. there are additionally two upper thread tension adjusters. On one regulator of the upper thread tension in the "Radom" machine, for the passage of the two upper threads, there are two pairs of plates, each thread passes through one pair of plates. The upper and lower threads are tucked in. The tension of the threads and the quality of the stitches are checked by sewing a piece of knitwear. The threads are selected in the color of the knitwear. Then the product is prepared for hemming.
For hemming, the cut of the knitted product is leveled (for example, when shortening the combinations), it is folded once to the desired seam width (Fig. 28, e) and swept by hand. Bridging is done with threads that differ sharply in color from the color of the garment being hemmed.
They notice at the very edge of the bent edge so that there are small stitches on the seamy side of the material or product being sewn, and on the front side there are so large stitches that they should form an almost continuous line.
The product or material is placed under the machine foot face up (Fig. 28, e) and so that the basting line is located in the middle between the needles, lower the foot onto the material and stitch after the end of the work, take out the sweeping threads.
On the front side there should be two adjacent straight stitches 21, and on the seamy side - a zigzag stitch 22 (Fig. 28, g), covering the cut of the material.
This zigzag stitch is obtained without switching the machine with lever 2 to the zigzag stitch.
The frequency of the zigzag stitching depends on which division the lever is on. Usually knitwear is hemmed with stitches 2-3 mm long.
The hemming of knitwear is made with thin threads, for cotton knitwear, cotton (bobbin) threads of the eightieth, sixtieth number or floss threads are used, and for silk - only silk threads. If silk knitwear is hemmed, cotton (bobbin) threads can be wound on the bobbin, and silk threads are threaded into the needles for the front side of the product.
At the same time, slightly loosen the tension of the upper threads.
If for hemming cotton jersey, bobbin threads of the eightieth number are threaded into the needles, then the bobbin threads of the sixtieth number are wound on the bobbin.
The hemming of knitwear with a double needle is beautiful, durable and difficult to unravel.
The same three-thread stitch can also be used to hem cotton fabrics and even make a hemming in the form of a decoration, if you thread the needles with silk or floss threads and not necessarily the same color. In this case, the bobbin is tucked in with ordinary cotton thread (bobbin).
When sewing with a straight stitch with a normal machine needle on zigzag machines, you can use the control lever 3, for example, when you want to stitch closer or further from the edge of the fabric or from another stitch. Using lever 3, you can sew from the edge within the range of 2 to 6 mm by moving the needle to the right or left.
All zigzag machines have two or more bobbins. The Tula model 7 has one main and one additional removable spool pin. To put an additional spool pin on the machine, loosen the fastening nut, machine sleeve covers, put the fork of the rod under the nut and screw the nut.
If you sew with a double needle, then two spools of thread or two tubes of silk are placed on the bobbin pins and the threads are led from them together through the same thread guides through which one thread is passed. Only in those machines, in the thread guides of which there are two holes for the passage of the threads, they are carried out separately. In the Tula model 7, the thread guide has two holes for a separate thread wire, and in the Tula model 1 machine, both spools are placed on one spool pin (on top of each other) and the threads from them are passed together as one to the needles, and then each thread into a separate needle.
STRETCHING SMALL FOLDING
To sew small folds 4 mm wide, fold the fabric in half and put it under the foot so that the fold line 5 (Fig. 29, a) of the fabric runs flush with the right edge 6 of the foot. Lower the foot onto the fabric and stitch. To make the folds even and uniform, use the limit ruler 7 (Fig. 29, b).

Rice. 29. Sewing small folds
In addition to the limit ruler, the machine control lever 3 can also be used to make a fold on the zigzag machine. Without changing the presser foot and without changing the position of all other control levers installed for sewing with a simple straight line stitch, only the position of the lever 3 is changed when the needle is in the upper position.
When making folds 4 mm wide, the needle should pass in the center of the needle slot of the foot (Fig. 29, c), the machine control lever 3 should be in its central position; and then the distance from the point 8 of the passage of the needle through the fabric to the right side 6 of the foot will be 4 mm.
But if a fold of 6 mm wide is required, then with the same method of inserting the fabric and the same setting of the limit ruler, lever 3 is turned to the left and the needle rises to the left, as shown in Fig. 29, d.
When making folds with a width of 2 mm, the needle should pass from the right side of the needle slot (Fig. 29, (9) of the foot, lever 3 is put in the right position and then the distance from point 9 of the needle puncture of the fabric to the right side 6 of the foot will be 2 mm.
In all zigzag machines, lever 3 is used when it is necessary to change the position of the needle in order for the stitch to go closer to the edge of the fabric or further from it, but the setting of lever 3 is different in different machines. For example, in the Tula machine, it is turned right or left until it stops, and in other machines, lever 3 has a scale with signs or letters and it is set to one of the signs or to a certain letter, depending on which position the needle should take ( right, center or left).
Consider the installation of lever 3 for making pleats with a width of 2 to 6 mm on specific zigzag machines.
Tula car. Lever 3 usually stands in the center position, as shown in fig. 23, a. To make folds, depending on the required width, the lever 3 is left in a central position or turned to one of the sides, as described above. But in some Tula cars, lever 3 can be turned to the right or left and not to the stop, but to a smaller turn. For example, if they want to get a fold not in 2, but in 2.5 mm, then they turn it to the right, but not all the way, and if they want to get a fold, for example, 3.5 mm wide, then turn lever 3 to the left not all the way. However, in the majority of Tula machines, lever 3, as in all other machines, except for the Veritas, is not held halfway through the turn, but rebounds to the stop or returns to its central position.
Lada car. Lever 3 usually stands in a central (vertical) position (see Fig. 24, a, b, c). To sew folds 2 mm wide, lever 3 is turned to the right, as shown in Fig. 30, a, b, c, for sewing folds 6 mm wide, lever 3 (Fig. 30, d, e, f) is turned to the left.
The Koehler car. To sew folds with a width of 2 mm, lever 3 is turned in a circle (clockwise) until it stands with the left triangle sign upwards under the triangle, as shown in Fig. 30, g, if you want to make a fold with a width of b mm, then lever 3 is also put with a "sign" - a triangle up, only the one to the right of the rhombus, as shown in Fig. 30, h.

Rice. 30. Installing the lever 3 to control the machine when making small folds on machines:
a, b, c, c, d, f - "Lada": f - "Kehler"; and, k - "Radom"
Car "Radom". To sew folds 2 mm wide, lever 3 is turned to the right and set against the right mark of its scale, as shown in Fig. 30, and, and in order to make a fold 6 mm wide, lever 3 is turned to the left and set against the left sign of its scale, as shown in Fig. 30, bldg.
Unlike lever 3, which in all zigzag machines changes the position of the needle once in one turn, and this position of the needle remains for the entire sewing time, lever 2, when it is shifted from the zero setting, gives alternate movement of the needle, then from the right, then on the left side of the needle slot of the foot and when sewing, you will not get a straight stitch, but a zigzag stitch.
SEWING ZIGZAG STITCHING ON ZIGZAG MACHINES
In a zigzag stitch, the distance between the corners of two adjacent stitches can be different, for example, between corners 5 and 6 (Fig. 31, a) of a zigzag stitch, the distance is 4 mm, and between corners 7 and 8 (Fig. 31.6) of a zigzag stitch, the distance is equal to 2 mm.
The approaching or moving away of the corners from each other depends on the setting of the stitch length with the lever 1. The more often the stitch is sewn, the closer the corners of the stitches will be to each other. If lever 1 is set close to 0 of its scale, then the stitches will lie almost across the line of the line, that is, almost horizontally.

Rice. 31. Zigzag stitches of various widths and densities.
In this case, the stitches will almost closely adjoin one another (Fig. 31, c).
Such a zigzag stitch is similar to the satin stitching that is done when embroidering (embroidery will be discussed in Chapter IV of the book). If a zigzag stitch has corners 5 and b (see Fig. 31, a) at a distance of 3-4 mm from each other, such a zigzag stitch in the book is called rare, and the line in which they adjoin one another, as shown in rice. 31, c, is called a very thick zigzag stitch. In the manual for some imported machines (Veritas, Kehler), such a thick zigzag stitch is called a caterpillar stitch.
To obtain a distance between the corners of adjacent stitches of a zigzag stitch equal to 3 mm, lever 1 is set to the division of its scale corresponding to a stitch length of 2 mm.
But for a zigzag stitch, not only its density can change, but also its width. The width of a zigzag stitch is the distance from one side of it to the other.
The width of the stitch does not depend on its density. A wide zigzag stitch can be sparse (see Fig. 31, a) and thick (see Fig. 31, c). A narrow stitch can also be a sparse (Fig. 31, d) and thick (Fig. 31, e) line.
The stitch width is set with lever 2. If lever 2 is set to 2, the stitch will be 2 mm wide. If lever 2 is set on the number 4 of its scale, then the line will be 4 mm wide. Therefore, the larger the number of its scale is set lever 2, the wider the zigzag stitch will be.
The largest zigzag stitch width depends on the machine. For example, the Tula machine has the largest zigzag stitch width of 4 mm, the Keler and Chaika machines have 5 mm, and the Radom machine has 6 mm. At the same time, some machines of the same name, but of different classes or types, have different maximum width of the zigzag stitch. For example, by car "Lada" 236 cl. can be sewn with a zigzag stitch with a maximum width of 4 mm, and on the Lada machine 238 cl. - 6 mm.
In order to perform a zigzag stitch after sewing with a regular straight stitch on a newly purchased zigzag machine, lever 2 is pulled back from 0 and set depending on the required width of the zigzag stitch. There is no need to change the foot, as the machine has a zigzag foot. It is also not always necessary to change the position of lever 1. Lever 1 is moved with the presser foot raised, and lever 2 with the needle raised.
MARKING SECTIONS
To protect the cut of the fabric from shedding, it is swept over with a zigzag stitch. At the same time, if the seam must be ironed in different directions, then the sections of each panel are first swept separately (Fig. 32, a), and then they are grinded, and if the seam does not require unbuttoning or it will be ironed in one direction, then they are swept cuts of already sewn panels or products in one line.
For overcasting cuts of woolen and staple fabrics, lever 1 is left in the place where it is installed for sewing with a regular straight stitch (see Fig. 23-27), that is, to obtain stitches with a length of 2 mm, and the width of the zigzag stitch should be is equal to 4 mm, it is set with lever 2.
If a slice of easily crumbling silk is swept over, then lever 1 is placed a little closer to 0 of its scale, and if the fabric is not crumbling, then lever 1 is removed from 0 by almost the entire amount of its rotation.

Rice. 32. Overcasting cuts on zigzag machines
When overcasting, cut 5 (Fig. 32, b) of the fabric is placed under the foot so that it does not slightly reach the right side 6 of the right horn of the foot and lower the foot onto the fabric. In the process of overcasting, the cut 5 of the fabric is maintained so that the needle alternately passes at the very cut of 5 of the fabric, but without getting into it, then it pierces the fabric. If the cut of the fabric is pulled together, slightly loosen the upper thread tension.
Consider the installation of control levers when overcasting cuts on specific machines.
Tula car. Lever 1 (Fig. 33, a) is turned to the left of 0 and set at the second division from it, and lever 2 is turned to the right of 0 and set at number 4 of its scale.

Rice. 33. Overcasting of cuts on the Tula machine
With this setting, the zigzag stitch will look as shown in fig. 33, b. The seams of skirts and dresses are treated with this overcasting seam to protect them from shedding.
If you need to overcast a cut of non-crumbling fabric, you can do it with a sparser zigzag stitch. To do this, without changing the position of lever 2, that is, leaving it at number 4, loosen the screw 5 (Fig. 33, c) of lever 1 and, turning lever 1 to the left to the end of its scale, set it on the letter B.

Rice. 34. Overcasting of cuts on the machine "Lada"
The overcast with this setting of levers 1 and 2 will be wide and sparse.
Lada car. To overcast seam cuts, lever 1 (see Fig. 24, b, c) is set in the same way as for sewing with a straight line stitching cotton fabrics, i.e., according to a stitch length of 2 mm, and lever 2 is set with pointer 5 to a number 4 of its scales (Fig. 34, a).
If you want to overcast a cut of non-crumbling fabric, then overcast with a more rare zigzag stitch, setting for this lever 1 of the machine "Lada" 236-1 class. (Fig. 34.6) with the number 4 of its scale upwards against the pointer 6. If, working on the Lada machine, 236 cl. or "Lada" T-132 class, they want to get the same wide and sparse overcasting (Fig. 34, c), then, having loosened the knurled nut 7 (Fig. 34, d), the lever 1 is lowered to the very bottom end of the slot, i.e. e. set on the last risk of its scale (Fig. 34.6).
The Koehler car. For overcasting cuts of easily crumbling tissue on the "Kehler" machine, lever 1 is set by the second division of its scale from 0 upwards under pointer 5 (Fig. 35, a), and lever 2 (Fig. 35.6) with number 5 of its scale under pointer 6. The overcast will look like the one shown in fig. 35, c.

Rice. 35. Overcasting of cuts on the "Kehler" machine

Rice. 36. Overcasting of cuts with the "Radom" machine
If it is required to overcast a seam with a sparser zigzag stitch, then without changing the position of lever 2 (see Fig. 35.6), lever 1 (Fig. 35, d) is set with the number 5 of its scale upwards under the index 5. With this setting, the overcasting will be have the form shown in Fig. 35, d, that is, you get a zigzag stitch 5 mm wide with a stitch length of more than 5 mm.
Car "Radom". To overcast fabric cuts on the Radom machine, lever 1 is set in the same way as when sewing with a straight stitch (see Fig. 27, a), that is, with the number 2 of its scale 6 against risks 7, and lever 2 is removed from 0 and set at number 4 (Fig. 36, a) of its scale 7. The overlap will look as shown in Fig. 36, b. If you want to get a rarer overstitching, then the lever 1 is set with the number 4 (Fig. 36, c) of its scale 5 against the risks 6 on the rod protruding from the lever 1.
With this setting of the levers 1 and 2, the overcasting of the seams will look as shown in Fig. 36, d, that is, the zigzag stitch will turn out to be wide and sparse (4 mm wide, and the stitch length is more than 4 mm).
The edge stitch is also performed with a zigzag stitch.
EDGE STITCH
The edge stitch is used to process the cuts of the scarf, headscarves or ribbons.
The edge stitch is similar to the overcasting stitch, but narrower than it. It not only protects the cut from shedding, but also decorates the product. To process the edge stitching of silk products, silk threads are threaded into the machine. The processing of a cut of the fabric with an edge stitch is performed with a conventional presser foot, which performs a straight and zigzag stitch, for example, overcasting. The width of the edge line is average, equal to 2 mm, and its density is 1 mm.
The fabric slice intended for processing with edge stitching is pre-folded once by 2-3 mm and placed under the foot up to the middle of its needle slot (Fig. 37, a). Lower the foot onto the fabric and stitch. At the same time, the edge of the fabric is supported so that the line 5 of its bend runs against the middle of the foot.
If the slit 6 separating the arms 7 and 8 of the foot is straight, that is, directed towards the center of the needle groove 9 of the foot, then it is easy to support the edge of the fabric 10 with the line 5 of its fold against the middle of the foot. If the slot 11 (Fig. 37.6), dividing the horns of the foot, is oblique, then it is advisable to make a notch (mark) on the left side of the oblique slot (The mark can also be applied with paint) 12 (Fig. 37, c) so that it is exactly showed the middle of the paw. After finishing work and taking out the fabric from under the foot, cut off the excess bent fabric and stitching threads with scissors, as shown in fig. 37, g.

Rice. 37. Sewing an edge stitch on zigzag machines
When sewing with a foot that has a straight slit separating the arms, you can also sew an edge stitch in another way.
The advantage of the second method, which is described below, is that it does not require pre-hemming of the fabric cut and after the edge stitching does not need to be trimmed. The second method of making the edge stitching is that the aligned cut of the fabric is brought from the left side under the presser foot to the slot dividing its horns, and inserted into it. Moreover, cut 13 (Fig. 37, d) is carried out through the slot 6 up to the level of the upper plane 14 of the paw. Behind the legs, the fabric is turned to the left, and, lowering the presser foot, press the bent edge with it, as shown in Fig. 37, “5, and scribble.
When sewing stitches, make sure that the needle alternately passes to the right and then to the left of the cut, as shown in Fig. 37.5. At the same time, make sure that with left punctures the needle passes at the very cut of 13 tissue, then the seam will turn out to be even.
The machine will slightly tuck the fabric into the middle of the seam while tightening the stitches, and it will look like a curl.
If the zigzag stitch is made a little denser, that is, lever 1 is moved a little more to 0 of its scale and the edge stitch is sewn with silk threads, then it will look like a shiny cord.
In the second way, you can sew the edge stitch on the Tula, Lada and Radom machines, which have a straight slit in the presser feet for a zigzag stitching.
In the Köhler machines, in which the presser feet for the zigzag stitching have an oblique slit, the second way to perform the edge stitching is possible only by changing the foot: for Köhler machines 51-2 class. and "Kehler" 53-2 class. you can put the foot from the machine "Kehler" 51 class, "Kehler" 53 class. or "Kehler" class 49, since in the legs of the machines "Kehler" of previous releases there were no oblique slots separating the legs of the foot.
You can sew the edge stitch in the third way. It is sewn with a regular stitch, only with small stitches of 1-1.5 mm at a distance of 2-3 mm from the cut of the fabric. Then cut the cut to the line and overcast this simple line with a thick zig-zag stitch.
If you need to make an edge stitch on an oblique cut of fabric or on a very thin or very soft fabric along any of its cut (oblique or straight), then so that the cut of the fabric during processing with the edge stitch does not stretch out and does not gather, sweep a strip of paper so that it slightly (by 2-3 mm) did not reach the cut, as shown in Fig. 37, e. In this case, the paper will serve as an interlayer between the teeth of the rack (fabric engine) and the fabric, the needle will not grab it (Fig. 37, g). After finishing the work, remove the paper.
Consider setting levers for edgestitching on specific machines.
Tula car. Lever 1 is set to the first division (This division is shown on the machine with a long line) of its scale located to the left of 0, as shown in Fig. 38, a, lever 2 is placed on the number 2 of its scale.
To obtain an even thicker and slightly narrower edge stitch (when sewing with silk threads on silk fabrics), lever 1 is placed in the middle of the distance between 0 and the first line located to the left of 0 (Fig. 38, b), and lever 2 - for division located between numbers 1 and 2 of its scale, as shown in Fig. 38, b.
Lada car. To carry out the edge stitch on the machine "Lada" 236 cl. and "Lada" T-132 class. lever 1 is lifted up along the slot and set to the second division from 0, as shown in Fig. 39, a. Lever 2 is set with the pointer up, that is, on the number 2 of its scale (see Fig. 39, a).
To make the edge stitching thicker, lever 1 is set closer to the first division from 0, as shown in Fig. 39, b, and to make it narrower, lever 2 is set with a pointer against the interval on its scale between numbers 1 and 2, as shown in Fig. 39, b.

Rice. 38. Installation of control levers on the Tula machine for edge sewing
Setting the lever 2 for edge stitching on machines "Lada" 236-1 class. and "Lada" 238 cl. does not differ from the installation of lever 2 on the Lada 236 class machine described above, and lever 1 for the edge stitching is set differently, namely it is turned in a circle and set with the number 1 of its scale (Fig. 39, c) upwards , that is, against the pointer made in the form of a circle.

Rice. 39. Installation of control levers on the Lada machine for edge sewing

Rice. 40 Installing control levers on a Koehler machine
for edge sewing.
The Koehler car. To carry out the edge stitching on the Kehler machine, lever 1 (Fig. 40, a) is set with the first from 0 risk of its scale upwards under the pointer 5, depicted in the form of a triangle, and lever 2 with the number 2 upwards under the triangle 6. To obtain a thicker and of a narrower edge line, lever 1 (Fig. 40, b) is set up with an interval between 0 and the first division of its scale under triangle 5, and lever 2 is set up with an interval between numbers 1 and 2 of its scale under pointer 6.

Rice. 41 Installing the control levers on the machine
"Radom" for edge sewing.
Car "Radom". To carry out the edge stitching on the Radom machine, lever 1 (Fig. 41, a) is set with an interval between the numbers 1 and 2 of its scale, against risks 5 on the rod 6, and lever 2 (Fig. 41, b) - against the number 2 of his scales. To obtain a thicker edge stitching, lever 1 (Fig. 41, c) is set by the first division of its scale against the risks 5 of the rod 6, and lever 2 is set to number 2, as in the case of a rarer line.
In addition to overcasting the cuts and making the edge stitching with a zigzag stitch, laces are sewn, seams are sewn in and a number of various other operations are performed.
Sewing on laces
Lace is sewn to the edge of the fabric and at any distance from it. If you want to sew lace to the edge of the fabric, then cut off the edge, bend the cut of the fabric once, about 3 mm, and put the lace on it so that its edge covers the cut of the fabric, as shown in Fig. 42, a, and in this position, lace is sewn to the fabric.

Rice. 42. Sewing lace on zigzag machines
Having prepared the fabric for sewing lace to it, prepare the machine. Lever 1 is set as for a regular straight stitch (see Fig. 23, a - 27), if it was installed for such a stitch, then its position is not changed.
Lever 2 is set on number 2 of its scale, i.e. so that the width of the zigzag stitch is 2 mm.
Place the prepared fabric with lace swept under the foot with the lace up so that the basting line passes in the middle of the foot, as shown in Fig. 42, b. Lower the foot onto the fabric and stitch. At the same time, the fabric is supported so that the needle passes alternately on both sides of the basting stitching.
If you want to sew lace to the edge of the fabric, then sweep the edges of the fabric and lace as shown in fig. 42, c. The zigzag stitch is made narrower and thicker, namely 1.5-2 mm wide and 1 mm thick, and slightly loosen the thread tension.Place both edges under the foot together with the lace up, as shown in Fig. 42, d. Lower the foot and scribble. During sewing, the combined edges of the fabric and lace are guided so that the needle alternately passes through the edges, then past them (without getting into them), as when overcasting a seam.
After finishing the work and taking out the product from under the foot of the machine, unscrew the fabric and lace in different directions and straighten the seam with a thimble or a ring of scissors; the connection of lace with fabric is very beautiful.
If you need to sew the lace gathered together, then it is gathered with the help of a gathering foot or, by loosening the tension of the upper thread and setting a large stitch with the lever, and setting lever 2 to the zero position, sew along the edge of the lace, which will be sewn to the fabric with a sewing straight stitch. They take the lace in their left hand, clamp the ends of the threads on one side of the seam, and with their right hand grab the end of the lower thread, that is, tighter thread, and pull it out a little from the seam. The resulting assemblies are evenly distributed.
If the assemblies are not thick enough, then the lower thread is pulled out a little more from the line. To sew the gathered laces to the fabric, cut the edge of the fabric, bend its cut, mark the gathered lace cut to it and grind it with a zigzag stitch 2 mm wide and of the corresponding density.
If you want to sew lace not to the edge of the fabric, then a sewing line is laid on it with chalk, a simple pencil or thread, and the edge of the lace is applied to this line, as shown in Fig. 42, d, and stitch it to the fabric. Sewn laced to the fabric with a zigzag stitch 1.5 mm wide and 1.0-1.5 mm thick.
The gathered lace is also sewn with a zigzag stitch 2 mm wide and 2 mm thick, that is, the density and width should be almost the same. You can sew lace to the fabric using a knife switch, threading the edge of the fabric into the spiral of the knife switch, and lace into the needle slot of the knife switch if it has a side slit.
FABRIC CONNECTION JOINT
When it is required to connect two canvases of fabric so that their edges do not overlap one another, but only closely adjoin one another, they are basted on one strip of paper, as shown in Fig. 43, a, and put the paper down under the presser foot so that the fabric joining line is opposite the middle of the presser foot, as shown in fig. 43.6. Lower the foot onto the fabric and sew with a zigzag stitch. Usually, a test stitch is performed on pieces of fabric and, only by adjusting the stitch in width and density, the canvases are joined with a butt seam.

Rice. 43. Joining fabrics butt
When sewing, the fabric is guided so that the needle passes alternately to the right and then to the left of the connection line and at the same distance from it. On a fabric with a pile or with a production, if the threads are matched to the color of the fabric, the stitching will hardly be visible.
THREE-THREAD SUSPENSION OF COTTON FABRICS WITH VJUNCHIK AND HERLINE SEAMS
When sewing light women's dresses, summer sundresses, children's dresses from satin, chintz, the bottom of the product, short sleeves, neckline and pockets are hemmed with an ordinary straight stitch. The hemming will be more beautiful if it is sewn with a twin or twin needle and a three-thread stitch. To do this, instead of one needle, a narrow double needle with a distance of 1.8-2 mm between its blades or an average needle with a distance of 2.5 mm between the blades is placed on the zigzag machine and the upper threads are threaded: cotton (bobbin), silk (on tubes) , synthetic or floss (mercerized).

Rice. 44. Sewing cotton products with bindweed and herringbone seams.
Any thread can be used, but it must match the color of the fabric.
If the upper threads are silk and the lower threads are cotton, then slightly loosen the tension of the upper threads so that the lower thread is not visible on the right side of the fabric. Lever 2 is set to the middle digit of its scale, lever 1 - as for a straight line (see Fig. 23, a-27).
The fabric cut is folded two times: once by 3-4 mm, and another time in the same direction to the required hem width and the folded edge is swept out. Then the product is placed under the foot with the bent edge down so that the line of the note is located in the middle of the foot, as shown in Fig. 44, a. Lower the foot onto the fabric and stitch, guiding the fabric so that the note line does not extend from the middle of the foot.
After finishing work and taking out the hemmed product from under the machine's foot, remove the sweeping threads. The stitching on the front side of the product will look like a sewn-on bindweed, as shown in fig. 44, b, and from the seamy side of the product, this line will look like a herringbone (Fig. 44, c).
If you put the fabric under the foot with the bent edge up, then the bindweed-like stitch will be on the wrong side of the product, and the herringbone-like seam will turn out on the front side, as shown in Fig. 44, d.
If you thread the machine with three threads of different colors and, making the tension of the upper threads a little tighter than the tension of the lower thread, sew on the wrong side of the product, then the Christmas tree will be three-colored. The stitching turns out to be especially beautiful if you thread the machine with floss or silk threads. After finishing the hem and taking out the product from under the foot, remove the basting threads.
Stitches similar to a bindweed or a herringbone are used to hem not only the bottom of a dress or a sundress, but also to trim pockets, collars, yokes, hem tablecloths and curtains (Fig. 44, e)
RELIEF SEAMS
Embossed seams adorn women's suits, coats and children's coats made of woolen fabric. Embossed seams, like folds, must be made impeccably even, the same, otherwise they will only spoil the appearance of the product.
To perform a relief seam, a line is marked on the fabric, the fabric is bent along this line, sewn with a straight line at a distance of 2-3 mm from the fold line of the fabric, and a cord is pulled into the seam. Then other embossed seams are also made. With this method of making embossed seams, it takes a very long time to pull the cord through them. In addition, only experienced sewing masters can make embossed seams very even.
But if you make embossed seams and small folds with: using a double needle and a special foot, then they will turn out to be impeccably even, the same, and will be located at the right distance from each other. For their production, neither preliminary preparation of the fabric nor its direction during sewing is required.
To make embossed seams, instead of one needle, a double or twin needle is inserted into the machine, with a distance between the blades of at least 3 mm. Instead of the foot removed from the machine, a foot is placed, which has guide grooves (grooves) on its pressure plane (on the sole). To make embossed seams on woolen suit fabrics, a foot with wide grooves is required, and for thinner woolen and staple fabrics, narrow ones. These legs are attached to the Lada machine.
To make embossed seams, a double needle is threaded with two upper threads in the color of the fabric so that they are not visible on the product. Spools of cotton thread or tubes of silk thread are placed on the spool pins.
Having installed a double needle and a foot with grooves on its sole on the machine, set the machine control levers to a certain position in the same way as for a regular straight stitch, that is, lever 1 is set to such a division or such a number of its scale that corresponds to the stitch length in 2 mm, lever 2 and lever 3 - in their zero positions.
The installation of the control levers should be done as shown in fig. 23-27. After installing the control levers of the machine, make a test sewing. If the seam with the usual thread tension on a given fabric is not convex enough, then the thread tension is slightly increased.
Having prepared the machine, the fabric is also prepared, one line is marked on it for the first embossed seam and the fabric is placed under the foot so that the beginning of the outlined line 5 (Fig. 45, a) is opposite the slit (slot) 6 dividing the legs of the foot. The foot is lowered onto the fabric and stitched, guiding the fabric in such a way that the marked line 5 would also pass in the middle of the foot.

Rice. 45. Making embossed seams
After finishing the first stitch, remove the fabric from under the foot and put it back on so that the finished embossed seam enters the right or left groove of the foot, depending on which side of the first seam you want to make a group of embossed seams.
In fig. 45.6 relief seam 7 is wound into the right groove 8 of the foot. In the manufacture of the second raised seam, like all subsequent ones, it is not required to support or guide the fabric. The raised seam 7 inserted into the groove 8 of the foot will itself serve as a guide for the next seam. Touching the fabric with your hands while the machine is running can only move the seam guide out of the guide groove of the foot. You just need to make sure that at the end of each seam, stop the machine in time and, removing the fabric from under the foot, insert the seam into the right groove (guide groove) of the foot. If seams are to be made to the left of the first seam, then each previous seam is inserted into the left groove of the foot (Fig. 45, c).
The embossed seam will be even more convex if you put a special throat plate 9 (Fig. 45, d) with a projection 10 on the machine instead of the throat plate installed on it.
The fabric in front of the foot will bend around the shoulder to increase the bulge of the seam. Such a throat plate with a protrusion is supplied with the Lada machine, and on the Köhler machine, instead of a throat plate with a protrusion, a device is installed (Fig. 45, (3), which is called a tire in the instructions for the Köhler machine. the throat plate of the Köhler machine, in which there are special holes 11 for it (Fig. 45, e) During the lowering of the presser foot, which has grooves on the pressure plane, the tire, with its upwardly bent edge, enters the middle groove of the presser foot.
The accessories box sold with the Koehler car contains three tires of different heights and widths. One of them, the widest, is designed for making relief seams with a width of 4 mm and folds, the other, the narrowest, for tucks and the third, middle, for folds 2.5 mm wide.
To give a greater bulge to the embossed seam, a cord is laid inside it. The cord can be a thread of iris or an even thicker thread. Embossed seams with a cord are made with a regular throat plate without protruding without a splint, but with the same foot with grooves on the sole and a double needle, which are used to make embossed seams without a cord. Before placing fabric under the foot, place the cord on the throat plate so that it passes through the middle of the throat plate needle slot, that is, lies on the middle teeth of the rack.
In the throat plate of the Tula model 7 there is a special round hole 12 (Fig. 45, g), which is located in front of the needle slot 13. In the Köhler machine, the cord can be passed through the slot 11 (see Fig. 45, e) between needle and locking plates, made for inserting the bus. After passing the cord through a hole, groove or passing the beginning of the cord along the needle plate, put the fabric on top of the cord, straighten the cord under the fabric and, lowering the foot, turn the flywheel of the machine by hand, making the first stitches so that the right needle stitch goes from the right side of the cord, and the left needle stitch with the left needle, then the cord will be between the stitches. Further, the machine itself will provide the passage of the cord between the lines. On the back of the fabric, the bobbin thread will pull off both top stitches, so that the cord will be wrapped in the fabric.
Embossed seams with a cord (Fig. 45, h) are very strong and even when ironing the product does not smoothen.
EXECUTION OF PROTECTIONS
With the help of a double needle and a foot with grooves on the sole (grooved foot), you can make small folds, including the smallest folds, called tucks, in which the stitch runs at the very line of inflection of the fabric.
How folds and tucks are made on lockstitch machines was discussed in Chapter I, but they can also be performed on zigzag machines and in other ways, which greatly facilitates the work, improves its quality and requires much less time to complete them.
Pintucks are a beautiful decoration for a light blouse or dress made of fine fabric.
To make pinches on the machine, you need to set lever 1 a little closer to 0 than it is for a simple seam stitch, that is, you need to set lever 1 so that the stitch length is 1.5 mm. Lever 2 in all of the above machines must be in the zero position, that is, turned off from the machine; lever 3 is in its central position. Thus, all control levers, except for lever 1, must be set as for a regular straight stitch, i.e. as shown in fig. 23-27. Having installed the control levers, instead of a simple machine needle, insert a double needle with a distance between the blades (needle shafts) of no more than 2 mm and put on the machine a foot that has narrow guide grooves (grooved foot) on the pressure plane. A fabric is placed under the foot, on which one line is laid for the tucks. Place it so that the basting line is in the middle of the foot. Lower the foot onto the fabric and stitch. It turns out a very small fold, which is very difficult to make so even without guide grooves on the sole of the foot and a twin needle. Particularly well-made pintucks are obtained using a six-groove foot (Fig. 45, i) attached to the PMZ Chaika machine and feet with five grooves on the sole, sold in a set for the Kehler machine and separately for the Veritas machine.
After completing the first pint, insert it into the right or left groove of the foot, as when performing the raised seams described above.
PERFORMANCE OF FOLDING
Small folds with a width of 2 to 4 mm are made using a double needle and a foot with grooves on the sole in the same way as the relief seams described above, but for these folds the distance between the rods (blades) of the double needle must correspond to the width of the folds, i.e. That is, folds, for example, 3 mm wide, are made with a double needle with a distance between its rods of 3 mm. But in addition to the width of the fold, the thickness of the fabric must also be taken into account, for example, when making folds 2 mm wide on a thin silk fabric, take a needle with a distance between the blades of 2 mm, and when making the same folds on satin or staple, take a needle with a distance between its blades (rods ) 2.5 mm. The presser foot is selected according to the needles. For folds, for example, 2 mm wide, take the foot with the smallest grooves, that is, with five or three grooves on the sole.
When making small folds on the Lada machine 236 cl. change the throat plate to plate 9 with a projection 10 (see Fig. 45, d).
To make folds up to 4 mm wide on the Köhler machine, the throat plate is not changed, but a so-called splint is inserted into the special slot in the throat plate.
On the Köhler machine, folds of any size ranging from 1 to 4 mm are made using appropriate splints, double needles and feet with grooves on the sole. Folds made with a double needle will have a stitch on both sides of each fold, so when you iron a group of folds or one fold to either side, the stitch will be visible.
SEWING THE CORD
The cord for finishing clothes is sewn using a special foot for sewing on the cord. Please note that these feet are not suitable for all machines. Sewing on the cord on the Tula machine is carried out using the foot No. 1 for sewing loops. For the Lada machine, they buy a foot for sewing a cord from a Veritas or Nauman machine, it is sold without a number or under No. 301. On a Keler machine, they work with a foot for patterned stitches No. 0551, for sewing a cord on a Radom machine »Use buttonhole foot No. 86227.

Rice. 46. Sewing a cord on zigzag machines
Instead of the foot removed from it, a foot for sewing a cord or a foot replacing it, and a regular machine needle are placed on the machine. The cord is sewn with a zigzag stitch by adjusting the lever 2 so that the stitch does not protrude beyond the sides of the cord for a large distance and so that the needle does not fall into the cord (Fig. 46, a), that is, the width of the zigzag stitch is adjusted according to the width of the cord ... In this case, the lever 1 can be in the same position as when performing a normal straight stitch, or it can be set to a shorter stitch.
If you need to sew on a cord with a larger diameter than the diameter of the iris thread, then it is tied to the fabric stretched over the hoop, then sewn without a foot. How to operate the machine without the presser foot will be discussed in Chapter IV, Embroidery and Darning.
To sew a cord (iris thread) on the Tula machine, it is required not only to adjust the width of the zigzag stitching with lever 2 and its density with lever 1, but also turn lever 3 to the right, since hole 5 in foot No. 1 (Fig. 46.6 ), through which the cord 6 is passed under the foot, is located to the right of the center of the foot. On Lada, Kehler and Radom machines, lever 3 must be in its central position.
Sew on the cord with silk threads or floss threads. Moreover, the threads are not taken in the color of the cord and not in the color of the fabric, so that they are visible on the cord, the color of the lower thread can be any.
On machines "Lada" and "Kehler" you can sew not only with floss threads, but also with weaker threads. If the upper and lower threads are the same, that is, both cotton or silk, then their tension should be the same, and if the upper threads are silk or mercerized cotton, then the lower thread should be slightly tighter than the upper threads so that it was not visible from the front side of the product.
Usually, the cord is laid along straight lines, for example, when finishing the collars of sailors, but the cord can also be sewn along curved lines: smooth (Fig. 46, c) or broken (Fig. 46, d). You can lay the cord along two intersecting broken lines, as shown in fig. 46, d. To sew the cord in this way, it is first laid along one line 7, and then along another line 8.
Consider sewing a cord on a Kehler machine. Under the foot attached to the machine for sewing on the cord, bring the fabric so that one of the lines for sewing the cord outlined on it passes against the round hole 9 (Fig. 46, e), pass the cord through this hole, pull it out 2-3 cm from - under the paws and lead by the paw (Fig. 46, g). If the cord is an iris thread, then lever 2 is set so that the width of the zigzag stitch is about 2 mm, and lever 1 is set to a stitch length of 1.5-2 mm. In fig. 46, h shows the installation of the lever 2, and Fig. 46, and an approximate installation of the lever 1 is shown. Pay attention to the figure or the risk of the scale, which is located at the top, that is, under the pointer (triangle) in this case, at lever 2 - under the pointer 10, and at lever 1 - under pointer 11. Lever 3 should be in the center position when sewing on the cord. In the Kohler machine, it is placed with the rhombus of its scale upwards under the pointer (triangle) 12 (Fig. 46, k). Lever 4 is placed in the working position, ie point 13 up (Fig. 46, l) under the pointer (triangle) 14. Lower the foot onto the cord and stitch.
During operation, the machine guides the fabric so that the cord lies along the line marked for sewing it on. After sewing a little, they look at the resulting sewing of the cord and specify the position of levers 2 and 1. When sewing on the cord, only the fabric is guided, the cord is not touched, but only make sure that it does not get tangled in front of the foot and does not curl.
STITCHING
A very laborious manual work is buttonhole sewing. Machine-sewn buttonholes are much stronger and more beautiful than hand-sewn buttonholes.
On zigzag machines for sewing buttonholes, the foot is changed and the control levers are set for sewing the edges of the buttonhole, making their bartacks.
All zigzag machines use a regular needle, not a twin, for buttonholes.
Decorative buttonholes can be sewn with a double needle on both edges of the buttonhole. After setting lever 3 to the central position, lever 2 for overcasting a zigzag stitch 2 mm wide, and lever 1 on a tight buttonhole seam, insert a double needle with a distance of 2 mm between the blades and, putting fabric under the foot, make a loop of the required length. The loop turns out to be very smooth and beautiful. But you cannot cut it - it will crumble, since both sides of the loop from below are connected by one lower thread.
Regular buttonholes are made with one machine needle, sewing first one and then the other side of the buttonhole. The control levers are set to perform a thick zigzag stitch with a width of 2 mm. The density of the zigzag stitching is adjusted with the lever 1 according to the thickness of the threads.
With very thin threads, lever 1 is brought very close to 0 of its scale, but it is not set to the zero position, since there will be no advance of the fabric.
Having achieved a tight buttonhole seam, the position of the lever 1 during overcasting is no longer changed, and the position of the levers 2 and 3 of the machine control is changed several times depending on the operation, since when overcasting the edges (sides) of the buttonhole, one setting of the levers is required, when making bartacks on the ends of the loop - the other, and when fastening the ends of the threads - the third. Moreover, the fastening of the ends of the threads is performed not with the help of lever 1, as when sewing with a straight line, but with the help of lever 2. Lever 2 for the time of bartacking (3-4 stitches) is set to zero position.
Having prepared the machine, they also prepare the fabric or product for sewing loops, mark the places of the loops. A foot for sewing loops is installed on the machine, fabric is placed under it, loops are overcast, and then they are cut between the sides (edges) from bartack to bartack. The threads threaded into the machine must match the color and thickness of the fabric.
When using machines "Chaika" 115-1 class. and "Kehler" 53 cl. and 51 cl. you can only mark the beginning of the buttonhole, since these machines have rulers for sewing buttonholes.
For cars "Kehler" 53-2 class. and "Kehler" 51-2 class. you can buy buttonhole foot No. 0271 with a ruler from the Keler machine 53 cl. or 49 cl.
For machines "Lada" you can use the foot from the machine "Chaika" 115-1 class. or 116-1 cl.
The loops on all zigzag machines are performed in the same sequence, namely: first they overcast one side of the loop, then, after making a bartack, they overcast the second side and, having made the second bartack of the loop, fasten the ends of the threads so that the loop does not open.
For sewing buttonholes, the control levers are set differently for different zigzag machines. Consider sewing buttonholes using the example of specific machines.
Tula car. To sew buttonholes on the Tula machine, instead of the feet removed from the machine, attach the buttonhole foot No. 1, which is attached to the machine. Lever 2 (Fig. 47, a) is placed on the number 2 of its scale. Lever 1 is installed on the left side of its scale 0, as shown in Fig. 47, a. How to set lever 1, that is, closer to 0 or to the first risk from it to the left, depends on the thickness of the thread threaded into the needle.
Before sewing loops, they stitch on a piece of fabric and specify the position of lever 1. At the same time, when lever 1 approaches or moves away from 0 of its scale, the lever is pulled back to a very small distance, approximately equal to the thickness of one thread.

Rice. 47. Sewing buttonholes on the Tula machine
Having adjusted the required width with lever 2, and with lever 1 the density of the stitch for overcasting the sides of the buttonhole, put under the foot the place of the fabric or product on which the loop is marked, so that the loop line passes in the middle of the foot, and through the needle groove 5 (Fig. 47.6 ) of the foot, the beginning of the outlined buttonhole line was visible. Lower the foot onto the fabric. To make the first side of the loop, with the needle 6 in the upper position (see Fig. 47, a) and the thread take-up 7, turn the lever 3 to the right and, rotating the handwheel 8 of the machine by hand, slowly lower the needle. While lowering the needle, slightly raise the foot lifting lever, correct the position of the fabric so that the needle enters the very beginning of the outlined loop line, i.e., into the center of the outlined fastening line, as shown in Fig. 47, b. Lowering the foot onto the fabric, overcast one side of the buttonhole (Fig. 47, c). Turn the handwheel towards you until the needle enters the fabric in the center of the needle slot of the foot, that is, to the left of the serrated side of the buttonhole, as shown in fig. 47, c. Leave the needle in this lower position and, raising the presser foot (with the presser foot lifting lever), turn the fabric 180 ° (half a turn), as shown in Fig. 47, d.
Lower the foot onto the fabric. The needle is brought to the upper position and levers 2 and 3 are set for making the loop bartack, namely, "lever 3 is in its central position, as shown in Fig. 47, e, and lever 2 is on the number 4 of the scale, and 3-4 stitch.
After completing the bartack, turn the handwheel 8, raise the needle and to perform the second side of the loop, levers 2 and 3 are set in the same position in which they were in the manufacture of the first side of the loop (see Fig. 47, a), i.e. lever 2 set to number 2, and lever 3 is turned to the right. After completing the second side of the loop (Fig. 47, e), the bartack is again made. The second bartack is performed with the same setting of the control levers as the first, namely: lever 2 is placed on the number 4 (see Fig. 47, e) of the scale, and lever 3 is placed in its central position.
Bartack is carried out with 4-5 stitches so that it captures both sides of the loop and seals their ends.
To prevent the loop from unraveling, the ends of the threads are fixed at the zero position of the lever 2 (Fig. 47, g). Raise the foot and advance the fabric so that under the foot there is the beginning of the outlined line of the next loop, which, like everyone else, is performed in the same way as the first. Having finished sewing all the loops, they are cut through. To do this, take a knife from the accessories to the machine (Fig. 47, h), take it out of handle 9, turn it over with the tip 10 outward and insert it into the wooden handle 9 (Fig. 47, a). Then, taking the knife by the handle, pierce the loop with the tip at its very bartack, as shown in Fig. 47, k, and cut the loop to the second bartack.
Lada car. To sew buttonholes on any Lada zigzag machine, instead of the foot removed from the machine, put foot No. 025 and set the machine control levers to obtain a tight buttonhole stitch, that is, a thick zigzag stitch 2 mm wide.
In the car "Lada" T-132 class. (see fig. 24, a) and "Lada" 236 cl. (see Fig. 24, b) lever 1 is lifted up and its scale is set to about 0 (Fig. 48, a, b). In cars "Lada" 236-1 class, "Lada" 237-1 class. and "Lada" 238 cl. lever 1 is rotated in a circle and set by the first division of its scale under the pointer 5 (Fig. 48, c) or in small divisions corresponding to fractions of a millimeter.
Setting the lever 1 for buttonhole sewing on Lada machines is shown in fig. 48, a ("Lada" T-132 class); 48, b ("Lada" 236 cl.); 48, in ("Lada" 238 cl.).

Rice. 48. Overcasting of buttonholes on the Lada machine
Levers 2 and 3 in all Lada machines are set in the same way. To overcast the first side of the buttonhole, lever 2 is set against the number 2 of its scale, as shown in fig. 48.6, c, and the lever 3 is turned to the left (see Fig. 48, a, b, c).
Thread the machine, put a piece of the same fabric on which the loops will be sewn under the foot, and use lever 1 to adjust the density of the buttonhole seam. Then put a fabric or product under the foot with marked lines for overcasting loops so that through the needle slot 6 (Fig. 48, d) of the foot the beginning of the loop is visible, as shown in Fig. 48, d, lower the foot on the fabric, scribble. After sewing one side of the buttonhole (Fig. 48, e), leave the needle in the fabric. When it is in a central position in relation to the slit of the foot, carefully raise the foot so as not to bend the needles, turn the product 180 ° and lower the foot onto the fabric (see Fig. 48, e), turn the handwheel to raise the needle so that it comes out from the fabric and to make the bartack, change the position of levers 2 and 3. Lever 2 is placed on the number 4 (Fig. 48, g, h) of its scale, and lever 3 - in the central (vertical) position.

Rice. 49. Sewing buttonholes on the Kehler machine
Having made several stitches of the bartack, raise the needle to the upper position and set levers 2 and 3 in the same way as they were set for overcasting the first side of the buttonhole, i.e. lever 2 is placed on number 2, and lever 3 is turned to the left (see Fig. 48, b, c).
After overcasting the second side of the buttonhole (Fig. 48, i), perform the second bartack, setting lever 2 to number 4 (Fig. 48, g, h) of the PTO scale, and lever 3 to the central position and make several stitches. To prevent the loop from opening, the ends of the threads are fixed. To do this, put lever 2 in the zero position - (Fig. 48, k) and make 3-4 stitches.
At the end of the buttonhole sewing, the fabric is taken out from under the foot and the threads that go from the machine to the loop are cut with scissors, the loops are cut.
Although a chisel and a plank are given to the Lada machines for cutting loops, it is more convenient to cut the loop with a knife shown in fig. 47, and. It is attached to Tula, Keler, Veritas cars and is sold separately. How to use it is stated in the description of the processing of loops on the Tula machine.
The Koehler car. For sewing buttonholes on the "Kehler" machine, the control levers are set in the following order: lever 1 (Fig. 49, a) - in the first division to the right of 0 on its scale, upwards under the index 5; lever 2 - number 2 under the pointer 6; lever 3 - with a triangle sign facing an obtuse angle to the right under pointer 7.
Instead of the presses on the machine, place a buttonhole foot No. 0771 or No. 0271, place a piece of fabric under the foot and perform trial stitches. Having adjusted the position of the lever 1 until the required seam density is obtained, put the product under the foot on which you want to overcast the loops so that the beginning of the loop can be seen through the needle groove of the foot (Fig. 49.6). Lowering the foot onto the fabric, overcast one side of the buttonhole (Fig. 49, c). Then, leaving the needle in the fabric, when it has passed through the center of the needle slot of the foot, raise the needle slightly, turn the fabric or product 180 ° (half a turn), lower the foot onto the fabric and, rotating the handwheel of the machine, bring the needle to its upper provisions.
Set the levers 2 and 3 of the machine control for making the buttonhole in the following positions: lever 2 (Fig. 49, d) - with the number 4 of its scale upwards under the pointer 6, and lever 3 - with the sign shown on its scale in the form of a rhombus, upwards under pointer 7, make 4 to 5 bartack stitches. Raising the needle, rearrange the control levers 2 and 3 for overcasting the second edge (side) of the loop in the same position in which they were installed for overcasting the first edge of the loop, that is, set lever 2 with the number 2 of its scales up (see Fig. 49, a), lever 3 - with the right triangle sign up and overcast the second edge of the loop (Fig. 49, e).
The second bartack of the loop is performed with the same settings of the control levers at which the first bartack was made, namely: lever 2 (see Fig. 49, d) is set with the number 4 of its scale up, and lever 3 - with a diamond sign up, make 4- 5 stitches and fasten-loop.
To secure the ends of the thread, lever 2 (Fig. 49, e) is put in the zero position, that is, with the number 0 of its scale upwards under the triangle 6 and 3-4 stitches are made.
Having taken out the product from under the foot, cut off the threads going from the machine to the buttonhole with scissors, but do not cut them off, since if it breaks, the thread tack knot will also come off.
After completing all the loops outlined on the product with the knife supplied with the Köhler machine, cut each loop (between its sides) from bartack to bartack.

Rice. 50. Overcasting of buttonholes on the "Radom" machine.
Car "Radom". To overcast a buttonhole on the Radom machine, remove the foot installed on it and put on foot No. 86227 for overcasting.
Lever 1 (Fig. 50, a) is turned up and set with an interval between the first division and 0 of its scale against the groove 5 on the rod 6. Lever 2 is set on the number 2 of the scale, and lever 3 is turned towards the right sign of its scale, as shown in rice. 50, a. Place a piece of the fabric on which the loops will be sewn under the foot, lower the foot and make 10-15 stitches. If the buttonhole seam is not tight enough, then lever 1 is turned to the left so that 0 of its scale approaches the pointer 5, but does not coincide with the pointer, since when lever 1 is set to zero, the fabric will not advance.
Having prepared the machine, the places for the loops are marked on the fabric.
Place the fabric (product) with loops marked on it under the foot so that through the needle slot 7 (Fig. 50, b) of the foot the beginning of the outlined loop line can be seen. Lower the foot onto the fabric and overcast one edge of the buttonhole (Fig. 50, a). Leaving the needle in the fabric at the moment when it came down on the right side of the overcast seam, and raising the foot, turn the fabric half a turn (180 °). Lowering the foot onto the fabric, lever 2 is placed on the number 4 of its scale, as shown in Fig. 50, g, and lever 3 - to the middle sign of its scale, i.e., to the central position. The first bartack is carried out with 4-5 stitches. To overcast the second side of the loop, levers 2 and 3 are put in the same position as when the first side of the loop is executed, that is, lever 2 (see Fig. 50, a) is placed on number 2, and lever 3 is set against the right sign its scales.
The limiters (in the form of buttons) located under the lever 2 do not move, that is, they leave them in the lower position. It is generally better not to touch them.
After overcasting the second side of the loop (Fig. 50, (5), make a second bartack. It is performed at the same positions of the control levers as the first bartack of the loop, namely: lever 2 is placed on number 4 (see Fig. 50, d) its scales, lever 3 - in its central position After completing the second bartack with 4-5 stitches so that the loop does not unravel, fix the ends of the threads, for which lever 2 is set to 0 on its scale (Fig. 50, e) and several (3- 4) stitches. Having finished sewing all the outlined loops, the product is taken out from under the foot of the machine and the loops are cut (Fig. 50, g) with a knife provided in the set of accessories for the machine. inserted into the handle, as shown in Fig. 47, h, and, j. The loop is cut between its serrated sides from the bartack to the bartack.
BUTTON SITTING
On zigzag machines, you can not only overcast buttonholes, but also sew on buttons. Sewing on buttons requires a certain set of control levers and a button sewing foot.
All zigzag machines can only sew on buttons that have holes from top to bottom, not from the side. The distances between them can be different, but no more than 6 mm. Buttons with a distance from one hole to the other no more than 4 mm can be sewn on all zigzag machines, and with a distance of 5-6 mm only on those machines that perform a zigzag stitch with a width of 5 mm (on machines "Kehler" and " Seagull ") or 6 mm (on machines" Lada "238 class and" Radom ").
To sew buttons on any zigzag machine, levers 1 and 4 are turned off, that is, lever 1 is set to zero position, and lever 4 is in a non-working position, thereby stopping the advance of the rack teeth and lowering them under the throat plate. How to set these levers to the inoperative position will be discussed when considering the installation of levers for sewing on buttons on specific machines, since this is done differently on different machines.
Lever 2 is set depending on the distance from one hole to the other in the button, and the position of the lever 3 is changed when performing separate operations during button sewing.
Places for sewing buttons are marked on the product with chalk or a simple pencil. Place the product under the foot so that the designated point 5 (Fig. 51, a) for sewing on the button is in the center of the needle groove 6. On top of the fabric under the foot, put button 7 (Fig. 51.6) so that both of its through holes 8 and 9 were visible through the needle groove 6 of the foot. Lowering the foot on the button, rotate the flywheel of the machine by hand so that the needle, when lowered, does not reach the button by 2-3 mm. Look where the needle point is on the button. Slightly raising the foot, set the button so that the needle point is directed exactly against the middle 10 (Fig. 51, c) of the button (the interval between the through holes of the button). Lower the foot onto the button and, without looking at lever 2, turn it from 0. While turning lever 2, they look at the needle point, and when it stands against the center of one of the button holes, stop turning lever 2, i.e. leave it in this position.
Slowly turning the flywheel of the machine towards you with your right hand, check whether the needle will fall into the other hole of the button. If it hits, then they start up the machine and make 6-8 stitches for sewing on buttons 7 (Fig. 51, d), and so that the sewing on the button does not come loose, the thread is tied.

Rice. 51. Sewing on buttons on zigzag machines
To do this, lever 2 is set to 0, and lever 3 is set to its left position and, if the needle is precisely directed to the center of the left hole of the button, several (3-4) bartack stitches are made.

Rice. 52. Installation of control levers on the Tula machine for sewing on buttons
If the point of the needle is directed to the edge of the button hole, then using lever 3, the position of the needle is specified in relation to the center of the left through hole of the button and 3-4 stitches are made. From hitting the needle in the same place on the back of the fabric, a knot is formed, which must be preserved.

Rice. 53. Installation of control levers for sewing buttons on Lada machines:
a - "Lada" 236 cl .; b - "Lada" T-I32 class; c - "Lada" 238 cl .; g - foot
Therefore, after the product is taken out from under the foot, the threads that go from the machine to the button are cut with scissors, and they do not break off, since when the threads break, they are slightly pulled out of the sewn button and break off together with the bartack knot.
If the button has four through holes, then after sewing the button to the fabric for two holes (Fig. 51, e), it is moved, substituting the second two holes of the button under the needle groove of the foot and also sewn over the second two holes, as shown in Fig. 51, f.

Rice. 54. Installation of control levers for sewing buttons on the "Kehler" machine
A thread will pass between the sewing stitches of the first and second pair of holes. This thread 11 cannot be cut, as the sewing will open. This thread is distinguished by appearance sewing on buttons by machine from a manual method.
Consider the installation of control levers for button sewing on specific machines.
Tula car. Lever 1 is set to 0 of its scale, as shown in Fig. 52, a, lever 2 is also initially set to 0. Lever 3 is in its central position. By moving or removing the sliding plate 5, the knurled head 6 of the lever 4 is turned from working to failure, that is, until it turns further. Direction of rotation in fig. 52, and indicated by an arrow. Close the sliding plate 5. Place the button sewing foot No. 2 on the machine (Fig. 52.6).
Lada car. Lever 1 in cars "Lada" T-132 class., "Lada" 236 class. and "Lada" 237 cl. lead up or down the slot and set against 0 of its scale (Fig. 53, a, b), and in the machines "Lada" 236-1 class, "Lada" 237-1 class. and "Lada" 238 cl. the lever 1 is turned in a circle and set 0 of its scale upwards under the pointer 5 (Fig. 53, c), that is, lever 1 of any Lada machine is set to the zero position, as shown in Fig. 53, a, b, c. Lever 2 at the beginning of work is also put in the zero position, that is, on the number 0 of its scale.

Rice. 55. Installation of control levers for sewing on buttons on the "Radom" machine
Setting the lever 2 to the zero position is the same in all Lada machines, except for the Lada T-132 class. It is made by turning the lever 2 in a circle and setting it with the pointer 6 against 0 of the scale. But the scales of the cars are located in different ways: for example, the cars "Lada" 236 class. and "Lada" 238 cl. on the dashboard, and the car "Lada" T-132 class. in the slot 7 (see Fig. 53, b) the sleeve rack. Lever 3 is placed in the central position, i.e. in the vertical position, as shown in Fig. 53, a, b, c. Lever 4 in the "Lada" T-132 cl. turn to the left and set its pointer 8 against the left point 9 (see Fig. 53, b), and in Lada cars of all other types and classes, except for Lada T-132 cl. and "Lada" T-132 class 2, lever 4 from the right working position is transferred to the left non-working position (see Fig. 53, a, c). A foot No. D25 (Fig. 53, d) is attached to the machine for sewing on buttons.
The Koehler car. Lever 1 (Fig. 54) when changing its position rotates together with its scale. It is set 0 up against pointer 5.
Lever 2 to start work is also set to zero position by turning it to the right so that 0 of its scale stands up under the pointer 6.
Lever 3 is placed in its central position, that is, with a diamond sign upwards under the pointer 7.
Lever 4 by turning to the left (towards the needle) is set with the lattice sign 8 upward under the pointer 9. In this case, the tooth with the dot sign 10 turns out to be on the left side, as shown in fig. 54.
For cars "Kehler" 53 cl. and "Kehler" class 51, as well as on the cars "Kehler" 53-2 class. and "Kehler" 51-2 class, for sewing on buttons, they put the foot having No. 291 or that foot of the set to the machine on which there is no number.
Car "Radom". Lever 1 (Fig. 55, a) is installed so that 0 of its scale stands above the pointer (groove) 5 on the rod 6 of lever 1.
Lever 2 is set to 0 of its scale,
lever 3 - opposite the middle mark 7 of its scale, as shown in fig. 55, a.
lever 4 is brought to the inoperative position. The groove 8 of the lever 4 in the working position is located above the platform 9 (Fig. 55, a) of the machine, and in the non-working position, half of it is under the platform 9, as shown in Fig. 55, b.
To bring the lever 4 to the non-working position, i.e. lower the teeth 10 of the rack (Fig. 55, a) under the throat plate And, press the head 12 (Fig. 55, a, b) of the lever 4, move the lever 4 to the left until those until part of the platform 9 of the machine enters into its groove 8, as shown in Fig. 55, b, and release the head. A foot for sewing buttons is placed on the Radom machine.
SEWING PATTERNS ON ZIGZAG MACHINES WITHOUT AUTOMATION
In addition to the stitches and seams that are sewn, pattern and embroidery stitches can be sewn on zigzag machines. Moreover, patterned and embroidery stitches are performed in different ways. Pattern stitches can only be sewn on zigzag machines, and embroidery stitches can be done on any machine, but they are easier to sew with zigzag machines. Patterned stitches on zigzag machines, which have not only a zigzag device, but also a copier called automatic, are even easier and easier to perform. When making some embroidery stitches, the zigzag machine not only facilitates the most laborious work, but also improves its quality and speeds up the process of its execution several times.
To obtain patterned stitches on a zigzag machine without automation, you need to manually control the levers of the machine so that all elements of the repeating patterns are the same. This requires rhythmic rotation of the lever while the machine is running, which requires some experience in manually operating the levers. When making patterned stitches on zigzag machines with automatic equipment, you do not need to turn the levers while the machine is running, but only before starting the machine, you need to make a certain setting of machine control levers and levers or automatic control levers, in other words, you need to dial pattern. A set of a pattern is the installation of machine control levers and automation control levers in accordance with the pattern selected in the table.
Patterned seams are made with a thick zigzag stitch, therefore, even with the so-called automation, they are not sewn very quickly, that is, a lot of stitches are required to complete each pattern of a patterned stitch. Sewing very long patterned stitches while working on a foot sewing machine is tedious, so it is advisable to buy and install an electric motor on the machine.
To carry out patterned stitching on the Kehler machine 51 cl. or "Kehler" 51-2 class. instead of the paws removed from it, a foot for patterned stitches is installed, and a foot for sewing buttonholes is put on the Lada machine, but it is more advisable to buy a foot for patterned stitches from the Veritas machine, it also fits the Lada machine.
If there are no special pads for pattern stitches, they can also be sewn with the presser foot (zigzag foot). If the pattern stitches are sewn with the presser foot, they will turn out to be flattened, not convex, since there is no groove on the sole of the presser feet, and the groove on the sole of the buttonhole foot is slightly narrower than the groove that the foot for patterned seams has. Therefore, when sewing with the buttonhole foot, the edges of the patterns are wrinkled.
Patterned stitches are performed with silk threads, floss threads or thin cotton (bobbin) threads No. 60, 80. Moreover, the upper thread when making patterned stitches can be silk or floss, and the lower thread - bobbin thread. But in this case, the tension of the upper thread should be slightly weaker than the tension of the lower thread so that the lower thread is not visible from the front side.
And if both threads (upper and lower) are silk or floss and you need to get a patterned line with a frame, then thread the machine with threads of different colors and the tension of the upper thread is made a little tighter than the tension of the lower thread. Then the lower thread will be visible on the front side of the fabric along the edges of the pattern, as if framing it.
Patterned stitches, when laid in parallel in several rows with small distances from each other, will create a wide patterned stripe.

Rice. 56. Finishing products with patterned stitches.
This finish can be used for summer dresses and suits, children's clothing, pillowcases, etc. Pattern stitches can be made not with the same patterns, but by alternating different pattern lines or changing the thickness of individual patterns. Pattern stitches can be made at different distances from one pattern to another. Examples of using patterned stitches are given in Fig. 56, a.
Patterned stitches can be used to hide the seams of joining various fabrics (Fig. 56, b), if, for example, the fabric is narrow or short. So, with the help of patterned stitches, you can make a large beautiful tablecloth, curtains, curtains for windows and smaller things, such as cushions, from individual pieces of fabric. In fig. 56, c shows a tablecloth sewn from several pieces using patterned stitches.
Patterned lines not only mask the stitching seam, but also serve as a decoration for products. You can also attach a colored border to the tablecloth, curtain, sew a colored strip to the bottom of the dress (Fig. 56, d, e).
To perform a patterned stitch, lines are applied to the fabric or product along which it must pass. If you want to sew the patterned stitch in a straight line close to the edge of the fabric, you can use the limit ruler. The fabric is inserted under the foot so that the marked line along which the patterned stitch should pass is directed against the middle of the foot.
Consider the execution of specific patterned stitches on zigzag machines.
In all zigzag machines, before making patterned stitches, machine control levers 1 and 2 are set in the same way as for sewing buttonholes (Fig. 57, a, b, c, d, e) and a test seam is made on a piece of the fabric on which the pattern will be executed.
Lever 1 adjusts the density of the zigzag stitching. To do this, lever 2 is set on the number 2 of its scale, and lever 1 is brought closer or further away from the zero setting, depending on the thickness of the thread, until the stitches lie across the line of the line and close to each other. Then lever 2 is returned to the zero position (Fig. 57, f, g, h, i, j), and lever 1 is no longer touched.
After adjusting the density of the stitch, take out a piece of fabric from under the foot, put a product or fabric on which the patterned seam will be made. To perform the selected pattern, for example three-stage (The name "three-stage" is given in the book conditionally.) With the width of its parts from 1 to 2 mm, set lever 2 to the division of its scale, at which the required width of the parts is obtained (Lever 2 can be installed to different widths, starting almost from the 1st division to the end of the 2nd division of the scale, but not further than the number 2.), lower the foot to

Rice. 57. Different setting of control levers 1 and 2 when making patterned stitches on machines:
a, f, l, p, x - "Tula" model 7; b, f, m, s, c - "Lada" 236 class: c, s, n, t, h - "Lada" 238 class; z, u, o, u, w - "Kehler"; d, k, p, f, u - "Radom"

Rice. 58. Various settings of the lever 3 of the machine control for making patterned stitches:
a, f, l - by car "Tula"; b, g, m - by car "Lada"; c, h, k - by car "Kehler"; e, i, o - by car "Radom"; d, k, p - by car "Chaika"
fabric, and, having set the machine in motion, control the lever 3, namely from the central position (Fig. 58, a, b, c, d, e) move the lever 3 to the left position (Fig. 58, f, g, h, i, j) and hold it like this until it is counted to three, and then again move lever 3 to its central position (Fig. 58, a, b, c, d, e) and hold it like this until do not count to three, then turn lever 3 to the right (Fig. 58, l, m, n, o, p); the lever is left in this position until it is counted to three, and then it is moved to the central position and the permutation of the lever 3 is repeated, holding it in each position for the same time. In this case, the lever 3 is transferred from one position to another as quickly as possible. With such a change in the positions of the lever 3, the three-step pattern will consist of square parts (Fig. 59, a), and if at each of the three positions the lever 5 is held until they are counted to five, then the parts of the pattern will be longer (Fig. 59 , b). You can change not only the length of the parts of the pattern, but also their width.
If you move lever 2 closer to 0 and set it as shown in Fig. 57, l, m, n, o, n, then the largest width of the patterned line will be 1.5 mm, and the pattern will have the form shown in fig. 59, c.

Rice. 59. Samples of patterned stitches made on zigzag machines
If lever 2 is still brought closer to 0 and set at the first division from 0, for example, at the number 1 (see, Fig. 57, p, c, t, y, f), then the pattern will consist of even narrower parts, and if the lever 2 put in its zero setting (see, Fig. 57, f, g, h, i, j), then the pattern will consist of one simple line (Fig. 59, d), but will remain three-stage.
If lever 3 is moved from the left position to the right, and then again to the left and again to the right, without holding it in the central position, then the pattern will turn out to be two-stage *; as shown in fig. 59, d, f, g.
If a two-step seam is performed with the zero position of the lever 2, then it will have the form shown in Fig. 59, (5, and if lever 2 is set accordingly to a zigzag stitch with a width of 2 mm, then the patterned seam will have the form shown in Fig. 59, e, if it is, accordingly, to a zigzag stitch with a width of 1.5 mm, i.e., lever 2 set as shown in Fig. 57, l, m, n, o, n, then the pattern will have the form shown in Fig. 59, g.If lever 2 is set at the first digit from 0, as shown in Fig. . 57, p, s, z, y, f, then the pattern will consist of even narrower parts.
But different patterns can also be obtained by turning the lever 2.
If you set the lever 3 in its central position (see Fig. 58, a, b, c, d, e), and while the machine is running, turn the lever 2, then the patterns will look different.
For example, to get the pattern shown in fig. 59, h, it is required during the operation of the machine to move the lever 2 from its zero position (see Fig. 57, f, g, h, i, k) to the end of the scale, as shown in Fig. 59, h. 57, x, c, h, w, u, and back to zero position (see Fig. 57, f, g, 3, i, k).
Lever 2 should be shifted evenly in each direction, counting up to five, and if you turn lever 2 faster, then the parts of the pattern will be shorter (see Fig. 59, and), if, on the contrary, you turn the lever 2 more slowly, then the parts of the pattern will be longer. If lever 2 is turned slowly in one direction and very quickly in the other, then the pattern will look like a chain of triangles shown in Fig. 59, office
You can also use lever 3 when working with lever 2, for example, move lever 3 to the left position, as shown in. rice. 58, f, g, h, i, k, and turn lever 2 from one end to the other end of its scale, the pattern will have the form shown in Fig. 59, l, and if you set the lever 3 to the right position (Fig. 58, l, m, n, o, p), and turn the lever 2 in the same way, then the pattern will look as shown in fig. 59, f. Using a different set of control levers, you can make other patterns by combining them.
For example, if after each pattern with the central position of the lever 3, hold the lever 2 at its zero setting, counting to two or three, then a straight line will pass between the patterns, as shown in Fig. 59, n, o.
You can alternate patterns and lay a regular line between them to get the pattern shown in Fig. 59, p. With the central position of lever 3, lever 2 is smoothly turned first to the end of its scale and back to zero position.
Then the lever 2 is delayed by 0 for as long as the straight line laid between the patterns is of the desired length. Then the lever 2 is quickly transferred to the number 4 and again, just as quickly, it is returned to the zero position.

Rice. 60. Lever limiters 2 of the Koehler machine in different installations
You can make patterns in which parts of the unequal width are, that is, the outer parts of the pattern are 2 mm wide, and the middle part is 4 mm. To do this, the lever 2 is first set in such a position that the width of the pattern parts is 2 mm. For example, in a Tula or Lada car, you can move lever 2 from 0 to number 2 of its scale and, having started the machine, keep lever 2 in this position, counting to three, and then move lever 2 further from 0 to the end its scale. and, keeping it in this position and counting to three, again translate it to number 2 of its scale. After completing a part of the pattern in a count of up to three with this setting of the lever, move the lever to zero position, hold it so, counting to three, then repeat all over again. The pattern stitch will look like the one shown in fig. 59, p.
If you change the setting of lever 1, i.e. make the zigzag stitch less dense, then the patterns will look as shown in fig. 59, s, t, u.
Wide patterned stripes can be made from these narrow patterned stitches by running the patterned stitches in several rows in a row, as shown in fig. 59, f, x, c.
To make it possible to move lever 2 from one scale digit to another when making a pattern, without looking at the lever and its scale, the Koehler machine has special limiters.
If, for example, to make a pattern on the Koehler machine, you need to move lever 2 from number 2 to number 4 and back to number 2 of the scale, set lever 2 with number 2 under pointer 6 (Fig. 60, a), pressing the left stop 5 , move it to the left and up, that is, in a circle until it stops (Fig. 60, b), and then, moving the lever 2 with the number 4 upwards under the pointer 6 (Fig. 60, c), press the right stop 7 and take away it to the right and up until it stops (Fig. 60, d). And if, after installing the limiters, it is necessary to temporarily move the lever 2 to any position, then press the button 8 located under the star 9 of the disc 10 and, turning the lever 2 to the required position, release the button 8.
SEWING PATTERN STITCHES ON ZIGZAG MACHINES WITH AUTOMATIC (COPYING DEVICE)
If the zigzag machine has automation, then to complete the patterned stitching, you do not need to turn one or another lever while the machine is running, since the automation itself will ensure the execution of the pattern, the exact repetition of its parts.
With the help of automation, it is possible to perform not only all those patterns that a zigzag machine makes without automation, but also such patterns that cannot be performed without automation.
To sew patterned stitches on any zigzag machine, both with and without automation, you need to put on the machine a foot for patterned stitches or for sewing buttonholes; insert a regular machine needle, thread the machine with silk or floss threads. You can thread the machine so that the upper thread is silk or floss, and the lower thread is cotton (bobbin), no. 60. Then adjust the machine for a tight buttonhole seam.
After that, the fabric is prepared, that is, the lines are marked on it along which the patterned line should pass.
Place the fabric under the foot and lower the foot onto the fabric so that the patterned stitch is in the desired position.
But setting levers and making patterned stitches on machines with an automatic machine is done differently than on a zigzag machine without an automatic machine. To perform a patterned line on machines with automatic equipment, first, a pattern is selected according to a special table, then they are typed on the machine and, turning on the automation and starting up the machine, they only direct the fabric placed under the foot.
How the pattern is typed and how it is performed is described below.
Patterned stitches using automation are performed in the following order.
At zero settings of the levers and automatic control stars, set the machine control levers to the buttonhole stitch. Having adjusted the seam density according to the thickness of the threads that will be used for the patterned stitching, lever 2 is returned to zero position, and lever 1 is left in the same position in which it was adjusted for the buttonhole stitch.
Automation is controlled differently for different machines. For example, Lada cars have levers, Veritas cars have stars, and Kohler cars have stars on the levers. Even the Lada machines have different control of the automatics: the Lada machines have 237 cl. and "Lada" 237-1 class. it is required to type a pattern on the machine, and the car "Lada" T-132-2 class. it is required to change the copiers on the automation shaft.

Rice. 61. Execution of patterned lines on machines "Lada" 237 cl. and "Lada" 237-1 class.
Therefore, the execution of patterned lines with the help of automation in the book is considered on specific machines.
Lada car. On all Lada cars with automatic equipment (Lada 237 class, Lada 237-1 class and Lada T-132-2 class), the matic is located under the cover of the machine sleeve.
Automation on machines "Lada" 237 cl. and "Lada" 237-1 class. the same. Therefore, basically the execution of a patterned line will be considered on the example of the machine "Lada" 237 class, and some differences in the control levers of the machine will be discussed below. Making patterned lines on the Lada T-132-2 class machine, which has a completely different device and automatic control, is said at the end of the book.
* In the car "Veritas" 8014/35 cl. with a software device and in the car "Lada" T-132-2 class. with replaceable copiers, the pattern is not typed, but installed.
Automation on the machine "Lada" 237 cl. located under the cover 5 (Fig. 61, a) of the cover 6 of the machine arm. Automation is controlled by three levers: left A (Fig. 61.6), right B and upper (rear) C. The zero setting of all these three automation levers is such that they stand against 0 of their scales 7, 8, 9. To display any automation lever from its zero position, certain techniques are required, and for the left and right levers there is also a certain setting of levers 2 and 3 to control the machine.
When using the automation control levers and machine control levers, keep in mind the following:
to move the left lever A of the automatics, turn the lever 3 to control the machine to the left, and to move the right lever B of the automatics, turn the lever 2 to control the machine to the right. Moving the upper lever C of the automation does not require a specific installation of control levers and a specific installation of the automation levers: it moves independently of the position of the other levers. When turning lever 3, lever 2 must be in the zero position, and also when turning lever 2, lever 3 must be in the zero (center) position;
having installed one automation lever, the levers 2 and 3 of the machine control are returned to their original (zero) positions, and only then they are set as required for the movement of the next automation lever, after installing the next automation lever, the levers 2 and 3 of the machine control are again set to zero provisions, and then as required according to the pattern table;
first, the left automation lever A is set to a certain position, and then the right B. The upper lever is installed last.
To be able to move the automation levers along the scale, you must first press the lever head, then move it slightly to the left of the scale and, leading along the slot, set it against a certain division.
After setting the automation levers to a certain position, levers 2 and 3 are first set to zero, and then to the position required to complete the selected pattern.
In what position should be the levers 2 and 3 of the machine control and the left and right levers of the automation, depends on the pattern selected from the table, which indicates the positions of the left and right levers of the automation and levers 2 and 3 of the machine control.
* If you start to move the levers A and B without a predetermined setting for their movement of the machine control levers, then the automation will deteriorate.
Having set the automation levers and the machine control levers to a certain position to perform the patterned stitch selected from the table, turn on the automation and start the machine.
Moreover, if they want to get a patterned line from narrower patterns, then lever 2 can be set to a smaller number of its scale, and it cannot be set to a larger one than is required by the pattern, since the automation will deteriorate.
The head of any lever A, B or C of the automatics is pressed until the lever is moved to the required scale digit, after which the head of the lever is released, and the lever itself will fall into place, i.e. moves closer to the scale.
The automatic lever C should be installed on the number 4 or a larger number of its scale, for example, on the number 5 or 6, but it should not be installed on a lower number, since it will be difficult to make out the drawing; it will be indistinct, indistinct or a patterned line will not work at all, but there will be a thick wide line.
Having considered the rules for handling the automatic levers, let us look at the table of patterns attached in the manuals for the Lada 237 cl. and "Lada" 237-1 class.
The table (Fig. 62, a) consists of share and transverse graphs.
The first left vertical column 5 of the table shows oval-shaped figures located in the upper and middle parts of the column. These oval figures represent the machine control lever 3 and indicate in which position it should be. If, for example, oval 6 is shown in the table without an inclination, then lever 3 (see Fig. 58, b) should be in its central position a, if the oval located at the very top of column 5 (see Fig. 62, a) of the table 7 is shown tilted to the left, then the lever 3 (see Fig. 58, g) must be set to the left position.
Oval 7 (see Fig. 62, a) is located in the first cell, from which there is a horizontal column 8 with patterns to the right. The position of the oval 7 applies to all patterns in this column. Oval 6 is in the second square and from it begins column 9 with patterns, therefore, its position refers to all patterns in column 9.
Oval 10 has a slope to the right, therefore, the lever 3 (see Fig. 58, m) must be turned to the right. Oval 10 (see Fig. 62, a) is at the beginning of the horizontal column 11 and refers to the patterns of this column, and oval 12 is located almost in the middle of the vertical column 5. It refers to all patterns except those located on the top three columns 8, 9 and 11.
The uppermost horizontal column 14 of the table is divided into four unequal parts; in three of them, one circle 15, 16 and 17 is drawn, above which there are numbers from 0 to 4. These circles represent the lever 2 of the machine control, and the numbers above the circle represent the scale of the lever 2.

Rice. 62. The table of patterns of the automatics of the machine "Lada" (a) and a separate pattern (b)
In the inner part of each circle of column 14, near one of its sides, there is a triangle 18, which indicates which digit of the scale should be set to lever 2, that is, the triangle represents the pointer (see Fig. 61.8) of lever 2. In the attached to the machine instructions on the pattern table in the rightmost circle, the triangle is mistakenly placed opposite 0, but should be opposite the number 4, as shown in circle 17 in Fig. 62, a.
The second (top) horizontal column 19 (see Fig. 62, a) of the table is also divided into unequal parts. Nothing is depicted in the leftmost part of it, and in all its other cells there are numbers and letters. This graph shows the position of the right lever B of the automation (see Fig. 61, d).
In the table in the cells of column 19, lever B is denoted by letters c; the numbers in the cells of column 19 show at what division of the scale the lever B of the automation should be.
The position of the upper lever C of the automatics is not indicated in the table, since it has a different purpose - to turn the automatics into operation. It can also be used to shorten or lengthen the pattern a little.
In all, except for those listed above, the cells of the table contain samples of patterns that can be performed using automation. If you take any pattern, then it is at the intersection of two graphs: vertical and horizontal. To obtain such a pattern, you need to put the machine control lever 3 and the automation lever A in the positions shown in the horizontal column of the table, and the machine control lever 2 and the automation lever B in the positions shown in the vertical column of the table.
Consider, for example, obtaining a pattern, which we will conditionally call pattern 20 (see Fig. 62, a). To complete this pattern, you first need to put the lever 3 (see Fig. 58, g) in the left position, then the lever A of the automation, pressing and moving to the left, move from the zero position (see Fig. 61.6) along the slot towards the working up to number 4 (see Fig. 61, d) and release him (he will enter the place himself, that is, he will come close to number 4). To remove it from the zero position and set it against the desired digit of the second automation lever - lever B - it is necessary to turn the machine control lever 2 to the right and set its scale against the number 4 (see Fig. 61, e). Lever A of the automatics was placed opposite the number 4 (see Fig. 61, d), since on the left side of the horizontal strip of the table, on which pattern 20 is selected (see Fig. 62, a), there is the number 4, and in the upper part of the vertical of the strip on which the pattern 20 is located, there is the number 6 and the letter B next to it, which means that the lever B (right lever) of the automation should be placed against the number 6 of its scale. In order to move the right lever B of the automatics from its zero setting (see Fig. 61.6) to the number 6 (with the lever 2 of the machine control turned to the right), press the head of the lever B of the automatics, move it slightly to the left and move along the slot to the number 6 of its scale, as shown in fig. 61, d.
After installing the levers A and B of the automation, the levers 2 and 3 of the machine control are returned to their zero installations, and then look at the table to find out how to set them for the selected pattern.
Since in the upper strip of the table circle 17 (see Fig. 62, a), related to the selected pattern, has a setting on the number 4, it means that lever 2 (see Fig. 61,<3) тоже надо установить на цифру 4.
If on the table on the left side of the column on which pattern 20 is selected, the oval is shown tilted to the right, the machine control lever 3 must be turned to the right, as shown in Fig. 58, m.
Having installed the control levers of the machine, turn on the automation. To do this, squeezing the lever C away from you (see Fig. 61.6), move it to the right and bring it closer to the number 4, 5 or 6, depending on how long they want to perform each pattern, that is, from the patterns of what length want to sew a patterned stitch. For example, if the pattern is as long as the pattern samples in the table, set the lever against the number 5 on the scale, as shown in fig. 61, d. Having reached the number 5, move the lever C towards itself so that it enters between the teeth 10, located near its scale for locking the lever C, so that it does not move during the operation of the machine. After or before installing all other levers, the position of the lever 4, which should be in the working position, is checked, i.e. the teeth of the tissue motor rack should not be lowered (turned off).
In the second vertical column 13 on the left (see Fig. 62, a), except for one upper cell, all other cells contain one number and one letter. This graph shows the position of the left lever A (see Fig. 61, d) of the automation. Therefore, in column 13 (see Fig. 62, a) after the number is the same letter a. The numbers that are in the cells to the left of the letter a indicate to which digit of the left scale 8 (see Fig. 61.6) of the automatics lever A of the automatics should be installed. When the automation is off, it should be opposite 0, as shown in Fig. 61.6.
If, for example, the letter a is in column 13 (see Fig. 62, a) about 0, then the left lever A of the automatics should be in the zero position, as shown in Fig. 61.6.
When performing any pattern typed according to the table, you can change its width, for this lever 2 is set closer to 0 on its scale. You can even complete the pattern in one simple stitch if lever 2 is set to zero. For example, in Fig. 62, b shows a pattern 20, made at the zero position of the lever 2. But it is impossible to move the control lever 2 towards a larger digit of its scale than set according to the table for the selected pattern, otherwise the automation can be damaged. Therefore, after a certain pattern has been set, lever 2 can be brought closer to 0 of its scale and even set to 0, but it cannot be moved in the opposite direction.
The patterns obtained at the zero position of the lever 2 are shown on the third vertical line of the table (see Fig. 62, a), if we count the stripes on its left side.
By car "Lada" 237-1 class. to obtain a patterned seam, all levers are installed in the same way as on the Lada 237 class machine, except for lever 1 (see Fig. 61, a), which is moved by the Lada 237-1 class machine. not along the vertical slot of the arm of the machine, as in the machine "Lada" 237 class, but in a circle. Lever 1 of the machine "Lada" 237-1 class. also adjust to set a pattern for a thick (looped) seam (see Fig. 61, d).
To install the lever 1 of the machine "Lada" 237-1 cl. on a buttonhole seam, it is set in one of the small scale divisions between 0 and 1, for example, the numbers 0; 2 upwards under the index 11, as shown in fig. 61, d, and put lever 2 on the number 2 of its scale, as shown in Fig. 57, c.
The Koehler car. On cars "Kehler", as well as on cars "Lada" 237 cl. with automatic equipment, the pattern is typed, and not put on the machine a ready copier, as on the machine "Lada" T-132-2 class. or household car PMZ 122-1 class.
But in the Köhler machine, the stars of the automatics and the machine control levers are on the same disks, and the disks are located on the arm of the machine (from the side of the worker). One disc is closer to the flywheel and the other is closer to the machine head. On the left disk there is an automatic star and a machine control lever 3, and on the right disk there is a second automatic star and a machine control lever 2. In zigzag machines "Köhler" without automatic control levers 2 and 3 are also located on the discs together with the stars, but nothing is shown on the teeth of the stars (see Fig. 4.6), and in the machines "Köhler" with automatic equipment on the teeth of the stars there are various patterns (see fig. 5). Automatic stars have the same distance from one tooth to another between all the teeth, except two, and between two of them there is a much greater distance than between all the others.
* The cars "Kehler" 51 cl. and "Kehler" 51-2 class. only minor differences, for example, in "Kehler" 51 class. there are additional regulators of the tension of the upper thread, and the "Kehler" 51-2 class. They are not here. Moreover, they differ in appearance.

Rice. 63. Automation control
The scale of the machine control lever is located between these two teeth. On the right disc 5 (Fig. 63, a) between the teeth? and 7 star 8 is the scale of lever 2 with five digits. On the left disc 9 (in a large interval) between the two teeth there is a scale of the lever 3. It shows a diamond and two triangles.
To determine in which position the lever 2 or lever 3 stands, pay attention to the sign or the number that is under the pointer. If, for example, the right disk 5 is located by the scale of lever 2 (Fig. 63, b) upwards under the pointer 10 (i.e., one of the digits of the scale - lever 2 from 0 to 5), then this setting of lever 2, and if the disk is one of the teeth of the sprocket or one of the smaller intervals between the teeth under the pointer 10, as shown in fig. 63, in, then this is the installation of an automatic star. If the left disc 9 (see Fig. 63, a) is scaled up under the pointer 11, then this is the installation of the lever 3, and if the disc 9 is one of the teeth of the stars up under the pointer 11 (Fig. 63, d), then this is the setting stars of automation.
Both discs, that is, both the right 5 (see Fig. 63, a) and the left 9, when they are set up by the scales of the levers 2 and 3 of the machine control, can rotate to the right and left, but only within the scales of the levers, and if you need to set disk under the pointer with one of the teeth of the automatic stars, then in this case they can only be turned clockwise, that is, to the right. Even if you need to set the automatic star, for example, tooth 7 (Fig. 63, b) under the pointer 10, then you need to turn the disk almost a full turn.
The discs easily turn to the right and left by the length of the lever scales, and when installing the automatic stars, the disc turns with difficulty.
When installing the automatic star with its tooth or at a shorter interval under the pointer, a loud click should occur, that is, it will lock for the duration of this installation. If the click does not occur, the star will rotate while the machine is running and the pattern will not work. But before installing the automatic stars, you must first turn the lever 4 to turn the automation into operation.
Lever 4 (see Fig. 63, a) is located on the lower part of the sleeve stand on the left side of the lever 1, that is, in the same place as in the Kohler zigzag machines without automation. It is also made in the form of an asterisk, it has on its teeth, in addition to two signs (points for regular and zigzag stitching, lattice for darning), another sign 12 for patterned seams.
When the automation is switched on, lever 4 is set with sign 12 under the indicator 13. In order to install the right and left star of the automation, lever 4 can be installed upward with any part of the sign 12 *, but after installing the stars of the automation, that is, after the pattern is set on machine, the position of the lever 4 needs to be specified in order to obtain the desired length of the pattern.
As with all zigzag machines, on machines with automatic control, when making patterned seams, the first thing to change is the foot. Instead of the one removed from the machine, they put a foot for patterned seams or for overcasting. Thread the machine. The upper thread should be silk or floss, and the lower thread can be cotton (bobbin). If the lower thread is bobbin, then so that it is not visible on the front side of the product, its tension should be slightly tighter than the tension of the upper thread. Therefore, the tension of the upper thread is loosened. By car "Keler" 51 cl. this is done by the upper thread tension adjusters located below the cover 14 (Fig. 63, e) of the machine sleeve, that is, one tension adjuster 15, which is found in all household sewing machines, and two upper tension adjusters 16 and 17, which are available only by cars "Kehler" 51 cl. and on machines "Lada" 236 cl. and "Lada" 237 cl. You need to adjust the tension of the upper thread with the regulator through which the thread is passed. In the car "Kehler" 51-2 class. (see Fig. 63, a) there are no upper adjusters and the upper thread is weakened only by the general regulator 18 of the upper thread tension.
After adjusting the tension of the threads, the required density of the patterned seam is set. To do this, first, the lever 1 is set up so that the first division of its scale is aligned with the triangle (pointer 19) (see Fig. 63, a). Lever 2 is left in the zero position. Lever 4 is turned upwards with sign 12 under indicator 13 (Fig. 63, e). If you install lever 4 with the left side of sign 12 (Fig. 63, g) under the index 13, then the parts of the patterns will be shorter, and if with the right side, they will be longer.
To make a patterned seam, a pattern is selected, samples of which are shown in the instructions supplied with the machine. Each of these pages depicts patterns 1 through 50, the tops of the discs depicting levers and stars, and pattern numbers as shown in fig. 63, h.
They are arranged in the following order: to the right of the pattern, two semicircles and a pattern number, for example No. 3. The semicircle, which is closer to the pattern, represents the left star 20 (Fig. 63, a, h) of the automation and the scale of the lever 3 for controlling the machine, and the next semicircle, located next to pattern No. 3 (Fig. 63, h), depicts the right star 8 (Fig. 63, a, h) of the automation and the scale of the control lever 2 of the machine.
* Lever 4 can be turned to the right and left only within the teeth, with signs, but cannot be turned up with clean teeth.
In such a position as on these semicircles (disks) shown in Fig. 63, h, and the stars of the automatics and the scales of the machine control levers must be supplied to complete the pattern No. 3.
Consider the set and implementation, for example, pattern number 30 (Fig. 63, and). Having set the lever 1 (see Fig. 63, a) to the first division from 0, turn the lever 4 according to the required length of the pattern parts. Then set the automatic stars or machine control levers as shown in the instructions for this pattern. On the right semicircle of disk 5 (see Fig. 63, a, i), the installation of the lever 2 is shown, and on the left semicircle of disk 9 - the installation of the automatic star. First, set the star of automation, as it is shown on the left, and then the lever 2. In the machine "Kehler" install one thing: either the control lever, or the star of the automation.
On the left semicircle of the disc 9, the scale of the lever 3 is on the left, and the automatic star stands under the pointer 11 with its tooth 21, which is located next to the scale of the lever 3 on its right side.
Consequently, this is how it is necessary to install the automatic star on the machine, that is, put it under the pointer 11 (see Fig. 63, k) with such its tooth, which corresponds to tooth 21 of the star 20 (see Fig. 63, and).
The right semicircle 8 (Fig. 63, i) of the figure is shown up by number 3 of the scale of lever 2, and set lever 2 on the machine, that is, number 3 (see Fig. 63, k) of its scale under the pointer 10. Settings of all levers for making pattern No. 30 are shown in fig. 63, office
Having typed a pattern on the machine, they put it in motion and only direct the fabric. To make the patterned seam fall along the marked line, support the edge of the fabric so that it slides along the edge of the ruler, as shown in fig. 63, d, which shows the execution of pattern No. 32. The settings of the automatic stars for it are shown in Fig. 63, l.
A. I. Zyuzin
This full zigzag machine is foot operated. The hook and bobbin case are interchangeable with the parts of the Chaika machine. Swinging shuttle; working phase - clockwise. The previous modification of the Lada T-237 is not much. differs from the Lada T-238. Significant differences:
- The Lada T-237 has a left-hand rotating shuttle.
- The mechanism for switching with decorative stitches is at the top, right under the top cover (by the way, it works very badly).
The upper sleeve cover is on two screws, the front cover is on two hook screws; to remove, you need to lightly press it from left to right and lift it up. A snug fit of the cover is ensured by adjusting the hook screws.
The needle bar frame swings in a straight line during zigzag.
- Reconstruct the upper thread tension regulator. Remove the thread guide. Redesign the compensation spring to the left side and make it work for expansion from bottom to top. Stretch the conical spring to a length equal to two original ones. Then squeeze to the limit and release - it will become more elastic. The tension of the compensation spring must be significant.
- The needle thread guide must be closed. Put its left free end behind the needle holder so that the thread can be threaded without difficulty, and its exit during operation would be impossible.
- The position of the needle in the slot of the needle plate for all operations ( see fig. 67), where B = G- fine. Adjustment - factory setting. In the extreme case, for D> B mill the groove for the needle in the needle bar, when G< В - bend the end of the needle bar forward. It is better to bend it with preheating, briefly heating it to a temperature of 800-900 ° C (to a crimson color).
Zigzag needle position ( see fig. 67), where M = K- fine. Adjust with the eccentric screw connecting the needle bar frame to the zigzag arm. The eccentric screw is secured with a nut from the back. The thread on it is right-hand, so rotate it clockwise when adjusting ).

Rice. 114. Unit for adjusting the position of the needle in the hole of the throat plate
("Lada" T-236, "Lada" -236-1):
- If the screw in the needle holder is broken, perform the following operations:
a) unscrew the nut securing the eccentric screw of the needle bar frame and remove the screw;
b) remove the frame axis using the МЗ screw (the screw is in the needle holder);
v) remove the frame, having previously unscrewed the screw securing the hinge link with the thread take-up lever (the screw has LEFT thread!);
G) remove the needle bar from the frame and remove the thread guide;
e) lower the needle bar into an 8 mm hole in the metal plate and knock it out of the needle holder;
f) drill a hole in the break of the needle holder with a drill with a diameter of 2.5-2.6 mm;
g) carefully, in small steps, cut the thread with an MZ tap using I8A oil.
Reassemble in reverse order. It happens that the needle holder does not clamp the needle. It has an asymmetrical hole for the passage of the needle bar. Therefore, it is imperative to place the needle holder with its side (wedge-shaped) facing the seam from the needle side. The wedge will jam the needle when tightening the needle clamp screw.
- Adjust the hook clearances:
a) the gap between the needle and the thread guide plate is set within 0.8-1 mm. Adjustment: remove the plate from the shuttle travel housing and punch both holes in it to the right (when viewed from the front cover side) by 2 mm ( see fig. 105- similarly). Move the plate in place to the left until the required clearance is obtained;
b) the gap between the shuttle and the pusher at the thread entry and exit is 0.3 mm. Adjust it by bending the pusher, its ends, as well as the outlet end of the spring plate;
v) the gap between the needle and the nose of the shuttle in the vertical plane of its rotation is within 0.05-0.1 mm (on the left stab of the zigzag).
Adjustment: remove the shuttle; while turning the handwheel, make sure that the needle is not touching the inlet end of the follower. If it does, either bend the end inward or cut it off (the side that touches the needle). Place the hook and lower the needle to the lowest position. Observe whether the needle touches the wide flange of the hook ( see fig. 34- similarly). The needle can touch both the wide area and the hook nose at the same time. If it touches only a wide platform, and forms a gap of different sizes (sometimes up to 1 mm) up to the shuttle nose, the edge of the platform must be cut with a diamond file to the vertical plane of the nose. Only then set the required clearance. To do this, loosen the locking screw on the shuttle housing, loosen the screw securing the journal of the shuttle travel housing. On the left side of the body rim there is a screw screwed into the platform and secured with a lock nut (9 mm). Use this screw to set the desired clearance between the hook and the needle. Then secure the screw with the lock nut. Check if the gap is out of order. And only when the adjusting screw is securely fastened and the required clearance is observed, tighten the screw that secures the housing pivot;
G) the distance between the nose of the shuttle and the needle at the left prick of the zigzag, when it is in the lowest position, is 3-3.5 mm.
Adjustment: There is a crank at the right end of the hook shaft, which is connected to the connecting rod. The crank covers the shaft with a clamp - a terminal connection fastened with a screw (the head of the tightening screw is at the bottom). After loosening the screw, turn the shaft, and hence the shuttle, to the desired angle. In this way, adjust the desired distance. Tighten the screw firmly;
e) the moment the needle meets the nose of the shuttle at the right stab of the zigzag should occur at a distance of 1.2 mm above the eye of the needle. Adjust by vertical offset of the needle bar.
Good luck with the repair!
All the best, writeto © 2010