The lambda probe (also called oxygen controller, O2 sensor, DC) is an integral part of the exhaust system of vehicles that meet environmental standards EURO-4 and above. This miniature device (usually 2 or more lambda probes are installed) monitors the O2 content in exhaust mixtures vehicle, due to which the emission of toxic waste into the atmosphere is significantly reduced.
In case of incorrect operation of the DC or if the lambda probe is disconnected, the functioning of the power unit may be disrupted, due to which the motor will go into emergency mode(Check Engine will light up on the panel). To prevent this from happening, the car system can be outsmarted by installing a snag.
Mechanical snag lambda probe ("screwdriver")
"Vvertysh" is a bushing made of bronze or heat-resistant steel. The inner part of such a "spacer" and its cavities are filled with ceramic chips with a special catalytic coating. Due to this, the exhaust gases are burned out faster, which, in turn, leads to different indicators of pulses 1 and 2 DC.
Important! Any snag is installed only on a serviceable lambda probe.

Homemade lambda probe snag, the diagram of which is presented below, is easy to manufacture. To do this, you need to prepare:
- blank;
- screwdriver;
- a set of keys.
A snag is made on a processing lathe. If there is none, then you can contact a specialist by providing him with a drawing.

The resulting part is compatible with most exhaust systems of both domestic and foreign cars.
The installation of the lambda probe trick is as follows:
- Lift the car onto the overpass.
- Disconnect the negative terminal on the battery.
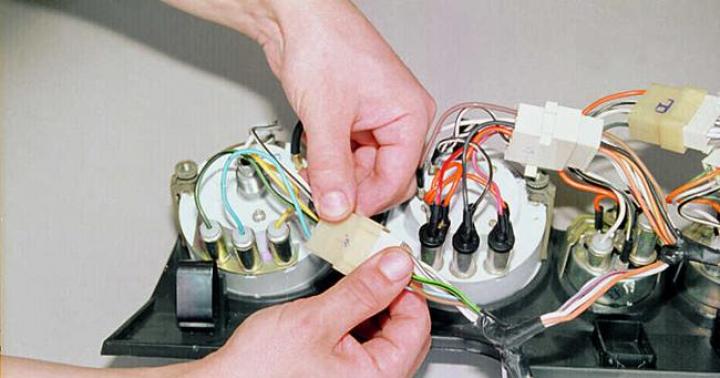
- Unscrew the first (upper) probe (if there are two, then remove the one located between the catalyst and the exhaust manifold).
- Screw the lambda probe into the spacer.
- Reinstall the "enhanced" sensor.
- Connect the terminal to the battery.
Healthy! Usually, the mechanical snag of the second lambda probe is not performed, since this DC is protected by the catalyst and only monitors its condition. The most sensitive is the first sensor, which is installed closest to the collector.
After that, the "Check Engine" system error should disappear. If this method does not work, you can use a more expensive trick.
Electronic snag
Another way to fix problems with DC is electronic snag lambda probe, the diagram of which is presented below. Since the oxygen sensor transmits a signal to the controller, a decoy circuit connected to the wiring from the sensor to the connector will allow the system to be "coarse". Thanks to this, in a situation where the lambda probe is faulty, power unit will continue to work correctly.
Healthy! The installation locations of such trompe l'oeil may differ depending on the PBX model. For example, it can be installed in the center tunnel between the seats, in a torpedo or in the engine compartment.
The blende circuit is a single-chip microprocessor that analyzes the processes in the catalyst, receives data from the first DC, processes them, converts them to the readings of the second sensor and sends a corresponding signal to the car's processor.
To install a snag of this type, you need a lambda probe connection diagram, which looks like this.

As you can see, there are different pinout of the lambda probe (4 wires, three and two). The colors of the wires may also differ, most often there are products with 4 pins (2 black, white and blue).
To make a fraudulent device, you will need:
- small tip soldering iron and solder;
- rosin;
- non-polar capacitor with a capacity of 1 μF Y5V, +/- 20%;
- resistor (resistance) for 1 mOhm, C1-4 imp, 0.25 W;
- knife and duct tape.
Healthy! Before installation, it is best to place the circuit in a plastic case and fill it with "epoxy".
- Disconnect the negative terminal of the battery.
- "Dissect" the wire that goes from the DC itself to the connector.
- Cut the blue wire and connect it back through the resistor.
- Solder the non-polar capacitor with the white and blue wires.
- Insulate connections.
Below is a diagram of a do-it-yourself lambda probe trick for pinout for 4 wires.

On the final stage, you should get the following.

Such manipulations should not be performed if you do not have the proper experience. Today, stores offer ready-made trick schemes that even a novice driver can easily install.
Re-flashing the controller
Some particularly sophisticated car owners decide to rewrite the control unit, thereby blocking the processing of signals from the second oxygen sensor. However, it should be borne in mind that any changes in the system operation algorithm can lead to irreversible consequences, since it will be almost impossible and costly to return the factory settings. Therefore, it is not recommended to perform such manipulations on your own. The same goes for ready-made firmwares that are sold on the Internet.
Healthy! When flashing, the lambda probes are deleted.
If you still want to flash the system, then contact a competent specialist who can disable the receipt of DC data using specialized equipment.

It should also be borne in mind that almost any intervention in the operation of systems can lead to not the most pleasant consequences.
What are the consequences after installing bogus
You need to understand that any snag is installed at the risk of the car owner. If the installation was done incorrectly, then you may encounter the following problems:
- Because of on-board computer cannot regulate liquid injection, motor malfunction may occur.
- If the circuit is not properly soldered, it can damage the wiring.
- During the installation of the trick, you can damage the oxygen sensors, after which you will not even know about their malfunction (since you will already have the trick installed).
- After such interventions (not only when flashing), a failure in the on-board computer may occur.
Any inaccuracy will lead to disastrous consequences, so it is better to install a more secure ready-made emulator. Unlike the trick, it does not "deceive" the control unit, but only ensures its correct operation by converting the DC signal. A microprocessor is also installed inside the emulator (as in a homemade electronic blende), which is able to evaluate the exhaust gases and analyze the situation.
In custody
Many car owners install homemade trickery on their cars to save money on buying new oxygen sensors. However, in such a pursuit of profit, you may well face large monetary costs if the artisanal device affects the operation of "vital" systems. Therefore, it is recommended to install trompe l'oeil only if you understand the work of such a plan.
We paid, everything is fine, started saving and then ... Check Engine lights up! An indicator that all motorists are afraid of, and which, as a rule, does not bode well ... You come to the installers, and they tell you that the lambda probe (oxygen) sensor gives an error because the fuel mixture, when running on gas, has a different composition as on gasoline.
And what's next, most car owners ask? How to deal with this? And then you are told several options for getting out of the situation, among which there will certainly be the installation of a lambda probe emulator. Here more and more questions arise, continuous confusion is shorter, you have the feeling that they are trying to cheat you or they are being promoted again for money ... So in order for you to understand what this is about and what a lambda probe emulator is and what it is for , we decided to write this article. Sit back, now we will tell you everything in order in simple and understandable words for you ...
To begin with, I'll tell you "where the legs grow from" and why such a problem arises, that is, why the "Check" lights up.
How does a lambda probe work?
An oxygen sensor or oxygen sensor, as well as a lambda probe, is a sensor that monitors the toxicity of the exhaust. How does this happen? During the combustion of a fuel-air mixture (FA) consisting of oxygen and gasoline (diesel oil or gas), harmful elements are formed in the exhaust that pollute the atmosphere. So, in order to prevent pollution, smart people came up with the idea of monitoring the toxicity of the exhaust using such sensors. The lambda monitors what percentage of oxygen is contained in the exhaust and sends data about this to the ECU (brains, in other words), which in turn concludes whether the mixture is "rich" or "poor" and then decides whether to increase the fuel supply or decrease it. The ideal air to fuel ratio is considered to be: 14.7: 1. This proportion is called stoichiometric, and it is based on it when adjusting the fuel equipment and all engine systems as a whole. In addition, it has been proven that it is this ratio that causes minimal harm to the environment. So, when the engine is in good working order and works on its familiar native fuel assembly, everything is fine and there is no "Check". But as soon as you install HBO, the composition of the mixture will change significantly, and the lambda, which "stands on guard and sees everything," will somehow notice it, report it to the "brains", which will notify you about this with the appropriate inscription on the panel. More details about why "Check" lights up on a car with HBO. So, we sort of figured it out, let's move on.
What is a lambda probe emulator, how does it work and what is it for?
A lambda probe emulator is a device that, roughly speaking, "replaces concepts", that is, it simulates or intercepts and corrects the signal coming from the lambda and sends it further in the correct correct form, that is, to the ECU. Lambda probe emulator is installed on injection cars in which oxygen sensors are present, either during or after the installation of HBO. Depending on the type and brand of the manufacturer, the emulator copies the signal of the lambda probe and thus prevents errors during engine operation on the gas-air mixture.
Installing a lambda probe emulator
The emulator is installed in the engine compartment in places protected from moisture and high temperatures. At the same time, the lambda probe emulator should be located in a place where its operation (signal indicators) will be conveniently monitored, and also, if necessary, make adjustments to its operation.
Connecting an emulator
- The blue wire connects to the gas / petrol switch.
- The white wire connects to the injector ECU.
- The white-blue wire is connected to the lambda probe.
- The black wire is connected to ground.
Attention!!! An incorrectly connected emulator can lead to undesirable consequences, up to a complete failure of the standard ECU.
How it works?
When the engine switches to gas, the emulator is notified by a signal from the gas / petrol switch, the control signal from the lambda probe to automatic mode disconnected from the engine ECU. Instead of a standard signal, the ECU receives emulation, that is, a signal from the lambda emulator. The signal coming from the lambda is transmitted to the emulator and displayed as control lamps, each of which means the following:
- Green - mixture "poor";
- Yellow - normal proportion (intermediate state);
- Red is a "rich" mixture.
When the engine runs on a kind of fuel, that is, gasoline, the signal input and output are short-circuited, while the oxygen sensor signal can freely go through the lambda probe emulator and go out without any changes.
In general, something like this ... I hope now everything is clear to everyone, and the question of what is a lambda probe emulator can be considered closed !? Thank you for your attention and see you soon on the pages.
How to determine catalyst wear?
There are three main reasons for catalyst failure - loss of catalyst efficiency, degradation and melting.
To check for reflow, install a pressure gauge in place of the oxygen sensor, and measure the pressure in exhaust system... If in different operating modes the pressure exceeds 0.5 atm (Kg / cm2), the catalytic converter is melted.
If the readings of the lambda probes before and after the catalyst coincide, this means that the catalyst has lost its emissive ability (efficiency).
The effectiveness of the catalyst can be checked in another way. Warm up the engine (half an hour ride). After that, using a thermo-gun (pyrometer), check the temperature at the welding seam before and after the catalyst, if the temperature behind the catalyst is the same or lower, then the catalyst is faulty.
In the event that something rumbles inside the catalyst, you need to urgently take action. Otherwise, debris inside can damage the engine.
FAQ
1. Does it work exactly?- Yes, we give a 2-year guarantee for the result. Complete with the emulator, you will receive instructions and a warranty card. The law also gives the right to return the product within 2 weeks without explanation.
2. Will I be able to get support?- yes, you can consult by phone, skype or e-mail. All issues can be resolved.
3. What emulator do I need for my car?- at the top of this page there is a form for selecting an emulator by car.
4. Where can I install the emulator?- from our representatives. Any auto electrician can also install.
5. The rear lambda probe does not work for me. Can an emulator bypass it?- yes, it can be absolutely on all cars. If the front lambda is wideband, with a current signal (AFR, LAF sensor), then an SK-08 emulator is installed. If the rear probe is faulty, the signal for the emulator is taken from the front probe. If the heater in the rear lambda probe is faulty, then instead of the heater, a resistor of about 10 Ohm with a power of 10 W is additionally connected.
6. Is it possible not to remove the catalyst?- it is possible if it is mechanically whole (not melted, does not ring, the engine thrust is normal) and the front lambda with a 0 ... 1 volt signal (exceptions in the previous question). The reference signal for the emulator in this case is taken from the front lambda.
7. Is it obligatory to install a stronger (flame arrester)?- optional, but desirable. It only affects the exhaust sound. Without a stronger, the exhaust will not burn out faster (popular opinion), since after a working catalyst, the temperature is always higher than before. We drove before without a catalyst ...
8. Will the consumption decrease after installing the emulator?- if you have an overestimated expense now, then it should decrease. On Euro-4 and 5 cars, the rear lambda feels in the preparation of the fuel mixture and the consumption directly depends on the state of the catalyst. On cars Euro-3 and below, consumption can be reduced due to the transition of the engine from emergency mode to normal mode. Consumption can also be reduced if you had a molten catalyst.
9. Why is the emulator better than software removal?- the car continues to drive according to the factory program, no intervention in the engine control unit is performed. Illiterate software deletion can lead to the fact that the malfunction lamp on the instrument panel will never light up at all - untimely troubleshooting can lead to engine damage. With programmatic allotment, the operating modes of the motor can change and no one knows how this will affect it.
10. I have HBO installed, an error on the catalyst constantly appears, no one can do anything .... - We face this problem a lot. First you need to try to ride on gasoline. If there are no problems with gasoline, then the problem is HBO. You can read more in this article.
It is clear that, in response to the amount of oxygen in the exhaust gases, it produces a voltage of 0.1 - 0.2V (lean mixture) or 0.8-0.9V (rich mixture). The electronic control unit (ECU) of the engine constantly changes the amount of injected fuel - the lean mixture enriches, the rich one depletes. Thus, the optimum is maintained, and the signal on the Lambda probe at the same time looks (can be viewed with an oscilloscope) as a series of pulses of equal duration, almost rectangular (important!), With a swing from 0.1 - 0.2V to 0.8-0.9V ...
This is how everything works as long as the autoregulation circuit is closed, which includes an engine with a "body kit", an ECU and a Lambda Probe. The chain starts to work poorly if you take care of economy and ecology and supply gas equipment (LPG).
For a single injection engine, a simple ejector system is sufficient. Only here is yellow Check light The engine starts to burn constantly, and when driving on gasoline, a solid overrun appears.
There is an opinion that the gas is to blame. Allegedly, the Lambda Probe is "accustomed" to gasoline, and "he goes crazy on gas."
In fact, everything is much simpler. The Lambda Probe doesn't care what kind of fuel it burns. It continues to respond to the amount of oxygen in the exhaust just as well. But his reaction does not affect the operation of the engine in any way - after all, the automatic control circuit is broken. If earlier, in response to a signal about rich mixture, The ECU reduced the supply of gasoline (for a shorter time, including the nozzle), and enriched the signal about the lean, maintaining the stoichiometric mixture, then when working with gas, the ECU cannot in any way affect the LPG ejector system.
Seeing that there is no reaction, the ECU lights up the Check Engine light and switches to the "emergency" mode. When driving on gas, this does not affect its consumption in any way, since it is determined by the LPG setting. But when switching to petrol, the consumption will rise sharply because the "emergency mode" remains in the memory of the ECU.
For normal operation of the engine on gas, the Lambda-Probe Emulator is just needed. His task is to deceive the ECU, when working on gas, to show that everything is in order. It does this very simply: it gives out a signal similar to the reaction of a real Lambda probe during normal operation.
The emulator will give out 0.1V, the ECU will begin to enrich the mixture, the emulator will give out 0.9V. The ECU will begin to lean the mixture, as it happens when running on gasoline. Thus, the Check Engine light does not light up, and the ECU does not go into emergency mode.
You can buy a ready-made emulator, you can make it yourself according to a simple scheme, the main thing is to connect it correctly.
A simple diagram of the Lambda Probe Emulator

The lambda probe emulator is assembled on the most popular microcircuit. Resistor R1 sets the pulse frequency (1-2 per second), the LED indicates the operation of the device. During normal operation, the voltage on it does not exceed 1.8V. The resistor R6 will have exactly half, i.e. 0.9V or 0V.
The circuit receives power from the LPG switch, the relay is triggered and connects the device output (K2) to the ECU input (K3).
When the HBO is turned off, the relay releases and the ECU input is connected to the lambda probe (K1), i.e. the device is switched on in the wire break from the Lambda probe to the ECU.
There are many options commercially available. Some manufacturers are introducing an additional two or three LEDs to signal the quality of the mixture.
This is not difficult to do, because the Lambda probe continues to perform its functions in terms of issuing a signal. This means that if you connect two threshold devices to the Lambda probe - one for 0.1V, the other for 0.9V, then they will light up the corresponding LEDs at the appropriate times.
Thus, it is possible, as a first approximation, to determine the quality of the mixture when working on gas.
So, if you decide to put an ejector LPG on an engine with "monoinjection", you cannot do without the Lambda-Probe Emulator.
In all other cases (replacement faulty L-Z or something similar) it is absolutely useless.
I am collecting questions about installing a lambda probe emulator, answering them along the way 🙂
Lambda probe emulator. The location of the components on the board.
In order to avoid brainstorming, loss of time and errors in wiring the circuit, I give an image on which all the components are signed, the polarity is indicated (when it is required) and the values of the components of the lambda emulator are indicated.
It is in this form that the board will appear in front of you after etching. Naturally, this is a rear view, from the side of the tracks, keep this in mind, because the components on this side will be soldered, and on front side to be 🙂
2. What lambda should I choose to install it with a lambda probe emulator?
It's up to you to choose on this topic. You need zirconium, that is, the one that is in any auto parts store. On the specialized forums of each machine, there are whole topics with an answer to this question. But I will write a few numbers later, these are the lambdas that people have and work in conjunction with the lambda probe trick.
3. How to properly install lambda snag?
At the time of this writing, there are two connection instruction images. The first is a photo of an unknown author, the second is mine) I am attaching.

Lambda probe emulator. Connection diagram.
Looking ahead, I will say, the idea arose to record a video with the installation process of the emulator and comments. So far I do not promise anything on the timing, but I really hope that the video will be recorded with the arrival of the summer heat) We are waiting, monitoring)
By the way, the scheme given above will be supplemented well, just the other day ...
4. Cars on which it is possible to install a lambda probe emulator.
At this point, there will be a supplemented list. Supplemented by feedback, it means slow) You can always help if your car is not on the list.
How to determine the lambda on the car? Get into the car with any pribluda, "sniffing" the lambda and see the numbers or lambda graphs. Titanium lambda ranges from 0 to 5 volts, zirconium from 0 to 1 volts.
- Jeep Cherokee XJ. 1987-1991 years of release (onwards)
- Opel Vectra. ???? - ???? G.V.
- Hyundai V6 - ?????
The most important thing is feedback! If you have questions, write them in the comments, in the feedback form, on Drive, I will supplement the article for future readers)