Today we want to invite you to make an original gift for a man with your own hands - a retro car. The car can be used as an independent gift or filled with something - sweets, etc.
For work you will need:
- corrugated cardboard, any industrial box can be disassembled;
- corrugated paper - black and white;
- hot glue and a gun to it;
- twisted cord;
- screw caps;
- toothpicks;
- buttons;
- half beads;
- Styrofoam;
- jars from under shoe covers;
- thin plexiglass;
- a piece of mesh;
- acrylic paint as needed;
- every little thing that is at hand.

The main tools are a ruler, scissors, a stationery knife.

We take cardboard, cut out the bottom according to the specified dimensions.


We cut out two sidewalls, I didn't know how to describe the dimensions in more detail, I hope it's clear.


Where the outside will be, attach the covers where the wheels are supposed to be. Circle with a pen.

We glue all the details with white corrugation. if you wish, you can pre-paste the cardboard with office paper so that it does not shine through. in the places where the lids were circled, it is also necessary to apply glue, it is not scary that it shines through. First you paste over the outer part of the parts, then the inner part.

We glue the parts together.

I glued the sides from above to the bottom.


We cut out a detail from the cardboard, tried it on, everything sits well. We paste over with corrugation.


Now let's take care of the hood, measure the height in this place.

And here it is necessary to measure. We put the height and length of the hood together and cut one piece out of the cardboard. IMPORTANT! Cut this part and the subsequent ones across the inner veins of the cardboard.

Now you need to make such an incision on the cardboard.

We try on, if the sizes do not match, we cut it.

We measure a piece of Styrofoam on the hood lid, cut out the desired piece and glue the Styrofoam to the cardboard. Foam thickness 2 cm.

Round off the angular edges of the foam on three sides.

Here's what you should get.

We glue the part with white corrugation and glue it to the car body. IMPORTANT: this and the following parts must be pasted across the folds on the corrugated paper.

Now we take on the trunk. We also cut a piece of cardboard across the veins. We measure the bottom of the trunk.

The top of the trunk and of course the height as measured by the hood. And the length is an arc. You can roughly measure with a ruler or use a tailor's centimeter - it doesn't matter. The difference can then be cut off.

We tried it on, the height is the same. We remove the part and work with it further.

We begin to cut the cardboard between each vein about half of the part.


It is difficult to explain further, I think from the photo it is clear that it is necessary to try on the car body and finish cutting the cardboard into strips as shown in the photo. Turn the part over and make one notch on the back.

We glue the part with corrugation and glue it to the body.

Here's a crocodile turned out.

We trim the edges with a cord. In front we glue the loop, as in the photo, for the future bead.

We also glue the loop at the back.

If you wish, you can glue such a side, but you can do without it.

We leave the body and take up the wheels. You will need 8 caps and a black corrugation.

We fold the two covers in one direction to each other. One side of the wheel is concave, the other convex.

We apply the corrugation in this way and begin to pull on the edge of the covers.


We closed the paper, we also coat it with glue inside.

On the concave side of the wheel, we try to push the paper all the way, as in the photo.

If there are such holes in the middle, we glue it with a circle of corrugation.


And in this way we glue two small drops to the wheel. The distance between the needles is not important.

This is how it happened.

For the center of the wheel, I choose the buttons without legs. In extreme cases, the legs can be cut or broken.

We glue the buttons in the middle and surround everything with a cord.

I decided to glue more half-beads here.

Putting the wheels aside and grabbing the seats. We cut out 4 squares of 4.5 cm from the foam. The size may vary, it is better to try on in place, leaving a small gap. Foam thickness 1.5 cm.

We rounded the edges like this on three sides, glue it over with black corrugation and a cord.

We glue the seats in place first, then the backs.

We glue the finished wheels in place.

Now let's get to the wings. cut out two strips of cardboard about 45-47 cm long and 4 cm wide. And again across the veins on the cardboard.


I always try on the position of the wing by eye.

This is how it should turn out. Measure the width of the nut - 2 cm. Draw a line from the nut to the very end of the wing.

Cut off the unnecessary part. Here's what you should get. Along the edges 4 cm, nut - 2 cm.

We glue it with black corrugation, glue it to the body. You can pre-sketch with a simple pencil the places for gluing.

We glued the wings, edged them with a cord.

We take a piece of thin plexiglass. if this is not the case, you can use dense polyethylene, a plastic folder, etc.

We try it on to the hood, cut out the desired piece, and surround it with a cord.


We glue the parts like this.

Now to the car.

From these details I made a steering wheel - improvised means. I am showing it simply as an example, not as a sample. It's hard for me to even describe them.

A ready-made steering wheel.

Cut the leg obliquely and measure it in place before gluing.

The lever was made from a piece of a wooden skewer and a tip from an umbrella needle.


We glue the parts into place, the lever between the seats fits well.

Let's move on to the face. I pasted the net and edged it with a cord.


It's the same on the hood.

On the trunk, you can decorate as you go, the main thing is that the composition does not interfere with the function of opening the trunk.

We simulate a door cord.

We cut out such a detail from cardboard, glue it with corrugation and glue it here.

Cut out one more detail to fit the printed license plate, slightly larger than the license plate.

We glue it in place like this.


For rear bumper cut out about such a detail, the length and width are approximate as you like.

We try it on to the body under the rear wheels and cut it like this.

We glue it to the bottom like this.

We glue the same part with the number as in the front.

We take the jars from the shoe covers, open them, wrap the base with black corrugation, close the lid, paint the lid or select the lid to match the color of the car.

We glue the "headlights" into place. We insert a bead into a toothpick and glue it to the hood above the loop.

I made a klaxon out of these two parts, I also post the photo as an example.

I wrapped the ball with polysilicon, and the socket with a metallized corrugation, connected everything and glued it to the body. The door handle was imitated with a wooden bead. I cut it in half and glued the halves to the doors.

Well, that's it! Mechanical engineering is over! Now admire!


I bring to your attention a prefabricated wooden model retro car MG TC, from the British company MG Cars specializing in the production of sports cars.
The work is difficult, but you should not be afraid of it. This wooden model of a retro car consists of 42 elements. Such a model will serve as a good interior decoration and will take its rightful place on your shelf.
1945 MG TC Roadster
Plywood car

In order to assemble such a retro car with your own hands, you will need the following tools and accessories:
Workplace preparation
As usual, the first thing you need to do is equip your workplace where you will be working. The rules are not complicated: there should be no unnecessary things on the table, the entire tool should be in its place and be at hand. Not everyone has their own desktop and you probably already thought about creating it. Making a table is not difficult - it is more difficult to choose a place for it in the house. A good option- this is an insulated balcony on which you can start working on your craft at any time. If you have a specially equipped room with a workbench, then you are lucky. You can read about preparing the table in a separate article where I tried to describe the whole process of creating it in as much detail as possible. After you have completed the process of creating a workplace, you can proceed directly to your future crafts. 
Plywood selection
Estimated dimensions of a car model made of plywood (10 cm x 26.5 cm x 10 cm.) The drawing is based on the A3 format, the parts can fit on two sheets of plywood 38x23 cm in size, the thickness of the plywood should be from 2.5 to 3 mm. Before transferring the drawing to plywood, sand the workpiece with a coarse sandpaper, and finish with a fine one. It is more convenient to grind with a wooden block wrapped in sandpaper. Sand the finished plywood along the layers, not across. A well-sanded surface should be even, perfectly smooth, glossy-matt in the light and silky to the touch. Pay attention to the location of the fibers, knots, dents and other defects. Quality and color. 
Transferring the drawing to plywood
You need to translate the drawing accurately and accurately: fix the drawing with the buttons or just hold it with your left hand. Check if the drawing fits the dimensions. Arrange the individual parts so that you can use the plywood sheet as economically as possible. You should not rush, because your future craft depends on the drawing. To speed up the translation process, you can use the technique of fast translation of a drawing, for this I suggest that you familiarize yourself with the article: You can download a file with a drawing of a car from plywood at the end of the article.
Sawing a car with a jigsaw
There are many rules for cutting, but you need to be based on the most common ones. First, you should cut out the internal elements, then proceed to sawing out the contour. There is no need to rush when cutting. The main thing is to always keep the jigsaw straight at a 90 degree angle when cutting. Saw parts along precisely marked lines. The jigsaw must always move evenly up and down. Also, do not forget to monitor your posture. Try to avoid bevels and irregularities. If you get off the line while cutting, don't worry. Such bevels, irregularities can later be removed with a flat file or "Coarse-grained" skin.
Recreation
We often get tired when sawing. Fingers and eyes, which are always tense, often get tired. During work, of course, everyone gets tired. In order to reduce the load, you need to do a couple of exercises. You can watch the exercises here. Do the exercises several times in the process.
Assembly diagram


Detailed assembly diagram:
Assembling the parts of the craft in this work is not very difficult, my son, 6 years old, was assembling a model of a retro car, with my tips and not much help. Such exercises develop fine motor skills of hands, imagination, imagination and patience is also trained. 

After the parts are assembled into one common craft without any problems, then proceed to gluing them.
To make it more similar, you can add several strokes in the form of lines using an electric burner. It can be very difficult to beautifully burn out a pattern, but there are not many lines here and it is quite simple to make them. First you need to draw lines with a pencil, then slowly go along these lines with an electric burner. You can read how to work with an electric burner and add patterns in a separate article.
Main types
Side view: 
Back view: 
Isometry: 
Varnishing crafts

Collectible model a retro car, if you wish, you can varnish or paint, this is not necessary, but it will give a lot of individuality to your craft. Try to choose a good quality varnish. Perform varnishing with a special brush, take your time. Try not to leave visible streaks of bubbles and lint from the brush.

Residents of the Moscow region have collected and put up for sale a unique homemade car. The prototype of the convertible was Mercedes Stirlitz, however, the craftsmen only found details from the Zhiguli. But ingenuity and golden hands helped.
As a real rarity, under a layer of dust this convertible will wait six months for warmth in the garage. And its designers and owners calculate the number of sunny days in the Moscow region, during which the car will not be idle. The idea to create a car with an open body came about by accident.
The image from the cinema and the desire to have a convertible. Since modern convertibles cost crazy money, I had to make something out of the old that is pleasing and attractive to the eye and something that would be unusual for modern convertibles.
- Valery Zemisov.
The work went on for about seven years. Moreover, even now the car requires improvements: they decided to improve the gearbox. So there will be a big renovation in the coming winter.

Driving performance can be determined while we roll it out of the garage. The car is heavy, three of us have to push. And, perhaps, not too maneuverable. The designers were inspired by the fashion of the 30s of the last century. By the way, we drove not as fast then as now. Therefore, the engine was installed here from an old Niva, which belonged to one of the designers.
When we checked in, we were surprised what kind of Mercedes it was, according to the documents it was a Zhiguli. When you go, many turn around, show "super"!
- Valery Zemisov.

The most unusual thing about the car is the fiberglass body. The inflated wings were cast in our own workshop. The rest of the details are from the entire global automotive industry, and something was even borrowed from yachts.
All this is homemade. Klaxons and these corrugations. The engine of the Niva is standing, the chassis is from a Mercedes. Salon from Chrysler, something was done by hand. Decoratively made of wood, just like the awning itself was ordered
- Valery Zemisov.
As a result, the cost of the parts alone is more than a million rubles. It is impossible to calculate the time spent on work. Now the car is put up for sale for one million seven hundred thousand rubles. But social media users were skeptical about the idea of selling the original convertible. Since it does not represent any historical value. While the car occasionally leaves for weddings or photo shoots, and spends most of the time in the garage.

Cats took a fancy. Everyone likes it, including the cats. Cats climb, they love to climb, to warm up, to walk on a soft
- Valery Zemisov.
However, the owners do not lose hope that there will be a person as enthusiastic as they are and will bring the project to perfection.
I am a very long-time subscriber of the magazine - even from "UMK", the issues of which I once looked for in kiosks. The files "M-K" and today give impetus to creativity, are a technical encyclopedia and reference book, so I keep almost all numbers.
Since my school years, I have always made something: at first, models of ships, airplanes. Having matured, he began to create working machines (about some of them there was information in "MK" No. 5 for 2005).
For all the time I made about two and a half dozen homemade products. Some of them still benefit and facilitate labor in household... This is a walk-behind tractor with a VP-150 engine, with which I process my personal plot: plowing, cultivation, milling, planting, hilling and harvesting - all with the help of it. A mini-tractor and a mini-car “work” on the farm, on which I transport goods. On the go and a scooter with a cabin - for trips in bad weather.
1 - frame (ash beam 50 × 50); 2 - decorative headlight (tin can, 2 pcs.); 3 - steering chain transmission (from the bicycle); 4 - cardan joint of the steering control; 5 - engine control knob ("gas"); 6 - lever (pedal) for tension roller (clutch) control; 7 - parking brake handle; 8 - engine; 9 - driven double-grooved pulley; 10 - the leading sprocket of the chain drive and the rolling axis rear axle; 11 - drive chain; 12 - driven drive sprocket; 13 - front axle; 14 - steering rod
In recent years, he has assembled a three-wheeled velomobile (two front wheels - steerable; rear, larger diameter - leading) with a voluminous trunk for business transport. I made a glider simulator, but, unfortunately, it hasn’t taken off yet: it’s either heavy, or the wind in our places is weak.
But after retiring, he created a design "for the soul and for age" - a car in retro style.
The vintage car presented in the article was assembled not so long ago - in 2014. I really wanted it to look like the first cars - more like strollers with a motor. Therefore, he took the spoke wheels, bicycle, and decided to make the car a single, walking one.


Vintage car cabin: on the right - engine control lever (throttle lever)

Rear axle: right - drive sprocket, left - brake drum

Actually, drawings for their homemade cars I don’t, except for the parts I order. If necessary, I make a model at a scale of 1:10 in order to have a three-dimensional representation or templates.
But this time I drew "X-ray" side and front views at a scale of 1:10, and then I drew the nodes and adjusted them in place. The only drawings for this car were for the drive and fastening of the rear wheels, since turning work was necessary there.
The frame of the car is assembled from maple beams 2000 mm long and 50 × 30 mm cross-section, which are fastened together with cuttings. A subframe is welded from steel pipes with diameters of 20 mm and 16 mm. seat and trunk frames that are bolted to the frame. Wing and cockpit frames are made of 5mm wire.
The front axle is suspended from the frame on single-leaf quarter-elliptical springs (from passenger car). The front beam is made of a steel profile tube of rectangular cross-section 30 × 25 mm. Glasses are welded to the ends of the beam, into which bearings 6200 are pressed from below and from above. A bolt with a diameter of 10 mm is used as a pivot. A wheel fork bent from a tube with a diameter of 16 mm is attached to the kingpin with the help of bracket angles. From the bottom to the fork there are lugs welded to fix the wheel axle and swivel levers made of steel sheet 3 mm thick.

1 - steering cardan shaft; 2 - chain drive; 3 - bipod; 4 - short thrust; 5 - long (interwheel) thrust; 6 - lever steering knuckle(2 pcs.)

1 - fork of the right wheel (left - mirrored); 2 - bracket (corner 50 × 50, 4 pcs.): 3 - washer (4 pcs.); 4 - glass (2 pcs.); 5 - bearing 60200.4 pcs.); 6 - spring attachment area (2 pcs.); 7 - pivot (bolt M10); 8 - kerchief (4 pcs.); 9 - right rotary roar: - transverse thrust; 10 - short thrust pivot arm; 11 - left swing arm of the transverse link

Control pedals (near - clutch, far - brakes) and steering mechanism with cardan joint and valuable transmission

The intermediate shaft of the transmission: on the left - a two-groove block of driven pulleys: on the right - a chain drive of the drive of the driving rear right wheel
Steering. Tie rod ends - from kart, with spherical bearings. The rods themselves are made of steel tubes with a diameter of 12 mm. The long rod connects the wheels, and the short one is connected with one end to the bipod - a connecting rod with an asterisk (from a teenage bike), the other - with a swing arm (left). The pedal carriage is welded to the frame. Above the carriage, a wooden block with a hole (oak) is bolted. A shaft passes through the hole, at one end of which a small sprocket from a bicycle is fixed, and at the other end there is a universal joint. The sprockets (small and large) are connected by a bicycle chain. Gear ratio 1: 3. The cardan assembly is connected to the steering wheel shaft (from the stroller).
Rear axle with part of the frame - from the card. The rear axle shaft rotates in three bearings. Clamping flanges are at the ends of the shaft for fastening the wheels. There are two more flanges on the shaft. One is for attaching the brake drum, the other is for attaching the driven sprocket. The rear axle is suspended (movably fixed) along the intermediate shaft axis and sprung by two shock absorbers from the scooter.
Engine and transmission. Forced motor air cooled with a power of 6.5 hp. - from the walk-behind tractor. Rotation from the engine to the intermediate shaft is carried out by a V-belt transmission, from the intermediate shaft to the right axle shaft of the rear axle - by a chain drive from the bicycle. On one side of the intermediate shaft, a block of two pulleys of different diameters is fixed. With a larger pulley maximum speed car - 30 km / h, with a smaller pulley - 40 km / h. Pulleys - one aluminum from washing machine with a diameter of 220 mm, another with a diameter of 180 mm, homemade, machined from textolite. The engine has a three-strand pulley block, from the "Neva" walk-behind tractor, too, of different diameters (changing the belt takes a few seconds). At the other end of the shaft is an 11-tooth sprocket. There is a 60-tooth sprocket on the rear axle shaft. Used as a clutch V-belt transmission... The belt is "engaged" with the pulleys using a tension roller. The roller is connected with a cable to the clutch release pedal in the cab.
Brakes. A brake drum from a moped is attached to the rear axle shaft using a clamping flange. Drive to the drum using a cable from the pedal in the cab. The parking brake is band.
A rubber-cloth tape is thrown over the brake drum. The tape is clamped using a handle on the left side of the cab.

1 - nut and locknut; 2 - centering washer; 3 - landing sleeve; 4 - flange (steel); 5 - locking plate; 6 - M8 bolt (4 pcs.); 7 - axis (screwed into the end of the shaft); 8 - clamping flange; 9 - shaft (Ø25); 10 - wheel hub

1 - nut and locknut; 2 - conical washer; 3 - bicycle overrunning clutch; 4 - axis (welded to the flange); 5 - bearing 104; 6 - flange (steel); 7 - stepped washer; 8 - clamping flange

The car body is wooden, made of 3 mm plywood, with the exception of the floor, dashboard and seat base, which are made of 10 mm plywood. The plywood is coated with linseed oil and painted twice with enamel.
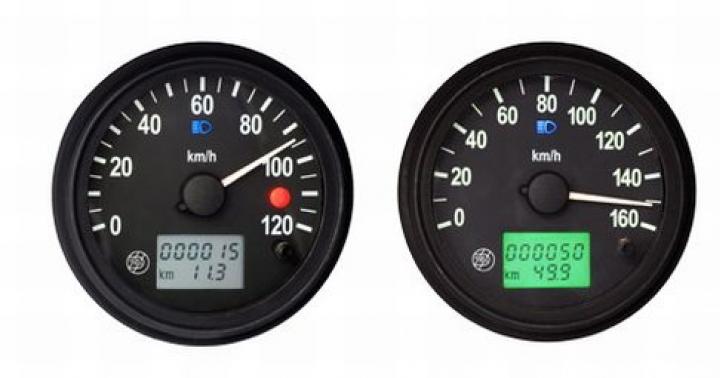
The awning of the cab is sewn onto a black wire frame. The foam seat (and the back, too) is covered with brown leatherette. There is a small trunk at the back. Decorative lights - paint cans. Lighting - two battery-operated LED flashlights. Rear brake light and turn signals, bike electronics. In the cab there is a bicycle speedometer driven by front wheel, turn switch, wheel and on the right is the throttle stick. The headlights and radiator surround are finished in bronze.
A retro car does not stand idle like an exhibit. Last summer, I drove it on country roads for more than 500 km. I made a "Medvedka" -type trailer for it, on which I can carry up to 100 kg of cargo. There were no breakdowns. The attitude of others to the car is the most friendly.
N. KURBATOV, Belgorod region