A jig for drilling holes is a device used in mechanical engineering to simplify the process of machining a part. In fact, it is a template that serves to guide or position the workpiece. It can be used on various equipment, for example, such as a diamond drilling machine.
In mechanical engineering, conductors are fairly accurate devices (up to 0.05 mm (depending on the requirements for the part being manufactured)). They are of two main types: overhead (in the form of plates) and box-like, which are three-dimensional structures. There are also jigs for mixed drilling. These devices are used to reduce labor intensity: the marking operation is removed from the technological process of processing the part, in addition, it becomes possible to simultaneously drill several holes.
The drilling jig is used only in serial and mass production. This is due to the fact that for a small batch of parts it is impractical to produce a separate device, which, moreover, will have to be installed and configured separately.
A jig for drilling, as a rule, is used to machine several holes that lie in the same plane. Best of all, if the parts are unified by standard size, this will allow the device to be used for a wide range of products.

The drilling jig is also used in light industry and construction. Such devices are only of the overhead type, made of or lighter materials, for example, wood or plexiglass. These products are not designed for high accuracy, the positioning error is only ± 0.5 mm. But this is more than enough to make holes for fittings in furniture or drill a series of holes in the wall of a house. As equipment, a conventional drill or bench-type drilling machine is used.

You can make your own conductor for household needs. It will be needed during repairs, when you need to make many holes of the same type and there is no desire to waste time on preliminary marking. For its manufacture, you can use any available materials: mark and drill all the necessary holes on a sheet of metal or a wooden board, which will serve as guides. If necessary, an additional plumb line is made so that chips or concrete chips do not fall on the floor. A dust-free jig can be made when the template is covered with a specially fitted half of a plastic bottle.
The main advantages of these devices are high accuracy of hole positioning without preliminary marking, high performance labor and reduction of perpendicular deviation (due to guide bushings). However, the use of a jig for drilling is not always economically justified, especially with small batches of parts in production.
The use of a jig allows you to drill holes without preliminary marking. Drilling holes along the jig is more accurate than marking. The jig guides the drill and prevents it from slipping to the side, especially when deep drilling.
The conductor is metal box with hinged lid. The shape of the box matches the workpiece. In some cases, when large sizes parts of the whole conductor are not made for the entire part, but the part is placed in the conductor only with the part in which the holes are drilled. In this case, the conductor covers only a small area of the part itself. For example, to drill holes in a wing spar, the jig consists of a series of plates placed on a common frame. The jig plates are located above the points of the spar where the assemblies are to be installed and where holes are to be drilled.
The jig consists of a body, guide bushings through which the drill passes, clamps for fixing the part in the jig and clamps, along which the part is installed in the jig. Sometimes the jig is replaced with a metal part, for the installation of which holes are drilled on a wooden part. In this case, after fixing the metal part, through the holes in it, holes are drilled in the wood. The use of a jig significantly reduces the time spent on marking and drilling. The installation of the drill and the part on the table is similar to the installation when drilling along the marking, as well as the sequence of carrying out the work itself. An example of drilling in a jig is shown in FIG. 64, and an example of drilling through the part is shown in FIG. 65.

Countersinking. holes
Countersinking is used to form a socket under the head of a countersunk screw, bolt or rivet. Countersinks on a drilling machine using a tapered or cylindrical countersink. Countersink with a separate countersink is produced after drilling holes. The countersink dimensions are determined by the corresponding bolt head dimensions.
When drilling along the markings, it is more expedient to use a combined drill with countersink and carry out countersinking simultaneously with drilling.
Work transitions
1. Place the part on the machine, secure it, and check the alignment of the drill and hole axes.
2. Drilled holes in the part.
3. Take off the drill, replace it with a countersink, fix it firmly in the chuck of the machine.
4. Countersink the hole with a countersink (fig. Bb).

The depth of countersinking can be measured with a caliper and a depth gauge, but it is better to use countersinks with a limiter, since in this case all the nests are automatically obtained at the same depth, and there is no need for special measurements of the depth of countersinking.
Selection of longitudinal slots
Slots and oblong holes are selected on horizontal drilling machines due to their longitudinal movement of the table. (In aircraft construction, the grooves are in most cases produced on copy-milling machines.)
Determination of the depth and length of the groove on horizontal drilling machines is achieved by installing appropriate stops that limit the movement of the spindle carriage in the axial direction, and the working table in the longitudinal direction.
Work transitions
1. Place the drill in the chuck of the machine and check that it is installed correctly.
2. Set the work table at the required height by bringing the drill to a bar with pre-marked nests lying on the table.
3. Place the stop on the drilling machine spindle carriage to the required hole depth.
4. Install stops that limit the travel of the table to obtain a nest of a certain length.
5. Position the work clamp so that the clamp is over the hole to be drilled. With long sockets and with a small thickness of the cheeks, in order to avoid deflection, it is recommended to place the clamp somewhat away from the socket.
6. Fix the product on the table.
7. Turn on the machine.
8. The selection of longitudinal slots on drilling machines can be done in two ways:
a) drilled to the full depth the extreme holes that determine the length of the nest, then by longitudinal movement of the table in one direction or the other, while pushing the drill onto the part, drilled the nest (Fig. 67, a) or
b) drilled a number of holes along the length of the nest to the entire depth, at a possible close distance, one from the other, and then by a lateral movement of the table to the entire depth of the nest, clean out the side cheeks (Fig. 67, b).

9. Retract the drill and turn off the machine.
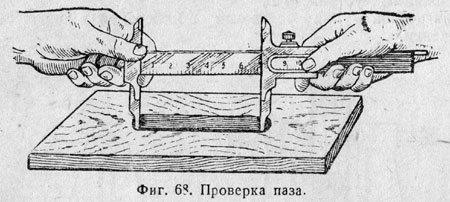
10. Check the correct selection of the nest (Fig. 68).
Drilling side members in the conductor
The jig for drilling the wing spars (Fig. 69) is a strong, stable fixture, often installed on a concrete base. The jig consists of the following main components:

sturdy, stable metal frame 1
, welded or riveted, most often made from channels;
jig plates 2
, which are steel plates with steel bushings pressed into them;
pressure devices 3
retainers 4
to install the side members in a specific position.
The spar is installed on the frame of the conductor so that its correctly cut end fits tightly against the retainer 4
conductor. In this position, the spar is firmly fixed in the jig with clamps.
On one common frame of the conductor, several conductor plates can be installed in the places where the knots are to be placed and the hole drilled. Sometimes the conductor is made of separate sections, not connected with each other, but located in a certain order.
Often, to obtain a more accurate drilling, a common jig is made for drilling holes in the front and rear side members. Such a jig makes it much easier to obtain a more accurate drilling of holes for all nodes on the side members.
The order of drilling through the hole guide and counterbore of the socket is as follows:
1. Install the spar in the conductor by; clamps and secure it with clamps (Fig. 70).
Hole drilling jig
If you often have to assemble furniture, work with complex shapes and complex connections, then you just need to purchase a jig for drilling holes, this is probably the most convenient device for performing such tasks.
The jig itself is a template widely used in the mechanical engineering industry. It allows you to lock the workpiece in the desired position and guide the torch so that the workpiece is processed as accurately and accurately as possible. Jigs are used for drilling holes on a variety of equipment - on diamond drilling machines, on conventional drilling machines, etc.
Types of conductors
Depending on the purpose, the conductors are different types and different production. The highest accuracy requirements are imposed on industrial jigs, which are used in mechanical engineering; box-type or surface-mounted jigs, as well as mixed-type jigs are used here.
In home use, industrial conductors are not the best option, primarily because of their high price. For small amounts of work, an ordinary jig for drilling holes is quite suitable - you can buy it at tool and building supplies stores. Some craftsmen make conductors with their own hands, but if there is no relevant experience, then you should not experiment - the purchased conductor will certainly be more reliable.
What is the main benefit of using a conductor for a furniture maker and assembler? And the fact that you do not need to mark the elements of furniture, adjust them to fit each other. Everyone who has come across the assembly of furniture knows that the bulk of the time is spent on marking. And the conductor allows you to do everything quickly and without quality loss. In addition, with the help of the jig, you can drill several holes at once.
Application of the conductor
During construction and finishing works there are many cases when the use of a jig for drilling holes can greatly facilitate the work. As mentioned above, it is well suited for assembling furniture and other wooden structures, it can also be used for hanging fittings on walls, for working with pipes, etc. Let's consider the application of the conductor in more detail.
When assembling furniture, it is very important to make holes accurately and accurately, in case of a miss, you will have to drill in a new way, and this does not help preserve good appearance furniture. After all, it is unlikely that extra holes in the walls can decorate it. In addition, if the holes are too close, the wood may crumble and the fasteners will fall out. And if you have a conductor at hand, you can easily and easily drill the necessary holes in thin walls, in corner joints. The jig is especially convenient in situations where there is no full-fledged drilling unit. Also, furniture makers note the convenience of using the conductor when installing furniture dowels. When installing them, accuracy is very important, because if the dowel is installed crookedly, then the adjacent parts will also stand crookedly and the whole structure will come out lopsided. And if you use a conductor, then all the work can be done quickly and accurately.

When working with pipes, the conductor is also irreplaceable. After all, it is difficult to drill a hole exactly according to the mark on a round surface - the drill will constantly slide off. A jig for drilling holes on pipes will greatly facilitate the work, because will fix both the pipe and the drill. It can be used to drill pipes of even very small diameters.
As you can see, the conductor will be very useful in construction, decoration or renovation. It will save time, effort and nerves by doing the job quickly and accurately. Therefore, if you are still thinking whether to buy a jig for drilling holes, you must definitely buy it!
Today in construction, devices are used that facilitate the processing of materials. For example, a jig for drilling holes is one of those devices that allow you to work without the use of any marking tools.
What is the product?
The presented device allows you to do the job as accurately as possible. It is a special box that provides the required hole parameters. That is, you can easily adjust the angle of entry of the drill into the workpiece material. Moreover, if there are several parts, then drilled holes will match.
I must say that such devices can be purchased at any hardware store. Their cost ranges from 1000-2500 rubles. However, you can make a jig for drilling holes yourself. This is especially necessary if the work requires special parameters.
Advantages of the device
 A jig for drilling holes has the following advantages:
Reasonable cost and the possibility of hand-made production.
There is no need to use a ruler, pencil or other means to mark the surface to be treated.
Reducing the complexity of the procedure.
Very simple use of the product, intuitive even for an amateur.
As you can see, the hole drilling jig is a very useful device for household or for a small business.
Areas of application of the product
In principle, such a device can be used almost everywhere. For example, most often it can be found in the process of making furniture. Such work requires precise parameters. The use of the same measuring instruments takes a lot of time. This entails additional costs that can be detrimental to small businesses.
The conductor is also a very important device in mechanical engineering. Here the equipment of the device plays a huge role. It should be as accurate as possible. As you can see, the presented device is quite common and useful. It allows you to significantly simplify your work.
Device design
 The jig for drilling holes, the drawing of which you can see in the article, can have a different design. It all depends on the purpose for which the device will be used. For example, if you purchased a device in the form of a small strip or corner with holes drilled in one line, then with its help you can make holes in one row at a right angle.
If you do not need such a design, but you need a more complex version with holes that are not on the same axis, then you will have to make the device yourself. You can find out how to do this below. However, first you need to understand the varieties of the presented products. As you can see, the jig for perpendicular hole drilling has a not too complex structure, which even an inexperienced master can figure out.
Classification of devices
 So, we can distinguish the following types of devices:
Stationary. They differ in that they do not have rotary elements capable of moving the workpiece. That is, those products that are drilled are of the same type.
Overhead. Their feature is considered to be simplicity of design and low cost. To work, such a device just needs to be put on the part that will be processed. At the same time, it must be fastened with a washer and a nut.
Tilting. They are able to drill multiple holes in one piece. Moreover, they can have different angles in relation to each other.
Swivel. In this case, the location of the drill bushing is determined by the indexing disc.
Rocky. Such products are most often installed on professional drilling machines. They are in particular demand in the engineering industry.
How to choose the right device?
 In order for the jig for drilling holes, the photo of which is presented in this article, to successfully cope with the tasks assigned to it, you need to purchase the correct device. When choosing and buying, try to be guided by the following recommendations:
1. The type and purpose of the device. This parameter is the most important. If you pick up the wrong device or its equipment, then it will be useless for you, and money will be wasted.
2. The cost of the apparatus. This parameter is also important. You should not give preference to the cheapest products that can go to pieces at the first use. Buy durable metal devices.
3. Manufacturer's warranty. Do not purchase an item in the basement. There you are not insured against counterfeiting or defective goods. It is better to contact an official certified point of sale, where you can change the product under warranty if it does not suit you or turns out to be non-functional.
4. Additional features. Today, a jig for drilling holes in pockets can be equipped with special devices that help to eliminate dust during operation, or other devices.
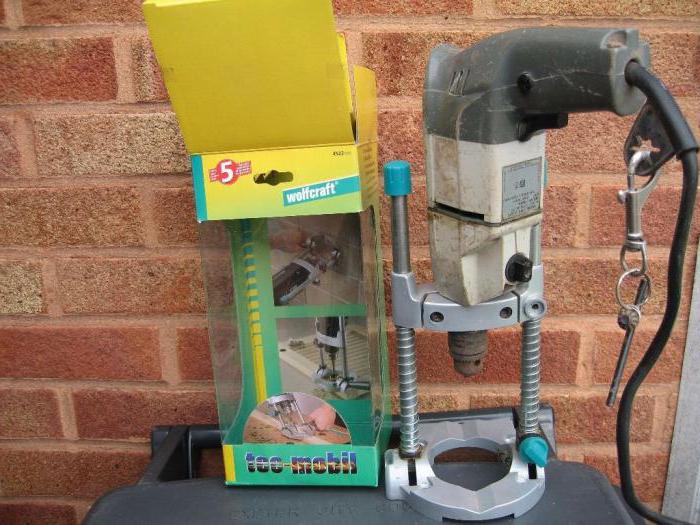
5. Manufacturer. It all depends on your taste and reputation of the manufacturer. Now the most popular is the Wolfcraft drilling jig.
Features of self-production
 This is not at all difficult to do. First you need to pick up required material... A channel or corner is best suited for this purpose. Naturally, before processing the workpiece, it is necessary to make a template, according to which the holes will be drilled. The diagram can be drawn on a regular sheet of paper.
Next, you need to make the markup on the workpiece itself. After that, it must be clamped in a vice or with the help of clamps, and only then start drilling. Please note that it is quite difficult to do this strictly perpendicularly. The fact is that manually you can make a hole with a certain deviation. Moreover, the thicker the workpiece you choose, the more difficult it will be to work with it.
Next, you just need to drill holes in the marked places. When doing this, take into account the drill diameter. It must exactly match the size of future holes in the material being processed. It is best to use a drilling machine for this purpose. It is he who will allow you to achieve the desired angle of 90 degrees. If there is no drilling machine, then the drill must be fixed so that it does not deviate. For this, you can use all kinds of coasters.
Features of the device
 The KWB drilling jig, like any other device of the presented type, must be used correctly. Only in this case can you achieve a positive result. So, try to comply with these conditions:
During operation, all parts, as well as the device itself, must be as clean as possible from dust or other contaminants.
Try to choose exactly the drill that will suit you in diameter.
Please note that during the installation of the jig, it must lie flat against the plane of the table. Naturally, the drilling depth should also be set at this stage.
When choosing the rotational speed of the drill, it is imperative to check that the drill is set correctly for runout.
The work piece must be very firmly fixed on the jig.
Through the guide sleeve, the drill must be brought to the workpiece and drilling begins.
Please note that you should not press too hard on the tool during operation. Otherwise, the drill may simply break or lose its sharpness.
After completing the work, you must carefully remove the tool from the part and unscrew the jig.
During the implementation of all manipulations, try to follow the safety rules as much as possible. For example, wear protective clothing, gloves, and goggles. If you feel that the tool has begun to junk, stop working immediately. Otherwise, you risk injury.
That's all the features of using a conductor. Good luck!


