Before proceeding to describe how replace generator on a car with 1.6 a few words about the signs that indicate the lack of charging. And so in this case, while driving, a hum was heard from under the hood of the car, in all likelihood this hum came from. As a result, the battery light on the dashboard came on, which meant there was no charging. Then the airbags went off, this was evidenced by the illumination of the AirBag indicator. Following this, the on-board computer turned off and the car stalled.
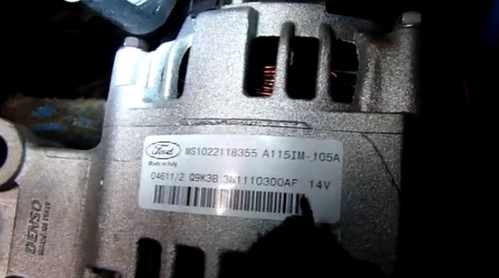
The manufacturer installs on Ford focus generators by Denso, catalog number FORD # A 115 IM, on 105 A and 14 V
Instructions for replacing the generator Ford Focus
How to remove a generator
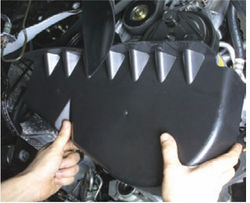
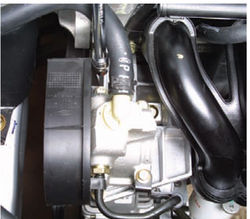
- Using an 8 socket wrench, unscrew the mount and remove the tank.
- Use a flat screwdriver to squeeze the clamp and remove the branch pipe of the removed power steering reservoir.
- Now you need to remove from the mount expansion tank and take it to the side so that it does not interfere with the removal of the generator.
- Next, you need to disconnect the power cable from the battery.
- Note! It is not necessary to disconnect the entire terminal, but only the wire that goes to the generator. This will avoid re-adjusting the power windows, radio and on-board computer Ford Focus.
- Disconnecting the wire from the generator, having previously unscrewed the nut fastening its terminal with a 10 socket wrench.
- Now you need to disconnect the connector, which is located next to the generator. To do this, you need to use a thin screwdriver on the lock button on its side, and then remove the chip by pulling it towards you.
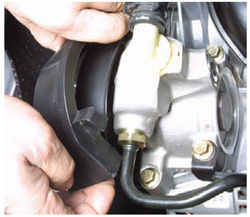
- Using a 15 head, it is necessary to unscrew the lower generator mounting bolt, which is located under the pulley.
- Also, unscrew the top bolt and nut with a 15-inch head and remove the plate. Then, using the sprocket head, unscrew the stud, on which the upper nut was screwed, and remove the Ford Focus generator.
Installing the Ford Focus generator
Installing a new generator into its seat and screw in the hairpin, so we fix it.
Next, we screw in the lower bolt, after putting on the plate on which the power steering reservoir is attached, and then the upper one together with the upper nut.
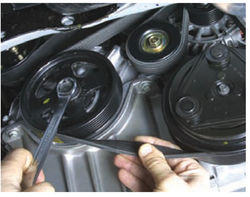
Now you need to put on and pull the Ford Focus, it is also a drive belt attachments- hydraulic booster and pump. For details on how to put on and tension the alternator belt, see the video presented
Replacing the FORD FOCUS generator. VIDEO
Every 15,000 km or 12 months (whichever comes first), we check the condition of the drive belt auxiliary units.
The belt is mounted on the engine near the right mudguard.
To check the condition of the belt, install the car on a viewing ditch or overpass and remove the engine mudguard (see "Changing the engine oil and oil filter").
For convenience, you can remove the right front wheel(see "Changing a wheel").
Using the "8" head with an extension cord, unscrew the two fastening bolts ...
And remove the lower protective cover of the accessory drive belt.
Turn the pulley with a spanner key "19" crankshaft for the bolt of its fastening and inspect the belt along its entire length on both sides.
There should be no tears, deep cracks or delamination on the belt. Small transverse cracks on the ribs of the belt are allowed. The defective belt must be replaced.
To replace the belt ...
Using the "10" head, unscrew the bolt of the right rear fastening of the power steering pump, which also secures the upper belt casing.
Remove the upper casing of the accessory drive belt.
We loosen the tension of the accessory drive belt.
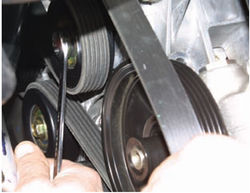
Using a 15 spanner spanner, turn the tension roller bolt clockwise and move the roller until it stops (in this case, you have to overcome the tensioner spring resistance). Remove the belt from the power steering pump pulley.
If it is not necessary to store the belt, it can be cut to facilitate handling. We take out the belt from the engine compartment.
The belt should be centered on the pulleys. Displacement of the belt to the edge of the pulley will cause intense belt wear and damage.
It is more convenient to install a new belt with an assistant who will control the correct installation of the belt on the pulleys and hold the belt so that it does not come off.

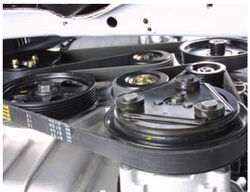
Accessory drive diagram:
1 - crankshaft pulley;
2 - tension roller;
3 - a pulley of the coolant pump;
4 - pulley of the power steering pump;
5 - alternator pulley;
6 - intermediate roller;
7 - air conditioner compressor pulley.
We put on the accessory drive belt on all pulleys.
The sequence of actions may be as follows: put on the belt on all rollers and pulleys, with the exception of the power steering pump pulley. Then with a key "15", turning the tension roller bolt clockwise, we move the roller until it stops. We put the belt on the last remaining pulley. We release the tension roller, which, under the action of the spring, will tighten the belt with the required force.
We install the shrouds of the accessory drive belt and the mudguard.
Page 1 of 2
According to the manufacturer's recommendation, the drive belt for auxiliary units (generator, water pump and power steering pump) must be changed every 60 thousand km or 6 years of operation (whichever comes first).
You will need: a socket head "for 8", a key "for 19", a special device for installing a belt, a knife.
Hang up the front of the vehicle and place it on a secure base. Remove the right front wheel.
Remove the right front wheel arch liner.
Remove the protective cover of the belts of the drives of auxiliary units and the air conditioner compressor by unscrewing the bolts of its fastening to the engine with a socket head "8".
Remove the air conditioning compressor drive belt (see "Replacing the Ford Focus AC compressor drive belt").
According to the manufacturer's recommendations, the accessory drive belts and the A / C compressor should be cut with a knife for removal, after which they become unusable. This is due to the fact that both belts, even after being removed without damage, cannot be reused, since they are designed only for one-time stretching when put on the pulleys (belt tension adjustment is not provided). In addition, the replacement of belts is regulated after a certain mileage or service life, therefore, when replacing the accessory drive belt, you should also replace the air conditioning compressor drive belt at the same time.
Remove the accessory drive belt by cutting it with a knife.
Wipe the pulleys of all units with a clean rag to prevent slippage of the accessory drive belt during installation.
Install a new accessory drive belt on the crankshaft, water pump and power steering pump pulleys so that the belt is on the center of the pulley grooves. Install the tool on the pulley of the water pump in the position shown in fig. 1, pressing it until it clicks, which means fixing the device on the pulley.
Ensure that the accessory drive belt installer clip snaps into place on the pulley and is firmly engaged. Otherwise, the belt will be damaged during installation.
Remove the belt from the water pump pulley and install it on the alternator pulley. Turn the belt installer counterclockwise to the position shown in fig. 2, and slide the belt over the attachment foot.
Make sure the belt is properly installed on the mounting fixture, otherwise it will be damaged during installation.
Engage 1st gear in mechanical box gears (or set the selector automatic box position "P" - parking) and brake the car parking brake to fix crankshaft engine from cranking.
Turn the belt installer clockwise by the bolt installed in it (fig. 3) until the belt is put on the water pump pulley (at this moment the belt tension will be released). Make sure that the mounting device is not caught between the belt and the water pump pulley, otherwise the belt will be damaged.
Using a large screwdriver or mounting spade, pry the mounting tool off the water pump pulley against the resistance of its retainer.
Place the transmission lever in neutral.
Turn the crankshaft with a 19 key by the bolt of fastening of its pulley by about 90 ° to such a position that the mounting device is not caught by the belt, and remove it. The device for mounting the accessory drive belt is disposable, as it is deformed during installation
Turn the engine crankshaft two turns and check that the belt is correctly positioned in the grooves of the pulleys. Reinstall the belt if necessary.
Install the A / C compressor drive belt.
Install the parts in the reverse order of removal.