Is the engine knocking or is it just time to check the valves?
Valve clearance setting
Introduction.
To make the setting yourself or in the workshop, everyone decides for himself. I would like to note that adjusting the valve clearance is not such a difficult matter, anyone who knows how to turn the nuts can handle it. All that is needed is attention and accuracy. This article will help you.
When to make adjustments.
The scooter will not start or is difficult to start.
Gaining momentum with difficulty.
Constantly stalls.
The motor makes a ringing noise.
Attention, not only incorrect valve adjustment can cause these problems. Description of common problems, possible reasons occurrences and remedies will be published on our website.
Attention:
Gap adjustment ONLY WITH A COLD ENGINE!
Remove the seat carefully, the plastic is fragile, especially at low temperatures!
It may be necessary to tune the carburetor after adjusting the gap.
Before removing the cylinder head cover, it is advisable to clean the engine. After removal, make sure that no foreign objects enter the engine.
For possible harm caused by incorrect adjustment, the author of the article does not bear any responsibility.
Required tools:
Pliers
crosshead screwdriver
Wrenches 9 and 8 mm (heads)
Probe for setting valve clearance (we need 0.05 and 0.1 mm)
Step 1. Preparatory work.
Prepare 3-4 jars or other containers for screws, nuts and other small parts. This way we will not lose anything in the course of work.
Removing the seat. Here we need a 10mm socket wrench and a screwdriver. V luggage compartment there are 4 nuts that must be unscrewed (two on the sides of the seat lock and two on the bottom). There are 2 screws under the rubber foot mat, which we also unscrew (see photo).

Step 2. Fan cover.
To tune the valve, we need to find top dead center.
To do this, remove the plastic fan lining for the generator:
Unscrew 2 nuts (M8) and two screws and remove the cladding:
Step 3. Cylinder head cover.
Remove the cylinder head cover:

To do this, unscrew 4 M10 bolts and 2 nuts (a metal tube is screwed on with nuts). Now we remove the lid and see the following picture:
The arrows indicate the valves: inlet at the top, outlet at the bottom. Before we start setting the gap, we need to find the TDC (top dead center).
Step 4. Top dead center (TDC)
TDC is the point at which the piston in the cylinder is in the highest position. In this article, I present a method for finding TDC using marks on the generator rotor. Of course, you can determine the TDC in another way, for example, by the position of the rocker arms. Attention: There are 2 TDCs for four-stroke scooters!
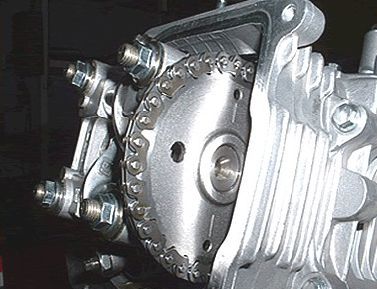
There are 3 holes on the camshaft sprocket. Their location, shown in the photo, corresponds to the TDC of the piston, at which both valves are closed (what we need).
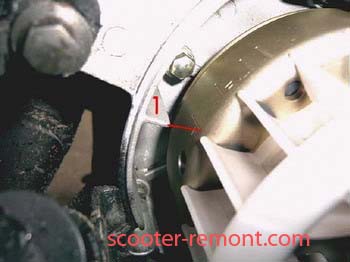
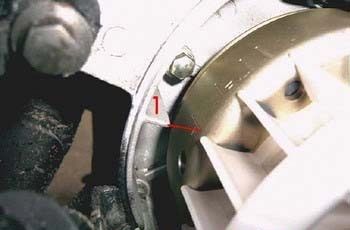
On the flywheel of the generator, the risks are vibrated: T (TDC) and F (ignition moment):

Risk T should be opposite the ledge marked with 1.

To match the protrusion and the TDC risk, use a socket wrench and rotate the fan CW until the TDC is reached. To find out that this is really TDC, we lightly move the key, while the rocker arms should not move. If they move, then this is not TDC, we turn the fan further, CLOCKWISE, until the risk and the protrusion are combined.
Well, we have found the top dead center, now you can start adjusting the valves.
Step 5. Adjusting / Checking valve clearance.
To check the gap, we take a 0.05 mm dipstick and try to push it between the intake valve and the adjusting bolt.
If this fails (due to the lack or insignificant gap) or the gap is too large, then loosen the M9 locknut and twist the adjustment bolt with pliers or a suitable wrench. Clockwise - the gap decreases, counterclockwise - increases. At the same time, we hold the dipstick between the valve and the adjusting bolt.
The dipstick should fit snugly between them, so that the dipstick can be moved, but when moving, there should be no scratches on it. Tighten the lock nut while holding the adjustment bolt with a wrench or pliers. After tightening, check the gap again.
So we have tuned the intake valve.
We do the same with the release valve. It is difficult to reach it with a probe, but it is possible. The gap here should be 0.1 mm.
The valve setup is done. We assemble in the reverse order, put all the parts in place. (head cover, fan lining, seat).
See if we have forgotten anything. We tighten all screws, bolts, nuts accordingly. We work with plastic carefully! May break down, especially at low temperatures.
Well, everything is ready, fair wind for you!
When copying and posting information from our site, an indication of the author, notification to the administration and a link to our site are required.
On a four-stroke scooter, one of the main problems is carburetor operation and valve misalignment. This unit constantly requires adjustment and testing, and if your scooter suddenly loses power, starts poorly and picks up speed very slowly, and at the same time you hear a faint clatter from the engine, you definitely need to check and further action. On Chinese four-strokes, why the clearance setting very often gets lost, perhaps this is due to the quality of the metals and workmanship. maybe with something else, but it doesn't matter to us anymore, the main thing is to adjust everything correctly and on time.
In fact, adjusting valve clearance is much easier than many of you imagined, and almost anyone can do it without resorting to the help of workshops.
To begin with, you should remove the plastic that prevents you from getting to the cylinder head, then remove the cooling cover and unscrew the head itself.
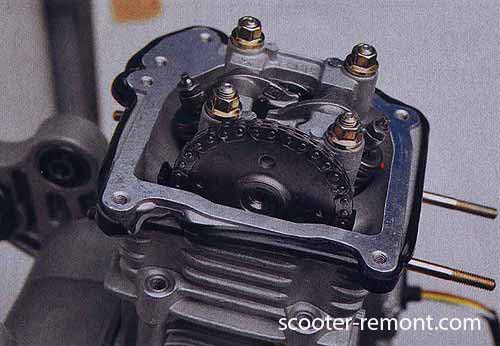
It looks like a cylinder with a removed head
You will see two valves, as well as a sprocket with a tensioned timing chain. The star has holes and engraved stripes. In our case, to check the clearance, you first need to set the piston to the "Top Dead Center". To do this, remove the casing of the cooling impeller and fix the nut with a key so that you can turn the crankshaft. We rotate it until the two small holes with stripes are parallel to the cylinder, and the large hole is on top. In this case, the mark on the generator rotor must match the arrow on the crankcase, as shown in the figure.
Label specified
To determine whether the "dead point" has really been found, we slightly turn the key in two directions, while the rocker arms of the valves should be motionless.
Now we proceed directly to the adjustment, for this you will need such a set of probes.
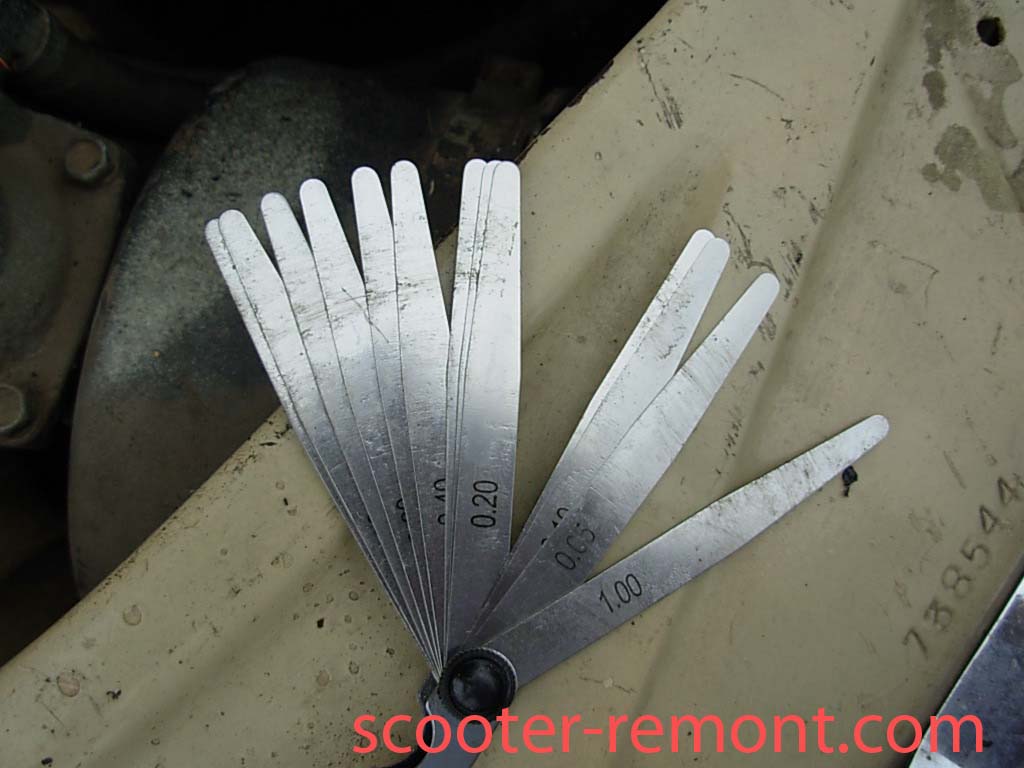
To adjust the valves, such a kit is required.
In the set we need 0.05mm and 0.1mm probes. First, we take the first one, with it we will adjust the intake valve. We are trying to push it between the adjusting bolt and the intake valve, if this does not work, we unscrew the bolt a little, but if it passes freely, tighten it. The dipstick should fit snugly in the gap, and you shouldn't force yourself to pull it out. After adjustment, tighten the lock nut. We do the same action from the exhaust valves, only the dipstick is already taken by 0.1mm.
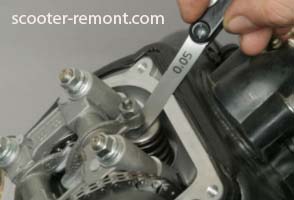
Adjustment of the inlet valve with a 0.05mm dipstick
Above the intake valve, below the exhaust valve. Clearances are indicated.
After fixing the settings, we assemble everything in the reverse order, the cylinder head, casing, plastic.
Check the clearance regularly, with intensive use of the scooter, keep the carburetor clean, and most of the problems with the repair of minutes are up to you.
The main feature of four-stroke scooter engines is the presence of valves in the cylinder-piston group. Therefore, sooner or later, every scooter driver has to find out what the valve setting on a scooter is. You can find out about this after you hear a strange clatter in the area of the cylinder or notice that the speed is too slow. Depending on the condition of the scooter, its adjustment may be required at different intervals, a clatter appears approximately every 2,500 km. If you replaced the CPG or bought a new scooter, you need to adjust the valves after 500 km. If the valve adjustment procedure is avoided, engine wear will increase on a daily basis to the point of complete failure.
Most often, valve adjustment on a 4-stroke scooter is needed due to the Chinese assembly and the low quality of the metal. That is why the gap gets lost over time. If this is the first time you are faced with adjusting the valves and are not yet familiar with the design, the first procedure will seem complicated, but then adjusting the valves on a 4t 150 cc scooter. will run in 15-20 minutes.
First of all, stock up the necessary tools, to treat them:
- keys for 8, 9 and 13;
- crosshead screwdriver;
- a stylus with a thickness of 0.05 and 0.1 mm;
- pliers.
Also note that you will have to let the engine cool down before tuning, but it should not be completely cold, stick to the average. The first step will be to remove the plastic and the seat with the trunk, the seat is held by 4 bolts that will have to be unscrewed. This will help you get to the engine and guide you through the tuning process. But it will be impossible to carry out the adjustment with the lining of the electric generator fan, we also remove it. Behind this facing you will have to find a "dead center" in order to properly adjust the gaps.

The next step is to remove the casing and the cylinder head, after which you will see a structure with valves, there is an asterisk on the timing chain next to it, the first step is to find the "top dead center", marks and holes are visible on the sprocket, two small and one large. Tighten the crankshaft so that the piston can be turned, then turn the crankshaft until the same holes are horizontal and parallel to the cylinder. When doing this, keep in mind that the large hole on the sprocket should be at the top.
Important: there is also a mark on the generator, therefore, with the correct setting, it should coincide with the arrow on the crankcase, as can be seen in the photo below.
Having found a "dead point", you can proceed to the valves themselves, on a 4t scooter, 50 cubes or 80 cubes happens the same way. Here, the 0, 05 and 0, 1 mm probes come in handy.
First of all, when adjusting the valves on a scooter, the intake valve is adjusted, measurements are made with a probe at 0.05 mm. To do this, the dipstick will have to be inserted between the bolt and the valve itself (shown in the picture), if the intake valve is not configured, unscrew the bolt and the dipstick will fit. A correctly set valve will show optimal stylus movement, and the gap is adjusted.
During operation of the four-stroke engine air cooling(these engines are found on most Chinese scooters and motorcycles) the cylinder head (hereinafter referred to as the cylinder head) can heat up to 260 degrees. This is certainly not the operating temperature, but this is often the peak temperature.
The valves, which are located directly in the cylinder head itself, heat up in the same way as the head, with the only difference that the intake valve heats up a little less since it is cooled by the working mixture, and it is ordinary atmospheric air saturated with gasoline vapors, and the exhaust valve heats up much more. Since a flow of exhaust gases passes through the exhaust valve, the temperature of which can reach 600 degrees.
The problem is that metal parts expand when heated. The valve is no exception: during operation, the valve heats up and becomes slightly longer. And when the valve becomes longer, it simply rests on the gas distribution mechanism and opens slightly, or rather does not close to the end (clamped), due to which gases under high pressure leaking through leaks melt the working edges of the valve and its seats.
The edges of the burned-out valves look something like this.
By the way, they burn out not only the valves, but also the nests in which they sit
And this is how the working edges of the valves and seats look after repair.
As you can see, there is no particular point in regulating what has long been burned out. The burned-out valve will no longer hold compression. And if you find that one of the valves has been pinched, then feel free to remove the head, grind the valve, otherwise there will be no sense.
Clearances
Before you is the combustion chamber of the engine of an ordinary Chinese scooter.
During engine operation, the valves heat up to significant values. And in order to compensate for the expansion coefficient of the valve and the entire timing belt as a whole, there is a small gap between the valve and its opening mechanism. Called thermal.
In our case, the gap that we will adjust is between the valve and the rocker arm adjusting bolt. Tightening the adjusting bolt within the required limits, we will be able to adjust the thermal gap as much as we need.
But do not forget that the gap should not be very large - otherwise the mechanism will work with shock loading and will quickly fail. And very small: the valve heats up, rests against the rocker arm and burns out.
Preparation
From the above, you probably figured out that the thermal gap exists in order to compensate for the thermal expansion of the timing parts. The most important rule follows from this: the thermal gap can only be adjusted on a cold engine. If you start adjusting the heat while hot, then simply increase it, since the initial gap will go to expansion. And when the engine cools down, the clearance adjusted in this way will double. I hope this is clear.
Instruments
- Small pliers or special wrench
- Open-end wrench 9
- Socket wrench for 14 or head
- Socket wrench for 8
- A set of measuring probes, preferably with a step of 0.02 mm
We release access to the cylinder head: depending on the model of the scooter, we remove the hood or the seatpost. We find the valve cover there, unscrew the four bolts by 8 and remove it from the engine.
The valve cover looks like this. In my case, in order to get to it, I had to remove the hood, saddle and seatpost.
After the mark on the generator coincides with the ledge on the engine crankcase, we check in which position it has become camshaft... The camshaft should be in a position where both valves are closed. And he gets into this position every second turn crankshaft since it rotates twice as slow.
Correct position camshaft identified by its asterisk. The sprocket should become a large hole up, and the small holes and the marks that are knocked out near them should become parallel to the plane of the valve cover connector.
This is if, ideally, but in practice, the asterisk rarely becomes the way we need it. And the chain is often to blame for this - and the camshaft begins to overtake the crankshaft a little. If your asterisk has become a little crooked, then by and large it is nonsense. But if you don't understand how it became, then this problem must be solved very quickly - otherwise, sooner or later, the valve will bend.
Once again, we check that the "T" mark on the generator rotor is opposite the protrusion, and the camshaft sprocket is in the correct position. We turn off the locknuts on the adjusting bolts.
We unscrew the adjusting bolts a little, insert the dipstick between the valve and the adjusting bolt and without removing it - tighten the adjusting bolt with our fingers, clamp the adjusting bolt with pliers and fix it with a locknut.
After tightening the lock nut, check how easy the dipstick moves. Ideally, the dipstick between the valve and the bolt should move with a subtle amount of force.
- If the dipstick moves without effort, loosen the locknut and tighten the bolt slightly.
- If the dipstick is difficult to move or is pinched, loosen the bolt.
The size of the gaps
What I don't like about Chinese scooters is that they don't have any alignment data. There is infa on the Internet about this, but it is not reliable everywhere.
Believe me or not, it's your right, but for my clients I adjust the clearances within the following limits:
- On engines of the 139QMB series (ordinary Chinese eighties) I set the clearance of 0.05 mm - both on the intake and exhaust valves - the same.
- On engines of the 157 QMJ series (ordinary Chinese hundred fifty), I set 0.05 mm at the inlet and 0.07 mm at the outlet.
Periodicity
It is advisable to make the first adjustment immediately after purchasing a scooter, both new and used. The rest of the adjustments should be made after 3000 - 4000 km of run.
When to make adjustments.
♦ The scooter will not start or is difficult to start.
♦ Difficult to gain momentum.
♦ Constantly stalls.
♦ The motor makes a ringing noise.
Attention, not only incorrect valve adjustment can cause these problems. A description of common problems, possible causes and remedies will be published on our website.
Attention:
♦ Clearance adjustment only ON A COLD MOTOR!
♦ Remove the seat carefully, the plastic is fragile, especially at low temperatures!
♦ It may be necessary to tune the carburetor after adjusting the gap.
♦ Before removing the cylinder head cover, it is advisable to clean the engine. After removal, make sure that no foreign objects enter the engine.
♦ For possible damage caused by incorrect adjustment, the author of the article does not bear any responsibility.
Required tools:
♦ Pliers
♦ Phillips screwdriver
♦ Keys 9 and 8 mm (heads)
♦ Probe for setting valve clearance (we need 0.05 and 0.1 mm)
Step 1. Preparatory work.
Prepare 3-4 jars or other containers for screws, nuts and other small parts. This way we will not lose anything in the course of work.
Removing the seat. Here we need a 10mm socket wrench and a screwdriver. In the luggage compartment there are 4 nuts that must be unscrewed (two on the sides of the seat lock and two on the bottom). There are 2 screws under the rubber foot mat, which we also unscrew (see photo).
Step 2. Fan cover.
To tune the valve, we need to find top dead center.
To do this, remove the plastic fan lining for the generator:
Unscrew 2 nuts (M8) and two screws and remove the cladding:
Step 3. Cylinder head cover.
Remove the cylinder head cover:
To do this, unscrew 4 M10 bolts and 2 nuts (a metal tube is screwed on with nuts). Now we remove the lid and see the following picture:
The arrows indicate the valves: inlet at the top, outlet at the bottom. Before we start setting the gap, we need to find the TDC (top dead center).
Step 4. Top dead center (TDC)
TDC is the point at which the piston in the cylinder is in the highest position. In this article, I present a method for finding TDC using marks on the generator rotor. Of course, you can determine the TDC in another way, for example, by the position of the rocker arms. Attention: There are 2 TDCs for four-stroke scooters!
There are 3 holes on the camshaft sprocket. Their location, shown in the photo, corresponds to the TDC of the piston, at which both valves are closed (what we need).
On the flywheel of the generator, the risks are vibrated: T (TDC) and F (ignition moment):
Risk T should be opposite the ledge marked with 1.
To match the protrusion and the TDC risk, use a socket wrench and rotate the fan CW until the TDC is reached. To find out that this is really TDC, we lightly move the key, while the rocker arms should not move. If they move, then this is not TDC, we turn the fan further, CLOCKWISE, until the risk and the protrusion are combined.
Well, we have found the top dead center, now you can start adjusting the valves.
Step 5. Adjusting / Checking valve clearance.
To check the gap, we take a 0.05 mm dipstick and try to push it between the intake valve and the adjusting bolt.
If this fails (due to the lack or insignificant gap) or the gap is too large, then loosen the M9 locknut and twist the adjustment bolt with pliers or a suitable wrench. Clockwise - the gap decreases, counterclockwise - increases. At the same time, we hold the dipstick between the valve and the adjusting bolt.
The dipstick should fit snugly between them, so that the dipstick can be moved, but when moving, there should be no scratches on it. Tighten the lock nut while holding the adjustment bolt with a wrench or pliers. After tightening, check the gap again.
So we have tuned the intake valve.
We do the same with the release valve. It is difficult to reach it with a probe, but it is possible. The gap here should be 0.1 mm.
The valve setup is done. We assemble in the reverse order, put all the parts in place. (head cover, fan lining, seat).
See if we have forgotten anything. All screws, bolts, nuts are tightened accordingly. We work with plastic carefully! May break down, especially at low temperatures.
Well, everything is ready, fair wind for you!