One of the very time-consuming and exciting activities is building your own robot.
Everyone, from teenagers to adults, dreams of making either a small and cute or a large and multifunctional robot, just as there are as many different modifications of robotics as there are people. Do you want to make a robot?
Before such a serious project, you should first make sure of your capabilities. Building a robot is not the cheapest or easiest thing to do. Think about what kind of robot you want to make, what functions it should perform, perhaps it will be just a decorative robot made from old parts or it will be a fully functional robot with complex, moving mechanisms.
I have met many craftsmen who create decorative robots from old, worn-out mechanisms, such as watches, alarm clocks, televisions, irons, bicycles, computers and even cars. These robots are made simply for beauty; they, as a rule, leave very vivid impressions, especially children like them. Teenagers are generally interested in robots as something mysterious, still unknown.

Parts of decorative robots are attached in various ways: with glue, welding, and screws. In such an activity there are no unnecessary parts; any details are used, from a small spring to the largest bolt. Robots can be small, tabletop, and some craftsmen manage to make decorative robots of human size.

It is much more difficult and no less interesting to make a working robot. The robot doesn’t have to look like a person, it can be a tin can with horns and caterpillars :) here you can use your imagination ad infinitum.

Previously, robots were mostly mechanical, all movements were controlled by complex mechanisms. Today, most crude mechanical components can be replaced with electrical circuits, and the “brain” of a robot can be just one microcircuit into which the necessary data is entered through a computer.

Today, the Lego company produces special kits for constructing robots, while such construction kits are expensive and not available to everyone.

Personally, I’m interested in making a robot with my own hands from scrap materials. The biggest problem encountered during construction is the lack of electrical knowledge. If mechanically you can still do something without problems, then with electrical circuits things are more complicated; it is often necessary to combine several different electrical components, and this is where difficulties begin, but all this can be fixed. When creating a robot, problems may arise with electric motors; good motors are expensive, you have to disassemble old toys, this is not very convenient. Many radio components have also become scarce, more and more equipment is made on complex microcircuits, and this requires serious knowledge. Despite all the difficulties, many of us continue to create amazing robots for a variety of purposes. Robots can do laundry, clean up dust, draw, move objects, make us laugh, or simply decorate our desktop.
I will periodically publish photographs of my new robots on the site, if you are also interested in this topic, then be sure to send your stories with photographs or write about your inventions on the forum.
Robotics is one of the most promising areas in the field of Internet technologies, and in our time there is no need to explain that the IT sector is the future. Robotics is a fascinating thing: to design a robot is almost to create a new creature, albeit an electronic one.
Since the 60s of the last century, automated and self-managing devices that do some work for a person began to be used for research and in production, then in the service sector, and since then, every year they have become more firmly established in their place in people’s lives. Of course, it cannot be said that in Russia everything is carried out entirely by independent mechanisms, but a certain vector in this direction is definitely outlined. Sberbank is already planning to replace three thousand lawyers with smart machines.
Together with experts, we will try to figure out why robotics is needed and how to approach it.
How does robotics for children differ from professional robotics?
In short, robotics for children is aimed at studying a subject, while professional robotics is aimed at solving specific problems. If specialists create industrial manipulators that perform various technological tasks, or specialized wheeled platforms, then amateurs and children, of course, do simpler things.
Tatyana Volkova, employee of the Center for Intelligent Robotics: “As a rule, this is where everyone starts: they figure out the motors and force the robot to simply drive forward, then make turns. When the robot executes movement commands, you can already connect a sensor and make the robot move towards the light or, conversely, “run away” from it. And then comes the favorite task of all beginners: a robot that drives along a line. There are even various robot races organized.”
How can you tell if your child has a penchant for robotics?
First you need to buy a construction set and see if your child likes assembling it. And then you can give it to the circle. Classes will help him develop fine motor skills, imagination, spatial perception, logic, concentration and patience.
The sooner you can decide on the direction of robotics - design, electronics, programming - the better. All three areas are vast and require separate study.
Alexander Kolotov, leading specialist in STEM programs at Innopolis University: “If a child likes to assemble construction sets, then construction will suit him. If he is interested in learning how things work, then he will enjoy doing electronics. If a child has a passion for mathematics, then he will be interested in programming.”
When to start learning robotics?
It is best to start studying and enrolling in clubs from childhood, however, not too early - at 8-12 years old, experts say. Earlier, it is more difficult for a child to grasp understandable abstractions, and later, in adolescence, he may develop other interests and become distracted. The child also needs to be motivated to study mathematics, so that in the future it will be interesting and easy for him to design mechanisms and circuits, and compose algorithms.
From 8-9 years old Children can already understand and remember what a resistor, LED, capacitor is, and later master concepts from school physics ahead of the school curriculum. It doesn’t matter whether they become specialists in this field or not, the knowledge and skills they gain will definitely not be in vain.
At 14-15 years old you need to continue to study mathematics, push robotics classes into the background and start studying programming more seriously - to understand not only complex algorithms, but also data storage structures. Next comes the mathematical basis and knowledge in algorithmization, immersion in the theory of mechanisms and machines, design of electromechanical equipment of a robotic device, implementation of automatic navigation algorithms, computer vision algorithms and machine learning.
Alexander Kolotov: “If at this moment you introduce a future specialist to the basics of linear algebra, complex calculus, the theory of probability and statistics, then by the time he enters a university he will already have a good idea of why he should pay additional attention to these subjects when receiving higher education.”
Which designers to choose?
Each age has its own educational programs, constructors and platforms, varying in degree of complexity. You can find both foreign and domestic products. There are expensive kits for robotics (around 30 thousand rubles and more), there are also cheaper, very simple ones (within 1-3 thousand rubles).
If the child 8-11 years, you can buy Lego or Fischertechnik construction sets (although, of course, manufacturers have offers for both younger and older ages). The Lego robotics kit has interesting details, colorful figures, is easy to assemble and comes with detailed instructions. The Fischertechnik series of construction sets for robotics brings you closer to the real development process, here you have wires, plugs, and a visual programming environment.
.jpg)
At 13-14 years old you can start working with TRIC or Arduino modules, which, according to Tatyana Volkova, are practically a standard in the field of educational robotics, as well as Raspberry. TRIC is more complex than Lego, but lighter than Arduino and Raspberry Ri. The last two already require basic programming skills.
What else will you need to study?
Programming. It is possible to avoid it only at the initial stage, but then you can’t live without it. You can start with Lego Mindstorms, Python, ROS (Robot Operating System).
Basic mechanics. You can start with crafts made from paper, cardboard, bottles, which is important for fine motor skills and general development. The simplest robot can be made from individual parts (motors, wires, a photosensor and one simple microcircuit). The “Making Tool with Father Sperch” will help you get acquainted with the basic mechanics.
Basics of Electronics. First, learn how to assemble simple circuits. For children under eight years old, experts recommend the “Connoisseur” construction set; then you can move on to the “Basics of Electronics” set. Start".
Where can children practice robotics?
If you see a child’s interest, you can send him to clubs and courses, although you can study on your own. During the courses, the child will be under the guidance of specialists, will be able to find like-minded people, and will engage in robotics on a regular basis.
.jpg)
It is also advisable to immediately understand what you want from classes: participate in competitions and compete for prizes, participate in project activities, or simply study for yourself.
Alexey Kolotov: “For serious classes, projects, participation in competitions, you need to choose clubs with small groups of 6-8 people and a coach who leads students to prizes in competitions, who constantly develops himself and gives interesting tasks. For hobby activities, you can go to groups of up to 20 people.”
How to choose robotics courses?
When registering for courses, pay attention to the teacher, recommends commercial director of Promobot Oleg Kivokurtsev. “There are precedents when a teacher simply gives the children the equipment, and then anyone can do whatever they want,” Tatyana Volkova agrees with Oleg. Such activities will be of little use.
When choosing courses, you should also pay attention to on the existing material and technical base. Are there construction kits (not just Lego), is it possible to write programs, study mechanics and electronics, and make projects yourself. Each pair of students should have their own robotics kit. Preferably with additional parts (wheels, gears, frame elements) if you want to participate in competitions. If several teams are working with one set at once, then, most likely, no serious competition is expected.
Find out what competitions the robotics club participates in. Do these competitions help you consolidate your acquired skills and provide an opportunity for further development?
.jpg)
Robocup Competition 2014
How to study robotics on your own?
Courses require money and time. If the first one is not enough and you won’t be able to go somewhere regularly, you can study independently with your child. It is important that parents have the necessary competence in this area: without the help of a parent, it will be quite difficult for a child to master robotics, warns Oleg Kivokurtsev.
Find material to study. They can be taken on the Internet, from ordered books, at conferences attended, from the magazine “Entertaining Robotics”. For self-study, there are free online courses, for example, “Building robots and other devices using Arduino: from a traffic light to a 3D printer.”
Should adults learn robotics?
If you have already left childhood, this does not mean that the doors of robotics are closed for you. You can also enroll in courses or study it on your own.
If a person decides to do this as a hobby, then his path will be the same as that of a child. However, it is clear that it is unlikely that you will be able to advance beyond the amateur level without a professional education (design engineer, programmer and electronics engineer), although, of course, no one forbids you to get an internship at a company and stubbornly gnaw on the granite of a new direction for you.
Oleg Kivokurtsev: “It will be easier for an adult to master robotics, but time is an important factor.”
For those who have a similar specialty, but want to retrain, there are also various courses to help. For example, for machine learning specialists, the free online course on probabilistic robotics “Artificial Intelligence in Robotics” will be suitable. There is also the Intel educational program, the Lectorium educational project, and ITMO distance courses. Don’t forget about books, for example, there is a lot of literature for beginners (“Basics of Robotics”, “Introduction to Robotics”, “Handbook for Robotics”). Choose what is most clear and suitable for you.
It should be remembered that serious work differs from amateur hobby at least in the cost of equipment costs and the list of tasks assigned to the employee. It’s one thing to assemble the simplest robot with your own hands, but quite another to practice, for example, computer vision. Therefore, it is still better to study the basics of design, programming and hardware engineering from an early age and subsequently, if you like it, enter a specialized university.
Which universities should I go to study at?
.jpg)
Majors related to robotics can be found at the following universities:
— Moscow Technological University (MIREA, MGUPI, MITHT);
— Moscow State Technical University named after. N. E. Bauman;
— Moscow State Technological University “Stankin”;
— National Research University “MPEI” (Moscow);
— Skolkovo Institute of Science and Technology (Moscow);
— Moscow State Transport University of Emperor Nicholas II;
— Moscow State University of Food Production;
— Moscow State Forestry University;
— St. Petersburg State University of Aerospace Instrumentation (SGUAP);
— St. Petersburg National Research University of Information Technologies, Mechanics and Optics (ITMO);
— Magnitogorsk State Technical University;
— Omsk State Technical University;
— Saratov State Technical University;
— Innopolis University (Republic of Tatarstan);
— South Russian Federal University (Novocherkassk State Technical University).
The most important
Knowing the basics of robotics may soon be useful for ordinary people, and the opportunity to become a specialist in this field looks very promising, so it’s definitely worth at least trying your hand at robotics.
Who wouldn’t want to have a universal assistant, ready to carry out any assignment: wash the dishes, buy groceries, change a tire on the car, and take children to kindergarten and parents to work? The idea of creating mechanized assistants has occupied engineering minds since ancient times. And Karel Capek even came up with a word for a mechanical servant - a robot that performs duties instead of a person.
Fortunately, in the current digital age, such assistants are sure to become a reality soon. In fact, intelligent mechanisms are already helping a person with household chores: a robot vacuum cleaner will clean up while the owners are at work, a multicooker will help prepare food, no worse than a self-assembled tablecloth, and the playful puppy Aibo will happily bring slippers or a ball. Sophisticated robots are used in manufacturing, medicine and space. They make it possible to partially, or even completely, replace human labor in difficult or dangerous conditions. At the same time, androids try to look like people in appearance, while industrial robots are usually created for economic and technological reasons and external decor is by no means a priority for them.
But it turns out that you can try to make a robot using improvised means. So, you can construct an original mechanism from a telephone handset, a computer mouse, a toothbrush, an old camera or the ubiquitous plastic bottle. By placing several sensors on the platform, you can program such a robot to perform simple operations: adjusting the lighting, sending signals, moving around the room. Of course, this is far from a multifunctional assistant from science fiction films, but such an activity develops ingenuity and creative engineering thinking, and unconditionally arouses admiration among those who consider robotics to be absolutely not a handicraft business.

Cyborg out of the box
One of the easiest solutions to making a robot is to purchase a ready-made robotics kit with step-by-step instructions. This option is also suitable for those who are going to seriously engage in technical creativity, because one package contains all the necessary parts for mechanics: from electronic boards and specialized sensors, to a supply of bolts and stickers. Along with instructions allowing you to create a rather complex mechanism. Thanks to many accessories, such a robot can serve as an excellent base for creativity.
Basic school knowledge in physics and skills from labor lessons are quite enough to assemble the first robot. A variety of sensors and motors are controlled by control panels, and special programming environments make it possible to create real cyborgs that can execute commands.
For example, a sensor on a mechanical robot can detect the presence or absence of a surface in front of the device, and the program code can indicate in which direction the wheelbase should be turned. Such a robot will never fall off the table! By the way, real robot vacuum cleaners work on a similar principle. In addition to carrying out cleaning according to a given schedule and the ability to return to the base on time to recharge, this intelligent assistant can independently build trajectories for cleaning the room. Because there may be a variety of obstacles on the floor, such as chairs and wires, the robot must constantly scan the path ahead and avoid such obstacles.
In order for a robot created by oneself to be able to carry out various commands, manufacturers provide the possibility of programming it. Having drawn up an algorithm for the robot’s behavior in various conditions, you should create a code for the interaction of sensors with the outside world. This is possible thanks to the presence of a microcomputer, which is the brain center of such a mechanical robot.

Self-made mobile mechanism
Even without specialized, and usually expensive, kits, it is quite possible to make a mechanical manipulator using improvised means. So, having been inspired by the idea of creating a robot, you should carefully analyze the stocks of home bins for the presence of unclaimed spare parts that can be used in this creative undertaking. They will use:
- a motor (for example, from an old toy);
- wheels from toy cars;
- construction details;
- carton boxes;
- fountain pen refills;
- different types of tape;
- glue;
- buttons, beads;
- screws, nuts, paper clips;
- all kinds of wires;
- light bulbs;
- battery (matching the voltage of the motor).
Advice: “A useful skill when creating a robot is the ability to use a soldering iron, because it will help securely fasten the mechanism, especially the electrical components.”

With the help of these publicly available components, you can create a real technical miracle.
So, in order to make your own robot from materials available at home, you should:
- prepare the found parts for the mechanism, check their performance;
- draw a model of the future robot, taking into account the available equipment;
- put together a body for the robot from a construction set or cardboard parts;
- glue or solder spare parts responsible for the movement of the mechanism (for example, attach a robot motor to a wheelbase);
- provide power to the motor by connecting it with a conductor to the corresponding battery contacts;
- complement the themed decor of the device.
Advice: “Beady eyes for a robot, decorative horns-antennae made of wire, legs-springs, diode light bulbs will help to animate even the most boring mechanism. These elements can be attached with glue or tape.”
You can make the mechanism of such a robot in a few hours, after which all that remains is to come up with a name for the robot and present it to admiring spectators. Surely some of them will pick up the innovative idea and be able to make their own mechanical characters.
Famous smart machines
 The cute robot Wall-E endears himself to the viewer of the film of the same name, making him empathize with his dramatic adventures, while the Terminator demonstrates the power of a soulless, invincible machine. Star Wars characters - the faithful droids R2D2 and C3PO - accompany you on journeys through a galaxy far, far away, and the romantic Werther even sacrifices himself in a battle with space pirates.
Mechanical robots also exist outside of cinema. Thus, the world admires the skills of the humanoid robot Asimo, who can walk up the stairs, play football, serve drinks and greet politely. The Spirit and Curiosity rovers are equipped with autonomous chemical laboratories, which made it possible to analyze samples of Martian soils. Self-driving robotic cars can move without human intervention, even on complex city streets with high risks of unexpected events.
Perhaps it is from home attempts to create the first intellectual mechanisms that inventions will grow that will change the technical panorama of the future and the life of mankind.
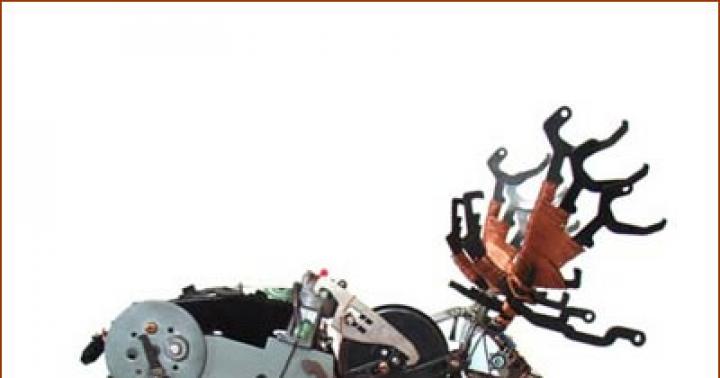
I decided to smoothly transition to dynamic moving models. This is a project for a small homemade IR-controlled robot, assembled from simple and readily available parts. It is based on two microcontrollers. Transmission from the remote control is provided PIC12F675, and the receiving part for the motor controller is implemented on PIC12F629.
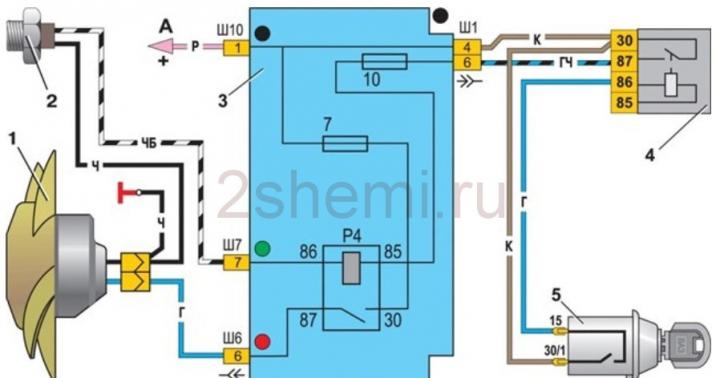
Robot circuit on a microcontroller

Everything went smoothly with the digital part, the only problem was in the “propulsion system” - small gearboxes, which are very problematic to make at home, so I had to develop the idea " vibrobugs"The micromotors are controlled through amplifying transistor switches on the BC337. They are replaceable with any other small n-p-n transistors with a collector current of 0.5 A.

The dimensions turned out to be very small - in the photo there is a comparison of it with a coin and also near a matchbox. The robot's eyes are made of super-bright LEDs, tucked into a housing of small electrolytic capacitors.

Discuss the article SMALL HOMEMADE ROBOT
Make a robot very simple Let's figure out what it takes to create a robot at home, in order to understand the basics of robotics.
Surely, after watching enough movies about robots, you have often wanted to build your own comrade in battle, but you didn’t know where to start. Of course, you won't be able to build a bipedal Terminator, but that's not what we're trying to achieve. Anyone who knows how to hold a soldering iron correctly in their hands can assemble a simple robot and this does not require deep knowledge, although it will not hurt. Amateur robotics is not much different from circuit design, only much more interesting, because it also involves areas such as mechanics and programming. All components are easily available and are not that expensive. So progress does not stand still, and we will use it to our advantage.
Introduction
So. What is a robot? In most cases, this is an automatic device that responds to any environmental actions. Robots can be controlled by humans or perform pre-programmed actions. Typically, the robot is equipped with a variety of sensors (distance, rotation angle, acceleration), video cameras, and manipulators. The electronic part of the robot consists of a microcontroller (MC) - a microcircuit that contains a processor, a clock generator, various peripherals, RAM and permanent memory. There are a huge number of different microcontrollers in the world for different applications, and on their basis you can assemble powerful robots. AVR microcontrollers are widely used for amateur buildings. They are by far the most accessible and on the Internet you can find many examples based on these MKs. To work with microcontrollers, you need to be able to program in assembler or C and have basic knowledge of digital and analog electronics. In our project we will use C. Programming for MK is not much different from programming on a computer, the syntax of the language is the same, most functions are practically no different, and new ones are quite easy to learn and convenient to use.
What do we need
To begin with, our robot will be able to simply avoid obstacles, that is, repeat the normal behavior of most animals in nature. Everything we need to build such a robot can be found in radio stores. Let's decide how our robot will move. I think the most successful are the tracks that are used in tanks; this is the most convenient solution, because the tracks have greater maneuverability than the wheels of a vehicle and are more convenient to control (to turn, it is enough to rotate the tracks in different directions). Therefore, you will need any toy tank whose tracks rotate independently of each other, you can buy one at any toy store at a reasonable price. From this tank you only need a platform with tracks and motors with gearboxes, the rest you can safely unscrew and throw away. We also need a microcontroller, my choice fell on ATmega16 - it has enough ports for connecting sensors and peripherals and in general it is quite convenient. You will also need to purchase some radio components, a soldering iron, and a multimeter.
Making a board with MK
In our case, the microcontroller will perform the functions of the brain, but we will not start with it, but with powering the robot’s brain. Proper nutrition is the key to health, so we will start with how to properly feed our robot, because this is where novice robot builders usually make mistakes. And in order for our robot to work normally, we need to use a voltage stabilizer. I prefer the L7805 chip - it is designed to produce a stable 5V output voltage, which is what our microcontroller needs. But due to the fact that the voltage drop on this microcircuit is about 2.5V, a minimum of 7.5V must be supplied to it. Together with this stabilizer, electrolytic capacitors are used to smooth out voltage ripples and a diode is necessarily included in the circuit to protect against polarity reversal.
Now we can move on to our microcontroller. The case of the MK is DIP (it’s more convenient to solder) and has forty pins. On board there is an ADC, PWM, USART and much more that we will not use for now. Let's look at a few important nodes. The RESET pin (9th leg of the MK) is pulled up by resistor R1 to the “plus” of the power source - this must be done! Otherwise, your MK may unintentionally reset or, more simply put, glitch. Another desirable measure, but not mandatory, is to connect RESET through the ceramic capacitor C1 to ground. In the diagram you can also see a 1000 uF electrolyte; it saves you from voltage dips when the engines are running, which will also have a beneficial effect on the operation of the microcontroller. Quartz resonator X1 and capacitors C2, C3 should be located as close as possible to pins XTAL1 and XTAL2.
I won’t talk about how to flash MK, since you can read about it on the Internet. We will write the program in C; I chose CodeVisionAVR as the programming environment. This is a fairly user-friendly environment and is useful for beginners because it has a built-in code creation wizard.

Motor control
An equally important component in our robot is the motor driver, which makes it easier for us to control it. Never and under no circumstances should motors be connected directly to the MK! In general, powerful loads cannot be controlled directly from the microcontroller, otherwise it will burn out. Use key transistors. For our case, there is a special chip - L293D. In such simple projects, always try to use this particular chip with the “D” index, as it has built-in diodes for overload protection. This microcircuit is very easy to control and is easy to get in radio stores. It is available in two packages: DIP and SOIC. We will use DIP in the package due to the ease of mounting on the board. L293D has separate power supply for motors and logic. Therefore, we will power the microcircuit itself from the stabilizer (VSS input), and the motors directly from the batteries (VS input). L293D can withstand a load of 600 mA per channel, and it has two of these channels, that is, two motors can be connected to one chip. But to be on the safe side, we will combine the channels, and then we will need one micra for each engine. It follows that the L293D will be able to withstand 1.2 A. To achieve this, you need to combine the micra legs, as shown in the diagram. The microcircuit works as follows: when a logical “0” is applied to IN1 and IN2, and a logical one is applied to IN3 and IN4, the motor rotates in one direction, and if the signals are inverted - a logical zero is applied, then the motor will begin to rotate in the other direction. Pins EN1 and EN2 are responsible for turning on each channel. We connect them and connect them to the “plus” of the power supply from the stabilizer. Since the microcircuit heats up during operation, and installing radiators on this type of case is problematic, heat dissipation is provided by GND legs - it is better to solder them on a wide contact pad. That's all you need to know about engine drivers for the first time.
Obstacle sensors
So that our robot can navigate and not crash into everything, we will install two infrared sensors on it. The simplest sensor consists of an IR diode that emits in the infrared spectrum and a phototransistor that will receive the signal from the IR diode. The principle is this: when there is no obstacle in front of the sensor, the IR rays do not hit the phototransistor and it does not open. If there is an obstacle in front of the sensor, then the rays are reflected from it and hit the transistor - it opens and current begins to flow. The disadvantage of such sensors is that they can react differently to different surfaces and are not protected from interference - the sensor may accidentally be triggered by extraneous signals from other devices. Modulating the signal can protect you from interference, but we won’t bother with that for now. For starters, that's enough.

Robot firmware
To bring the robot to life, you need to write firmware for it, that is, a program that would take readings from sensors and control the motors. My program is the simplest, it does not contain complex structures and will be understandable to everyone. The next two lines include header files for our microcontroller and commands for generating delays:
#include
#include
The following lines are conditional because the PORTC values depend on how you connected the motor driver to your microcontroller:
PORTC.0 = 1; PORTC.1 = 0; PORTC.2 = 1; PORTC.3 = 0; The value 0xFF means that the output will be log. "1", and 0x00 is log. "0". With the following construction we check whether there is an obstacle in front of the robot and on which side it is: if (!(PINB & (1< If light from an IR diode hits the phototransistor, then a log is installed on the microcontroller leg. “0” and the robot starts moving backward to move away from the obstacle, then turns around so as not to collide with the obstacle again and then moves forward again. Since we have two sensors, we check for the presence of an obstacle twice - on the right and on the left, and therefore we can find out which side the obstacle is on. The command "delay_ms(1000)" indicates that one second will pass before the next command begins to execute. I've covered most of the aspects that will help you build your first robot. But robotics doesn't end there. If you assemble this robot, you will have a lot of opportunities to expand it. You can improve the robot's algorithm, such as what to do if the obstacle is not on some side, but right in front of the robot. It also wouldn’t hurt to install an encoder - a simple device that will help you accurately position and know the location of your robot in space. For clarity, it is possible to install a color or monochrome display that can show useful information - battery charge level, distance to obstacles, various debugging information. It wouldn't hurt to improve the sensors - installing TSOPs (these are IR receivers that perceive a signal only of a certain frequency) instead of conventional phototransistors. In addition to infrared sensors, there are ultrasonic sensors, which are more expensive and also have their drawbacks, but have recently been gaining popularity among robot builders. In order for the robot to respond to sound, it would be a good idea to install microphones with an amplifier. But what I think is really interesting is installing the camera and programming machine vision based on it. There is a set of special OpenCV libraries with which you can program facial recognition, movement according to colored beacons and many other interesting things. It all depends only on your imagination and skills. List of components: ATmega16 in DIP-40 package> L7805 in TO-220 package L293D in DIP-16 housing x2 pcs. resistors with a power of 0.25 W with ratings: 10 kOhm x 1 pc., 220 Ohm x 4 pcs. ceramic capacitors: 0.1 µF, 1 µF, 22 pF electrolytic capacitors: 1000 µF x 16 V, 220 µF x 16 V x 2 pcs. diode 1N4001 or 1N4004 16 MHz quartz resonator IR diodes: any two of them will do. phototransistors, also any, but responding only to the wavelength of infrared rays Firmware code: At the moment my robot is almost complete. It is equipped with a wireless camera, a distance sensor (both the camera and this sensor are installed on a rotating tower), an obstacle sensor, an encoder, a signal receiver from the remote control and an RS-232 interface for connecting to a computer. It operates in two modes: autonomous and manual (receives control signals from the remote control), the camera can also be turned on/off remotely or by the robot itself to save battery power. I am writing firmware for apartment security (transferring images to a computer, detecting movements, walking around the premises).Conclusion