Both traditional and brick ovens can crack over time. Even the highest quality oven is not immune from such a defect. Cracks can appear for various reasons, one of the most common being uneven heating. Many masters for the safety of the furnace are interested in advance how and with what to cover the furnace so that it does not crack.
Many households do not attach importance to the gaps that have appeared in the masonry or plaster of the stove, but the problem can lead to serious consequences. Even through small cracks, carbon monoxide penetrates into the house, which, as you know, is very harmful to humans. You can prevent such defects if you choose the right coating for the furnace.
How to coat the oven
Cracks cannot simply be repaired from above with plaster or other material, all defects must be detected and restored correctly. You should not save on such work, as this can lead to even greater defects. The entire process of restoring the lining of the furnace includes the following steps:
- inspection and finding out the causes of defects;
- selection and mixing of the solution;
- applying grout and plaster.

In most cases, the actions will not take much time, and most importantly, they will not allow carbon dioxide and combustion products to accumulate in the room.
Reasons for the formation of cracks
Masonry and coating defects may appear on the stove due to the following features:


The most difficult defect to correct is the drawdown. On the foundation of the furnace is never worth saving. A quality stove can survive even after the destruction of the house.
Note! Often, households believe that the smoke in the room accumulates precisely because of the cracks. But sometimes the reason lies elsewhere.
Often, combustion products accumulate at home due to the following shortcomings:


If you cannot independently determine the cause of smoke at home, be sure to invite a professional to do this. An experienced stove-maker will not only help to detect defects in the stove, but also make an estimate of the work.
Furnace Inspection
To analyze the condition of the furnace, you do not need to have the professional skills of a builder or stove-maker. The main thing is to find all the cracks and evaluate their size. If there are no large defects on the masonry, then it will be enough to remove the old coating and apply a new one. In addition, it is necessary to remove part of the mortar between the bricks in the place where the crack is formed. After these procedures, the masonry is covered with mortar so that there are no noticeable patches.

In the case of large defects, it will be necessary to dismantle some of the bricks and replace them with new ones. You can determine the danger of a crack by the characteristic smell of burning from the cracks and the release of smoke. Restoration of large cracks is a painstaking and lengthy process. It is best to entrust such restoration to a professional.
Mixing the mortar
For any nature of defects, a solution will be needed to cover them. Sometimes fireclay (chamotte clay) or a traditional mixture of sand and clay is used for this. The modern market of finishing materials offers a large selection of different grouts and adhesives. Ordinary grout can be made independently. There are several recipes for traditional putties:

All materials are equally popular in kiln putty. In order to choose a solution suitable for your oven, you should familiarize yourself with the pros and cons of each of the compositions presented.

Chamotte clay
Clay of this grade is considered one of the most popular putties among traditional compositions. Fireclay is considered a very reliable material, it is resistant to high temperatures. Most of the old stoves coated with chamotte clay are still in operation.

You can buy fireclay in almost any construction department. The material is packaged in bags of 5, 10, 20 and 50 kg. Before applying, the clay must be diluted with water and left for a day to gain viscosity and plasticity.
Sand coating
This composition is very popular due to its low cost. Moreover, it is used not only for coating, but also for laying seams during masonry. The low cost of the components does not affect the quality of the composition. After kneading, a very plastic mass will be obtained, which will gain strength after a couple of heating cycles.

To prepare the sand-clay mass, use the following instructions:


The coating composition is thoroughly kneaded and checked for plasticity. To do this, the mass is rolled into a ball and clamped between the fingers. The correct composition turns out to be plastic, like plasticine, when pressed and rolled, it wrinkles well and does not crack. If chips form on the ball, it is worth adding a little more water. To apply such a grout, you must first moisten the crack. After that, with the fingers, the mass is pushed into the crack, trying to get as deep as possible. When the mixture is taken, it is rubbed and plastered.

Grout for oven
The optimal composition for beginners is oven grout. It is very easy to work with the mass, but the main thing is that it has high plasticity and durability. After application and drying, it can withstand temperatures up to 10000C?.
Note! Before grouting itself, the walls are moistened in places of cracks.
The disadvantages of such a composition include its high cost, but it is fully justified by high performance. If you want to save money, then putty can be made independently. This will require:

Clay must be mixed with water (1 part water and 3 parts clay), after which the mass is left for a couple of days. Then sand is poured into the solution, gradually mixed. At the very end, the composition is supplemented with straw and salt, and everything is kneaded.
oven glue
Such a composition can also be purchased at a hardware store. It is very easy to mix and apply.
Today, the construction market offers two types of glue: plastic and solid. The first is optimal for restoration (filling cracks), the second is used as a finish.

Important! Oven glue dries very quickly, so you need to work with it as efficiently as possible. It is recommended to knead the composition in small portions and immediately apply to cracks.
The composition is applied according to the following instructions:
- kneading 1 liter of glue;
- wetting places with cracks with water;
- treatment of cracks with a mixture (you need to push the composition as deep as possible);
- kneading 5-6 liters of solid glue;
- oven finish.

Cracks can form on any structure, this process should not be started. Timely restoration can significantly extend the life of the furnace.
Plastering from cracks
It is impossible to plaster the oven over cracks. First you need to process the defects in one of the ways described above, and then apply the plaster. The composition can also protect the furnace from improper heating and cracking.
In the process of restoring the furnace, plaster is always removed where defects have formed. You also need to remove the decorative trim.

Before any restoration, the masonry is abundantly moistened with water, this increases the adhesion of the composition to the working surface. If you skip this step, the solution may simply fly off.
When working with cracks, it is most convenient to apply the mass with your fingers, this will allow you to feel the direction of the putty and its amount. For convenience, the composition is best applied with rubberized gloves.
After processing all the defects, the oven is left to dry for 7-10 days. Only after this period has elapsed can the first furnace be carried out.
Over time, even the most well-built stove needs repair. During operation, cracks and crevices form on it, due to which cold air enters the brick oven. As a result - smoke, the appearance of carbon monoxide and poor heating of the house. In addition, cracks spoil the aesthetic appearance of not only the stove, but the entire room. In order to get rid of cracks, it is necessary to know what material can be coated with the furnace and cover up the resulting defects.
Before proceeding with the repair of defects, it is necessary to determine the reasons for their occurrence. If a large number of small cracks have accumulated on the surface or cracks have gone through the masonry mixture, then they can be repaired and plastered. More serious damage will require disassembly and reconstruction.
Tools and materials necessary for work
You will need the following tools to carry out the painting work:
- maklovitsa or brush;
- hammer;
- putty knife;
- mesh made of steel wire or natural burlap;
- nails.
For proper cooking, you will need the following tools and raw materials:
- a sieve with a mesh size of at least 0.3 cm;
- container for mixing;
- spade for mixing;
- bucket;
- sand;
- clay.
Coating compositions according to their purpose are of the following types:
- to cover cracks and cracks;
- in order to completely plaster the surface.
Varieties of solutions for coating the furnace
In order to coat the oven, it is best to use a time-tested clay solution. This method is the simplest and most common.
The classic clay mixture recipe is simple: just mix clay and sand in a 2:1 ratio. To  to give the solution elasticity and fire resistance, crushed asbestos can be added to the solution. To avoid the appearance of cracks, experts recommend adding table salt at the rate of 0.3 kg per 10 liters.
As an economy, instead of salt, the addition of small straw is allowed. This putty should be infused for 10-12 hours.
Also, the following compositions can be used for coating:
- a solution based on clay and lime. Asbestos and sand are also added to it. The proportion of the mixture is as follows 1:1:0.5:2;
- mix clay and cement in equal quantities, add sifted sand and asbestos there. The proportion of the solution is as follows 1:1:2:0.5;
- combine gypsum and sand in equal amounts, add sifted sand and lime. The proportion of ingredients should be 1:1:2:0.2.
Lime-based cooking scheme
For proper preparation of the solution, it is necessary to adhere to a certain order of work:
- Sift all ingredients through a sieve.
- In order for clay to mix better with sand, it must be left in water for 24 hours.
- Extinguish lime with water.
- Combine lime milk with the rest of the ingredients.
- The result should be a solution of a homogeneous and thick consistency.
Rules for the preparation of a gypsum-based solution
This type of solution must be done in small portions, as it quickly hardens.
In the process of coating, the composition must be immediately leveled on the surface. You can do this with a spatula.
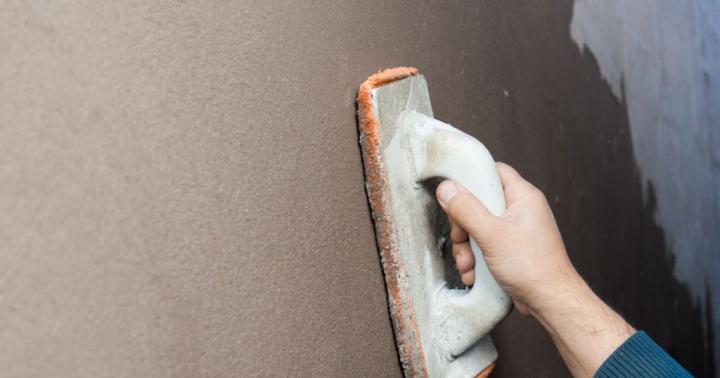
Coating technology
In order to correctly coat the oven, you must adhere to certain rules and recommendations:
- Clean up the brick surface.
- Clear masonry joints to a depth of 10 mm.
- Cover the stove with steel mesh and fix it with nails in a checkerboard pattern, falling into the inter-laying seams. The distance between the nails should be 0.1 m. The steel mesh will help to avoid the appearance of cracks during further operation and prevent the mortar from peeling off.
- Wet the surface.
- Coat the structure in 2 steps. In order for the coating material to hold better, the surface of the structure must be hot. The first layer should be 0.5 cm thick. For these purposes, you need a solution that resembles sour cream in its consistency. The second layer is also applied with a thickness of 0.5 cm. The solution for this layer should be thicker.
- Align layers.
- Perform surface polishing.
- If cracks appear after drying, it is necessary to cut them and align the edges. Next, wet and grout with a thick consistency solution.
- After the plaster has dried, you can start finishing work.
- If finishing work is not performed, then the structure can be started to operate after 72 hours.
Sealing cracks and crevices in the oven
In order to cover up cracks and crevices, the following types of solutions can be used:

Properly prepared solutions lie flat on the surface. After drying such mixtures, it will be enough to sand the surface with sandpaper. Fresh solutions are recommended to be used immediately after preparation. Before applying the mixture, the surface must be moistened. This will help the material adhere better to the repaired surface.
With the correct observance of all proportions, the technology of work and the use of high-quality materials, the repaired structure will have a service life of at least 10 years.