It turned out that everything is not so simple, most of the reviews were about devices intended for installation in cars, and, the saddest thing, with negative reviews, but it seemed like there were a number of comments mentioning the good TPA3116 amplifier, so I started look for something based on it.
So the hero of today's review: 
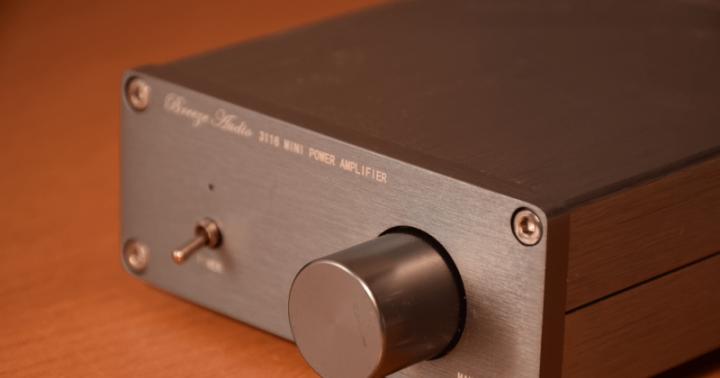
Breeze Audio two-channel amplifier based on the TPA3116 chip.
Housing: milled aluminum, 90mm width, 35mm height, 120mm depth.
Controls: power switch and volume control
Connectors: input through 2 tulips, output through contact barrels with screw fastening.
Power: 12-24V, 5.4mm jack
So what came out of all this? 
Well, first of all, the body. Looks pretty good. Made of milled aluminum, smoothly polished and has a pleasant matte finish. The inscriptions are applied neatly and, most importantly, quite modest, without Chinese show off. Compared to the original amplifier of my speakers, this box is simply miniature, and out of habit, I can’t believe it’s capable of anything. On the front of the case there is a strict metal toggle switch, a small (and, most importantly, not very bright) LED indicating operation, and a volume control potentiometer with a metal knob. The front and rear panels are screwed to the body using flush-mounted hex head screws: strictly and neatly.
The power supply is not included, the seller offers for $8 to add some kind of 12V unit, I don’t know what power. I refused this generous offer, fortunately I found an old adapter from Thinkpad and also made by IBM in the box.

As for the audio connection, the input is made with classic tulips, but, of course, they saved some money on the output contacts. Not an expert in the types of connectors, but they are screws drilled from the side at an angle of 90 degrees, into which the wires from the speakers are inserted and pressed on top with wing nuts. In theory, spring terminals do not take up much more space, do not cost much more, and are much more convenient to use: it is easier to insert a wire, even if not tinned, and it is more difficult to short-circuit two contacts with a randomly protruding “tail.” (Below in the comments they explained that you don’t need to press the wire with nuts, but buy banana connectors and connect through them. It’s like Hi-Fi and much better than terminals. =)

I opened the case to see what was inside. It looks quite neat, the soldering is normal, although the flux has not been washed off. But I didn’t bother removing the radiator to look at the chip markings, you can throw tomatoes at me, I was too lazy. So let's trust the Chinese that there is a beautiful TPA3116D2.
And finally, and most importantly, what about the sound? This is where everything is most difficult. I really like it. It sounds much better than the original Microlab amplifier (at least as I remember it). The bass is rich, enough for me, the mids are well defined. The scene is quite legible, there is depth. This is enough for listening at medium volume in a small room. But here you need to understand that I’m not an audiophile, I don’t understand the intricacies of gold wires, but I test the sound quality on mp3 playback =)
The main thing to note is that this box does not make noise during pauses, does not wheeze during saturated compositions, and adjusts the volume smoothly through the channels and without rattling. And the fact that there are no lamps sticking out of it, that it doesn’t heat up like an A-class iron or the devil with it, it does its job and that’s okay.
This is where I’ll probably end this short review, thank you all for your attention.
I'm planning to buy +31 Add to favorites I liked the review +39 +72Good afternoon, dear readers. Finally, I got around to reviewing the amplifier for the computer workstation, which I made several months ago.
Background
I wanted a compact amplifier based on TPA3116 like this. Only with built-in power supply and FM radio. Having studied the offers in various Chinese stores, I didn’t find anything for myself, either I didn’t like it or it was expensive. It was decided to make it myself. The idea was this: the device works like a regular amplifier, with the ability to switch to FM radio mode.
Kit
Every device needs a housing. At first I wanted to assemble everything in a purchased plastic case, but I wanted it to be beautiful. I decided to use the housing of the existing satellite tuner. The donor was an old satellite receiver Orton 4100C
The following board was chosen as an amplifier (seller's photo): 
Now the seller is selling boards made of green PCB, I received a yellow one: 
Bought for our own, delivery to Ukraine 22 days by China Post. It was sealed in an antistatic bag and wrapped in bubble wrap on top.
Dimensions:  Specifications:
Class D
Operating voltage: DC 8 - 25V
Operating current: 4.5 - 7.5A
Output power when powered DC 24V 4Ohm 50W + 50W
Operating frequency: 20Hz to 20KHz
Current and overheat protection
The amplifier is assembled on a TPA3116D2 chip - datasheet
There will be no testing of the audio path; there are enough tests for this microcircuit on the network.
The well-known MP3 module will work as an FM radio, bought 

The package is standard - the module itself, wiring and remote control.
All this stuff will be powered by the people's power supply DC2412, bought 
Brief characteristics:
Input voltage - 85-265 V
Output voltage - 24 V
Load current - 4-6 A
Output power - 100 W (maximum)
Dimensions - 107x57x30mm
Well, the connectors for connection: 
We bought and
Assembly
The idea was to make the most of the original front panel of the receiver, with minimal modifications. The control buttons will also be used natively. The receiver has the following board inside on the front panel (the microphones have already been removed): 
A board was made from textolite according to the dimensions of the original one, an MP3 module and microphones for control were fixed in it (the original board became the donor of the microphones): 

The MP3 module board had to be shortened a little (it rested on the last mic), USB and mini jack connectors, an SD card slot, and buttons had to be unsoldered (I soldered the mics to the contacts where the buttons were)

The task was to make the display of the module shine through the translucent plastic of the front panel. This is what it looks like in the case (the “Amplifier” and “Radio” modes, respectively): 
I didn’t like the volume control knob that came with the amplifier at all; Ali sells better ones, but I don’t like the prices either. As a result, I machined a new handle from aluminum myself: 
A hole was cut out for it in the front panel of the case: 
From the beginning, the plan was to power the MP3 module from the main power supply, through a DC-DC converter (the module needs 5V). In the process, it turned out that with such a connection a small background appears in the speakers. This option did not suit me, so I assembled a simple transformer power supply with a stabilizer on the LM7805: 
I decided to remove all terminals and connectors from the power supply and amplifier board, and soldered the wires directly. The power supply is isolated from the case and mounted on plastic racks. The antenna wire from the FM radio was connected to a mini jack connector on the rear panel. This is what it all looks like inside: 
The rear panel had to be replaced almost entirely, since there was almost no body left on the original one after dismantling the receiver connectors: 
Front view: 
The large button on the front panel switches the “radio” or “amplifier” modes, the small ones in the “radio” mode switch stations. Don't forget that there is also an IR remote control.
I liked the sound, there is enough power (S-30 speakers).
This is such a nice project. Thank you for your attention!
The design of this D-class audio amplifier was created for an experiment (I had long wanted to listen and evaluate the new class D), in addition, a new audio amplifier was needed to replace the old one for the computer. It was decided to buy 2 ready-made bridge amplifier modules in class D, which are called TPA3118 (like the microcircuit that is installed in them). They cost 150 rubles each and theoretically produce 60 W mono power. If you wish, you can assemble a similar UMZCH from scratch using separate radio components -.
 TPA3118 module purchased on Ali
 Specifications
- Chip TPA3116
- Operating voltage: 8 - 24 V
- Operating current: up to 7.5 A
- Standby current: 40 mA
- Input level: 0.3 - 6.3 V
- Output power: (12V 4Ohm 25W + 25W) and (21V 4Ohm 50W + 50W)
- Operating frequency: 20 Hz - 20 kHz
- Current and overheat protection
- Board dimensions: 100x60x25 mm
TPA3116 Class D amplifier circuit
 Electrical circuit of the TPA3116 amplifier
 With a unipolar power supply of 12 V, the output power is about 10 W, at 24 V - about 30 W (at 8 Ohm AC).
 Power - ULF distortion, graph
 Judging by the distortion graphs, there’s no need to pump it up too much, up to 20 W and that’s it. Then Kni climbs sharply upward.
 Block board TPA3116, TPA3118, TPA3130
 Despite the modest size of the board and the unusual absence of radiators for an audio assembler, this little guy plays very loudly. The assembly itself took a couple of hours - you don’t need to do anything special, just solder the wires from the connectors and the power supply. But try to do everything as efficiently as possible so that you don’t have to disassemble and redo it later. These UMZCH modules are most often powered by switching power supplies, which whistle and make noise along the circuit. Therefore, install additional capacity filters that will eliminate these effects.


Please note the additional TIP-142 power filter transistor. It was assumed that it would heat up a little, so the transistor was screwed to the body. In reality he is cold. An additional advantage is that the voltage increases gradually through this filter, after switching on for a short time.
In general, for power supply, one more 50V/6800uF capacitor per channel was installed in front of the modules. TPA3116 boards are installed vertically using bushings. If you want the end result to leave a good impression, find a good volume control knob and good audio connections. External power also comes through the socket.
Summary of work and results
The amplifier set on the table near the computer looks very stylish and is convenient in that you can connect different speaker systems to it - it easily drives even 100-watt speakers (of course, not to their full capacity). The voltage is supplied from the laptop power supply 19 V and there is complete silence in the speakers.
An excellent solution for assembling an amplifier with your own hands!
Are available
Buy in bulkCheaper as a set
The amplifier module allows you to implement the principle: buy - connect. This low-frequency amplifier has minimal nonlinear distortion coefficient, self-noise level and a wide range of supply voltages and load resistances. The areas of application of this ULF are extremely diverse. The ULF can be used both in a car and outdoors, for various events, and at home as part of your musical audio complex.
Specifications
Peculiarities
- Wide range of supply voltage 5V-24V.
- Protection against excess temperature of the microcircuit housing.
- Load short circuit protection
- High conversion frequency of 400 kHz-1.2 MHz, which allows you to obtain a high-quality signal without the use of bulky filters for PWM cleaning.
- High efficiency over 90%
- Possibility of connecting to a linear input without preamplifiers and matching circuits.
- The use of closed loop feedback provides excellent power supply noise suppression.
- The board has a volume control and tone controls for high and low frequencies.
Principle of operation
The module is built on the basis of a D-class TPA3116 audio chip. The chip drivers are bridged. Thus, 50W of output power per channel is achieved with low intermodulation interference and low distortion. Due to the high efficiency of the chip, more than 90%, massive radiators and active cooling systems are not required. The board has a volume control and tone controls for high and low frequencies, which makes the amplifier more convenient to use.
Functions
- Enhances speech or music in the audio range 20…22000 Hz.
Device operating modes
- Class D
Articles
Contents of delivery
- MP3116mini module - 1 pc. PC.
- Instructions - 1 pc. PC.
What is required for assembly
- Soldering iron
- Shielded wire
- Side cutters
Preparation for use
- Connect the speakers.
- Apply 5-24V power to the module, observing the polarity.
- Touch the line input contacts with tweezers. A faint background should be heard through the speakers.
- Check completed. Enjoy your use.
terms of Use
- -40…+85 degrees C
- Humidity up to 95% without condensation.
Precautionary measures
- Do not exceed the maximum supply voltage of the module.
- Do not confuse the polarity of the power connection.
- Failure to comply with these requirements will result in module failure.
Questions and answers
- on the website ti.com they write that the TPA3116 chip does not break down to 30V. Is the amplifier power supply limited to 24V due to some other elements?
- The Datasheet says 26V http://www.ti.com/lit/ds/symlink/tpa3130d2.pdf
- Is it secured in the body with nuts on the regulators or is there another way?
- That's right, with nuts. If the regulators are removed, then use hot glue.
- Hello! What housing fits this amplifier?
- There is no special case for this device. Universal, taking into account the placement of the power source, you can choose here https://site/shop/cases
- You need a low-power amplifier with a volume control. balance and timbre. With the ability to connect headphones. because I have poor hearing and one ear hears worse.
- We don't have such low power headphone amplifiers.
Hi all!
Today I’ll tell you a little about assembling a power amplifier from Chinese boards. Everything is very budget friendly.
A friend asked me to build an amplifier for simple Soviet speakers (like C30). There is a minimum amount of money allocated for entertainment, so I needed to assemble a completed device for 1,500 rubles. Moreover, preferably something more powerful (at the expense of quality, as usual) and with a pleasant appearance, it will stand on the table!
With such a micro budget, there are two options: either one that’s been shipped from Avito, or a Chinese class D with a shoe box instead of a case.
But he turned to me, and I have a lot of Chinese goods in my stash. Therefore, for 1500 rubles I will have Mark Levinson (almost).
In a limited budget, the TPA3116 chip leads by a significant margin. I ordered a payment with him.
Package: 
Set: 
amplifier board and jst cable for connecting a sound source.
Moreover, in the description of the board, the 3116 chip is not indicated anywhere, only a proud inscription about 120 W. The board is, naturally, stereo.
We tear off the radiator, here it is original: 
Rear board: 
Dimensions 9.2 * 6.8 cm. The peculiarity of the board is that there is no volume control on it; we connect a dual variable resistor or adjust it at the source or something else to choose from. The board is cheap (I think it cost $6), saving on everything.
I wanted to take this volume control: 
motorized. Price: $15.00 AUD
But he didn’t come, the money was returned. What a pity, if only there was a remote control.
I had to install a cheap variable resistor: 
With the money I saved, for a spectacular appearance, I took beautiful ones, I used them once.
Since the power supply range of the amplifier is 12-26 V, we select the appropriate power supply, of course from the pulse ones. The transformer will be expensive. 
. Price US$10.26
Kirich is described in detail
Characteristics:
Model: XK-2412-24
Protection: short circuit, current, overvoltage.
Ac Input: AC85-265V
Frequency: 50Hz/60Hz
Output voltage: DC24V
Output current: 4A-6A
Output power: 100W
Positioning hole size: 9.8*4.7cm
Board size: 10.65*5.7*2.8 cm
That was all for the budget, I had the rest.
Test run of the amplifier, Tenda mp3 source module: 
Everything is working. There is a clicking noise when turned on, and a slight background noise if you install a long input cable.
Output noise: 

Gain: 
With 24 V power supply, the amplifier produces as much as 60 W at 4 Ohms: 
It’s clear that there will be a fair amount of distortion, but it’s powerful. Powerful. As requested.
It was possible to assemble it in the case of a computer CD (), but somehow it was not solid.
I used a plastic case for REA: 
I had it lying around for a long time, so it came in handy. Dimensions: 215x180x70 mm.
I CNC cut 2 mm stainless steel panels for it: 
This will add a sparkle to the design (if this word is applicable to such a collective farm) and add solidity. Not every hifi brand will allow itself to put stainless steel in amplifier housings, but I can)).
Ventilation holes in the case: 
The good thing about plastic cases is their ease of processing.
Painting with silver paint from a spray can for car rims: 
Dries in 1 hour!
The layout of the case is very dense: 
The board stands are cheap nylon. For dial indicators I used a separate small 12 V 1 A power supply.
Preparing the case and assembling the amplifier takes exactly one evening.
Finished amplifier inside: 
Filling:
1. The actual subject of the review, the TPA3116D2 amplifier board.
2. with fuse and switch.
3. Power supply 24 V 5 A.
4. switching on with illumination and fixation.
5. Signal level indicators.
6. Driver board for dial indicators (included with them).
7. 4 pcs. They are not magnetic.
8. Ferrite ring (to reduce interference). To the signal input.
9. 12 V 1 A to power the indicators.
10. RCA input connectors.
11. Volume control: variable resistor.
Appearance of the finished product.
Front: 
Behind: 
The level indicators are equipped with warm lamp (ordinary incandescent lamp) backlighting: 
You can not only listen, but also look at the music: 
Here's a simple project. I listened - it was playing, there weren’t enough stars in the sky, which was expected.
The point is: it is easy to assemble a powerful amplifier, but it is very difficult to assemble a good powerful amplifier))
Thank you for watching. Happy shopping and only high-quality sound!