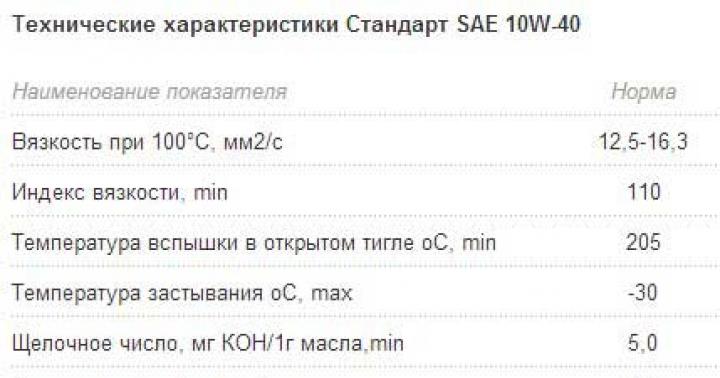
The topic of the article is the timing belt ZMZ 406. We will talk about a set with double-row chains. When a standard car arrives to replace the timing belt, this is one thing. When an UAZ patriot arrives on 33 wheels or a medical gazelle with a ton of equipment on top of the dry mass, this is different. To the question what to put? Single-row chain, double-row, or leave the wonderful tooth-and-plate design? The answer is unambiguous: two-row chains. But a stalemate has come on the market, when there is nothing decent, but cars need to be made. For this reason, the timing kit ZMZ 406, 405, 409 was born, which I bring to your attention.
Timing belt ZMZ 406, situation
On these engines, with my own hands, I changed several dozen timing belts and have a fairly good idea of the situation in my region (St. Petersburg and the surrounding area). The fact that clients brought in "factory boxes" or with magical names of a double and tenth resource, I certainly set, but I took a receipt from people in which I warned that I did not like the quality even visually. Very often they brought kits from the Progress company. But they have their own problem. Almost every set was individual. There were no identical sets. Either different manufacturers of chains, or not the gears that were "yesterday". Accordingly, the quality floats like a "violet in the hole." Rusmash produces good sets, but they don't make adjustable sprockets. The best, in my opinion, are the Rhodes-M kits (Medvedev I.A.), but unfortunately they are poorly available for logistical reasons. Today there is, and then a couple of months there may be a failure in the supply. Sometimes more. Based on these reasons, it was decided to assemble a kit for customers and services, which can be given a decent guarantee, and most importantly, meets modern technical requirements. And he also tried to implement what was asked from all over Russia. The kit should include EVERYTHING that may be needed for replacement, including the cuff, gaskets, half rings, and even additionally can be ordered. That is, in order to overhaul the gas distribution mechanism and forget about it for a very long time.
Timing belt ZMZ 406, my version
- 4 stars (rusmash). .
- Tensioner shoes (Rusmash or Rhodes-M)
- Tensioners 2 pcs. (Rusmash)
- Euro-2 sedatives
- crankshaft seal
- Gasket set (pump and tensioner gaskets, 2 chain cover gaskets)
In the extended version, the kit is supplemented with a bottle of brake cleaner, sealant and a medium thread locker. This is all that I use when replacing timing belts on these engines. A lot of this list I have already painted separately on the pages of the site. I will dwell on those points that have not previously been met or are quite important when replacing timing belts.
Of the spare parts, you may need a pump and a promval. But if the pump can then always be installed in a couple of hours, then the replacement of the promval, this is a new, complete disassembly of the timing. Therefore, if the engine mileage is close to a hundred or more, find out in advance which store has a quality spare part. If you don’t need it, it’s good, if you need it, you will know where to buy it. The kit was run in an ambulance. The audit was carried out at 50 and 100 thousand kilometers. On the ambulance with the speed of running around the clock, there are no problems)) Most of all I was interested in "chain extraction". The camshafts “ran away” for a given run by 1-2 degrees from the initial installation. which is within the margin of error. This result satisfied me.
Question answer
- What kind of warranty do you provide for this kit?
When I install this kit with my own hands, I give a guarantee from 3 months to six months without mileage limitation, depending on the rest of the engine condition. Of course, when it comes to our boundless homeland, such guarantees would be stupidity on my part. But I hope that this displays for customers the approximate reliability of the kit.
- Is it possible or not to purchase part of this kit?
Maybe. For example, a client wants to re-riveted Mercedes chains, put other sprockets or tensioners. In this case, the price of the kit is calculated individually and, of course, there can no longer be any guarantees on my part.
- Are the components in this set changing or not?
As I said above, this approach of other manufacturers personally annoys me and causes misunderstanding. Therefore, the main components of this set are unchanged. For a year of sales, compared to the primary photo, I only changed the chain tensioners. Replacing the tensioners with a wear indicator in the kits with ordinary ones without an indicator (of the same manufacturer). This was due to sound logic, why are there wear indicators on the new “zero” double-row chains? Which may be needed after a few years of operation. Yes, and the pricing of the kit is also an important thing.
The timing mechanism on the UAZ Patriot engine synchronizes the operation of the camshaft and crankshaft. It also functions to set the opening cycles of the valve system. The quality functioning of the engine directly depends on the operation of this node. In view of this, special attention should be paid to this node. Of course, the chain is practical and reliable, but it also stretches. In some cases, the chain may even break. The timing chain on the UAZ Patriot must be changed after 80,000 km. But this is only the recommended interval. In fact, the chain drive can become unusable even earlier. Its premature wear can be affected by factors such as weather conditions, driving style and more. If you notice that the chain has begun to “clatter”, this is an occasion to take an interest in its condition.
Here we will talk about how you can replace the chain yourself at home. Of course, you can also turn to specialists, but it will cost money and, moreover, will not contribute to the addition of experience, but it is so necessary for motorists who want to learn how to understand technology. There are 2 chains in the UAZ Patriot timing mechanism, which makes replacing a consumable difficult. But do not think that only professionals can do it. Each motorist will be able to replace the chain with his own hands, you just need to make all your efforts for this.
Signals for replacement
Over time, the hinge joints of the chain wear out and the chain stretches. It is necessary to change the chain in the case when it is no longer possible to adjust its tension, when there has been a mismatch between the marks on the shafts. If chips or any other damage appear on the chain, this also means that the consumable has served its purpose, and it is time to replace it with a new one. With a stretched chain, the engine runs unevenly, a rattle is constantly heard. In this case, the car will no longer start the first time. Also, a stretched chain causes the car to “eat up” more fuel. A stretched chain can slip over the sprocket. In the end, it can simply break off, and this will cause the pistons to hit the valves. The latter will bend from this, and the car will need to be overhauled.
The chain, of course, is somewhat more practical than the belt, but its resource is once developed, and it needs to be replaced. If you decide that you will carry out this procedure yourself, then follow the instructions below exactly, and you will definitely succeed.
Consumable replacement
Work should only be carried out when the engine is cold. Before carrying out the main work, the radiator must be dismantled. Remove the hose that supplies cooling to the pump by loosening the clamp that secures it. We dismantle the cover that closes the cylinder block by unscrewing 4 fixing bolts. Remove the water pump. Now you need to dismantle the crankshaft timing sensor and its pulley. Remove the chain tensioner cover. It comes off with the gasket. When dismantling the casing, care must be taken, as the tensioner spring presses on it. We remove the tensioner. In the same way, we remove the tensioner acting on the lower chain.
Now you can remove the chain cover. To do this, unscrew 7 bolts. You need to remove it carefully, you must try not to damage the gaskets. Now remove the upper and lower tensioner arms along with the gears. Remove the chain damper, which is attached with two bolts. We dismantle the camshaft gears, which are bolted to the flanges.
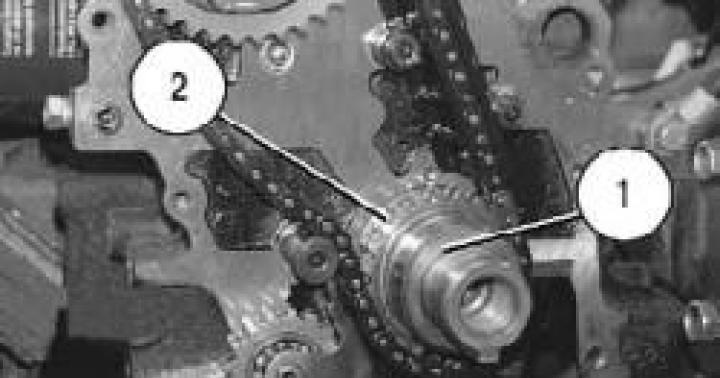
Perceiving the following information, be guided by the photo below, as the numbering of the necessary details will be given here. We turn out the bolts (2) and raise the damper of the upper chain. We bend the lock plate (6) and unscrew the bolts (5). The intermediate shaft must be fixed so that it does not rotate. To do this, insert a screwdriver into the hole (3). Now we remove the gear (4) by inserting a thin screwdriver between it and the gear (4). Now we remove the gear (4) and take out the chain, which for this should be pulled up. Now remove the gear (3) and remove the lower chain.
Now let's look at the next picture below. We remove the sleeve (1), after which we remove the gear (2). You will also have to remove the rubber seal. Now we press the gear (2) and remove the gears. For this purpose, you can use a special puller.

After dismantling, the gears should be washed in gasoline and wiped with a rag. It is possible that the gears will also have to be replaced. This will be necessary if chips or cracks are noticed on them. Most likely, the dampers will also need to be changed, since plastics are a fragile material. Also check the condition of the tensioners. They have to be changed if there are chips on the teeth of the sprockets.
If you removed the crankshaft gear, then when assembling the mechanism, it will have to be pressed onto the crankshaft. After that, we put the seal and sleeve. Pay attention to the alignment of labels. The crankshaft should be rotated so that the mark (1) (see photo below) on the crankshaft converges with the mark (2) located on the cylinder block. The piston of the main cylinder in this case should take the TDC position. Install the damper (4). Bolts (3) should not be tightened too much yet. Now we take the chain (5), lubricate it and put it on the crankshaft gear.

We put the chain on the main gear (1) (photo below) and on the intermediate shaft (2). Pay special attention to the fact that the mark (4) converges with the mark (5). At this time, the section of the chain located on the damper (3) must be tensioned.

Now we tighten all the unscrewed bolts and check the alignment of the marks again. To do this, tension the chain by pressing on the tensioner.

Having previously lubricated the upper chain, we put it on the main gear of the intermediate shaft. It will have to be inserted into the hole, which is located in the cylinder head. We insert the main gear and, turning the crankshaft to the right, put a chain on it. We stretch the chain by turning the camshaft counterclockwise. All other nodes must be assembled in the order in which they were disassembled.
As you can see, there is nothing particularly complicated here, you will definitely succeed.
Video instruction
The UAZ Patriot 409 engine from the Zavolzhsky Motor Plant has recently been brought up to the Euro-4 environmental standard. In fact, this is an injection 406 engine, which was installed on the Volga and GAZelles. The actual design of the power units is very similar, in addition, the ZMZ 409 engine also inherited the problems of the 406 engine. Next, we offer a description and technical characteristics of the UAZ Patriot 409 engine.  The gasoline, in-line, 4-cylinder and 16-valve unit has an aluminum cylinder block (with cast-iron liners inside) and an aluminum cylinder head. There are two camshafts in the head of the block, which rotate by means of a timing chain drive. There are hydraulic compensators in the valve mechanism, which free you from manually adjusting the thermal clearance of 16 valves.
The device of the gas distribution mechanism of the engine ZMZ 409 UAZ Patriot
The camshafts are cast iron. To achieve high wear resistance of the working surface, the cams were “chilled”. The shafts rotate in bearings formed by the cylinder head and removable aluminum covers. These covers are machined complete with the cylinder head and are therefore not interchangeable. Camshaft drive chain, two-stage. Includes: asterisk 1 crankshaft driven 5 and leading 6 intermediate shaft sprockets, driven sprockets 12 And 14 camshafts, two chains (72 and 92 links) 4 And 9 , hydraulic tensioners with reinforced spring 2 And 8 , tensioner levers 3 And 7 and chain guides 13 , 16 And 17 . The tension of the chain of each stage is carried out by hydraulic tensioners located: one - on the front cover of the cylinder block (chain cover), the other - on the cylinder head.

1 - crankshaft sprocket
2 - lower hydraulic tensioner
3 - lower chain tensioner lever
4 - lower chain
5 - intermediate shaft sprocket driven
6 - an asterisk of an intermediate shaft leading
7 - upper chain tensioner lever
8 - upper hydraulic tensioner
9 - upper chain
10 - alignment mark on the sprocket
11 - dowel pins
12 - intake camshaft sprocket
13 - upper chain damper
14 - exhaust camshaft sprocket
15 - the upper plane of the cylinder head
16 - medium chain damper
17 - lower chain damper M1 and M2 - alignment marks on the block
Perhaps it is the complex mechanism of the timing device 409 of the UAZ Patriot engine that causes a lot of trouble during engine operation. The lack of oil pressure quickly disables hydraulic lifters, you must carefully monitor the oil level in the engine. And frequent breakdowns of the chain tensioners cause an unpleasant sound. The problem is solved by installing imported hydraulic tensioners and regular replacement of high-quality oil. It should be noted that the valves are interchangeable with similar valves of the VAZ-2108 engine. Further characteristics of the UAZ Patriot gasoline engine.
Engine UAZ Patriot 2.7 ZMZ 409 (128 hp) specifications, fuel consumption
Working volume - 2693 cm3
Number of cylinders - 4
Number of valves - 16
Cylinder diameter - 95.5 mm
Piston stroke - 94 mm
Power hp/kW - 128/94.1 at 4600 rpm
Torque - 209.7 Nm at 2500 rpm
Compression ratio - 9
Timing Type/Timing Drive - DOHC/Chain
Fuel brand - gasoline AI 92
Ecological class - Euro-4
Maximum speed - 150 km/h
Acceleration to 100 km/h - n/a
Fuel consumption in the city - n / a
Combined Fuel Consumption - N/A
Fuel consumption on the highway - 11.5 liters
This engine is very voracious, this is perhaps the main problem of the Patriot with this power unit at the moment. A rather outdated design will not please you with its reliability. However, the price of the new UAZ Patriot makes us turn a blind eye to such disadvantages.
Replacing timing chains UAZ Patriot (manual, photo) UAZ Patriot (3163-010, 3163-012, 3163-020, 3163-022, 3163-032)
The gas distribution mechanism on the engine of the UAZ Patriot car performs the function of synchronizing the crankshaft and camshaft, and also sets the cycles for opening and closing valves. The efficiency of the engine, its trouble-free and reliable operation depend on its operation. That is why the operation of the timing system of the UAZ Patriot engine is very responsible. So
In this article, we will just provide information on replacing chains and gears of the gas distribution mechanism. It is noteworthy that the UAZ Patriot timing mechanism uses 2 chains, conditionally lower and upper. Such a timing mechanism can be considered difficult to maintain, so replacing the chains will require advanced skills from the mechanic who will carry out the work.
The process of replacing timing chains ZMZ 409 Euro 3
Before starting work on the engine, it is necessary to remove the radiator
. and power steering pump drive belts
. generator and pump
. Loosen the inlet hose clamp to the cooling system pump and remove the hose from the fitting.
. Remove the cylinder head cover. Turn out four bolts and remove a forward cover of a head of the block of cylinders in gathering with the coupling of a drive of the fan and the fan (the viscous coupling with the fan are removed for descriptive reasons).
. Remove the water pump
. Remove crankshaft speed sensor (timing sensor)
. Remove the crankshaft pulley (see "Replacing the crankshaft oil seals UAZ Patriot"). Remove the oil sump (see "Replacing the crankcase of the UAZ Patroit engine").
. Turn out two bolts and remove a cover of a hydraulic tensioner of the top chain with a lining. Remove the cover carefully, as it is affected by the hydraulic tensioner spring. Then remove the hydraulic tensioner
. Also remove the lower chain tensioner.
. Turn out 7 bolts and remove a cover of a chain. Remove the cover carefully so as not to damage the front crankshaft oil seal installed in it, the cover gaskets and the cylinder head gasket.
Remove 1 top tensioner bolt and remove tensioner arm with sprocket.
. Also remove the lower tensioner arm. Also with an asterisk.
. Remove the 2 bolts and remove the plastic chain guide.
. Remove the gears from the camshafts by unscrewing the bolts securing the gears to the camshaft flanges. Here you will need a puller.
. Turn out bolts 2 and take up a guide 1 chains. Bend the ends of the locking plate 6 and unscrew the bolt 5, for which keep the intermediate shaft from turning by inserting a screwdriver into the hole of the gear 3. Remove the gear 4 by inserting a screwdriver between it and the gear 3 and resting the screwdriver as a lever against the gear 3. Remove the gear 4 from the top chain and remove the chain by pulling it up. Remove gear 3 from the intermediate shaft and remove it from the lower chain. Remove the lower chain from the crankshaft gear.

. If it is necessary to remove gear 2 from the crankshaft, first remove bushing 1 and the rubber o-ring between bushing and gear. Then compress gear 2. The gears are removed using a puller.

. After removal, wash the chains and gears in gasoline, wipe and dry them.
Examine the chains. If cracks, chips, or significant signs of wear are found on the chain bushings, replace the chains.
Replace gears that have chipped or chipped teeth.
Replace damaged chain guides.
The tensioner sprockets must rotate freely on the axles. If the sprocket teeth are chipped or chipped, replace the tensioners.
Assembling the timing mechanism and installing timing chains UAZ Patriot (recommended tightening and preload torques)
If the gear was removed from the crankshaft, Rotate the crankshaft so that mark 1 on the crankshaft gear matches mark 2 on the cylinder block. In this case, the piston of the 1st cylinder will take the TDC position. Install the chain damper 4 without tightening the bolts 3 fastening the damper. Put chain 5 on the crankshaft gear, after lubricating it with engine oil.

. Put the chain on the driven gear 1 and install the gear on the intermediate shaft 2 so that the gear locating pin fits into the hole of the intermediate shaft. In this case, mark 4 on the gear must coincide with mark 5 on the cylinder block, and the chain branch passing through damper 3 must be tensioned.

. Install the countershaft drive gear so that its locating pin fits into the hole in the driven gear.
. Screw in two bolts of fastening of gears of an intermediate shaft, having placed a lock plate under them. Tighten the bolts to a torque of 22-25 N/m (2.2-2.5 kgf/m) and fix them by bending the edges of the lock plate on the edges of the bolt heads.
. While pressing the tensioner lever, tighten the chain and check the alignment of the marks on the gears and the cylinder block.

. Tighten the chain guide bolts. 
Lubricate the upper chain with engine oil and then put it on the countershaft drive gear, passing it through the hole in the cylinder head.
Put the chain on gear 2 and, turning the exhaust camshaft slightly clockwise, install gear 2 with the chain on it.
Pin 8 of the camshaft must enter the gear hole.
Screw in a bolt 1. Turn a camshaft a key for a square on a camshaft. Then, turning the camshaft slightly counterclockwise, tension the chain.
The intermediate and crankshafts must not rotate. Mark A must align with the top surface of the cylinder head. Turn out a bolt 6 and remove a gear wheel 4 from an inlet camshaft. Put a chain on gear 4 and install gear 4 with chain on the camshaft by slightly turning the camshaft clockwise. The pin 5 of the camshaft must enter the gear hole. By slightly turning the camshaft counterclockwise, tension the chain. Mark A on gear 4 must match the top surface of the cylinder head. The rest of the shafts must not rotate. Screw in the bolt 6. Tighten the bolts 1 and 6 to the torque of 46-74 N/m (4.6-7.4 kgf/m), keeping the camshafts from turning with a wrench on the squares. Install damper 3 by pushing it into the hole in the block head. Install damper 7.
Reinstall the chain cover and water pump. Spread a thin layer of sealant on the sealing surfaces of the cover and cylinder block and block head. Install the cover carefully so as not to damage the gland.
Install the upper and lower chain tensioners, see Assembly (Charging) and Installing the Chain Tensioners . Install the crankshaft pulley. Screw in the bolt of the crankshaft pulley, then, turning on the fifth gear and braking the car with the parking brake, tighten the bolt to a torque of 104-128 N / m (10.4-12.8 kgf / m), holding the crankshaft from turning. When tightening the ratchet, the pulley is pressed onto the crankshaft.
Turn the crankshaft two turns by the ratchet and set the piston of the 1st cylinder to the TDC position (see operation 3). Check if the labels match.
Install the front cover of the cylinder head, first apply a layer of Hermesil sealant to the surface of the cover adjacent to the block head. Tighten the cover fastening bolts to 12-18 N/m (1.2-1.8 kgf/m).
Install the cylinder head cover. Tighten the cover fastening bolts to 6.0-12 N/m (0.6-1.2 kgf/m). Connect the crankcase ventilation hose and tube to the fittings on the valve cover, and the wires to the coils
Install the previously removed belts and the radiator of the cooling system.
Engine UAZ Patriot 409 from the Zavolzhsky Motor Plant have recently been brought up to the Euro-4 environmental standard. In fact, this is an injection 406 engine, which was installed on the Volga and GAZelles. The actual design of the power units is very similar, in addition, the ZMZ 409 engine also inherited the problems of the 406 motor. Next, we offer a description and UAZ Patriot 409 engine specifications.
The petrol, in-line, 4-cylinder and 16-valve unit has a cast-iron cylinder block and an aluminum cylinder head. There are two camshafts in the head of the block, which rotate by means of a timing chain drive. There are hydraulic compensators in the valve mechanism, which free you from manually adjusting the thermal clearance of 16 valves.
The device of the gas distribution mechanism of the engine ZMZ 409 UAZ Patriot
The camshafts are cast iron. To achieve high wear resistance of the working surface, the cams were “chilled”. The shafts rotate in bearings formed by the cylinder head and removable aluminum covers. These covers are machined complete with the cylinder head and are therefore not interchangeable. Camshaft drive chain, two-stage. Includes: crankshaft sprocket 1, intermediate shaft driven sprocket 5 and drive 6, camshaft driven sprockets 12 and 14, two chains (72 and 92 links) 4 and 9, hydraulic tensioners with reinforced spring 2 and 8, tensioner levers 3 and 7 and chain dampers 13, 16 and 17. The chain tension of each stage is carried out by hydraulic tensioners located: one on the front cover of the cylinder block (chain cover), the other on the cylinder head.

- 1 - crankshaft sprocket
- 2 - lower hydraulic tensioner
- 3 – lower chain tensioner lever
- 4 - lower chain
- 5 - an asterisk of an intermediate shaft driven
- 6 - an asterisk of an intermediate shaft leading
- 7 - upper chain tensioner lever
- 8 – upper hydraulic tensioner
- 9 - upper chain
- 10 - installation mark on the sprocket
- 11 - dowel pins
- 12 – an asterisk of a camshaft of inlet valves
- 13 – upper chain damper
- 14 – an asterisk of a camshaft of final valves
- 15 - the upper plane of the cylinder head
- 16 - medium chain damper
- 17 - lower chain damper
- M1 and M2 - installation marks on the block
Perhaps it is complex mechanism of the timing device 409 of the UAZ Patriot engine causes a lot of trouble when operating the engine. The lack of oil pressure quickly disables hydraulic lifters, you must carefully monitor the oil level in the engine. And frequent breakdowns of the chain tensioners cause an unpleasant sound. The problem is solved by installing imported hydraulic tensioners and regular replacement of high-quality oil. It should be noted that the valves are interchangeable with similar valves of the VAZ-2108 engine. Further characteristics of the gasoline engine UAZ Patriot.
Engine UAZ Patriot 2.7 ZMZ 409 (128 hp) specifications, fuel consumption
- Working volume - 2693 cm3
- Number of cylinders - 4
- Number of valves - 16
- Cylinder diameter - 95.5 mm
- Piston stroke - 94 mm
- Power hp / kW - 128 / 94.1 at 4600 rpm
- Torque - 209.7 Nm at 2500 rpm
- Compression ratio - 9
- Timing Type/Timing Drive - DOHC/Chain
- Fuel brand - gasoline AI 92
- Ecological class - Euro-4
- Maximum speed - 150 km / h
- Acceleration to 100 km / h - n / a
- Fuel consumption in the city - n / a
- Combined Fuel Consumption - N/A
- Fuel consumption on the highway - 11.5 liters
This engine is very voracious, this is perhaps the main problem of the Patriot with this power unit at the moment. A rather outdated design will not please you with its reliability. However, the price of the new UAZ Patriot makes us turn a blind eye to such disadvantages.
ZMZ-406, timing marks - installation instructions
In order for the engine to work in normal mode on a Volga or Gazelle car, it is necessary to correctly expose on ZMZ-406 timing marks. On cars, a chain or belt can be used as a drive. Each type has many advantages and disadvantages, some argue that the chain is not capable of breaking. You need to be able to upset, and how! In addition, for its normal operation, lubrication is required, so when replacing the chain, you really need to disassemble half of the motor and even drain the oil.
Design features
Before installing timing marks on the ZMZ-406, you need to consider the features of this engine.

In total, there are four phases in which the gas distribution system operates:
- The inlet of the fuel mixture into the combustion chamber.
- Compression stroke.
- The stroke of the piston is moving from top dead center down.
- Release of the fulfilled gases.
An actuator must be used to ensure maximum efficiency and prevent damage to the valves. On motors ZMZ-406 and the like, a metal chain is used.

But be sure the camshafts and crankshafts are installed according to the marks, this ensures the synchronism of the operation of all mechanisms. The gas distribution mechanism allows you to timely open and close the holes with valves, supplying the fuel mixture and releasing combustion products into the atmosphere.
Where is the chain located?
On ZMZ-406 engines, timing chain marks are located on the crankshaft and camshafts. The rotation from the crankshaft pulley is transmitted to the distribution. The design of the drive has a special design damper, with its help the chain tension is regulated. If this guide fails, the tension changes and this can cause the chain to jump one or more teeth.
Similar news

As a result of this, the operation of the motor is disrupted, the phases are shifted. In this case, the wear of mechanisms occurs much faster. The timing chain drives the fluid pump, hydraulic booster pump (if any), intermediate ignition shaft. The operation of several systems at once depends on the state of the drive circuit.
Signs of a broken gas distribution mechanism
Among the main signs of malfunctions in the gas distribution mechanism are:
- a significant drop in engine power;
- the appearance of pops in the intake and exhaust manifolds;
- decrease in compression in the cylinders (the normal value is above 10 kg / sq. cm.).
If the circuit is faulty, it will begin to make a characteristic noise. The cause of breakdowns may be a loose fit of the valve plates to the seats. In this case, the formation of soot is provoked, the springs break. If the chain is replaced in a timely manner, then all these troubles can be avoided.
Typical malfunctions
If the thermal clearances do not correspond to the norm in a certain phase, the opening and closing of the valves will not occur correctly, which causes breakdown of the hydraulic compensators. At the same time, there is a strong wear of the gear on the crankshaft and camshafts. As a result, it will be necessary to repair the motor, replace most of the elements.

When installing timing marks on the ZMZ-406 engine, it is important to follow all the rules. Only in this case, the operation of the gas distribution mechanism will occur in normal mode, the valves will open and close synchronously, in a timely manner injecting fuel and ejecting combustion products. Try to timely tension the chain, monitor its condition. The frequency of maintenance is at least once every 80 thousand km. run.
The longer the vehicle is used, the more the chain stretches. At ZMZ-406, its resource is no more than 20 thousand km. run. If symptoms of breakdowns suddenly appear, it is necessary to repair the gas distribution system, replace the worn chain and damper.
Timing Chain Replacement Tools
Before installing on the engine ZMZ-406 labels Timing, you need to prepare the necessary set of tools:
- Heads and ratchet.
- Ring and open-end wrenches.
- Hexagons.
- The key is dynamometric.
- Chisel and hammer.
- Pullers with two or three arms.

Be sure to treat all threaded connections that are covered with dust, rust, dirt, with a penetrating lubricant, this will allow you to disassemble the units much faster.
How to set timing marks 406, 409
Step by step repair. Installation by labels 8:45. Replacement of chains, stars, hydraulic tensioners, oil seal, pump and other things.
Similar news
Replacing the timing drive ZMZ 409 Euro-3 UAZ Patriot. NEW 2016
Instructions for self-replacement of the drive timing on UAZ Patriot ZMZ 409. Installed set Ideal.
Draining antifreeze from the system
First, prepare the containers into which you will need to drain the liquids. First of all, empty the antifreeze cooling system should be quite a lot, about 10 liters. To drain the antifreeze, you need to unscrew the plug located in the lower half of the cooling radiator.

As soon as the plug is unscrewed, the pressure will be very strong, as the level decreases, it will decrease. It is advisable to use a wide container so as not to lose liquid. To make the antifreeze drain faster, you need to unscrew the plug on the expansion tank, increasing the pressure in the system.
The initial stage of disassembly
- Remove the front apron and grille. In the event that work is carried out on Gazelle-Business, it is necessary to unscrew the fasteners on the sides and in the center.
- Remove all pipes by loosening the fastening clamps.
- If there is a hydraulic power steering, remove the pump drive belt.
- Remove the alternator drive belt, fluid pump. Before doing this, you need to loosen its tension.
- Remove the valve cover by unscrewing all fastening bolts. Be sure to fold them separately so that you do not lose them during assembly. Be sure to keep the lid in a clean place so that foreign elements cannot get on its inner surface.
- Unscrew the fasteners of the fan impeller drive coupling.
- Remove the impeller and clutch.
- Remove the fluid pump.
- Disconnect and remove the sensor on the crankshaft.
- Remove the crankshaft pulley and pan.
Preparatory work will take more time than replacing the chain and installing timing marks ZMZ-406. Their photo is given in the article.
Final dismantling of the drive chain
Further steps to remove the timing chain on the Gazelle engine look like this:
- Unscrew the hydraulic tensioner fasteners. You need to get two elements, upper and lower. They take off the same way.
- Remove the tensioner housing.
- Remove the cover that covers the chain. To do this, unscrew the 7 mounting bolts. Try not to destroy the oil seal on the crankshaft and the head gasket.
- After unscrewing the upper hydraulic tensioner bolt, remove the lever and sprocket.
- Remove the chain guide.
- unscrew fastening bolts gears to the camshaft flange (there are two of them on the ZMZ-406 engine).
- Bend the lock plate, while you need to keep the intermediate shaft of the ignition system from turning.
- Install a screwdriver, use it to remove the gears and the lower edge of the chain.

If difficulties arise, you need to remove the rubber seal, which is located between the bushing and the gear. The dismantling of the second gear is carried out only with the help of a two-legged puller.
After removing the drive
After removing the chain and getting it out, you need to wash it. For this, it is best to use gasoline. After getting rid of contaminants, a visual inspection should be carried out. If it is stretched more than 1-2 cm, it is better to install a new one. Such an increase in length is more than enough to disrupt the valve timing.

Similar news
You also need to pay attention to:
- The condition of the bushings in the presence of wear, cracks and scoring, it is necessary to replace.
- Gears if there are mechanical damage, chips, then it is also necessary to change them.
- Chain guides at the slightest damage, install new elements.
- Tensioner sprockets need to rotate freely, the presence of chips and damage is unacceptable.
If a major overhaul of the ZMZ-406 engine is being carried out, the timing marks must be installed. This will ensure the normal operation of all systems, increase the life of the motor and its power.
Carrying out assembly
Before proceeding with the assembly, you need to correctly set the phases. To do this, you will need to perform the following manipulations:
- Rotate the crankshaft until the first notch is in the top position.
- Make sure the piston is at top dead center in the first cylinder.
- Install the damper, but do not rush to tighten the bolts of its fastening.
- Lubricate the bottom of the chain with clean engine oil.
- Put the chain on the gears crankshaft and led.
- The pin of the crankshaft gear must fit into the hole in the intermediate shaft.
- Make sure that label on the gear matches the one on the motor block. The part of the chain that is next to the damper should be taut.
- Now you can tighten the pinion bolts on the intermediate shaft. Be sure to install the stop plates.
Be sure to use a torque wrench when carrying out repairs. Bolt torque limit 22/2.5 Nm.

Be sure to bend the lock plate to prevent the bolts from coming loose. Then you need to press the hydraulic tensioner lever and check the coincidence of the marks on the engine block and gear. After that, you need to tighten all the bolts securing the damper and lubricate the upper part of the chain drive.
Timing marks and tightening
To scroll the camshaft, you need to use a four-sided wrench. Turning it clockwise tightens the chain. At the same time, be sure to fix the position of the crankshaft and intermediate shaft so that they cannot rotate. Make sure that the marks on the pulley and the head of the block match. Then perform the following manipulations:
- Remove the gear from the exhaust camshaft.
- Put a chain on it.
- Reinstall the gear by carefully turning the camshaft clockwise.
- Make sure the pins fit into the hole on the gear.
- Rotate the camshaft clockwise to achieve normal chain tension.
- Install cover on chain and fluid pump. It is advisable to apply a little silicone sealant on top of the cover.
- Install pulley crankshaft and hydraulic tensioners. The tightening torque of the threaded connection of the crankshaft pulley is 105129 Nm. To facilitate tightening, you will need to install the car on the handbrake and turn on fifth gear.
- Tighten the ratchet.
- Install the block head cover. It is also desirable to apply a layer of silicone sealant on it. Tighten the threaded connections with a torque of 12 Nm.