How to pass the site to the traffic police the first time? First, you should familiarize yourself in detail with the entire procedure for the driver's license exam. Attention must be paid to all key points of the exam, as well as preparation and emotional state. Additionally, attention is paid to proper rest before the exam at the traffic police department. Passing the driving test at the test track is the second part of the test. An applicant for a driver's license is allowed to apply for it after successfully passing the theoretical part. If you fail to pass the theory the first time, then a second attempt is available, but the applicant for a driver’s license being examined is not allowed to the site.
The traffic police authorities provide three separate tests for applicants for a driver's license, which are taken in strict sequence:
- The theoretical part, where the knowledge of traffic rules of applicants for a license is revealed.
- Delivery of the circuit to the State Traffic Inspectorate, where basic driving skills are learned at a specialized site.
- After the site has been passed to the traffic police, the examinee is allowed to drive around the city.
Strictly in this sequence, the exam is accepted by the traffic police inspector, who assigns an appropriate grade for each stage passed.
The examination part for applicants for a driver's license has a clear sequence, and if a student does not pass one of the parts, then he has the opportunity to retake the part that was failed immediately.
Theoretical part
Passing the traffic police exam, which includes theory, site and city driving, begins with exam tickets. The first stage begins with a visit to the executive body. Testing takes place here in a special room.
In this case, moving to the next stage involves the following algorithm of actions:
- the examinee is allowed to access a computer on which a special theoretical test is already open;
- after pressing the corresponding button, a limited period of time is allotted for the test;
- the examinee is given a ticket that includes 20 questions, which are displayed on the screen in stages;
- here it is allowed to make two mistakes, as well as answer additional questions if necessary;
- Based on the test results, the result is displayed on the screen, where the person taking the theoretical part sees his mistakes.
Only after passing this stage, the applicant for a driver’s license is allowed to enter another part of the event - the site.
In practice, there is a video on the Internet where you can figure out how to pass your driving test at the traffic police (site) the first time, so as not to make mistakes, you can use the appropriate guide.

The special platform that examinees take at the state traffic inspectorate is no different from the one taught by instructors at a driving school. There is also a traffic order established by the rules. An applicant for a driver's license moves around the race track using the clutch (if the transmission is automatic, then each exercise is performed only with the use of the brake; only entering the overpass is performed with the gas).
This part of the exam in 2018 includes the following exercises:
- overpass (an exercise to stop and start moving from a place uphill, on a slight slope);
- sharp turns of 90 degrees, which are performed while the car is moving;
- turning a car in a limited space (this tests the ability to sense the dimensions of a car);
- snake (driving at low speed past cones that are located at the same distance from each other);
- entering the garage using reverse gear and gradually leveling the car relative to the cones;
- parallel parking (here the examinee independently fulfills the requirement to carefully park the car in a limited space).
During the second part of the exam, it is possible to make two mistakes; if the limit is exceeded, the driver's license candidate is not allowed to take the next part of the test.

How to correctly pass the garage and other tests of the traffic police exam on the site, learn from the video that can be found on the Internet; here all the methods for successfully passing the tests are described in detail for the persons being examined.
During the exam, traffic police inspectors pay special attention to safety, since this is the key point in the subsequent operation of the vehicle by an inexperienced driver.
To pass this part of the test successfully, the following recommendations should be followed:

At the autodrome, an applicant for a driver's license can make two minor mistakes, but if he hits a cone, this will be considered a gross violation, which is why the student will not be allowed to the next part.
The last test on the way to a driver's license will be driving on a city route. This part determines most of all whether the student will get a license or not.

To avoid any difficulties during the traffic police exam, you should follow a number of recommendations that are regularly used by driving school instructors with extensive work experience.
To successfully pass the race and city exam before the traffic police inspector, you need to plan your time in advance. In driving schools, 25 hours of driving are allocated during training. It is recommended to take additional sections for practice if there is hidden excitement or uncertainty. This will allow you to gain more practice and identify all possible mistakes that are made when students travel with examiners.
If the student’s family does not have a car, and he does not have a hidden talent for driving, then it is recommended to take additional time for training on the site and in the city.

There are a number of reasons why it is best to take the exam in the early hours:
- in the early morning, any person is more intelligent compared to lunch and evening time;
- in the early hours of the morning, traffic police inspectors are not yet tired, and therefore do not have internal irritation;
- In the morning the climatic conditions on the street are quite comfortable, and in addition there is no large flow of traffic when traveling around the city;
- in the early hours of the day the number of students being examined is less than at later times.
Also, in the morning, human concentration has not yet dulled, which allows you to quickly respond to any situations that may arise on the site or in the city.
Get a good night's sleep before an exam
It is extremely important that the driver's license applicant is well rested the day before.
- You need to go to bed early (everyone chooses the optimal time for themselves, but it is recommended to go to bed no later than 22.00).
- On the eve of the examination part, you cannot drink alcoholic beverages in any quantity.
- Before an exam, you should not take sedatives in the evening, as this may adversely affect your concentration in the morning.
- Sound, healthy sleep will ensure the most comfortable psychological state during the exam part.
- Before going to bed, it is not advisable to replay the upcoming test in your head the next morning.
- Before going to bed, it is recommended to distract yourself with an unrelated topic that is not related to the upcoming test.
If there is strong anxiety, then it should be removed by the usual distraction of thoughts and concentration on the upcoming tests. All this will allow you to pass the race track and the entire exam the first time, and then receive the long-awaited driver’s license.
The first stage of the practical examination is carried out using one of two methods:
a) one candidate driver performs all the exercises provided for in the complex in a certain sequence;
b) several driver candidates alternately perform the same exercise provided for in the complex, and then proceed to the next exercise.
When conducting this part of the exam using the first method, the candidate driver, without stopping the engine, by switching the headlights, informs the examiner about the completion of one exercise and about the readiness to perform the next.
When using the second method of conducting the exam, the candidate driver, having received the task, at the command of the examiner must:
Take a seat in the car;
Prepare to move;
Start the engine;
Signal by turning on the low beam headlights that you are ready to start.
After completing the exercise and stopping the car, the candidate driver must:
Engage neutral gear;
Apply the parking brake;
Turn off the engine;
Turn off the headlights;
Leave the car.
To adapt to the test vehicle, the candidate driver is given the right to make a test drive within the site for no more than 2 minutes. In this case, its owner must be present in the examination vehicle. Errors made during the test ride are not recorded and do not affect the exam result.
After completing a test drive, the driver candidate may declare that he is not ready and refuse to take the test. In this case, its completion is not counted as an attempt to pass the exam.
To determine the preparedness of a driver candidate, at the first stage of the practical exam, his performance of the following elements is assessed:
1.1. Test Item #1: Stopping and Starting on a Hill
The examinee must stop the car on a 16% slope and then continue driving. In this case, the start should be smooth, the engine should not stall, and the car should not roll back more than 30 cm.
Performance technique
Before performing this element of the exam, you will need to first drive onto the inclined section from position I at the “START” line (Fig. 1), without crossing the horizontal marking lines of the site and without knocking down the elements of the marking equipment (cone). Having entered the hill, stop at the “STOP-1” line (position II) (Fig. 1), without crossing it. While holding the vehicle in place by pressing the brake pedal, apply the parking brake, and then remove your foot from the brake pedal.
After which you can proceed directly to driving off on an incline. To do this you must:
Press the clutch pedal to the floor, disengaging the clutch, and engage first gear;
Release the clutch pedal slightly, selecting free play, and lightly press the gas pedal, slightly increasing the engine speed;
After this, slowly release the clutch pedal with a further smooth increase in engine speed;
At the moment when you feel that the car is about to start moving (the moment the clutch is engaged), begin to release the parking brake, pressing the gas pedal even more;
Then completely release the parking brake and clutch pedal.
rice. 1
In this case, the car should move smoothly without rolling back.
Be sure to note that when starting under these conditions, the vehicle must additionally overcome the force of lifting resistance. Therefore, the engine crankshaft rotation speed should be higher than when starting on a horizontal section (on an ascent you should press the gas pedal a little harder). Otherwise, the engine may stall.
If the engine stalls when starting on a hill (usually this happens when the clutch pedal is suddenly released, the engine speed is insufficient, or due to the parking brake being released too late), try not to get confused. And immediately slow down the car with the parking brake, then after starting the engine, try to start again.
Examiners control the amount of rollback as follows: after stopping the car at the “STOP-1” line (position II), a control stand is installed at a distance of 30 cm from its rear bumper. If the rollback value exceeds 30 cm, the stand will be knocked down.
After you have started off on an uphill slope, you should stop the car on the downhill at the “STOP” line (position III) (Fig. 1).
1.2. Exam Element #2: “U-Turn”
The examinee must drive into an area of limited size and turn 180° while engaging reverse gear once. When turning, the vehicle must not go beyond the limits.
Performance technique
Before you start turning, think over the diagram of this maneuver (Fig. 2). When preparing for and passing the exam, perform the turn in the following sequence:
Starting from the “START” line, bring the car as close as possible to the right edge of the corridor in which you will turn around (position I in Fig. 2);
Moving forward slowly, at the same time vigorously turn the steering wheel to the left so that the car is almost at right angles to its original position (position II in Fig. 2);
When the front wheels are approximately 0.7–1.0 m from the left edge of the corridor (position II in Fig. 2), begin to vigorously turn the steering wheel to the right;
Having approached the left edge of the corridor (position III in Fig. 2), stop the car and engage reverse gear;
While moving slowly in reverse, vigorously continue to turn the steering wheel to the right, and once in the middle of the corridor (position IV in Fig. 2), turn the steering wheel in the opposite direction (to the left) and continue driving until the car reaches a position from which you can move forward (position V in Fig. 2);
After completing the turn, stop the car at the “STOP” line without crossing it (position VI in Fig. 2).

rice. 2
Start this exercise by setting the corridor width L (Fig. 2) to approximately four car lengths, and then gradually reduce it. The final width of the corridor L must be twice the length of the vehicle in which the examination element in question is being performed.
Pay attention to the speed of movement when turning. It should allow you to move the steering wheel from side to side in a timely manner. The steering wheel should be turned quickly and not grabbed. Practice proper steering techniques, and thereby you will be able to increase the speed when turning and, accordingly, reduce the time it takes to complete the maneuver. For this, simulators are convenient in the initial stages, and if they are not available, then you can use a car, having first hung its front wheels. At the same time, do not forget to securely tighten the parking brake and engage first gear; pads under the rear wheels will not be superfluous (Fig. 3).

rice. 3
When the car is moving straight, your hands should be on the steering wheel as shown in Fig. 4.

rice. 4
Typically, to turn a car at significant angles, either power or high-speed steering techniques are used. In preparation for your practical driving test, you will need to master both steering techniques.
First of all, we will work on power steering techniques.
Let's start by turning left. Place your hands on the steering wheel in starting position 1 (Fig. 4), then with your left hand, rotate the steering wheel to the left, and move your right hand down along the steering wheel, slightly opening your fingers (the right hand slides down, and only the left hand turns the steering wheel).
Once your hands are in position 2 (Fig. 5), clench the fingers of your right hand and relax the fingers of your left. Now turning the steering wheel to the left continues with your right hand, which you move up. At the same time, move your left hand up, passing the steering wheel with your fingers slightly unclenched (the left hand slides up). As a result, your hands will be in position 3 (Fig. 5), from which, if necessary, you can continue to rotate the steering wheel to the left according to the above diagram for turning the steering wheel from position 1 to position 2.

rice. 5
Then practice power steering to turn the car to the right. Again, your hands should be in starting position 1 (Fig. 4), from which rotate the steering wheel with your right hand, and move your left hand down along the steering wheel, slightly unclenching your fingers (only the right hand rotates the steering wheel).
Once your hands are in position 2 (Fig. 6), clench the fingers of your left hand and relax the fingers of your right. Now the turn to the right is continued by the left hand, which moves up along the steering wheel. At the same time, move your right hand up along the steering wheel with your fingers slightly unclenched. As a result, your hands will be in position 3 (Fig. 6), from which you can easily continue rotating the steering wheel in any direction. Practice turning when the width of the roadway is limited (exam element No. 2), using power steering techniques.
Using power steering techniques, you can rotate the steering wheel quite slowly, so the speed of the car will be relatively low.

rice. 6
Once you have successfully completed test element No. 2 using power steering, it is time to move on to mastering high-speed techniques. Let's start again by turning left.
From starting position 1 (Fig. 4), turn the steering wheel to the left with both hands until they are in position 2 (Fig. 7).

rice. 7
After this, continue to rotate the steering wheel to the left with your right hand, and lift your left hand from the steering wheel and move it to its highest point (grab the steering wheel). Your hands will be in position 3 (Fig. 7), from which the left hand continues to rotate the steering wheel to the left, and the right hand is moved away from the steering wheel to its highest point (steering wheel interception). As a result, your hands will be in position 4 (Fig. 7), from which you continue to rotate the steering wheel with both hands.
Now let's practice turning right. From the starting position 1 (Fig. 4), with both hands, turn the steering wheel to position 2 (Fig. 8).

rice. 8
As soon as your hands are in this position, continue turning the steering wheel with your left hand, and lift your right hand away from the steering wheel and move it to its highest point (position 3 in Fig. 8). From position 3 (Fig. 8), continue to rotate the steering wheel with your right hand, and lift your left hand from the steering wheel and move it to its highest point (grab the steering wheel). Your hands will take position 4 (Fig. 8), from which continue to similarly rotate the steering wheel in the desired direction.
Using speed steering will allow you to increase your speed when making turns in tight spaces and reduce the time it takes to complete this test element.
1.3. Exam element No. 3: “Entry into boxing”
The examinee must reverse into a box located perpendicular to the direction of travel while engaging reverse gear once. After stopping, the car must be positioned so that its outer contours are inside the designated box.
Performance technique
Before you start reversing, you need to place your left hand on the upper half of the steering wheel and hold it slightly more firmly than in the case of steering with two hands.
After this, begin exam element No. 3:
Press the clutch pedal to the floor and engage reverse gear;
Place your right hand on the back of the adjacent seat (Fig. 9);
Lightly release the clutch pedal, selecting free play, and at the same time lightly press the gas pedal;
Then, smoothly releasing the clutch pedal and pressing the gas pedal even harder, start moving in reverse.
Drive slowly due to incomplete engagement (slipping) of the clutch, for which do not fully release the clutch pedal.
When putting the car in reverse into the box, remember that it will turn in the direction in which you turn the steering wheel. It would seem that there is nothing complicated about this.
However, for beginners, the car often deviates from the required trajectory and does not fit into the dimensions of the box. This is due to the fact that by turning his head back, the driver candidate loses orientation and turns the steering wheel in the wrong direction. To avoid incorrect actions, first think through the maneuver pattern and move in reverse at low speed.

rice. 9
Let's take a closer look at the entrance to the box, located on the right in the direction of travel of the car (Fig. 10).
From position I from the “START” line (Fig. 10), direct the car to the left edge of the corridor. When approaching the border of the corridor by 1–1.5 m, start turning the steering wheel to the right and stop the car in position II (Fig. 10).
From position II (Fig. 10), start moving in reverse. Focus on the right post of the box (it is highlighted in Fig. 10).
As you approach the box, begin to navigate along the middle pillars of the box and, turning the steering wheel to the left, level the car so that it moves straight inside the box. The final position of the III car is determined by the rear pillars of the box.

rice. 10
Please note that when reversing, there is a significant widening of the lane along which the car is moving due to the difference in the trajectories of the rear and front wheels. This broadening is shown in Fig. 10. It is because of this that it is necessary for the car to move strictly in a straight line inside the box. Any taxiing is unacceptable there.
If you feel that the car does not fit into the box, then return to the starting position and repeat the maneuver.
Start practicing this exercise by setting the dimensions of the box in length L and width H to 2 meters greater than the length and width of the car (Fig. 10). Gradually narrow the box. Its final length L should be 1 m greater than the length of the car, and its width H should be 1 m greater than the width of the car.
Practice entering the box from different angles. Entering the box, located to the left rear of the car, is carried out in a mirror manner in relation to the considered scheme.
1.4. Exam element No. 4: “Acceleration - braking”
The examinee must start moving in a corridor of the established width, accelerate, moving in a straight line and changing gears from low to high, then stop in front of the “STOP” line. The exercise must be completed in no more than 14 seconds (for vehicles of categories “B” and “C”).
Performance technique
At the examiner’s command, start moving along the corridor (Fig. 11)

rice. eleven
After accelerating the car from a standstill in first gear, you must shift them in ascending order. For this:
Release the gas pedal and simultaneously disengage the clutch;
Move the lever to the position corresponding to second gear;
Release the clutch pedal (smoothly, but much faster than when starting) and press the gas pedal to accelerate the car again.
To stop at the “STOP” line (Fig. 11), proceed according to the following scheme:
Remove your right foot from the gas pedal and place it on the brake pedal;
By smoothly pressing the brake pedal, reduce the speed, then press the clutch pedal to prevent the engine from stalling and, pressing the brake pedal with your right foot, stop the car at the “STOP” line (Fig. 11), without crossing it;
Move the gear shift lever to neutral.
“Knowledge is power,” says the famous saying. And there is a huge amount of truth in these words. The more we know, the easier it is for us to cope with assigned tasks and the more confident we feel in a given situation. It is also impossible to pass the traffic police exam without the necessary knowledge and skills. Therefore, you need to prepare for this event and know all the pitfalls that you may encounter in the process.This article will not discuss the entire examination course, but only a separate part of it - area.
What is a platform?
 Area– this is a special area located away from the main roads, equipped with an overpass and separate areas for performing various exercises (maneuvers) on a training vehicle. Only cadets taking the exam and the examiner are allowed on the site. There are no foreign vehicles in this area.
 The site is intended for driving training for driving school cadets, as well as for passing the second stage of the exam, thanks to which you can see how well a person feels the car and controls it in certain situations.
Basic exercises on the court
 Each inspector chooses the sequence of exercises himself. Therefore, it is difficult to say exactly in what order the maneuvers will need to be performed. But now all the actions that the cadet must show to the examiner will be considered.
 Overpass
The first step is to describe the overpass, since this section creates quite a lot of problems for the person passing the driving test. And here the fault is not even a lack of skills, but, most likely, excessive anxiety, which causes sudden movements. And at this stage of the exam, you need to press the pedals and move smoothly, slowly and carefully.If you look at it with an inexperienced eye, it seems that climbing an inclined plane is very simple to do. However, not everything is as our imagination portrays to us. Here, any seemingly insignificant mistake can become fatal.
The delivery of the overpass is as follows::
The person taking the exam drives up to the overpass and stops near the stop line. The inspector gives the command, and then you need to drive onto the inclined plane and also stop at the place marked by the line. After which, the car is put in neutral gear, the handbrake is applied, and the feet are removed from the pedals. Next, also at the examiner’s command, the cadet needs to move away, with minimal rollback (or better yet, without it at all) and drive onto the upper part of the overpass, after which, in neutral gear, roll off it and stop.
Advice
To successfully pass the overpass, you need to train with an instructor as often as possible while studying at a driving school. When the time comes for the exam, everything should be done smoothly, thoughtfully and confidently. No need to worry. Feel free while driving and don’t pay attention to the inspector sitting next to you. Your main task is to drive through the overpass without making mistakes. Even if the examiner tries to provoke you in some way, stand your ground and do what you think is necessary. Well, but you definitely won’t make it worse.
To avoid rolling back, monitor engine operation and vehicle movement. When you need to start on a slope, hold the brake pedal all the way down and gradually release the clutch. The car should be pulled forward. And as soon as you feel it, at the same time take your foot off the brake and press on the gas pedal. In this situation, the risk of a rollback is reduced to a minimum.
Remember to watch the stop lines during the exercise and do not go beyond them.

Parallel parking
The next exercise is a common situation for all drivers. You need to park your car parallel between two cars. Of course, there will be no real vehicles; they will be replaced by a specially equipped site.Advice
In this case, everything is quite simple. The main thing here is to feel the dimensions of the car and navigate by the mirrors. Don’t be too lazy to turn your head back once again so as not to hit a chip with the rear bumper, but at the same time, do not forget about the front part of the car, which, when turning, can also hit the chips (and this is a mulligan).
Snake
This exercise involves maneuvering between obstacles. Here, not one of the obstacles should be touched.Advice
To successfully complete this stage of the practical exam, you need, as in the previous case, to feel the dimensions of the car and look around. Whenever you turn, look in the mirrors so as not to hit an obstacle with the rear wheel or threshold of the car. But the front part of the car should always be under control. The exercise must be performed slowly and think through the trajectory along which the vehicle will go. Read more in detail.
U-turn
A turn in a confined space is the easiest of all the elements listed above, which is performed in three steps. The essence of the exercise is that in a limited space, you need to turn 180°. Sequence of actions: turn left, move backward, turn the steering wheel to the right, move forward.Advice
When performing this exercise, be guided by the rear-view mirrors and take into account the dimensions of the car. This element is quite simple, so there should be no problems with it.
Conclusion
And so, we examined the exam at the traffic police site. Now, after receiving the tips described above, you can easily pass the practical part of the exam and head to the “finish line”, which is city driving. But it is worth remembering that in order to “learn, study and study again” and practice driving. To do this, you can take on extra hours or hire a private instructor. In any case, the time spent on training will bring you the coveted license and all that remains is to get a car.Not everyone can pass the traffic police exam with flying colors the first time. But you want to get your coveted driver’s license as early as possible. Coping with anxiety and thoroughly preparing for theory and practice is necessary for everyone who intends to perform all the exercises on the race track perfectly.
The traffic police exam consists of a theoretical and practical part. The first test involves testing your knowledge of traffic rules, the provision of medical care, the design of a car, and so on. For most examinees, these questions do not pose any difficulties. And the practical part is exercises on the race track, which will show the ability to park, enter the garage, and so on.
Exercises on the circuit
Currently, five tasks are being carried out at the circuit. Examination exercises are called as follows:
- "U-turn."
- "Overpass at the autodrome."
- "Snake".
- "Parallel parking"
- "Entering in reverse."
The principle of performing elements of a practical exam on a race track may in some respects differ from what the instructor taught. All the nuances depend on the placement of the figures on the site, the dimensions of the car, control features and other things. However, if you generally complete all elements correctly and take into account the instructions of your teacher, then most likely you will pass the exam the first time.

"Overpass"
The initial position for execution on the race track is that the car is stopped at the “Start” lane. In first gear, you reach the first stop line, press the clutch and stop. Without removing your feet from the clutch and brake pedals, put the car on the handbrake. After this, release the brake and press the gas. At the same time, you need to monitor the speed on the tachometer. As soon as they have grown to two thousand, the gas pedal is fixed and the clutch is carefully released.

Then the speed drops to one thousand. The clutch is locked. The handbrake is released. At the same time, squeeze the gas again to two thousand revolutions. Slowly release the clutch. Then you drive the car to the second stop line, still holding two thousand revolutions. Disengage the clutch completely and the gear is in neutral. The car is placed on
"Garage"
The garage exercise or entry into the box starts from the start line. In first gear, the car moves to the first flag. It symbolizes the wall of the building. The front right wheel should be just behind the mark, but not level. Next, turn the steering wheel to the left and continue driving. Stop when you see two flags in the left side mirror, indicating the beginning and end of the garage. Now the steering wheel must be turned to the right. This is necessary to ensure that the front wheels of the vehicle are straight.

Depress the clutch and start driving in reverse. It is convenient to monitor the correct trajectory of the car in the rear view mirror, or you can turn back. It is necessary to stop the car after the first flags (symbolizing the beginning of the garage) are in front of the front fender. The vehicle is transferred to neutral gear and the handbrake is put on.
"Snake"
The “Snake” exercise requires attentiveness and accuracy. The initial position is at the start line. The movement begins in first gear. When performing this element, you will have to navigate by the marks on the site, wheels and mirrors of the car. Turn the steering wheel to the right until the left wheel of the vehicle crosses the imaginary line on which the flags are placed. After this, you immediately begin to rotate the steering wheel in the opposite direction so that the car becomes parallel to the set marks. Immediately after the left mirror is level with the flag, which symbolizes the beginning of a new turn, you need to start turning

Continue driving until the right front wheel crosses the imaginary straight line between the flags located at the beginning of the left turn. Then the trajectory is leveled. When the right mirror reaches the next mark, turn the steering wheel to the right. With the help of such turns, you overcome the remaining distance between the flags, gradually approaching the finish line. The car must be stopped before the stop line. We set the lever to the neutral position, the vehicle to the parking brake. The “Snake” exercise is considered completed.
"Turn"
This element is considered the easiest in the practical test on the circuit. The area for performing the exercise is limited. The length is equal to three car bodies plus one meter. Width - two cases. Initial position - drive up to the starting line. You stop. Idle time should not exceed thirty seconds. You start moving. The front right wheel of the car should be as close to the edge of the area as possible. Your vehicle should stop with its front wheels approximately in the middle of the border.

Then turn the steering wheel as far as possible to the left. This changes the direction of the wheels. You start moving towards the opposite border. You stop. Now turn the steering wheel all the way to the right. Move in reverse until the necessary free space is created in front of your vehicle to complete the element. The exercise is considered completed after you have reached the finish line. It is worth noting that there is no need to drive to the completion lane at right angles. It is more important not to cross this border.
"Parallel parking"
The “Parking” exercise at the race track begins, like the others, from the starting line. In first gear, drive forward and stop so that the left front flag is behind the rear right wheel of the car. You stop. Next, depress the clutch and drive in reverse, while turning the steering wheel one turn to the right.

The movement continues until the rear left wheel of the vehicle crosses the imaginary line between the front and rear left flags. You stop. Turn the steering wheel all the way to the left. You start reversing again. Stop it after the car is level between the cones. Now disengage the clutch, the gear lever moves to the neutral position. The car is put on the parking brake.
New exercises
Due to the new regulations of 2016, the list of examination exercises has expanded. Previously, three elements were performed at the circuit. Most often it was “Overpass” and two exercises selectively. After the introduction of the new rules, the exam already included five elements (for taking on a regular site), six if it is automated.

The list of exercises according to the new regulations is as follows:
- "Overpass".
- Maneuvering in confined spaces. This exercise consists of three parts - a 90° turn, a “Snake” and a turn in a limited area. Two out of three parts are selected for delivery.
- Reversing.
- Entry into boxing.
- "Parking" (entry and exit). Stop for boarding/disembarking passengers.
- Directions (if passing the exam on an automated racing track).
What should you pay attention to if you studied according to the old rules?
The new regulations have their own grading system, number of attempts and time to complete the exam. Thus, according to the old rules, the exam is considered failed if there are five or more penalty points. Also, to complete three elements, you are given four attempts and the right to make a mistake in one of them (that is, roughly speaking, not to pass one exercise). Now, according to the new regulations, the traffic police exam has received the following changes:
- All elements are performed in one trip, and not separately, as before.
- There is a time limit. Now it takes about ten minutes to complete.
- There is no chance of making a mistake and re-executing the element.
- The points system has been abolished. Now the regulations clearly describe cases when the examinee did not pass the test (for example, if he stalled three times, he did not pass).
- Instead of flags, the race track uses cones. They are significantly lower. They are more difficult to detect. Therefore, if you were taught using flags, then before taking the exam it makes sense to practice on an area with cones.
- The new regulations have stricter distances. For example, according to the new rules, you should stop at a distance of one meter from the stop line on an overpass. If you exceed this distance even by five centimeters, the exercise does not count.
There are few changes. But they are significant. Therefore, it would be advisable to study the new regulations and practice new exercises on the circuit.

The nuances of passing the exam at the race track
Don't know how to submit? The autodrome is a complex thing, but you can study it. You just need to prepare well. A lot of information is provided in textbooks. Every future driver must master all elements of the exam, because when traveling around the city in the future you will have to perform much more complex maneuvers.
Due to the new rule - time restrictions - all examinees must practice with a stopwatch before taking the test. Calculate how many minutes you can spend on a particular element, where you can save a few seconds, and so on. It is important to feel confident and be attentive. You definitely need to concentrate on passing the exam. And only after the car has stopped completely and the phrase “You passed” said by the inspector can you relax and breathe a sigh of relief.
Exercises for passing the exam at the race track
We express our deep gratitude to the creators and administrators of the site www.pddmaster, on which we discovered such valuable material.
This article will discuss the updated rules for passing the first part of the practical exam - the circuit. Starting from September 1, 2016, the list of exercises at the circuit will include several new exercises for all categories of vehicles.
Let me remind you that the updated rules for conducting examinations are contained in the Administrative Regulations of the Ministry of Internal Affairs of the Russian Federation for the provision of public services for conducting examinations for the right to drive vehicles and issuing driver’s licenses. This document is the subject of a series of articles “Exams in the traffic police since 2016” on pddmaster.ru.
Let's move on to considering new exercises for passing the traffic police exam.
Exercises on the circuit for categories B, C, D and subcategories B1, C1, D1
Exercises that haven't changed:
· Stopping and starting on an incline;
· Turning around in confined spaces;
· Entering the box in reverse;
· Parallel parking;
So, 4 out of 5 exercises remained in the exam. We will not dwell on them in more detail. All these exercises are discussed in detail in the series of articles “Pass the racetrack in half a kick.”
New exercises on the circuit:
· New snake;
· Rotates 90 degrees;
· Passing through a controlled intersection.
New snake. This exercise will replace the “old” snake, which is well known to all drivers. Please note that the new snake only includes one turn to the left and one turn to the right. However, they need to be performed along a smooth trajectory.
Rotates 90 degrees. This exercise is completely new. It consists in the fact that the driver must make a left turn and a right turn. At the same time, the space for maneuver is limited.
Driving through a controlled intersection. This exercise will only be used on automated racing tracks. You need to drive up to the intersection and drive through it in the given direction. In this case, you should be guided by traffic lights.
The procedure for performing new exercises will be discussed in new articles in the series “Pass the race track with half a kick.” We will not dwell on it in detail within the framework of this article.
Until September 1, 2016, the examiner selects 3 out of 5 exercises for the driving test at the race track. After September 1, this rule will change.
To successfully pass the exam, a driver candidate must complete the following exercises:
In addition, the examiner selects two of three exercises:
On an automated racing track you also need to perform the following exercise:
Those. Autodrome exam from September 1, 2016 includes 5 exercises(6 on the automated circuit).
Overpass (slide on the autodrome)
Good afternoon, dear reader.
In the next article in the series “Pass the race track in half a kick” we will talk about how to pass the exercise "overpass"(slide), which becomes a stumbling block for many applicants for a driver's license.
Although in fact you can pass this exercise very simply, as they say, “with half a kick.” You just need to follow a few simple rules, which will be discussed below. Let's get started.
Exercise slide on the race track
A little about the slide (overpass) exercise.

The site is an overpass, that is, an artificial structure on which the road runs at an angle (the inclination ranges from 8 to 16 percent). The driver candidate must stop the car on an inclined section and then move off it. In this case, you should avoid rolling back when starting off.
The length of the inclined surface is equal to the length of the car + 2 meters. At a distance of 1 meter from the upper plane of the overpass there is a line “STOP-1”. When completing the exercise, an additional chip will be installed behind the car at a distance of 0.3 meters, which shows the maximum possible rollback.
In addition, there is an additional line “STOP-2” on the site, at which the driver must also stop. In this case, you need to stop no further than 1 meter from this line.
How to do the flyover exercise
2. Drive up to the “STOP-1” line on the overpass and stop.
3. Drive off on an uphill slope.
4. Drive up to the “STOP-2” line and stop at a distance of no more than 1 meter from it.
Error table for the flyover exercise
|
Error |
Possible quantity |
|
113.4. Crossed the "STOP" line along the projection of the front side of the vehicle. |
|
|
113.8. Stopped before the corresponding marking line at a distance exceeding the control value. |
|
|
113.13. When performing the exercise “Stopping and starting to move on an incline,” the vehicle rolled back on an incline by more than 0.3 m. |
|
Performing the flyover exercise in the exam
Let's look at the order of performing the "Overpass" exercise in the exam:
2. We start moving and slowly move towards the “STOP-1” line. We stop approximately at the line. You may not get there, you cannot move. In this case, we are guided by the cones installed along the edges of the line.

3. After stopping, secure the car using the handbrake. Release the brake pedal.
At this moment, an additional cone 1 with a bar is installed behind the car (at a distance of 30 cm).
4. The clutch pedal is depressed. Press the gas pedal with your right foot. At the same time, look at the tachometer on the instrument panel.
5. When the tachometer needle approaches 3000 rpm, fix the gas pedal. We begin to slowly release the clutch pedal. We look at the tachometer.
6. When the tachometer needle approaches 1000-1200 rpm, fix the clutch pedal.
7. Without changing the position of your legs, release the handbrake. Please note that at this moment the legs need to be fixed! The car starts and slowly drives towards the "STOP-2" line behind the overpass.

8. We stop at the “STOP-2” line behind the overpass. Please note that you need to stop at a distance not exceeding 1 meter. You can navigate by the additional cone number 2, which precisely indicates 1 meter from the line.
The exercise was successfully completed.
Turning around in confined spaces
Good afternoon, dear reader.
In the second article in the series “Pass the race track in half a kick” we will talk about how to do it right turning in a confined space.
In my opinion, the “turn around” exercise is the simplest, which is why it will be described first. In addition, in practice, driver candidates rarely experience problems when making a U-turn.
Please note that after completing training at a driving school, you will have to repeatedly make a U-turn in a limited space on real roads, so you should take the study of this exercise very responsibly.
First, a few words about what a turn in a confined space is and what the meaning of this exercise is.
Exercise area has a length equal to three car body lengths plus 1 meter and a width equal to two car bodies:
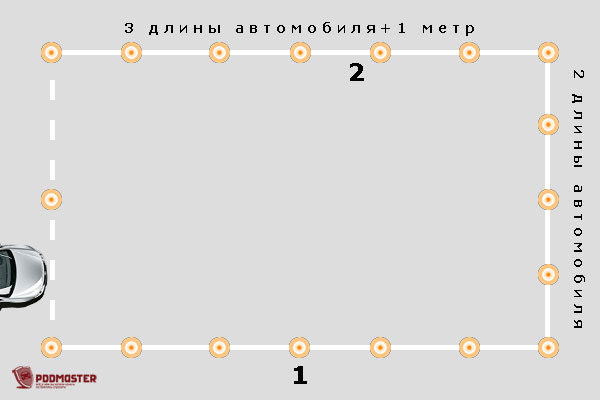
How to perform a U-turn correctly?
Let's look at what a driver candidate must do to successfully complete the U-turn exercise:
1. Drive up to the “Start” line and stop.
2. Turn around within the outlined square while engaging reverse gear once.
3. Drive up to the Stop line and stop.
In general, nothing complicated.
Table of errors for the exercise U-Turn
The first column of the table contains descriptions of possible errors, and the second column shows the number of errors that can be made. 0 means that after the first mistake the exam is graded “FAIL”.
|
Error |
Possible quantity |
|
113.1. Did not start performing the test exercise within 30 seconds after receiving the command (signal) to start performing it. |
|
|
113.2. The wheel ran over the marking line marking the boundaries of the test exercise areas, or knocked over the marking equipment. |
|
|
113.3. He drove (crossed the wheel) beyond the boundaries of the test exercise areas, marked by road marking lines 1.1 white or 1.41 yellow and marking cones (marking posts). |
|
|
113.7. Allowed the engine to stop. |
|
|
113.15. Left the exam (refused to complete the test exercise). |
How to make a U-turn in a confined space?
Let's look at how to properly make a U-turn in a confined space:
1. We approach the start line of the exercise and stop. The question arises: “for how long to stop?” In general, this does not matter, but you should not delay longer than 30 seconds.
2. Let's start and slowly move in the direction of cone 1. At this stage, your task is to get as close as possible to this cone with the front right wheel. When we arrived, we stopped.
Note. If there are several cones on the boundary of the site, then as cone 1, select the cone that is located approximately in the middle of the boundary of the exercise.
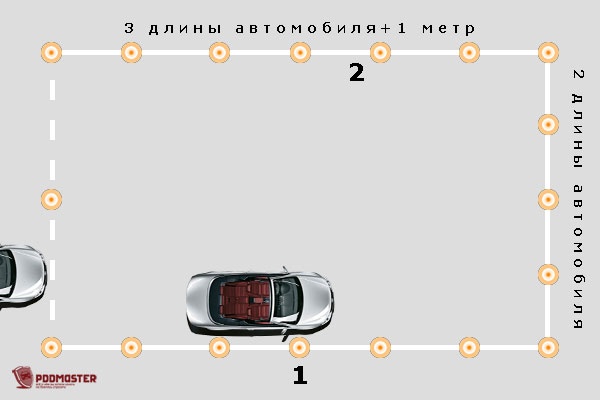
3. Stand still and turn the steering wheel all the way to the left (in the direction of the turn).
4. We begin to move towards cone 2. We move until we approach the cone or a solid marking line. We stop.

5. Stand still and turn the steering wheel all the way to the right.
6. We move in reverse until there is enough space in front of the car to move to the line where the exercise is completed. Attention! No need to drive in reverse all the way to the cones! There's no point in taking unnecessary risks.

7. Calmly approach the line for completing the exercise. It is not necessary to approach at a right angle. In practice, you don't need to do this at all! The main thing is not to cross this very line!

The exercise was successfully completed.
Entering the garage in reverse (entering the box)
Good afternoon, dear reader.
In the next article from the series “Pass the race track with half a kick”, the features of performing another exercise on the race track will be considered - entering the box in reverse. Its essence is that the candidate driver must drive into a small garage located at right angles to the trajectory of movement.
In my opinion, this exercise is the most difficult for a novice driver. However, in any case, you need to learn how to do it. Someday you will have to drive your car into a garage or parking space. This is where the skills acquired at the racetrack will come in handy.
Let's move on to the exercise.
Reversing into a garage at a race track
Exercise area driving into the garage in reverse:

The platform is an imaginary box into which you need to drive the car in reverse. In practice, this can be not only a garage, but also any parking space. Accordingly, you need to drive into the garage without hitting its walls. Or without touching neighboring cars in the case of a parking space.
In practice, garages can be larger than at a race track (car width + 1m X car length + 1m), but parking spaces can be smaller.
The maneuver must be performed on a strip with a width equal to the length of the car + 1 meter. I don’t think there’s any need to explain why in this case you need to park backwards. After all, driving in front in such conditions is very difficult.
Performing the exercise of reversing into a box
2. Reverse into the garage.
3. Stop in the garage.
4. Drive out of the garage and leave the exercise area.
Table of errors for the exercise entering the box in reverse
The first column of the table contains descriptions of possible errors, and the second column shows the number of errors that can be made. 0 means that after the first mistake the exam is graded “FAIL”.
|
Error |
Possible quantity |
|
113.1. Did not start performing the test exercise within 30 seconds after receiving the command (signal) to start performing it. |
|
|
113.2. The wheel ran over the marking line marking the boundaries of the test exercise areas, or knocked over the marking equipment. |
|
|
113.3. He drove (crossed the wheel) beyond the boundaries of the test exercise areas, marked by road marking lines 1.1 white or 1.41 yellow and marking cones (marking posts). |
|
|
113.5. Did not cross the control line with the external dimensions of the vehicle in cases where crossing the control line is provided for by the conditions of the test exercise. |
|
|
113.6. Deviated from the specified trajectory of movement provided for by the conditions of the test exercise. |
|
|
113.7. Allowed the engine to stop. |
|
|
113.15. Left the exam (refused to complete the test exercise). |
How to reverse into a garage?
1. We approach the start line of the exercise and stop.
2. We get underway and begin to move forward. At this stage, our task is to drive the right rear view mirror as close as possible to chip number 1. The closer we get, the easier it will be to enter. We stop the car after chip number 1 is between the front and rear right doors of the car.

3. We stop at the chip. Turn the steering wheel all the way to the left.
4. We begin to move to the left. Keep the steering wheel in the extreme left position. At the same time, look in the right rearview mirror! In this mirror we need to catch chip number 2. Moreover, in such a way that there is a small gap (10 centimeters) in the mirror between the chip and the car.
Also, be careful not to hit the cone with the front of the car. If chip number 2 still has not appeared in the rearview mirror, and there is nowhere to go, then we stop.

5. We stop. Turn the steering wheel all the way to the right. Let's engage reverse gear!
6. Let's start moving. We look in the right rear-view mirror and look for chip number 2 in it. As soon as there are about 10 centimeters left in the mirror, we stop.

7. We stop. Turn the steering wheel so that the car drives straight. Let's engage reverse gear!
Starting from September 1, 2016, the old snake becomes history, and all driver candidates go through the new version. This also applies to driver candidates who began taking exams before September 1, 2016, but for some reason failed the exam.
Let's look at the procedure for performing the "New Snake" exercise.
Exercise area The “New Snake” is presented in the following figure:

The site is a curved corridor, including one smooth turn to the left and one smooth turn to the right. The width of the corridor is 3.9 meters, i.e. the corridor is approximately 2 times wider than the car.
The radius of the outer arc is 7.3 meters. It's also slightly larger than the turning radius of a passenger car.
Performing the exercise "New Snake"
1. Drive up to the start line of the exercise and stop.
2. Make a left turn.
3. Make a right turn.
4. Stop before the end line of the exercise.
Error table for the exercise "New Snake"
The first column of the table contains descriptions of possible errors, and the second column shows the number of errors that can be made. 0 means that after the first mistake the exam is graded “FAIL”.
|
Error |
Possible quantity |
|
113.1. Did not start performing the test exercise within 30 seconds after receiving the command (signal) to start performing it. |
|
|
113.2. The wheel ran over the marking line marking the boundaries of the test exercise areas, or knocked over the marking equipment. |
|
|
113.3. He drove (crossed the wheel) beyond the boundaries of the test exercise areas, marked by road marking lines 1.1 white or 1.41 yellow and marking cones (marking posts). |
|
|
113.7. Allowed the engine to stop. |
|
|
113.15. Left the exam (refused to complete the test exercise). |
How to drive a new snake correctly
First of all, a few words about movement trajectories, which we will use. When performing this exercise, there is a high probability of knocking down the cones that are in the center of the turn, because The rear axle of the car moves along a smaller radius than the front. In this regard, when performing a snake, you need to ride the first half of the exercise along the right side of the corridor (along a large radius), and the second half along the left side of the corridor (also along a large radius).
Let's consider detailed instructions for performing the exercise “New Snake”:
1. We approach the line where the exercise starts and stop. In this case, you need to drive as close as possible to chip number 1, i.e. to the right side of the corridor. This will allow you to subsequently move along the correct trajectory:

2. We start moving straight and enter the corridor, stopping at cone number 1:

3. Turn the steering wheel to the left. At this stage, the steering wheel does not need to be turned all the way. You need to turn just enough so that the car can drive up to cone number 2.
4. We set off and move towards cone number 2. We stop at cone number 2. The position can be controlled by the right rear view mirror.

5. Turn the steering wheel all the way to the left.
In the next step, the car will move from the right wall of the corridor to the left. This is necessary to complete the second part of the exercise.
6. Let's start moving. We drive until the car is level with pillar number 3. We control the position using the right rear-view mirror.

7. We stop. Turn the steering wheel all the way to the right.
8. We start moving and approach the end line of the exercise. In this case, it does not matter at what angle you approach this line.

After this, the execution of the updated snake is completed successfully.
Rotates 90 degrees
Good afternoon, dear reader.
In the next article in the series “Pass the race track in half a kick” we will talk about the competent execution of the “90 degree turns” exercise.
Exercise " Rotates 90 degrees" refers to a group of new exercises that are used when passing exams in the traffic police starting from September 1, 2016.
Let's consider the scheme for performing this exercise.
Exercise area"90 Degree Turns" takes the form of a winding corridor:

The width of the corridor is 3.9 meters. In practice, this means that the corridor is approximately 2 times wider than the training vehicle, i.e. There is enough space to perform maneuvers.
The length of the corridor sections is equal to 2 lengths of the car body.
The radius of curves at turns is 1 meter.
When performing a turning exercise, the driver must do the following:
1. Drive up to the start line of the exercise and stop.
2. Enter the corridor and turn left 90 degrees.
3. Turn right 90 degrees.
4. Drive up to the end line of the exercise and stop.
When performing this exercise, unlike the U-turn exercise, the car can only move in front, i.e. Reversing is prohibited.
Error table for the exercise "90 degree turns"
The first column of the table contains descriptions of possible errors, and the second column shows the number of errors that can be made. 0 means that after the first mistake the exam is graded “FAIL”.
|
Error |
Possible quantity |
|
113.1. Did not start performing the test exercise within 30 seconds after receiving the command (signal) to start performing it. |
|
|
113.2. The wheel ran over the marking line marking the boundaries of the test exercise areas, or knocked over the marking equipment. |
|
|
113.3. He drove (crossed the wheel) beyond the boundaries of the test exercise areas, marked by road marking lines 1.1 white or 1.41 yellow and marking cones (marking posts). |
|
|
113.7. Allowed the engine to stop. |
|
|
113.9. Driving in reverse if reversing is not provided for by the conditions of the test exercise. |
|
|
113.15. Left the exam (refused to complete the test exercise). |
How to make turns correctly
Let's consider step by step instructions for performing the exercise “Turns 90 degrees”:
1. We approach the start line of the exercise and stop. In this case, you need to approach the line in such a way that the car is as close as possible to the right edge of the corridor. This will make the exercise easier to perform later.
The closer you get to this side, the better. However, you need to be careful not to catch the cones or cross the markings.
2. We get moving and slowly move along the right side of the corridor parallel to it. You need to move until the left rear view mirror is level with cone number 1.
There is no need to turn the car's steering wheel at this stage. As soon as cone number 1 is level with the rearview mirror, we stop.

3. While standing still, turn the car’s steering wheel all the way to the left.
4. Let's start moving. The car turns left. At this stage, you need to drive as close as possible to the left side of the corridor and stop parallel to it.

5. Set the steering wheel to a straight position and move parallel to the left wall of the corridor. At the same time, we follow cone number 2. As soon as this cone is at the level of the right mirror of the car, we stop.

6. While standing still, turn the car’s steering wheel all the way to the right.
7. We start driving and make the second right turn. We approach the end line of the exercise and stop. You can approach this line at any angle; it is not necessary to park the car perpendicularly. This is not an error.

The exercise was successfully completed.
Controlled intersection on a motorway
Good afternoon, dear reader.
This article will talk about performing the exercise " Signalized intersection"on the race track. This exercise is one of the simplest, as it does not involve any complex maneuvering.
The signalized intersection is used for the exam starting September 1, 2016. Moreover, this exercise is used only on automated racing tracks, of which there are quite a few in practice.
Nevertheless, let's look at how to correctly navigate through a controlled intersection. Let's get started.
Exercise area The "Controlled Intersection" is shown below:
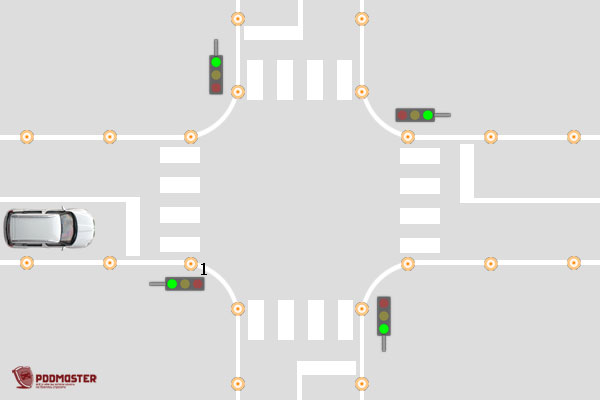
An intersection is the intersection of two two-lane roads. The configuration of the intersection depends on the circuit. Some racetracks use a T-junction.
The width of all roads is 7 meters, the width of the traffic lane is 3.5 meters. It corresponds to the lane width in real road conditions, so the candidate driver has plenty of room for maneuver.
The radius of curves at the intersection is 4 meters, the distance between the pedestrian crossing and the STOP line is 1 meter.
Performing the exercise "Controlled intersection"
1. Drive to the intersection.
2. When there is a prohibiting traffic light signal, stop in front of the STOP line.
3. When the traffic light gives permission, drive in the given direction.
Which direction should you go through the signalized intersection? The direction is set by the traffic pattern on the automated circuit. Those. The direction of movement depends on the race track where the test is taken, and the candidate driver must be informed about this in advance.
Below we will consider all options for driving through a controlled intersection (straight, left, right).
Error table for exercise "Controlled intersection"
The first column of the table contains descriptions of possible errors, and the second column shows the number of errors that can be made. 0 means that after the first mistake the exam is graded “FAIL”.
|
Error |
Possible quantity |
|
113.1. Did not start performing the test exercise within 30 seconds after receiving the command (signal) to start performing it. |
|
|
113.2. The wheel ran over the marking line marking the boundaries of the test exercise areas, or knocked over the marking equipment. |
|
|
113.3. He drove (crossed the wheel) beyond the boundaries of the test exercise areas, marked by road marking lines 1.1 white or 1.41 yellow and marking cones (marking posts). |
|
|
113.7. Allowed the engine to stop. |
|
|
113.9. Driving in reverse if reversing is not provided for by the conditions of the test exercise. |
|
|
113.14. When performing the exercise “Passing a controlled intersection”, you drove through an intersection (entered an intersection) or crossed the “STOP” line according to the projection of the front clearance of the vehicle when the traffic light signal was prohibiting. |
|
|
113.15. Left the exam (refused to complete the test exercise). |
How to correctly perform the "Controlled intersection" exercise
Let's look at the instructions for performing the "Controlled intersection" exercise:
1. We enter an intersection. The lanes in this exercise are quite wide, so it is better to enter the intersection in the center of the lane. This will prevent you from catching the chips while maneuvering:

2. If there is a traffic light at the traffic light (red, yellow, a combination of red and yellow), then we stop in front of the STOP line. Please note that you cannot cross this line. It's better not to get there:

We are waiting for the traffic light to turn on (green).
3. We pass the intersection in the required direction.
4. Turn right. We begin to turn the steering wheel after cone number 1 is in the middle of the car (approximately between the front and rear doors):

5. Go straight through the intersection. The simplest option. Just press the gas pedal, do not turn the steering wheel:

6. Turn left. When the car is in the middle of the intersection, turn the steering wheel to the left and make a turn:
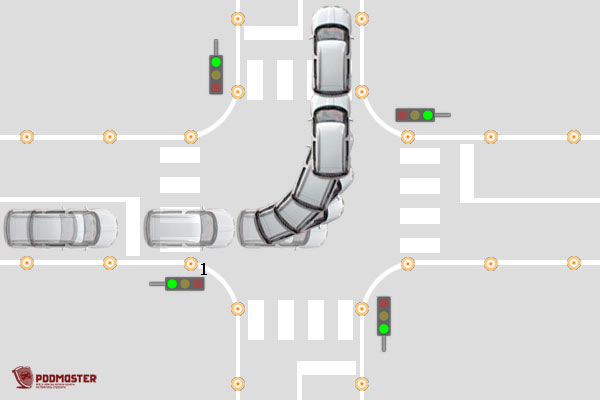
7. U-turn. This maneuver cannot be offered at a signalized intersection, because The width of the intersection is not enough to make a U-turn in one go.
The exercise was successfully completed.