Getting high-quality sound in a car is the task of a full-fledged audio system, as well as special equipment for signal amplification and purification. It is impossible to achieve good sound without the use of amplifiers and other modern means. Therefore, many car owners who like to listen to music while driving seek to purchase and install a car-type amplifier. Often the question arises of how to connect an amplifier to a car radio, observing all the rules and requirements of equipment manufacturers.

In fact, there is nothing complicated in this process. Each driver can independently make such a connection. Probably the most difficult process in installing modern equipment will be laying the wire, because for this you need to lift the carpet and look for a normal place to quietly pull all the wires to the speakers, as well as the subwoofer. Consider all the subtleties of installing an amplifier in a car.
We select and buy all the materials and the amplifier itself
The acquisition of equipment is an incredibly important step that will determine the quality of all work performed after that. If you give preference to an amplifier of unknown origin, which does not even have normal technical characteristics, there is a risk of ruining expensive acoustic equipment. Speakers simply can't handle a bad signal.
When buying an amplifier, think about the actual power. As indications on the case, almost all manufacturers use an increased parameter, which is also present in the equipment, but only in a potential sense. If the power in the technical data says 1000 watts, then in reality such an amplifier gives out from 100 to 130 watts. The following purchases are also important:
- if you buy acoustics, subwoofers, then take care of their maximum compatibility with the amplifier;
- wires you need to buy only the highest quality and most reliable - choose the most expensive options;
- it is better to solder and crimp all connectors on professional equipment, otherwise you will often have to repair the system;
- you should also think about buying special cable channels for laying wires on a car;
- at specialized outlets, you can find specific mounts for such channels;
- if a subwoofer is used in the sound system, you should also purchase a capacitor to connect in front of the amplifier;
- if you are buying an amplifier for a ready-made speaker system, choose the most suitable option.

The main problems of motorists who independently install the amplifier and other automotive equipment are expressed in the wrong selection of equipment. Only the surface parameters of acoustics, radio and amplifier are compared, and then an unexpected break in the speakers occurs due to the supply of too much power.
Also, problems are possible if the equipment is connected incorrectly. Swapped outputs or bad wires can even cause excessive heat and a fire in the entire system. Therefore, be as careful as possible in the process of connecting the system and use professional advice. When choosing equipment, also use the help of specialists in stores.
Installing and connecting a car amplifier
The first step is to decide where the amplifier will be installed in your car. Often it is installed together with a subwoofer in the same volume. It is advisable to securely attach the equipment so that it does not break from constant shaking. To do this, you can use the various tips of the masters who install music systems in cars.

It is better to connect all acoustic equipment through fuses. This way you can ensure safety when the system is overloaded. Once wires or equipment start to overheat, the fuse will blow out and turn off part or all of the system. When installing an amplifier in a car, you should remember the following important points and subtleties:
- the amplifier is connected to the linear output of the radio, which is often designated as Line Out;
- connection may require soldering a special wire, because each car owner has an individual speaker system;
- connecting equipment from an amplifier depends on the number of channels, five-channel amplifiers are often used - the most productive;
- a special wire is connected to the GND output to the car ground, it is better to make it as short as possible;
- do not forget about the power wire that connects the amplifier to the car's electrical system;
- the main fuse of the system is mounted in the engine compartment, it will break the system at the very beginning of connecting from the battery.

You can find thousands of car amplifier wiring diagrams that will be completely different. Nevertheless, it is worth acting according to the generally accepted method in order to exclude various unpleasant surprises in the operation of the equipment. An important point is to connect the speakers from the amplifier. To do this, you need to use a sufficiently powerful wire, otherwise the signal will be poor.
Do not save on wires, connectors and connectors, because the sound quality of music depends on the quality of this part of your future system. Using modern speaker system offerings, you can easily get the necessary conditions for listening to your favorite tracks in your car. It is enough to connect everything correctly and reasonably to avoid short circuits and other troubles. We offer you to watch a detailed video with tips from a car audio installation specialist:
Summing up
A high-quality speaker system in a car is impossible without a special amplifier. To use it, you need to purchase a lot of additional equipment, including the amplifier itself, a fuse, a capacitor, and a lot of wires to connect the system. The connection process itself will require partial disassembly of the interior of the car in order to lay the wires without significant visibility. This often scares off those who want to put acoustics in a car.
If you want to install the amplifier yourself, you will have to do all the above work. If such a process seems too complicated for you, and you have never connected acoustic equipment, in this case it is better to contact specialists and get the most out of the purchased equipment. If you have experience installing an amplifier and other acoustics, tell us about it in the comments.
Shvetsov Alexey Vladimirovich 63771
Don't like it when car speakers start to wheeze at high power? Not enough radio power to listen to your favorite music? The answer is simple: “You need a car amplifier.
In this article we will analyze the question: "How to connect an amplifier to speakers?".
One reason to install a car amplifier is a subwoofer. It requires at least a 2 channel amplifier. In this case, the channels are combined in a bridged mode, i.e. the right and left channels work together for one load - the subwoofer speaker.
The second reason - do not like the wheezing of the speakers at high power. Then, depending on the number of speakers, 2 or 4-channel amplifiers are used.

Using a five-channel amplifier will help to realize two options at the same time, although we will consider connecting a four-channel amplifier to speakers and a subwoofer.
Tip 1
Attention! Do not connect, on a two-channel amplifier, speakers and a subwoofer at the same time. Surely your amplifier protection will work, but the amplifier may burn out.
AMPLIFIER MOUNTING is carried out in any convenient place - usually in the trunk or under the seat. The speaker system is located in regular places, and the subwoofer is in the trunk.
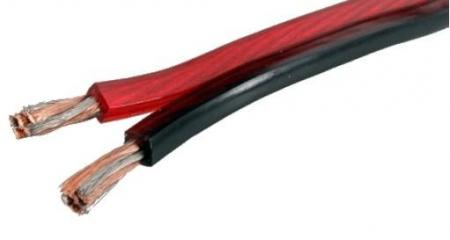
Connecting the speakers to the amplifier is carried out with specialized acoustic wires. The conductors of the speaker cable, as a rule, are of different colors, or one of them has an inscription.
Tip 2
Use a cable with a cross section of at least 2.5 square meters. mm. Don't skimp on the price of the cable - cheap Chinese speaker cable is more likely to be a source of interference.
 |
alarmobninsk.ru | 420 R | |
 |
alarmobninsk.ru | 440 R |
CONNECTING A 2 CHANNEL AMPLIFIER
The 2 channel amplifier is used for the following connection options:
- connecting two speakers
- subwoofer connection
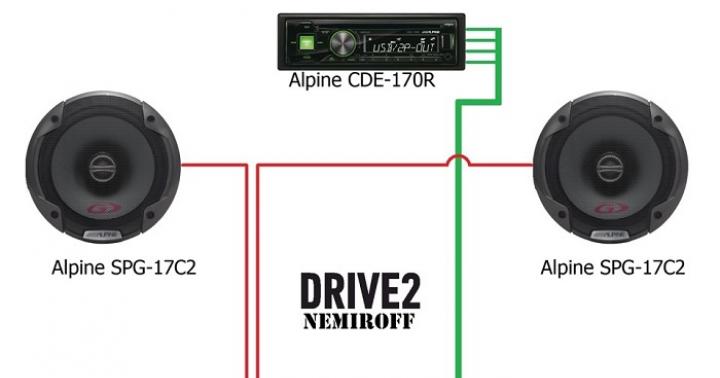
Connecting an amplifier to installed broadband speakers is subject to certain requirements. To the amplifier, the speaker cable is connected to the Left (Left) and Right (Right) terminals of the speaker output of the system.

Tip 3
When connecting, be sure to observe the polarity: the red core (or marked) of the cable must be connected to the terminal marked "+" (usually red), and the black (unmarked) to the "-" terminal. From the side of the acoustics, the connection is made to the left (Left) and right (Right) speakers with the obligatory observance of polarity.
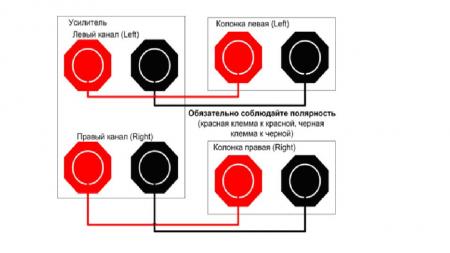
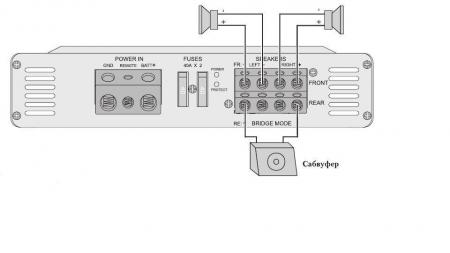
How to connect a subwoofer to a two-channel amplifier? Its connection is made as follows: the negative terminal of the subwoofer is connected to the "-" of the left channel, and the positive terminal to the "+" of the right channel. This is called "bridged" mode and the powers of each channel are added together.
CONNECTING A 4 CHANNEL AMPLIFIER
The 4 channel amplifier is used for the following connection options:
- 4 columns
- 2 speakers and subwoofer
- 2 subwoofers
If you have a 4-channel amplifier used to connect four speakers (front and rear), then you should connect them to the front left and right terminals (Front Left and Front Right and rear left and right) (Rear Left and Rear Right).
If you want to connect a passive subwoofer along with the speakers, then it must be connected in the same way as described above to the rear left and right speaker terminals). Normal front speakers are connected to the Front Left and Front Right terminals.
When using a 4 channel amplifier, two subwoofers can be connected. In this case, one subwoofer is connected to the Front (front) terminals, and the second Rear (rear) in the same way.
 |
alarmobninsk.ru | 770 R | |
 |
alarmobninsk.ru | 200 R | |
 |
The presence of a subwoofer can significantly improve the performance of the car's sound system, but this will only be possible when properly connected to the amplifier. Unfortunately, this operation is far from being as simple as it seems to many. In order for everything to work correctly, it is necessary to take into account a number of rather important parameters. In this article, we will try to figure out how to properly connect a subwoofer to an amplifier.

Before you start connecting an active and passive subwoofer to an amplifier, it makes sense to compare the RMS values (the power at which the equipment can operate with a real audio signal for an hour without damage) of the subwoofer and amplifier. It is necessary to select equipment in such a way that this parameter of the amplifier is higher than that of the subwoofer. Otherwise, it is possible to exceed the permissible power level (clip), which is one of the most common types of speaker failure.
For optimal performance, the power of the amplifier and subwoofer should be approximately equal.
What do you need to connect?
To connect a subwoofer to an amplifier, you first need to make sure that you have everything you need. To install a subwoofer and amplifier in the car you will need:
- A set of terminals and connectors;
- Audio output converter;
- Line fuse;
- Switch for remote power;
- Capacitor;
- A set of wires for connecting a subwoofer and amplifier, which are selected for a specific speaker system.

To purchase the required set of wires, simply go to any store that sells sound systems for cars, and indicate to them the models of your car and radio.
The length of the wires is determined depending on the chosen scheme for connecting the subwoofer to the amplifier.
Wiring
Before installing the subwoofer and amplifier, you need to decide where exactly the car amplifier will be located. In the selected place, you need to put the end of the power wire, and lay it under the hood of the car. To do this, you need to measure the wire with a margin of thirty centimeters.

Some machines already have holes with rubber or plastic inserts that are designed specifically for wiring the speaker system. If holes need to be drilled, then extreme care must be taken so as not to damage important components and parts. In some places, the wiring must be additionally protected with electrical tape.
Amplifier Power
Now you need to provide power to the car amplifier. To do this, you will need to disconnect the car power cable from the battery and connect the amplifier power cable to it. After that, without connecting the power cable to the battery, you need to insert it into the fuse of the appropriate current strength, and only then connect it to the battery.

grounding
The next step in installing the subwoofer and amplifier in the car will be grounding. To do this, it is necessary to connect the selected wire to the amplifier and from it to a bare (degreased, unpainted and without traces of corrosion) metal area. Before connecting the wire, it is worth grinding the selected area. Most often, one of the seat bolts is simply unscrewed, a ground wire is attached to it, and the bolt is twisted.
Connecting the amplifier to the radio
Naturally, connecting a subwoofer through an amplifier would be meaningless without a sound source, which is a car radio.

First of all, you need to provide remote power. Non-original car radios usually have a blue wire that you can simply cut off and connect a suitable length of cable instead.

In the event that you have an original radio, you need to buy a suitable switch and find the place where you place it and follow these steps:
- Pull the wire from the amplifier to the switch;
- Cut it in two;
- Connect the ends of the wire to the two terminals;
- Pass the cut part of the wire back, leaving a margin of 30 cm.
Next, you will need to connect a capacitor, which will prevent power surges due to the use of backlighting in combination with powerful bass. The capacitor should be placed as close as possible to the amplifier using its ground.

In order for the capacitor to perform its function, it must be charged. To do this, you need to use a resistor with a resistance of 1 kOhm. Charging will only take a few seconds, but it's best not to touch anything with your bare hands. Checking the charge of the capacitor is carried out using a voltmeter, which should show about twelve volts.
Next, you need to connect the signal wires from the linear outputs of the radio. Their number can reach up to six, although there may be more in multimedia centers. We select the appropriate outputs and connect them to the amplifier using interconnect cables. Appropriate interconnects are required for two and four channel models.

If the radio has only one pair of line outputs, and the used car amplifier has four channels, Y-adapters must be used. However, most modern amplifiers have the ability to connect inputs in parallel, which makes it possible to do without them.
In order to connect a subwoofer to an amplifier, we need an audio output converter - a small box with two RCA outputs and 4 wires. Two wires are used to connect the speaker, the rest can simply be removed from view. Wires for RCA output, connect to the amplifier.

How to connect a subwoofer to a single channel amplifier
Connecting a subwoofer to a single channel amplifier is a fairly simple operation. You need to solder the "+" and "-" of the output to the "+" and "-" of the subwoofer.
It is somewhat more difficult to connect several passive subwoofers. For this, parallel or series circuits are used. However, it is necessary to correctly calculate the resistance.
How to connect a subwoofer to a two-channel amplifier
The connection is carried out by a "bridge" - this method works great with almost all two-channel amplifiers to which you need to connect one subwoofer. To do this, you need to take "+" from one channel and "-" from the other, which we connect directly to the subwoofer.

The important point is that with this connection, the resistance must be at least four ohms. In addition, it must be taken into account that in this case the summation of the output power of the channels will occur.
If the amplifier can switch mono and stereo mode, then you can simply connect the wires to the "+" and "-" of one channel. In the event that you need to connect 2 subwoofers to the amplifier, then you just need to separate them into different channels.

It is also important to remember that for the correct operation of the subwoofer, you must turn on the LPF filter, which will cut frequencies above 50-100 Hz.
The classic connection of car acoustics to a four-channel amplifier is a circuit with two speakers and one subwoofer.

So, how in this case to connect the subwoofer and speakers to the amplifier?
The standard option would be to connect two speakers and one subwoofer. Each speaker is connected to a separate channel, while the subwoofer is installed by a bridge. The important point is that the speakers will have to be connected to the front channels, and the subwoofer to the rear.
It is also possible to separate two subwoofers into separate rear channels.
Gather your equipment (amp, subs, speakers and wires). You can find wiring kits in most stores, for 1400 rubles you can buy 4-gauge (5.189 mm) wires and a line fuse. You won't need wires larger than 4 gauge.
- If you are using a non-original car radio, go to an electronics store, find the radio department and ask for a set of wires for your car to a non-original car radio. Example: If you have a Chevrolet car and a Sony car radio, say that you need wires in a Chevrolet for a Sony car radio. They will ask you the year of manufacture of your car and give you the necessary set of wires from the shelf, as a rule, they are located behind the counter. Once you've got everything you need, spin the old car radio you have now, disconnect it, and connect the new wires to the new radio. When buying new wires, make sure they are the same shape/size as your radio.
Run the wires from your amplifier (power, ground). Decide where you are going to put the amplifier, put the end of the power wire (red) there with a margin of about 30 cm, and then run the power wire under the hood. Some vehicles may already have holes with plastic/rubber inserts. Pass the power wire through the fire barrier. If you need to drill a hole in a fire wall, be careful not to hit anything on the other side, and make sure you don't damage the power line while drilling the hole. Insulating tape in the place where the wire passes will additionally protect the wire. Make sure the wire is not obstructed by any moving parts.
Disconnect the power cable from the battery and connect your amplifier's power cable to the car's power cable; leave the cable unconnected. If you bought a kit, it should have a line fuse, if not, you need to purchase one. Cut off the power cable, insert the fuse and connect the cable. The amperage of the fuse must match the size of the cable.
Place the amplifier in the desired location, then connect the ground wire (black or brown) to the amplifier. Connect ground to a piece of bare metal (not painted). Most people unscrew the bolt from the seat, attach the wire, and tighten the bolt. Lightly sand the contact area to clean the metal before connecting the ground.
Now it's up to the composite (RCA) connectors, if you are using a non-original car radio, there should be 2 RCA jacks on the back. Just run the wires from there to the "in" (IN) on your amplifier, avoiding touching the side power line to minimize hum.
If you are going to use the original car radio and connect an amplifier to it, you will have to buy an audio output converter for 680 rubles. The converter is a small box with two RCA outputs and 4 speaker wires. To connect, you need to pull out the door speaker and run two of the four wires to it. Pay attention to the positive (+) and negative (-) terminals. You don't need the other 2 speaker wires, so keep them out of sight and run the RCA wires to the amplifier, plug them into the "input" (IN) jack.
Now about the remote power supply (blue wire). If you're using a non-original car radio, there will be a blue wire coming from the back of the radio, in most cases it's just taped on. Just cut it off, unwind the old end and run your remote power wire to the amplifier. If you are using an original car radio, you will need to purchase a switch (of your choice), find a convenient or hidden place to place it, where you will need to run the wire from the amplifier. Run the wire up to the switch, cut it, attach it to one terminal, and then attach the end you just cut to the second terminal. Then run the wire back to the amplifier and cut off, leaving about 30 cm of excess. You will need this later.
Use a capacitor to prevent voltage drops caused by deep bass, i.e. flashing lights at the same time as rhythm beats. Mount the capacitor as close to the amplifier as possible and use the same ground as for the amplifier. Check your power wire and determine where the capacitor will be, cut the wire and attach the battery cable to the battery. But you can’t just connect it like that, you first need to charge it with a resistor. Use 1 kΩ resistors as they don't get very hot. It only takes a few seconds, but don't do it with your bare hands. Then you need to ground the capacitor. Take a voltmeter and connect it to the capacitor. Take the resistor, connect it to the powered side of the capacitor, attaching the power cable to the other side of the resistor. The voltmeter should read about 12 volts, which means your capacitor is charged.
Route the power wire to your amplifier. If you have an original radio and have a remote power cable, you will need to coil the remote power cable with the power cable before inserting it into the amplifier's power slot. Connecting a remote power cable allows the amplifier to turn on when needed. If you do not have a switch wire from a non-original radio, in order to turn on the amplifier when you turn on the radio, you will have to turn on the amplifier manually. Make sure you always turn off your amplifier when you get out of your car so it doesn't overheat and drain your battery.
The low frequency power amplifier is the main component of a quality sound reproducing system. Everyone has an independent choice and the ability to connect it to the radio in the car. This is a difficult and troublesome business, but feasible for all motorists.
Car audio amplifiers
Purpose and principle of operation
The sound of the car radio can be improved by installing high performance speakers. Unfortunately, the parameters of standard equipment do not allow the use of high-power sound emitters, which limits the possibility of upgrading with little blood.
In a similar situation, the installation of an autonomous sound amplifier will help out. It is an electronic device powered by the vehicle's on-board network that increases the amplitude (range) and power of low-frequency electrical oscillations.
Four-channel adjustable car power amplifier
A signal taken, usually, from the linear output of the radio is fed to the input of the device. An acoustic system is connected to the output. In other words, in the electrical circuit, the amplifier is located between the sound source and the speakers.
Classification
The sound system of the car interior consists of several channels - separate "lines" of the formation, amplification and processing of low-frequency electrical signals necessary for the speakers.
For this reason, one of the criteria for classifying car amplifiers is the number of channels, each with its own input and output.
Photo gallery: examples of car amplifiers for 1-6 channels
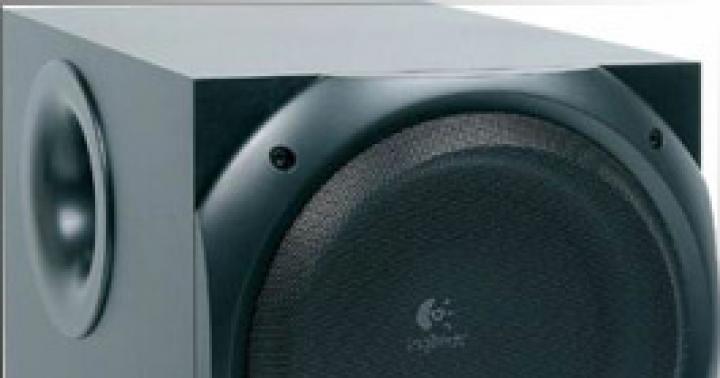
 Subwoofer Low Frequency Amplifier
  Car Stereo Audio Amplifier
  Six channel car amplifier
Usually in the device from 1 to 6 channels. The stereo system requires two (left and right speakers). The scheme "front plus rear" - four.
When a subwoofer is needed, choose amplifiers with an odd number of channels (3 or 5) or those that allow connection in bridge mode. The latter allows you to use a more powerful speaker, as it uses two channels of amplification at the same time. In addition, a low-frequency speaker can be connected using a separate single-channel amplifier - a monoblock.
According to the totality of energy efficiency and output signal distortion, car audio frequency amplifiers are divided into classes A, B, AB, C and D.
Class A devices have the lowest efficiency and the least signal distortion. On the contrary, class C is characterized by high energy efficiency and high distortion.
Class AB is an economical compromise solution that combines acceptable sound quality and good energy efficiency.
Class D refers to equipment with digital signal processing, which provides excellent sound. Its disadvantage is its high cost.
Specifications
From the consumer's point of view, the most important parameter of car audio amplifiers is output power. Its value is indicated in the passport or certificate. You should not be guided by the numbers printed on the case or front panel. As a rule, they are not true.
There are several methods for measuring output power. The following are the most frequently reported in documentation.
PMPO (Peak Music Power Output) - the maximum peak value of the output signal. In practice, it does not characterize either the sound quality or the capabilities of the device and, as a rule, is given for advertising purposes.
RMS (Root Mean Squared) - root mean square (square) value of power at a given signal quality. This parameter characterizes the state at which sound distortion is noticed even by an inexperienced listener.
DIN POWER is the most adequate parameter measured on the nameplate load with a normalized harmonic distortion factor. Its varieties are also referred to in the documentation as IEJA and IHF.
Among the main technical characteristics (except output power):
- frequency range,
- coefficient of non-linear (harmonic) distortion,
- signal to noise ratio,
- dumping factor.
In practice, the same type of characteristics of equipment from different manufacturers differ slightly and provide high sound quality.
Choice
By the number of channels, the amplifier is selected, focusing on the number of speakers that need to be connected, and the scheme of their connection.
An additional plus may be the presence of crossovers - built-in audio frequency filters (HPF selects the upper ones, LPF - lower ones) with adjustable parameters (cutoff frequency, gain, slope).
When choosing the power of a car amplifier, take into account the capabilities of the speakers. They do not need to be overloaded for long work, so the power should be less than that for which the speakers are designed.
In the absence of a linear output (tulips) in the radio tape recorder, which happens very rarely, a high-level input will be required.
How to connect an amplifier to a car radio
Installation location
The mounting location must meet the following requirements.
- No dampness or leaks.
- Easy access for connecting and setting up the amplifier.
- Good air circulation for cooling.
- The absence of inconvenience and interference with the normal operation of the car.
- Beautiful appearance.
Most often, motorists choose the following places.
- Rear shelf (top or bottom).
- Rear seat backs.
- Under the front seat.
- Below the floor of the trunk (if there are underground recesses and drawers).
Photo gallery: Placement of the amplifier in the car
 An example of placing a sound amplifier on the back of the rear seat of a car
  An example of placing an amplifier in the trunk of a car
  An example of placing the amplifier under the front seat
The positive and negative aspects of each solution are shown in the table.
Table: Advantages and disadvantages of car audio amplifier installation locations
| Place | Advantages | Possible disadvantages |
| Under the back shelf. | Cooling and access. | Takes up space in the trunk. |
| On the back shelf. | Cooling and access. |
|
| On the back of the rear seat. | Easy to mount. Cooling and access. |
|
| Under the front seat. |
| Inability to install. |
| Under the trunk floor. |
|
|
Materials and tools
Power wire
The purpose of the supply wire is to connect the device to a current source. The strength of the current consumed depends on the power of the amplifier. The diameter and cross section of the wire - from the length and current strength.
Power cable 8 AWG for connecting an audio amplifier
The value of the strength of the consumed current is in the passport of the amplifier. When power is specified in watts, the current in amperes is calculated by dividing its value by 12.
If the nameplate characteristic is unknown, the approximate value of the current is calculated from the output power. To do this, sum the rated power of all channels (DIN POWER or RMS, but not PMPO), double the result and divide by 12.
To connect to the vehicle's on-board network, as a rule, stranded copper wires are used. Specialized outlets offer wires made to the AWG standard.
The numbers in the name of the wire AWG (another designation Ga) indicate the caliber. The smaller the digital value, the larger the cross section of the conductor. For example, caliber 0000 AWG corresponds to an area of \u200b\u200bconductive core 107 mm 2, 13 AWG - 2.62 mm 2.
Correspondence of current consumption, wire length and wire gauge AWG (Ga) are shown below.
The gauge of the wire is chosen depending on the length and strength of the current.
Fuse
Power wiring should be protected from overload and short circuit by a fuse. Failure to do so may result in a fire.
The fuse rating is selected depending on the wire section (caliber).
The fuse rating is selected in accordance with the caliber and cross section of the power wire
It is allowed to install a fuse of a smaller, but not larger rating than recommended by the table. The lower limit is the sum of all the fuse ratings of the devices connected to the wire.
The fuse is installed in a wire break in close proximity to the battery no further than 30 cm from its terminal in a dry place accessible for control. The fuse holder is rigidly attached to the car body.
The cheapest fuse type is AGU. The most reliable are ANL, miniANL and AFS.
Capacitor for car amplifier
Capacitor for car sound system
The capabilities of the onboard electrical network are limited. In the mode of increased load, which is created by powerful equipment, the mains voltage reacts abruptly to the connection and disconnection of consumers. For example, it falls when switching from low beam to high beam.
Power surges adversely affect sound quality. The capacitor allows them to smooth out and reduce the negative impact. In addition, the capacitor reduces high-frequency interference in the on-board network, which can penetrate the audio path.
The capacitance of the capacitor is chosen at the rate of 0.1 farad for every 100 watts of amplifier power. Install as close as possible to the amplifier no further than 60 cm from it, connect between the positive power wire (terminal 12V) and the car body. In some devices, a separate connector is provided for the capacitor.
Interconnect (linear) cable is used to connect the outputs of the radio with the inputs of the amplifier.
Interconnect cable for connecting the radio and amplifier
As a rule, this is a shielded coaxial copper cable, the parameters of which can significantly affect the sound quality.
On sale there are both ready-made kits with soldered connectors (“tulips” RCA), and a “cut-in” cable.
If the capabilities of the car radio (number of outputs) allow, the signal to each channel of the audio frequency amplifier is supplied with a separate cable (using a separate pair of "tulips" of multi-channel cables).
When the number of channels exceeds the number of linear outputs of the car radio, a Y-adapter (Y-splitter) is used, which has one input and two outputs per channel. It is installed after the interconnect cable before the amplifier input.
Connecting the radio to the audio amplifier via the Y-adapter
An adapter is not needed if the device allows parallel connection of inputs.
Instead, they use a regular acoustic cable (for speakers) in the event of a complete absence of linear outputs in the radio, and connecting it to high-level inputs.
In some interconnect cables, manufacturers include a control wire (usually blue) needed to turn on the amplifier remotely. Otherwise, the REM connector is connected to the corresponding output of the radio with any conductor.
Tools and consumables
In addition to the above, you will need the following tools and supplies to install the audio amplifier.
- Screwdriver.
- A set of keys.
- Wire cutters.
- Drill.
- Hardware.
Mounting an audio frequency amplifier
Option for connecting a car audio amplifier
- Perform all work with the negative terminal of the car battery disconnected.
- Choose the most suitable installation location. Place the booster. Mark and drill mounting holes for all mounting points of the device. Fix the amplifier with bolts or self-tapping screws.
- Route the power cable from the amplifier to the battery. In the cabin, place the wire close to the other harnesses. If necessary, remove (completely or partially) the cladding elements during installation.
- Use the standard openings in the bulkheads for transitions from the passenger compartment to the engine compartment and trunk. Drill individual holes if necessary. Protect the cable with rubber (pieces of hose) or factory plastic bushings with seals, seal the transitions.
Use the standard holes in the bulkheads for transitions from the passenger compartment to the engine compartment
- Do not lay the power cable near moving parts, do not allow it to be pinched by sheathing elements, fix the wire in places where there is a possibility of chafing from vibration.
- Choose a location near the battery to install the fuse. Attach the holder to the case. Connect one contact of the fuse to the positive terminal. Connect the wire going to the amplifier to the second. Protect the cable lengths in the engine compartment with corrugated tubing.
Choose a location near the battery to install the fuse.
- Connect the power cable to the amplifier's 12V socket.
- Connect the GND terminal to the car body with the same wire with which the amplifier is connected to the power supply. Thoroughly clean the contact area from paint. Use corrosion resistant bolts, nuts and washers for fastening. Do not use self-tapping screws.
Thoroughly clean the contact area from paint
- Install a capacitor if desired.
- Lay and connect the interconnect cable to the amplifier and radio. Do not lay it along the bundles of the regular on-board network, avoid crossing with them. The farther the signal cable is from the wiring, the less likely it is to interfere.
- Together with the interconnect cable, lay the control wire, connect it to the input of the amplifier and the output of the radio.
- Connect acoustics (speakers and crossovers).
Connecting the amplifier to other elements of the sound system
- Plug in the negative battery terminal.
- Turn on the radio and amplifier, check its operation. If necessary, adjust the sound with the controls built into the amplifier.
- If everything is in order, fix the cables and wires, restore the casing.
Video: Connecting a car audio amplifier
Connecting an amplifier is an important part of equipping a car with high-quality sound. Self-selection of components and their installation is not such a difficult task as it seems, if you are well prepared in advance.